ASTM F431-04(2008)
(Specification)Standard Specification for Air Performance Measurement Plenum Chamber for Vacuum Cleaners
Standard Specification for Air Performance Measurement Plenum Chamber for Vacuum Cleaners
ABSTRACT
This specification covers the acceptable design details for the plenum chamber used in specified air performance measurement tests for vacuum cleaners. Plenum chambers conforming to this specification shall be fabricated in accordance with the dimensions, tolerances, and notes indicated for the following components: plenum chamber assembly; orifice plate; orifice plate holder and assembly; manometer connection; and acceptable machined edges for orifice plates.
SCOPE
1.1 This specification covers the acceptable details and tolerances for the plenum chamber used in specified air performance measurement tests for vacuum cleaners.
1.2 The plenum chamber is designed for vacuum measurements only. (Warning—The plenum chamber has been shown to accurately determine maximum air power values at various test points for vacuum cleaners. There is a possibility that the airflow values measured with orifices larger than 2 in. at high flow rates may be erroneous due to the proximity of the top and bottom surfaces to the orifice plate inlet.)
1.3 The values stated in inch-pound units are to be regarded as standard. The values given in parentheses are mathematical conversions to SI units that are provided for information only and are not considered standard.
General Information
Relations
Buy Standard
Standards Content (Sample)
NOTICE: This standard has either been superseded and replaced by a new version or withdrawn.
Contact ASTM International (www.astm.org) for the latest information
Designation:F431 −04(Reapproved 2008) An American National Standard
Standard Specification for
Air Performance Measurement Plenum Chamber for Vacuum
Cleaners
ThisstandardisissuedunderthefixeddesignationF431;thenumberimmediatelyfollowingthedesignationindicatestheyearoforiginal
adoption or, in the case of revision, the year of last revision.Anumber in parentheses indicates the year of last reapproval.Asuperscript
epsilon (´) indicates an editorial change since the last revision or reapproval.
1. Scope F558 Test Method for Measuring Air Performance Charac-
teristics of Vacuum Cleaners
1.1 This specification covers the acceptable details and
F820 Test Method for Measuring Air Performance Charac-
tolerances for the plenum chamber used in specified air
teristics of Central Vacuum Cleaning Systems
performance measurement tests for vacuum cleaners.
2.2 ASTM Adjunct:
1.2 The plenum chamber is designed for vacuum measure-
Orifice Plate Holder Details (F431)
ments only. (Warning—The plenum chamber has been shown
to accurately determine maximum air power values at various
3. Details
test points for vacuum cleaners. There is a possibility that the
airflow values measured with orifices larger than 2 in. at high 3.1 Plenum chambers conforming to this specification shall
flowratesmaybeerroneousduetotheproximityofthetopand
be fabricated in accordance with the dimensions, tolerances,
bottom surfaces to the orifice plate inlet.) and notes shown in the following figures:
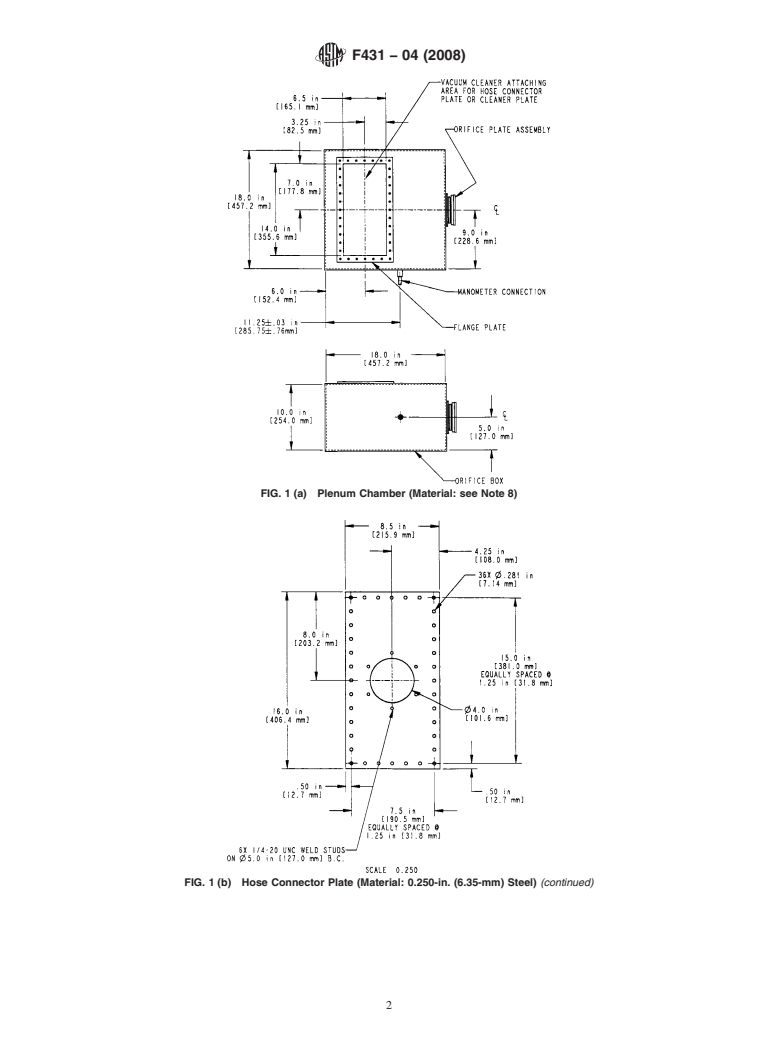
3.1.1 Plenum chamber assembly, see Fig. 1.
1.3 The values stated in inch-pound units are to be regarded
3.1.2 Orifice plate detail, see Fig. 2.
as standard. The values given in parentheses are mathematical
3.1.3 Orifice plate holder and assembly, see Fig. 3.
conversions to SI units that are provided for information only
and are not considered standard.
3.2 Manometer connection detail, see Fig. 1(f), Note 17.
2. Referenced Documents
4. Orifice Plates
2.1 ASTM Standards:
4.1 Orifice plates conforming to this specification shall be
fabricated in accordance to the dimensions, tolerances, and
notes shown in the following figure:
This specification is under the jurisdiction of ASTM Committee F11 on
Vacuum Cleaners and is the direct responsibility of Subcommittee F11.22 on Air 4.1.1 Orifice plate dimensional detail, see Fig. 2(a).
Performance.
4.1.2 Acceptable machined edges for orifice plates, see Fig.
Current edition approved Nov. 1, 2008. Published February 2009. Originally
2(b).
approved in 1975. Last previous edition approved in 2004 as F431 – 04. DOI:
10.1520/F0431-04R08.
For referenced ASTM standards, visit the ASTM website, www.astm.org, or
contact ASTM Customer Service at service@astm.org. For Annual Book of ASTM
Standards volume information, refer to the standard’s Document Summary page on Available from ASTM International Headquarters. Order Adjunct No.
the ASTM website. ADJF4031.
Copyright © ASTM International, 100 Barr Harbor Drive, PO Box C700, West Conshohocken, PA 19428-2959. United States
F431−04(Reapproved 2008)
5. Keywords
5.1 air performance; orifice plate; plenum chamber; vacuum
cleaner
F431−04 (2008)
FIG. 1(a) Plenum Chamber (Material: see Note8)
FIG. 1(b) Hose Connector Plate (Material: 0.250-in. (6.35-mm) Steel) (continued)
F431−04 (2008)
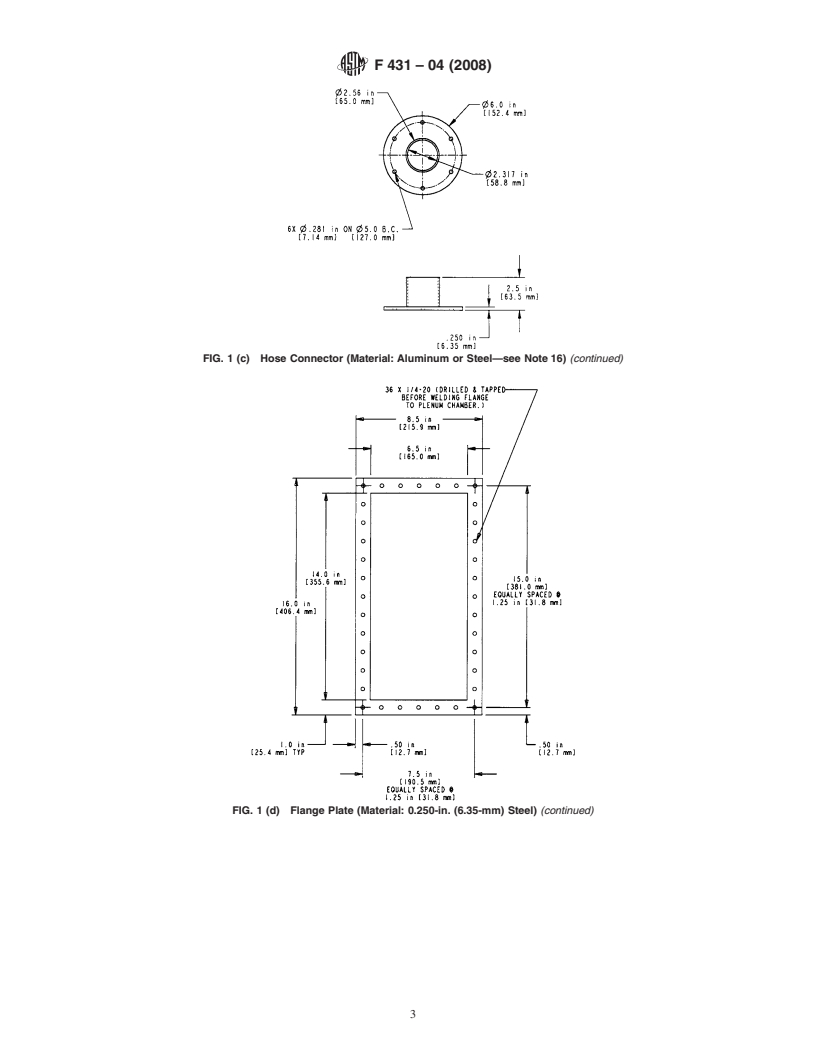
FIG. 1(c) Hose Connector (Material: Aluminum or Steel—see Note16) (continued)
FIG. 1(d) Flange Plate (Material: 0.250-in. (6.35-mm) Steel) (continued)
F431−04 (2008)
FIG. 1(e) Cleaner Plate (Material: 0.250-in. (6.35-mm) Steel) (continued)
F431−04 (2008)
NOTE 1—All dimensions are measured from inside surfaces.
NOTE 2—Interior must be clean, smooth, and free of projections or recesses on walls or attachment openings. Internal bracing should not be used to
support plenum chamber walls.
NOTE 3—Attachment port edge to be smooth and well rounded.
NOTE 4—Orifice box must withstand 180 in. of water (336 mm Hg) negative static pressure without significant distortion of walls or joints after
chamber is completely fabricated and attachment made.
NOTE 5—All joints and connections must be airtight.
NOTE 6—Tolerances (unless otherwise specified): one-place decimal 60.031 in. (0.080 mm); two-place decimal 60.01 in. (0.25 mm); three-place
decimal 60.005 in. (0.13 mm).
NOTE 7—Flange plate and manometer connection to be welded to chamber completely around the sides.
NOTE 8—Plenum chamber minimum material specification 0.187 in. (4.75 mm) thick low carbon steel.
NOTE 9—0.060 in. (1.52 mm) thick rubber seal dimensioned similar to flange plate should be used to seal cleaner and hose connector plates.
NOTE 10—Bore 0.375 in. (9.54 mm) through hole in plenum chamber for manometer connection and 3.000-in. (76.20-mm) diameter hole for orifice
plate assembly.
NOTE 11—All mating holes to be concentric to within 0.005 in. (0.13 mm) T.I.R. after assembly.
NOTE 12—A 0.060-in. (1.52-mm) thick rubber seal dimensioned similar to hose connector should be used to seal the hose connector plate to hose
connector.
NOTE 13—Six ⁄4-20 UNC-2B hex nuts or wing nuts should be used to fasten hose connector to hose connector plate.
NOTE 14—Thirty-six ⁄4-20 UNC-2A screws should be used to fasten either the cleaner plate or hose connector flange plate.
NOTE 15—Alternative materials, thicknesses, and construction methods may be used; however, requirements of Notes 2 and 4 and all internal
dimensions must be complied with.
NOTE 16—Hose connector internal diameter and length may be changed to accommodate specific hose construction.
NOTE 17—If a water column manometer or electronic pressure gauge without integration is used, it is recommended that the inner diameter of the
manometer connection port be 0.020 in. or as small as possible to minimize manometer overshoot and bounce. As an alternative to fabricating this hole
diameter, a hypodermic needle with an inner diameter of 0.020 in. may be placed in the line between the plenum box and the manometer.
FIG. 1(f) Manometer
...
This document is not an ASTM standard and is intended only to provide the user of an ASTM standard an indication of what changes have been made to the previous version. Because
it may not be technically possible to adequately depict all changes accurately, ASTM recommends that users consult prior editions as appropriate. In all cases only the current version
of the standard as published by ASTM is to be considered the official document.
An American National Standard
Designation:F431–04 Designation: F 431 – 04 (Reapproved 2008)
Standard Specification for
Air Performance Measurement Plenum Chamber for Vacuum
Cleaners
This standard is issued under the fixed designation F 431; the number immediately following the designation indicates the year of
original adoption or, in the case of revision, the year of last revision. A number in parentheses indicates the year of last reapproval. A
superscript epsilon (´) indicates an editorial change since the last revision or reapproval.
1. Scope
1.1 This specification covers the acceptable details and tolerances for the plenum chamber used in specified air performance
measurement tests for vacuum cleaners.
1.2 The plenum chamber is designed for vacuum measurements only. (Warning—The plenum chamber has been shown to
accurately determine maximum air power values at various test points for vacuum cleaners. There is a possibility that the airflow
values measured with orifices larger than 2 in. at high flow rates may be erroneous due to the proximity of the top and bottom
surfaces to the orifice plate inlet.)
1.3The foot-pound, inch system of units is used in this standard. The values in parentheses are given for information only.
1.3 The values stated in inch-pound units are to be regarded as standard. The values given in parentheses are mathematical
conversions to SI units that are provided for information only and are not considered standard.
2. Referenced Documents
2.1 ASTM Standards:
F 558 Test Method for Measuring Air Performance Characteristics of Vacuum Cleaners
F 820 Test Method for Measuring Air Performance Characteristics of Central Vacuum Cleaning Systems
2.2 ASTM Adjunct:
Orifice Plate Holder Details (F 431)
3. Details
3.1 Plenum chambers conforming to this specification shall be fabricated in accordance with the dimensions, tolerances, and
notes shown in the following figures:
3.1.1 Plenum chamber assembly, see Fig. 1.
3.1.2 Orifice plate detail, see Fig. 2.
3.1.3 Orifice plate holder and assembly, see Fig. 3.
3.2 Manometer connection detail, see Fig. 1(f), Note 17.
4. Orifice Plates
4.1 Orifice plates conforming to this specification shall be fabricated in accordance to the dimensions, tolerances, and notes
shown in the following figure:
4.1.1 Orifice plate dimensional detail, see Fig. 2(a).
4.1.2 Acceptable machined edges for orifice plates, see Fig. 2(b).
5. Keywords
5.1 air performance; orifice plate; plenum chamber; vacuum cleaner
This specification is under the jurisdiction of ASTM Committee F11 on Vacuum Cleaners and is the direct responsibility of Subcommittee F11.22 on Air Performance.
Current edition approved Aug.Nov. 1, 2004.2008. Published August 2004.February 2009. Originally approved in 1975. Last previous edition approved in 20032004 as
F 431 – 034.
ForreferencedASTMstandards,visittheASTMwebsite,www.astm.org,orcontactASTMCustomerServiceatservice@astm.org.ForAnnualBookofASTMStandards
volume information, refer to the standard’s Document Summary page on the ASTM website.
Available from ASTM International Headquarters. Order Adjunct No. ADJF4031.
Copyright © ASTM International, 100 Barr Harbor Drive, PO Box C700, West Conshohocken, PA 19428-2959, United States.
F 431 – 04 (2008)
FIG. 1 (a) Plenum Chamber (Material: see Note 8)
FIG. 1 (b) Hose Connector Plate (Material: 0.250-in. (6.35-mm) Steel) (continued)
F 431 – 04 (2008)
FIG. 1 (c) Hose Connector (Material: Aluminum or Steel—see Note 16) (continued)
FIG. 1 (d) Flange Plate (Material: 0.250-in. (6.35-mm) Steel) (continued)
F 431 – 04 (2008)
FIG. 1 (e) Cleaner Plate (Material: 0.250-in. (6.35-mm) Steel) (continued)
F 431 – 04 (2008)
NOTE 1—All dimensions are measured from inside surfaces.
NOTE 2—Interior must be clean, smooth, and free of projections or recesses on walls or attachment openings. Internal bracing should not be used to
support plenum chamber walls.
NOTE 3—Attachment port edge to be smooth and well rounded.
NOTE 4—Orifice box must withstand 180 in. of water (336 mm Hg) negative static pressure without significant distortion of walls or joints after
chamber is completely fabricated and attachment made.
NOTE 5—All joints and connections must be airtight.
NOTE 6—Tolerances (unless otherwise specified): one-place decimal 60.031 in. (0.080 mm); two-place decimal 60.01 in. (0.25 mm); three-place
decimal 60.005 in. (0.13 mm).
NOTE 7—Flange plate and manometer connection to be welded to chamber completely around the sides.
NOTE 8—Plenum chamber minimum material specification 0.187 in. (4.75 mm) thick low carbon steel.
NOTE 9—0.060 in. (1.52 mm) thick rubber seal dimensioned similar to flange plate should be used to seal cleaner and hose connector plates.
NOTE 10—Bore 0.375 in. (9.54 mm) through hole in plenum chamber for manometer connection and 3.000-in. (76.20-mm) diameter hole for orifice
plate assembly.
NOTE 11—All mating holes to be concentric to within 0.005 in. (0.13 mm) T.I.R. after assembly.
NOTE 12—A 0.060-in. (1.52-mm) thick rubber seal dimensioned similar to hose connector should be used to seal the hose connector plate to hose
connector.
NOTE 13—Six ⁄4-20 UNC-2B hex nuts or wing nuts should be used to fasten hose connector to hose connector plate.
NOTE 14—Thirty-six ⁄4-20 UNC-2A screws should be used to fasten either the cleaner plate or hose connector flange plate.
NOTE 15—Alternative materials, thicknesses, and construction methods may be used; however, requirements of Notes 2 and 4 and all internal
dimensions must be complied with.
NOTE 16—Hose connector internal diameter and length may be changed to accommodate specific hose construction.
NOTE 17—If a water column manometer or electronic pressure gauge without integration is used, it is recommended that the inner diameter of the
manometer connection port be 0.020 in. or as small as possible to mini
...
This document is not an ASTM standard and is intended only to provide the user of an ASTM standard an indication of what changes have been made to the previous version. Because
it may not be technically possible to adequately depict all changes accurately, ASTM recommends that users consult prior editions as appropriate. In all cases only the current version
of the standard as published by ASTM is to be considered the official document.
An American National Standard
Designation:F 431–03 Designation: F 431 – 04 (Reapproved 2008)
Standard Specification for
Air Performance Measurement Plenum Chamber for Vacuum
Cleaners
This standard is issued under the fixed designation F 431; the number immediately following the designation indicates the year of
original adoption or, in the case of revision, the year of last revision. A number in parentheses indicates the year of last reapproval. A
superscript epsilon (´) indicates an editorial change since the last revision or reapproval.
1. Scope
1.1 This specification covers the acceptable details and tolerances for the plenum chamber used in specified air performance
measurement tests for vacuum cleaners.
1.2 The plenum chamber is designed for vacuum measurements only. (Warning—The plenum chamber has been shown to
accurately determine maximum air power values at various test points for vacuum cleaners. There is a possibility that the airflow
values measured with orifices larger than 2 in. at high flow rates may be erroneous due to the proximity of the top and bottom
surfaces to the orifice plate inlet.)
1.3The foot-pound, inch system of units is used in this standard. The values in parentheses are given for information only.
1.3 The values stated in inch-pound units are to be regarded as standard. The values given in parentheses are mathematical
conversions to SI units that are provided for information only and are not considered standard.
2. Referenced Documents
2.1 ASTM Standards:
F 558 Test Method for Measuring Air Performance Characteristics of Vacuum Cleaners
F 820 Test Method for Measuring Air Performance Characteristics of Central Vacuum Cleaning Systems
2.2 ASTM Adjunct:
Orifice Plate Holder Details (F 431)
3. Details
3.1 Plenum chambers conforming to this specification shall be fabricated in accordance with the dimensions, tolerances, and
notes shown in the following figures:
3.1.1 Plenum chamber assembly, see Fig. 1.
3.1.2 Orifice plate detail, see Fig. 2.
3.1.3 Orifice plate holder and assembly, see Fig. 3.
3.2 Manometer connection detail, see Fig. 1(f), Note 17.
4. Orifice Plates
4.1 Orifice plates conforming to this specification shall be fabricated in accordance to the dimensions, tolerances, and notes
shown in the following figure:
4.1.1 Orifice plate dimensional detail, see Fig. 2(a).
4.1.2 Acceptable machined edges for orifice plates, see Fig. 2(b).
5. Keywords
5.1 air performance; orifice plate; plenum chamber; vacuum cleaner
This specification is under the jurisdiction of ASTM Committee F11 on Vacuum Cleaners and is the direct responsibility of Subcommittee F11.22 on Air Performance.
Current edition approved Oct.Nov. 1, 2003.2008. Published October 2003.February 2009. Originally approved in 1975. Last previous edition approved in 19982004 as
F431–98.F 431 – 04.
ForreferencedASTMstandards,visittheASTMwebsite,www.astm.org,orcontactASTMCustomerServiceatservice@astm.org.ForAnnualBookofASTMStandards
volume information, refer to the standard’s Document Summary page on the ASTM website.
Available from ASTM Headquarters. Order PCN 12-604310-47.
Available from ASTM International Headquarters. Order Adjunct No. ADJF4031.
Copyright © ASTM International, 100 Barr Harbor Drive, PO Box C700, West Conshohocken, PA 19428-2959, United States.
F 431 – 04 (2008)
FIG. 1 (a) Plenum Chamber (Material: see Note 8)
FIG. 1 (b) Hose Connector Plate (Material: 0.250-in. (6.35-mm) Steel) (continued)
F 431 – 04 (2008)
FIG. 1 (c) Hose Connector (Material: Aluminum or Steel—see Note 16) (continued)
FIG. 1 (d) Flange Plate (Material: 0.250-in. (6.35-mm) Steel) (continued)
F 431 – 04 (2008)
FIG. 1 (e) Cleaner Plate (Material: 0.250-in. (6.35-mm) Steel) (continued)
F 431 – 04 (2008)
NOTE 1—All dimensions are measured from inside surfaces.
NOTE 2—Interior must be clean, smooth, and free of projections or recesses on walls or attachment openings. Internal bracing should not be used to
support plenum chamber walls.
NOTE 3—Attachment port edge to be smooth and well rounded.
NOTE 4—Orifice box must withstand 180 in. of water (336 mm Hg) negative static pressure without significant distortion of walls or joints after
chamber is completely fabricated and attachment made.
NOTE 5—All joints and connections must be airtight.
NOTE 6—Tolerances (unless otherwise specified): one-place decimal 60.031 in. (0.080 mm); two-place decimal 60.01 in. (0.25 mm); three-place
decimal 60.005 in. (0.13 mm).
NOTE 7—Flange plate and manometer connection to be welded to chamber completely around the sides.
NOTE 8—Plenum chamber minimum material specification 0.187 in. (4.75 mm) thick low carbon steel.
NOTE 9—0.060 in. (1.52 mm) thick rubber seal dimensioned similar to flange plate should be used to seal cleaner and hose connector plates.
NOTE 10—Bore 0.375 in. (9.54 mm) through hole in plenum chamber for manometer connection and 3.000-in. (76.20-mm) diameter hole for orifice
plate assembly.
NOTE 11—All mating holes to be concentric to within 0.005 in. (0.13 mm) T.I.R. after assembly.
NOTE 12—A 0.060-in. (1.52-mm) thick rubber seal dimensioned similar to hose connector should be used to seal the hose connector plate to hose
connector.
NOTE 13—Six ⁄4-20 UNC-2B hex nuts or wing nuts should be used to fasten hose connector to hose connector plate.
NOTE 14—Thirty-six ⁄4-20 UNC-2A screws should be used to fasten either the cleaner plate or hose connector flange plate.
NOTE 15—Alternative materials, thicknesses, and construction methods may be used; however, requirements of Notes 2 and 4 and all internal
dimensions must be complied with.
NOTE 16—Hose connector internal diameter and length may be changed to accommodate specific hose construction.
NOTE 17—If a water column manometer or electronic pressure gauge without integration is used, it is recommended that the inner diameter of the
manometer connection port be 0.020 i
...



Questions, Comments and Discussion
Ask us and Technical Secretary will try to provide an answer. You can facilitate discussion about the standard in here.