ASTM D5041-98(2019)
(Test Method)Standard Test Method for Fracture Strength in Cleavage of Adhesives in Bonded Joints
Standard Test Method for Fracture Strength in Cleavage of Adhesives in Bonded Joints
SIGNIFICANCE AND USE
4.1 This test method provides a means of measuring the cleavage forces and energies required to fail adhesively bonded reinforced flat bonded specimens. It also offers a semi-quantitative observation of failure mode.
4.2 This test method has found application in screening structural adhesives for bonding reinforced plastics where simple lap shear testing has proven to be inadequate in distinguishing differences between adhesives.
4.3 It is important to note that the test method measures performance properties of the total bonded system (for example, reinforced plastic and adhesive) but will not yield fundamental properties of the adhesive alone.
SCOPE
1.1 This test method covers the determination of fracture strength in cleavage of adhesive bonds when tested on standard reinforced plastic specimens and under specified conditions of preparation and testing (Note 1).
Note 1: While this test method is intended for use in reinforced plastic applications, it may be used for measuring fracture properties of adhesives using other plastic adherends, provided consideration is given to the thickness and should be of equal rigidity to the plastic adherends.
1.2 The values stated in SI units are to be regarded as the standard. The values given in parentheses are for information only.
1.3 This standard does not purport to address all of the safety concerns, if any, associated with its use. It is the responsibility of the user of this standard to establish appropriate safety, health, and environmental practices and determine the applicability of regulatory limitations prior to use.
1.4 This international standard was developed in accordance with internationally recognized principles on standardization established in the Decision on Principles for the Development of International Standards, Guides and Recommendations issued by the World Trade Organization Technical Barriers to Trade (TBT) Committee.
General Information
- Status
- Published
- Publication Date
- 31-May-2019
- Technical Committee
- D14 - Adhesives
- Drafting Committee
- D14.40 - Adhesives for Plastics
Relations
- Effective Date
- 01-Jun-2019
- Effective Date
- 01-Apr-2017
- Effective Date
- 01-Jun-2014
- Effective Date
- 01-Oct-2012
- Effective Date
- 01-Jul-2012
- Effective Date
- 01-May-2012
- Effective Date
- 01-Dec-2011
- Effective Date
- 01-Jan-2011
- Effective Date
- 01-Jan-2011
- Effective Date
- 01-Jun-2010
- Effective Date
- 01-Nov-2009
- Effective Date
- 01-Apr-2009
- Effective Date
- 01-Dec-2008
- Effective Date
- 01-Nov-2008
- Effective Date
- 01-Oct-2008
Overview
ASTM D5041-98(2019), titled Standard Test Method for Fracture Strength in Cleavage of Adhesives in Bonded Joints, is an internationally recognized testing protocol developed by ASTM International. This standard defines the procedures for determining the fracture strength of adhesive bonds-specifically in cleavage-using reinforced plastic specimens under controlled conditions. The method is widely used to assess the performance of adhesives in structural applications where standard lap shear tests do not sufficiently differentiate between adhesive formulations.
Key Topics
- Fracture Strength Measurement: The method specifies how to measure the cleavage forces and energies required to cause failure in adhesively bonded, reinforced flat specimens.
- Failure Mode Observation: It provides guidance for semi-quantitative assessment of the failure mode of the bonded assembly, helping users understand how and where adhesion loss occurs.
- Applicability: While designed for reinforced plastics, the method can be adapted to other plastics with similar rigidity. Consistent specimen dimensions and properties are emphasized.
- System Performance Assessment: The standard measures the properties of the adhesive bond in combination with its substrate-not the properties of the adhesive alone.
- Precision and Repeatability: The procedure requires multiple specimens and detailed reporting to ensure reliable and comparable results.
Applications
ASTM D5041-98(2019) is particularly valuable in quality assurance and research and development environments for:
- Screening Structural Adhesives: Helps select the most appropriate adhesive for bonding reinforced plastics, especially where traditional lap shear testing is inadequate.
- Comparing Adhesive Formulations: Enables comparative evaluation of different adhesives in their ability to withstand cleavage forces.
- Evaluating Bonded Joints: Suitable for manufacturers of composite products, automotive components, aerospace structures, and sporting goods that use fiber-reinforced plastic or other rigid materials in bonded assemblies.
- Materials Development: Useful for adhesive suppliers and product designers in optimizing joint performance and processing conditions.
Related Standards
Several ASTM standards complement and support the implementation of ASTM D5041-98(2019), including:
- ASTM D907: Terminology of Adhesives
- ASTM D618: Practice for Conditioning Plastics for Testing
- ASTM D2093: Practice for Preparation of Surfaces of Plastics Prior to Adhesive Bonding
- ASTM D5573: Practice for Classifying Failure Modes in Fiber-Reinforced-Plastic (FRP) Joints
- ASTM E4: Practices for Force Verification of Testing Machines
Practical Value
- Enhanced Adhesive Selection: By providing reliable data on cleavage fracture strength, this standard helps users make informed decisions about adhesive and material pairings.
- Improved Bond Quality: The method's semi-quantitative failure assessment enables identification of weak interface regions and overall joint performance.
- Consistency Across Laboratories: Detailed procedural guidance and precision analysis promote comparability and reproducibility in test results worldwide.
Keywords: Adhesive bond strength, cleavage testing, fracture energy, reinforced plastic joints, structural adhesive screening, ASTM D5041, adhesive testing standard, joint failure mode, quality control in composites, international testing standards.
Buy Documents
ASTM D5041-98(2019) - Standard Test Method for Fracture Strength in Cleavage of Adhesives in Bonded Joints
Get Certified
Connect with accredited certification bodies for this standard

DIN CERTCO
DIN Group product certification.

Smithers Quality Assessments
US management systems and product certification.
Sponsored listings
Frequently Asked Questions
ASTM D5041-98(2019) is a standard published by ASTM International. Its full title is "Standard Test Method for Fracture Strength in Cleavage of Adhesives in Bonded Joints". This standard covers: SIGNIFICANCE AND USE 4.1 This test method provides a means of measuring the cleavage forces and energies required to fail adhesively bonded reinforced flat bonded specimens. It also offers a semi-quantitative observation of failure mode. 4.2 This test method has found application in screening structural adhesives for bonding reinforced plastics where simple lap shear testing has proven to be inadequate in distinguishing differences between adhesives. 4.3 It is important to note that the test method measures performance properties of the total bonded system (for example, reinforced plastic and adhesive) but will not yield fundamental properties of the adhesive alone. SCOPE 1.1 This test method covers the determination of fracture strength in cleavage of adhesive bonds when tested on standard reinforced plastic specimens and under specified conditions of preparation and testing (Note 1). Note 1: While this test method is intended for use in reinforced plastic applications, it may be used for measuring fracture properties of adhesives using other plastic adherends, provided consideration is given to the thickness and should be of equal rigidity to the plastic adherends. 1.2 The values stated in SI units are to be regarded as the standard. The values given in parentheses are for information only. 1.3 This standard does not purport to address all of the safety concerns, if any, associated with its use. It is the responsibility of the user of this standard to establish appropriate safety, health, and environmental practices and determine the applicability of regulatory limitations prior to use. 1.4 This international standard was developed in accordance with internationally recognized principles on standardization established in the Decision on Principles for the Development of International Standards, Guides and Recommendations issued by the World Trade Organization Technical Barriers to Trade (TBT) Committee.
SIGNIFICANCE AND USE 4.1 This test method provides a means of measuring the cleavage forces and energies required to fail adhesively bonded reinforced flat bonded specimens. It also offers a semi-quantitative observation of failure mode. 4.2 This test method has found application in screening structural adhesives for bonding reinforced plastics where simple lap shear testing has proven to be inadequate in distinguishing differences between adhesives. 4.3 It is important to note that the test method measures performance properties of the total bonded system (for example, reinforced plastic and adhesive) but will not yield fundamental properties of the adhesive alone. SCOPE 1.1 This test method covers the determination of fracture strength in cleavage of adhesive bonds when tested on standard reinforced plastic specimens and under specified conditions of preparation and testing (Note 1). Note 1: While this test method is intended for use in reinforced plastic applications, it may be used for measuring fracture properties of adhesives using other plastic adherends, provided consideration is given to the thickness and should be of equal rigidity to the plastic adherends. 1.2 The values stated in SI units are to be regarded as the standard. The values given in parentheses are for information only. 1.3 This standard does not purport to address all of the safety concerns, if any, associated with its use. It is the responsibility of the user of this standard to establish appropriate safety, health, and environmental practices and determine the applicability of regulatory limitations prior to use. 1.4 This international standard was developed in accordance with internationally recognized principles on standardization established in the Decision on Principles for the Development of International Standards, Guides and Recommendations issued by the World Trade Organization Technical Barriers to Trade (TBT) Committee.
ASTM D5041-98(2019) is classified under the following ICS (International Classification for Standards) categories: 83.180 - Adhesives. The ICS classification helps identify the subject area and facilitates finding related standards.
ASTM D5041-98(2019) has the following relationships with other standards: It is inter standard links to ASTM D5573-99(2019), ASTM D2093-03(2017), ASTM E4-14, ASTM D5573-99(2012), ASTM D907-12a, ASTM D907-12, ASTM D907-11a, ASTM D907-11, ASTM D2093-03(2011), ASTM E4-10, ASTM E4-09a, ASTM E4-09, ASTM E4-08, ASTM D618-08, ASTM D907-08b. Understanding these relationships helps ensure you are using the most current and applicable version of the standard.
ASTM D5041-98(2019) is available in PDF format for immediate download after purchase. The document can be added to your cart and obtained through the secure checkout process. Digital delivery ensures instant access to the complete standard document.
Standards Content (Sample)
This international standard was developed in accordance with internationally recognized principles on standardization established in the Decision on Principles for the
Development of International Standards, Guides and Recommendations issued by the World Trade Organization Technical Barriers to Trade (TBT) Committee.
Designation:D5041 −98 (Reapproved 2019)
Standard Test Method for
Fracture Strength in Cleavage of Adhesives in Bonded
Joints
This standard is issued under the fixed designation D5041; the number immediately following the designation indicates the year of
original adoption or, in the case of revision, the year of last revision. A number in parentheses indicates the year of last reapproval. A
superscript epsilon (´) indicates an editorial change since the last revision or reapproval.
1. Scope E4 Practices for Force Verification of Testing Machines
1.1 This test method covers the determination of fracture
3. Terminology
strengthincleavageofadhesivebondswhentestedonstandard
reinforced plastic specimens and under specified conditions of
3.1 Definitions—Many of the terms used in this test method
preparation and testing (Note 1).
are defined in Terminology D907.
NOTE 1—While this test method is intended for use in reinforced plastic
3.2 Definitions of Terms Specific to This Standard:
applications, it may be used for measuring fracture properties of adhesives
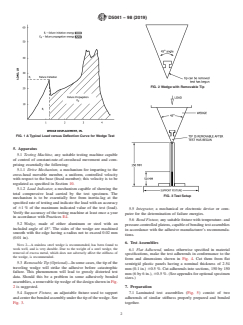
3.2.1 failure initiation energy, E—the area under the load
using other plastic adherends, provided consideration is given to the i
deflection curve where the first significant load drop occurs
thickness and should be of equal rigidity to the plastic adherends.
after the start of the test, showing the onset of permanent
1.2 The values stated in SI units are to be regarded as the
damage to the bonded assembly (see Fig. 1).
standard. The values given in parentheses are for information
only.
3.2.2 failure propagation energy, E —the area under the
p
load-deflection curve beginning at the failure initiation energy
1.3 This standard does not purport to address all of the
and ending at the catastrophic failure of the bonded assembly.
safety concerns, if any, associated with its use. It is the
(See Fig. 1).
responsibility of the user of this standard to establish appro-
priate safety, health, and environmental practices and deter-
3.2.3 semirigid—indicates that the adherends shall have
mine the applicability of regulatory limitations prior to use.
such dimensions and physical properties as to permit bending
1.4 This international standard was developed in accor-
them through any angle of up to 30° without breaking or
dance with internationally recognized principles on standard-
cracking.
ization established in the Decision on Principles for the
3.2.4 semirigid adherend, n—an adherend that has dimen-
Development of International Standards, Guides and Recom-
sions and physical properties that permit bending at designated
mendations issued by the World Trade Organization Technical
Barriers to Trade (TBT) Committee. test temperature through any angle up to 30° without breaking
or cracking.
2. Referenced Documents
3.2.5 total energy—failure initiation energy plus failure
2.1 ASTM Standards:
propagation energy.
D618 Practice for Conditioning Plastics for Testing
D907 Terminology of Adhesives
4. Significance and Use
D2093 Practice for Preparation of Surfaces of Plastics Prior
4.1 This test method provides a means of measuring the
to Adhesive Bonding
cleavageforcesandenergiesrequiredtofailadhesivelybonded
D5573 Practice for Classifying Failure Modes in Fiber-
reinforced flat bonded specimens. It also offers a semi-
Reinforced-Plastic (FRP) Joints
quantitative observation of failure mode.
4.2 This test method has found application in screening
This test method is under the jurisdiction of ASTM Committee D14 on
structural adhesives for bonding reinforced plastics where
AdhesivesandisthedirectresponsibilityofSubcommitteeD14.40onAdhesivesfor
simple lap shear testing has proven to be inadequate in
Plastics.
Current edition approved June 1, 2019. Published June 2019. Originally
distinguishing differences between adhesives.
approved in 1990. Last previous edition approved in 2012 as D5041 – 98 (2012).
DOI: 10.1520/D5041-98R19.
4.3 It is important to note that the test method measures
For referenced ASTM standards, visit the ASTM website, www.astm.org, or
performance properties of the total bonded system (for
contact ASTM Customer Service at service@astm.org. For Annual Book of ASTM
example, reinforced plastic and adhesive) but will not yield
Standards volume information, refer to the standard’s Document Summary page on
the ASTM website. fundamental properties of the adhesive alone.
Copyright © ASTM International, 100 Barr Harbor Drive, PO Box C700, West Conshohocken, PA 19428-2959. United States
D5041−98 (2019)
FIG. 2Wedge with Removable Tip
FIG. 1A Typical Load versus Deflection Curve for Wedge Test
5. Apparatus
5.1 Testing Machine, any suitable testing machine capable
of control of constant-rate-of-crosshead movement and com-
prising essentially the following:
5.1.1 Drive Mechanism, a mechanism for imparting to the
cross-head movable member, a uniform, controlled velocity
with respect to the base (fixed member); this velocity is to be
regulated as specified in Section 10.
5.1.2 Load Indicator, a mechanism capable of showing the
total compressive load carried by the test specimen. The
FIG. 3Test Setup
mechanism is to be essentially free from inertia-lag at the
specified rate of testing and indicate the load with an accuracy
of 61 % of the maximum indicated value of the test (load).
5.5 Integrator, a mechanical or electronic device or com-
Verify the accuracy of the testing machine at least once a year
puter for the determination of failure energies.
in accordance with Practices E4.
5.6 Bond Fixture, any suitable fixture with temperature- and
5.2 Wedge, made of either aluminum or steel with an
pressure-controlled platens, capable of bonding test assemblies
included angle of 45°. The sides of the wedge are machined
in accordance with the adhesive manufacturer’s recommenda-
smooth with the edge having a radius not to exceed 0.02 mm
tions.
(0.01 in).
6. Test Assemblies
NOTE 2—A stainless steel wedge is recommended, has been found to
work well, and is very durable. Due to the weight of a steel wedge, the
6.1 Flat Adherend, unless otherwise specified in material
removal of excess metal, which does not adversely affect the stiffness of
specifications, make the test adherends in conformance to the
the wedge, is recommended.
form and dimensions shown in Fig. 4. Cut them from flat
5.3 Removable Tip (Optional)—In some cases, the tip of the
semirigid plastic panels having a nominal thickness of 2.54
traveling wedge will strike the adhesive before catastrophic
mm (0.1 in.) 60.5 %. Cut adherends into sections, 150 by 150
failure. This phenomenon will lead to grossly distorted test
mm (6 by 6 in.), 60.5 %. (See appendix for optional specimen
data. Should this be a problem in some adhesively bonded
sizes.)
assemblies, a removable tip wedge of the design shown in Fig.
2 is suggested. 7. Preparation
5.4 Support Fixture, an adjustable fixture used to support 7.1 Laminated test assemblies (Fig. 5) consist of two
andcenterthebondedassemblyunderthetipofthewedge.See adherends of similar stiffness properly prepared and bonded
Fig. 3. together.
D5041−98 (2019)
TFE-fluorocarbon or release coated steel shim, as shown, to
control final adhesive thickness.
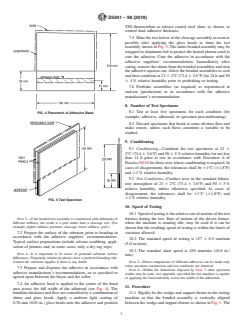
7.5 Mate the two halves of the cleavage assembly as soon as
possible after applying the glass beads to form the test
assembly shown in Fig. 5. The entire bonded assembly may be
wrapped in aluminum foil to protect the heated platens used to
cure the adhesive. Cure the adhesive in accordance with the
adhesive suppliers’ recommendation. Immediately after
curing, remove the shims from the bonded assemblies and trim
the adhesive squeeze-out.Allow the bonded assemblies to cool
and then condition at 23 6 2°C (73.4 6 3.6°F) for 24 h and 50
6 4 % relative humidity prior to postbaking or testing.
7.6 Postbake assemblies (as required) as experienced in
end-use (production) or in accordance with the adhesive
manufacturer’s recommendation.
8. Number of Test Specimens
8.1 Test at least five specimens for each condition (for
FIG. 4Placement of Adhesive Bead
example, adhesive, adherend, or specimen preconditioning).
8.2 Discard specimens that break at some obvious flaw and
make retests, unless such flaws constitute a variable to be
studied.
9. Conditioning
9.1 Conditioning—Condition the test specimens at 23 6
2°C(73.4 63.6°F)and50 65 %relativehumidityfornotless
than 14 h prior to test in accordance with Procedure A of
Practice D618 for those tests where conditioning
...


Questions, Comments and Discussion
Ask us and Technical Secretary will try to provide an answer. You can facilitate discussion about the standard in here.
Loading comments...