ASTM B973-10(2020)e1
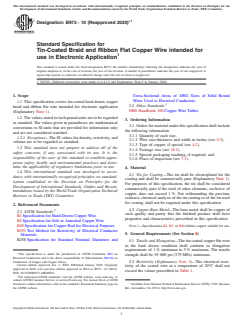
(Specification)Standard Specification for Tin-Coated Braid and Ribbon Flat Copper Wire intended for use in Electronic Application
Standard Specification for Tin-Coated Braid and Ribbon Flat Copper Wire intended for use in Electronic Application
ABSTRACT
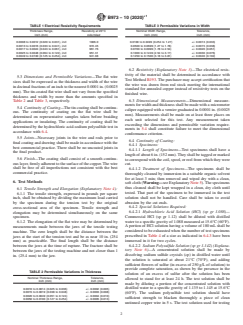
This specification covers tin-coated hard-drawn copper braid and ribbon flat wire intended for electronic application. The tin shall be electroplated for the coating and shall be commercially pure. For purposes of this specification, the tin shall be considered commercially pure if the total of other elements, exclusive of copper, does not exceed 1%. This specification covers electrical resistivity requirements, permissible variations in thickness, permissible variations in width, and limiting number of test specimens for coating test.
SCOPE
1.1 This specification covers tin-coated hard-drawn copper braid and ribbon flat wire intended for electronic application (Explanatory Note 1).
1.2 The values stated in inch-pound units are to be regarded as standard. The values given in parentheses are mathematical conversions to SI units that are provided for information only and are not considered standard.
1.2.1 Exceptions—The SI values for density, resistivity, and volume are to be regarded as standard.
1.3 This standard does not purport to address all of the safety concerns, if any, associated with its use. It is the responsibility of the user of this standard to establish appropriate safety, health, and environmental practices and determine the applicability of regulatory limitations prior to use.
1.4 This international standard was developed in accordance with internationally recognized principles on standardization established in the Decision on Principles for the Development of International Standards, Guides and Recommendations issued by the World Trade Organization Technical Barriers to Trade (TBT) Committee.
General Information
- Status
- Published
- Publication Date
- 31-Dec-2019
- Technical Committee
- B01 - Electrical Conductors
- Drafting Committee
- B01.04 - Conductors of Copper and Copper Alloys
Relations
- Effective Date
- 01-Jan-2020
- Effective Date
- 01-Apr-2024
- Effective Date
- 15-Apr-2020
- Effective Date
- 01-Oct-2018
- Effective Date
- 01-Oct-2018
- Effective Date
- 01-Oct-2018
- Effective Date
- 01-Apr-2017
- Effective Date
- 01-Apr-2016
- Effective Date
- 01-Apr-2016
- Effective Date
- 15-Sep-2015
- Effective Date
- 01-May-2015
- Effective Date
- 01-Apr-2014
- Effective Date
- 01-Oct-2013
- Effective Date
- 01-Oct-2013
- Effective Date
- 15-Nov-2012
Overview
ASTM B973-10(2020)e1 is the international standard specification for tin-coated hard-drawn copper braid and ribbon flat wire intended for electronic applications. Developed by ASTM International, this standard defines the requirements for materials, manufacturing, and quality control to ensure reliable performance in demanding electronic use cases. Tin-coated copper flat wire is essential in electronic assemblies for its excellent conductivity, solderability, and corrosion resistance.
This specification is widely referenced by manufacturers and quality control professionals to assure the performance and consistency of tin-coated copper braid and ribbon flat wires used in electronics. The standard ensures that both the copper base metal and the tin coating meet stringent purity and quality criteria.
Key Topics
Material Requirements:
- The copper base must be of high purity suitable for electronic conductors.
- Tin used for coating must be electroplated and commercially pure, with impurity levels (excluding copper) not exceeding 1%.
Dimensional Tolerances:
- Strict tolerances are set for wire thickness and width, with permissible variations depending on nominal dimensions.
- Dimensional measurements must be accurately performed using calibrated equipment.
Electrical Properties:
- The standard establishes maximum allowable electrical resistivity at 20°C, to ensure low signal loss and optimal performance.
- SI values are standard for density, resistivity, and volume.
Coating Quality and Continuity:
- The tin coating must be a smooth, continuous, and firmly adherent electroplated layer.
- Testing methodologies, including the hydrochloric acid-sodium polysulfide test, verify the continuity and integrity of the tin coating.
Mechanical Performance:
- Requirements for tensile strength and elongation ensure the wire’s durability and handling characteristics during assembly.
Inspection and Conformance:
- Procedures for sampling, inspection, and certification are defined to document compliance.
- Manufacturers must provide reasonable facilities for inspection and may need to certify product conformance upon request.
Packaging and Shipping:
- Protective packaging is required to safeguard the wire against damage during handling and transportation.
Applications
ASTM B973 tin-coated braid and ribbon flat copper wire is critical for a wide range of electronic applications, including:
- Electrical connections in consumer electronics, telecommunications equipment, and industrial devices.
- Shielding and grounding in cables and electronic enclosures, leveraging the braid's flexibility and conductivity.
- Flexible connectors in circuit board assemblies, where flat copper wire enables compact, customized interconnections.
- Harnesses and lead frames for automotive and aerospace electronics, where durability, conductivity, and ease of soldering are crucial.
Using wire conforming to ASTM B973-10(2020)e1 helps ensure reliable soldering, long-term corrosion resistance, consistent electrical properties, and manufacturing efficiency in electronic component production.
Related Standards
- ASTM B1 - Specification for Hard-Drawn Copper Wire
- ASTM B3 - Specification for Soft or Annealed Copper Wire
- ASTM B49 - Specification for Copper Rod for Electrical Purposes
- ASTM B193 - Test Method for Resistivity of Electrical Conductor Materials
- ASTM B258 - Specification for Standard Nominal Diameters and Cross-Sectional Areas of Wires
Manufacturers and users should refer to these related standards to ensure complete compliance and best practices in the selection and use of copper wire for electronic applications.
Keywords: tin-coated copper flat wire, electronic applications, ASTM B973-10, copper braid, ribbon wire, electrical conductivity, electroplated tin coating, corrosion resistance, electronic wire standards, ASTM International
Buy Documents
ASTM B973-10(2020)e1 - Standard Specification for Tin-Coated Braid and Ribbon Flat Copper Wire intended for use in Electronic Application
Get Certified
Connect with accredited certification bodies for this standard

IMQ S.p.A. (Certification)
Italian electrical product certification.

SLG Prüf- und Zertifizierungs GmbH
German testing and certification body.

UL Solutions
Global safety science company with testing, inspection and certification.
Sponsored listings
Frequently Asked Questions
ASTM B973-10(2020)e1 is a technical specification published by ASTM International. Its full title is "Standard Specification for Tin-Coated Braid and Ribbon Flat Copper Wire intended for use in Electronic Application". This standard covers: ABSTRACT This specification covers tin-coated hard-drawn copper braid and ribbon flat wire intended for electronic application. The tin shall be electroplated for the coating and shall be commercially pure. For purposes of this specification, the tin shall be considered commercially pure if the total of other elements, exclusive of copper, does not exceed 1%. This specification covers electrical resistivity requirements, permissible variations in thickness, permissible variations in width, and limiting number of test specimens for coating test. SCOPE 1.1 This specification covers tin-coated hard-drawn copper braid and ribbon flat wire intended for electronic application (Explanatory Note 1). 1.2 The values stated in inch-pound units are to be regarded as standard. The values given in parentheses are mathematical conversions to SI units that are provided for information only and are not considered standard. 1.2.1 Exceptions—The SI values for density, resistivity, and volume are to be regarded as standard. 1.3 This standard does not purport to address all of the safety concerns, if any, associated with its use. It is the responsibility of the user of this standard to establish appropriate safety, health, and environmental practices and determine the applicability of regulatory limitations prior to use. 1.4 This international standard was developed in accordance with internationally recognized principles on standardization established in the Decision on Principles for the Development of International Standards, Guides and Recommendations issued by the World Trade Organization Technical Barriers to Trade (TBT) Committee.
ABSTRACT This specification covers tin-coated hard-drawn copper braid and ribbon flat wire intended for electronic application. The tin shall be electroplated for the coating and shall be commercially pure. For purposes of this specification, the tin shall be considered commercially pure if the total of other elements, exclusive of copper, does not exceed 1%. This specification covers electrical resistivity requirements, permissible variations in thickness, permissible variations in width, and limiting number of test specimens for coating test. SCOPE 1.1 This specification covers tin-coated hard-drawn copper braid and ribbon flat wire intended for electronic application (Explanatory Note 1). 1.2 The values stated in inch-pound units are to be regarded as standard. The values given in parentheses are mathematical conversions to SI units that are provided for information only and are not considered standard. 1.2.1 Exceptions—The SI values for density, resistivity, and volume are to be regarded as standard. 1.3 This standard does not purport to address all of the safety concerns, if any, associated with its use. It is the responsibility of the user of this standard to establish appropriate safety, health, and environmental practices and determine the applicability of regulatory limitations prior to use. 1.4 This international standard was developed in accordance with internationally recognized principles on standardization established in the Decision on Principles for the Development of International Standards, Guides and Recommendations issued by the World Trade Organization Technical Barriers to Trade (TBT) Committee.
ASTM B973-10(2020)e1 is classified under the following ICS (International Classification for Standards) categories: 29.060.20 - Cables. The ICS classification helps identify the subject area and facilitates finding related standards.
ASTM B973-10(2020)e1 has the following relationships with other standards: It is inter standard links to ASTM B973-10(2014), ASTM B3-13(2024), ASTM B49-20, ASTM B3-13(2018), ASTM B258-18, ASTM B1-13(2018), ASTM B49-17, ASTM B193-16, ASTM B49-16, ASTM B49-15a, ASTM B49-15, ASTM B193-02(2014), ASTM B3-13, ASTM B1-13, ASTM B3-12. Understanding these relationships helps ensure you are using the most current and applicable version of the standard.
ASTM B973-10(2020)e1 is available in PDF format for immediate download after purchase. The document can be added to your cart and obtained through the secure checkout process. Digital delivery ensures instant access to the complete standard document.
Standards Content (Sample)
This international standard was developed in accordance with internationally recognized principles on standardization established in the Decision on Principles for the
Development of International Standards, Guides and Recommendations issued by the World Trade Organization Technical Barriers to Trade (TBT) Committee.
´1
Designation:B973 −10 (Reapproved 2020)
Standard Specification for
Tin-Coated Braid and Ribbon Flat Copper Wire intended for
use in Electronic Application
This standard is issued under the fixed designation B973; the number immediately following the designation indicates the year of
original adoption or, in the case of revision, the year of last revision. A number in parentheses indicates the year of last reapproval. A
superscript epsilon (´) indicates an editorial change since the last revision or reapproval.
ε NOTE—Editorial corrections were made to 6.4.1.2 and Explanatory Note 5 in January 2020.
1. Scope Cross-Sectional Areas of AWG Sizes of Solid Round
Wires Used as Electrical Conductors
1.1 This specification covers tin-coated hard-drawn copper
2.2 Other Standards:
braid and ribbon flat wire intended for electronic application
NBS Handbook 100 Copper Wire Tables
(Explanatory Note 1).
1.2 The values stated in inch-pound units are to be regarded
3. Ordering Information
as standard. The values given in parentheses are mathematical
3.1 Orders for material under this specification shall include
conversions to SI units that are provided for information only
the following information:
and are not considered standard.
3.1.1 Quantity of each size,
1.2.1 Exceptions—The SI values for density, resistivity, and
3.1.2 Wire size-thickness and width in inches (see 5.3),
volume are to be regarded as standard.
3.1.3 Type of copper, if special (see 4.2),
1.3 This standard does not purport to address all of the
3.1.4 Package size (see 10.1),
safety concerns, if any, associated with its use. It is the
3.1.5 Special packaging marking, if required, and
responsibility of the user of this standard to establish appro-
3.1.6 Place of inspection (see 7.1).
priate safety, health, and environmental practices and deter-
mine the applicability of regulatory limitations prior to use.
4. Material
1.4 This international standard was developed in accor-
4.1 Tin for Coating—The tin shall be electroplated for the
dance with internationally recognized principles on standard-
coating and shall be commercially pure (Explanatory Note 1).
ization established in the Decision on Principles for the
For purposes of this specification, the tin shall be considered
Development of International Standards, Guides and Recom-
commercially pure if the total of other elements, exclusive of
mendations issued by the World Trade Organization Technical
copper, does not exceed 1 %. Not withstanding the previous
Barriers to Trade (TBT) Committee.
sentence, chemical analysis of the tin coating or of the tin used
for coating shall not be required under this specification.
2. Referenced Documents
2 4.2 Copper-Base Metal—The base metal shall be copper of
2.1 ASTM Standards:
such quality and purity that the finished product shall have
B1 Specification for Hard-Drawn Copper Wire
properties and characteristics prescribed in this specification.
B3 Specification for Soft or Annealed Copper Wire
B49 Specification for Copper Rod for Electrical Purposes
NOTE 1—Specifications B1, B3,or B49 defines copper suitable for use.
B193 Test Method for Resistivity of Electrical Conductor
5. General Requirements (See Section 8)
Materials
B258 Specification for Standard Nominal Diameters and
5.1 Tensile and Elongation—The tin-coated copper flat wire
in the hard drawn condition shall conform to elongation
requirements of 1 % minimum to 5 % maximum. The tensile
This specification is under the jurisdiction of ASTM Committee B01 on
strength shall be 55 000 psi (379 MPa) minimum.
Electrical Conductors and is the direct responsibility of Subcommittee B01.04 on
Conductors of Copper and Copper Alloys. 5.2 Resistivity (Explanatory Note 3)—The electrical resis-
Current edition approved Jan. 1, 2020. Published January 2020. Originally
tivity of the coated wire at a temperature of 20°C shall not
approved in 2010. Last previous edition approved in 2014 as B973 – 10 (2014).
exceed the values prescribed in Table 1.
DOI: 10.1520/B0973-10R20E01.
For referenced ASTM standards, visit the ASTM website, www.astm.org, or
contact ASTM Customer Service at service@astm.org. For Annual Book of ASTM
Standards volume information, refer to the standard’s Document Summary page on Available from National Technical Information Service (NTIS), 5301 Shawnee
the ASTM website. Rd., Alexandria, VA 22312, http://www.ntis.gov.
Copyright © ASTM International, 100 Barr Harbor Drive, PO Box C700, West Conshohocken, PA 19428-2959. United States
´1
B973−10 (2020)
TABLE 1 Electrical Resistivity Requirements TABLE 3 Permissible Variations in Width
Thickness Range, Resistivity at 20°C Nominal Width Range, Tolerance,
Inch (mm) Ω·lb/mile2 Inch (mm) Inch (mm)
0.0008 to 0.0012 (0.020 to 0.031), incl 1006.0 0.0100 to 0.0499 (0.254 to 1.27) +/- 0.0013 (0.033)
0.0013 to 0.0016 (0.033 to 0.041), incl 972.45 0.0500 to 0.0699 (1.27 to 1.78) +/- 0.0015 (0.038)
0.0017 to 0.0024 (0.043 to 0.061), incl 961.76 0.0700 to 0.0999 (1.78 to 2.54) +/- 0.0020 (0.051)
0.0025 to 0.0048 (0.064 to 0.122), incl 951.31 0.1000 to 0.1249 (2.54 to 3.17) +/- 0.0030 (0.076)
0.0049 to 0.0100 (0.125 to 0.254), incl 941.08 0.1250 to 0.1500 (3.18 to 3.81) +/- 0.0040 (0.102)
6.2 Resistivity (Explanatory Note 3)—The electrical resis-
tivity of the material shall be determined in accordance with
5.3 Dimensions and Permissible Variations—The flat wire
Test Method B193. The purchaser may accept certification that
sizes shall be expressed as the thickness and width of the wire
the wire was drawn from rod stock meeting the international
indecimalfractionsofaninchtothenearest0.0001in.(0.0025
standard for annealed copper instead of resistivity tests on the
mm). The tin-coated flat wire shall not vary from the specified
finished wire.
thickness and width by more than the amounts specified in
6.3 Dimensional Measurements—Dimensional measure-
Table 2 and Table 3, respectively.
mentsforwidthandthicknessshallbemadewithamicrometer
5.4 Continuity of Coating—The tin coating shall be continu-
caliper equipped with a vernier graduated in 0.0001 in. (0.0025
ous. The continuity of coating on the flat wire shall be
mm). Measurements shall be made on at least three places on
determined on representative samples taken before braiding
each unit selected for this test. Any measurement taken
applications or insulating. The continuity of coating shall be
exceeding the dimensions and permissible variation require-
determined by the hydrochloric acid-sodium polysulfide test in
ments in 5.4 shall constitute failure to meet the dimensional
accordance with 6.4.
conformance criterion.
5.5 Joints—Necessary joints in the wire and rods prior to
6.4 Continuity of Coating:
final coating and drawing shall be made in accordance with the
6.4.1 Specimens:
best commercial practice. There shall be no uncoated joints in
6.4.1.1 Length of Specimens—Test specimens shall have a
the final product.
lengthofabout6in.(152mm).Theyshallbetaggedormarked
5.6 Finish—The coating shall consist of a smooth continu-
tocorrespondwiththecoil,spool,orreelfromwhichtheywere
ouslayer,firmlyadherenttothesurfaceofthecopper.Thewire
cut.
shall be free of all imperfections not consistent with the best
6.4.1.2 Treatment of Specimens—The specimens shall be
commercial practice.
thoroughly cleaned by immersion in a suitable organic solvent
for at least 3 min; then removed and wiped dry with a clean,
6. Test Methods
soft cloth (Warning—see Explanatory Note 5).The specimens
thus cleaned shall be kept wrapped in a clean, dry cloth until
6.1 Tensile Strength and Elongation (Explanatory Note 4):
tested. That part of the specimen to be immersed in the test
6.1.1 The tensile strength, expressed in pounds per square
solution shall not be handled. Care shall be taken to avoid
inch, shall be obtained by dividing the maximum load carried
abrasion by the cut ends.
by the specimen during the tension test by the original
6.4.2 Special Solutions Required:
cross-sectional area of the specimen. Tensile strength and
6.4.2.1 Hydrochloric Acid Solution (HCl) (sp gr 1.088)—
elongation may be determined simultaneously on the same
Commercial HCl (sp gr 1.12) shall be diluted with distilled
specimen.
water to a specific gravity of 1.088 measured at 15.6°C (60°F).
6.1.2 The elongation of the flat wire may be determined by
Aportion of HCl solution having a volume of 180 mLshall be
measurements made between the jaws of the tensile testing
considered to be exhausted when the number of test specimens
machine. The zero length shall be the distance between the
prescribed in Table 4 of a size as indicated in 6.4.3 have been
jaws at the start of the tension test and be as near 10 in. (254
immersed in it for two cycles.
mm) as practicable. The final length shall be the distance
6.4.2.2 Sodium Polysulfide Solution (sp gr 1.142) (Explana-
between the jaws at the time of rupture. The fracture shall be
tory Note 6)—A concentrated solution shall be made by
between the jaws of the testing machine and not closer than 1
dissolving sodium sulfide crystals (cp) in distilled water until
in. (25.4 mm) to the jaw.
the solution is saturated at about 21°C (70°F), and adding
sufficient flowers of sulfur (in excess of 250 g/Lof solution) to
provide complete saturation, as shown by the presence in the
TABLE 2 Permissible Variations in Thickness
solution of an excess of sulfur after the solution has been
Nominal Thickness Range, Tolerance,
allowed to stand for at least 24 h. The test solution shall be
Inch (mm) Inch (mm)
made by diluting a portion of the concentrated solution with
0.0010 to 0.0014 (0.025 to 0.036) +/- 0.0002 (0.005) distilled water to a specific gravity of 1.135 to 1.145 at 15.6°C
0.0015 to 0.0019 (0.038 to 0.048) +/- 0.0003 (0.008)
(60°F). The sodium polysulfide test solution should have
0.0020 to 0.0049 (0.051 to 0.124) +/- 0.0004 (0.010)
sufficient strength to blacken thoroughly a piece of clean
0.0050 to 0.0100 (0.127 to 0.254) +/- 0.0005 (0.013)
untinned copper wire in 5 s. The test solution used for testing
´1
B973−10 (2020)
A
TABLE 4 Limiting Number of Test Specimens for Coating Test
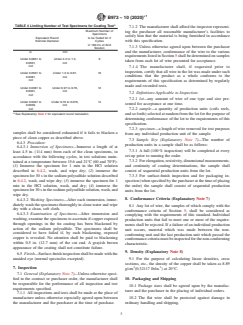
7.1.2 The manufacturer shall afford the inspector represent-
Maximum Number of
ing the purchaser all reasonable manufacturer’s facilities to
Specimens
satisfy him that the material is being furnished in accordance
Equivalent Round to be Tested for 2
with this specification.
Nominal Diameter Cycles
in 180 mL of Acid
7.1.3 Unless otherwise agreed upon between the purchaser
Solution
and the manufacturer, conformance of the wire to the various
in. mm
requirementslistedinSection5shallbedeterminedonsamples
Under 0.0851 to Under 2.2 to 1.3, 6
taken from each lot of wire presented fo
...


Questions, Comments and Discussion
Ask us and Technical Secretary will try to provide an answer. You can facilitate discussion about the standard in here.
Loading comments...