ASTM F607-03(2019)
(Test Method)Standard Test Method for Adhesion of Gasket Materials to Metal Surfaces
Standard Test Method for Adhesion of Gasket Materials to Metal Surfaces
SIGNIFICANCE AND USE
4.1 This test method provides terms such as megapascals or pounds-force per square inch of gasket surface for expressing the extent of adhesion applicable to all materials within the scope of Classification System F104. Under certain conditions, adhesion develops when gasket materials are confined in a compressed state between metal flanges. Adhesion is important as an index of ease of removal of a gasket material. Since other variables may enter into the performance in an application, the results obtained should be correlated with field results. A typical set of conditions is described in this test method. This test method may be used as an acceptance test when agreed upon between the user and the producer.
SCOPE
1.1 This test method provides a means of determining the degree to which gasket materials under compressive load adhere to metal surfaces. The test conditions described are indicative of those frequently encountered in gasket applications. Test conditions may also be modified in accordance with the needs of specific applications as agreed upon between the user and the producer. The maximum temperature recommended for this test method is 205°C (400°F).
1.2 The values stated in SI units are to be regarded as standard. The values in parentheses are for information only.
1.3 This standard does not purport to address all of the safety concerns, if any, associated with its use. It is the responsibility of the user of this standard to establish appropriate safety, health, and environmental practices and determine the applicability of regulatory limitations prior to use.
1.4 This international standard was developed in accordance with internationally recognized principles on standardization established in the Decision on Principles for the Development of International Standards, Guides and Recommendations issued by the World Trade Organization Technical Barriers to Trade (TBT) Committee.
General Information
- Status
- Published
- Publication Date
- 30-Apr-2019
- Technical Committee
- F03 - Gaskets
- Drafting Committee
- F03.40 - Chemical Test Methods
Relations
- Replaces
ASTM F607-03(2014) - Standard Test Method for Adhesion of Gasket Materials to Metal Surfaces - Effective Date
- 01-May-2019
- Effective Date
- 01-Aug-2018
- Effective Date
- 01-Mar-2014
- Effective Date
- 01-Apr-2011
- Effective Date
- 01-Oct-2009
- Effective Date
- 01-Oct-2006
- Effective Date
- 10-Apr-2003
- Effective Date
- 10-Oct-2002
- Effective Date
- 10-Oct-2000
- Effective Date
- 10-Apr-2000
- Effective Date
- 01-May-2019
Overview
ASTM F607-03(2019): Standard Test Method for Adhesion of Gasket Materials to Metal Surfaces establishes a standardized procedure for determining the degree of adhesion between nonmetallic gasket materials and metal surfaces under compressive load. Developed by ASTM International, this standard is essential for manufacturers, users, and specifiers within industries that depend on reliable gasket sealing and removal, such as automotive, aerospace, chemical processing, and power generation.
This test method expresses adhesion in terms of megapascals (MPa) or pounds-force per square inch (psi) and is applicable to materials covered under ASTM Classification System F104. The results help indicate the ease with which a gasket may be removed after service, with strong adhesion potentially complicating disassembly and maintenance. ASTM F607-03(2019) is internationally recognized and aligns with WTO TBT technical barriers to trade guidelines.
Key Topics
- Adhesion Measurement: The test evaluates the tensile force required to separate a compressed gasket from a metal surface after exposure to specific conditions, such as controlled temperature and humidity.
- Test Conditions: Standard conditions simulate typical gasket applications, though these can be adapted for specialized needs as agreed upon by stakeholders.
- Surface Preparation: Metal platens are prepared with a defined surface finish to ensure consistency and repeatability of results. Variations in surface finish can be specified per application.
- Specimen Conditioning: Gasket specimens are conditioned consistent with ASTM F104 or per the requirements of specific applications.
- Result Expression: Adhesion results are reported as force per unit area (MPa or psi). Additional details such as temperature, humidity, and creep relaxation data are included for comprehensive evaluation.
- Acceptance Criteria: The test method can be used for acceptance testing between producers and users, facilitating quality control and supplier evaluation.
Applications
ASTM F607-03(2019) is relevant across a broad range of industries that utilize gaskets for sealing applications, including:
- Automotive: Ensures reliable sealing and easy removal of engine, transmission, and exhaust gaskets, supporting maintenance and longevity.
- Aerospace: Validates adhesion properties for critical components that undergo temperature cycling and vibration.
- Industrial Equipment: Evaluates nonmetallic gaskets in pumps, valves, and flanges to predict performance and inform material selection.
- Power Generation: Assesses gasket removal ease and sealing reliability in turbines, steam lines, and boiler applications.
- Manufacturing and Quality Assurance: Assists in specifying and verifying material properties during procurement, production, and incoming inspection.
By providing a standardized method for measuring gasket adhesion, ASTM F607-03(2019) assists in product development, comparative material studies, failure analysis, and legal or contractual compliance.
Related Standards
Several other ASTM standards are relevant when working with nonmetallic gasket materials and their testing:
- ASTM F38: Test Methods for Creep Relaxation of a Gasket Material
- ASTM F104: Classification System for Nonmetallic Gasket Materials
These standards complement ASTM F607-03(2019) by offering additional insights into gasket behavior, classification, and performance under varying environmental and operational conditions.
Keywords: ASTM F607, gasket adhesion test, nonmetallic gasket materials, metal surfaces, adhesion measurement, ASTM F104, quality control, standard test method, industrial sealing, removal ease
Buy Documents
ASTM F607-03(2019) - Standard Test Method for Adhesion of Gasket Materials to Metal Surfaces
Get Certified
Connect with accredited certification bodies for this standard

Bureau Veritas Chile
Bureau Veritas certification services in Chile.

Bureau Veritas Peru
Bureau Veritas certification services in Peru.

BVQI Peru
Bureau Veritas certification in Peru.
Sponsored listings
Frequently Asked Questions
ASTM F607-03(2019) is a standard published by ASTM International. Its full title is "Standard Test Method for Adhesion of Gasket Materials to Metal Surfaces". This standard covers: SIGNIFICANCE AND USE 4.1 This test method provides terms such as megapascals or pounds-force per square inch of gasket surface for expressing the extent of adhesion applicable to all materials within the scope of Classification System F104. Under certain conditions, adhesion develops when gasket materials are confined in a compressed state between metal flanges. Adhesion is important as an index of ease of removal of a gasket material. Since other variables may enter into the performance in an application, the results obtained should be correlated with field results. A typical set of conditions is described in this test method. This test method may be used as an acceptance test when agreed upon between the user and the producer. SCOPE 1.1 This test method provides a means of determining the degree to which gasket materials under compressive load adhere to metal surfaces. The test conditions described are indicative of those frequently encountered in gasket applications. Test conditions may also be modified in accordance with the needs of specific applications as agreed upon between the user and the producer. The maximum temperature recommended for this test method is 205°C (400°F). 1.2 The values stated in SI units are to be regarded as standard. The values in parentheses are for information only. 1.3 This standard does not purport to address all of the safety concerns, if any, associated with its use. It is the responsibility of the user of this standard to establish appropriate safety, health, and environmental practices and determine the applicability of regulatory limitations prior to use. 1.4 This international standard was developed in accordance with internationally recognized principles on standardization established in the Decision on Principles for the Development of International Standards, Guides and Recommendations issued by the World Trade Organization Technical Barriers to Trade (TBT) Committee.
SIGNIFICANCE AND USE 4.1 This test method provides terms such as megapascals or pounds-force per square inch of gasket surface for expressing the extent of adhesion applicable to all materials within the scope of Classification System F104. Under certain conditions, adhesion develops when gasket materials are confined in a compressed state between metal flanges. Adhesion is important as an index of ease of removal of a gasket material. Since other variables may enter into the performance in an application, the results obtained should be correlated with field results. A typical set of conditions is described in this test method. This test method may be used as an acceptance test when agreed upon between the user and the producer. SCOPE 1.1 This test method provides a means of determining the degree to which gasket materials under compressive load adhere to metal surfaces. The test conditions described are indicative of those frequently encountered in gasket applications. Test conditions may also be modified in accordance with the needs of specific applications as agreed upon between the user and the producer. The maximum temperature recommended for this test method is 205°C (400°F). 1.2 The values stated in SI units are to be regarded as standard. The values in parentheses are for information only. 1.3 This standard does not purport to address all of the safety concerns, if any, associated with its use. It is the responsibility of the user of this standard to establish appropriate safety, health, and environmental practices and determine the applicability of regulatory limitations prior to use. 1.4 This international standard was developed in accordance with internationally recognized principles on standardization established in the Decision on Principles for the Development of International Standards, Guides and Recommendations issued by the World Trade Organization Technical Barriers to Trade (TBT) Committee.
ASTM F607-03(2019) is classified under the following ICS (International Classification for Standards) categories: 23.100.60 - Filters, seals and contamination of fluids; 73.080 - Non-metalliferous minerals. The ICS classification helps identify the subject area and facilitates finding related standards.
ASTM F607-03(2019) has the following relationships with other standards: It is inter standard links to ASTM F607-03(2014), ASTM F38-18, ASTM F38-00(2014), ASTM F104-11, ASTM F104-03(2009), ASTM F38-00(2006), ASTM F104-03, ASTM F104-02e1, ASTM F104-00, ASTM F38-00, ASTM F104-11(2020). Understanding these relationships helps ensure you are using the most current and applicable version of the standard.
ASTM F607-03(2019) is available in PDF format for immediate download after purchase. The document can be added to your cart and obtained through the secure checkout process. Digital delivery ensures instant access to the complete standard document.
Standards Content (Sample)
This international standard was developed in accordance with internationally recognized principles on standardization established in the Decision on Principles for the
Development of International Standards, Guides and Recommendations issued by the World Trade Organization Technical Barriers to Trade (TBT) Committee.
Designation: F607 − 03 (Reapproved 2019)
Standard Test Method for
Adhesion of Gasket Materials to Metal Surfaces
ThisstandardisissuedunderthefixeddesignationF607;thenumberimmediatelyfollowingthedesignationindicatestheyearoforiginal
adoption or, in the case of revision, the year of last revision.Anumber in parentheses indicates the year of last reapproval.Asuperscript
epsilon (´) indicates an editorial change since the last revision or reapproval.
This standard has been approved for use by agencies of the U.S. Department of Defense.
1. Scope the desired metal, loading the assembly, and subjecting it to a
specifiedsetofconditions.Thetensileforcerequiredtopartthe
1.1 This test method provides a means of determining the
platen is measured in newtons or pounds-force and is recorded
degree to which gasket materials under compressive load
along with the calculated stress (force per unit area) in
adhere to metal surfaces. The test conditions described are
megapascals or pounds-force per square inch of gasket surface.
indicative of those frequently encountered in gasket applica-
tions. Test conditions may also be modified in accordance with
NOTE 1—This tensile force required to separate the platens may be in
excess of 8896 N (2000 lbf).
the needs of specific applications as agreed upon between the
NOTE 2—This fixturing also provides for the measurement of creep
user and the producer. The maximum temperature recom-
relaxation in accordance with Method B of Test Methods F38.
mended for this test method is 205°C (400°F).
1.2 The values stated in SI units are to be regarded as 4. Significance and Use
standard. The values in parentheses are for information only.
4.1 This test method provides terms such as megapascals or
1.3 This standard does not purport to address all of the
pounds-force per square inch of gasket surface for expressing
safety concerns, if any, associated with its use. It is the the extent of adhesion applicable to all materials within the
responsibility of the user of this standard to establish appro-
scope of Classification System F104. Under certain conditions,
priate safety, health, and environmental practices and deter- adhesion develops when gasket materials are confined in a
mine the applicability of regulatory limitations prior to use.
compressed state between metal flanges.Adhesion is important
1.4 This international standard was developed in accor- as an index of ease of removal of a gasket material. Since other
dance with internationally recognized principles on standard- variables may enter into the performance in an application, the
ization established in the Decision on Principles for the results obtained should be correlated with field results. A
Development of International Standards, Guides and Recom- typical set of conditions is described in this test method. This
mendations issued by the World Trade Organization Technical
test method may be used as an acceptance test when agreed
Barriers to Trade (TBT) Committee. upon between the user and the producer.
2. Referenced Documents 5. Apparatus
2.1 ASTM Standards:
5.1 Circulating Air Oven, capable of maintaining 100 6
F38 Test Methods for Creep Relaxation of a Gasket Material 2°C (212 6 3.6°F) or other specified temperature as agreed
F104 Classification System for Nonmetallic Gasket Materi-
upon between the user and the producer.
als 3
5.2 Test Fixture, composed of two platens with holes 180°
apart on the side of each platen, a calibrated bolt, washer, nut,
3. Summary of Test Method
(in accordance with the fixture in Test Method B of Test
3.1 The procedure described in this test method involves
Methods F38) a dial indicator assembly, steel dowel pins, and
placing a specimen of a gasket material between flat platens of
a steel yoke or similar device to grip the dowel pins. The yoke,
in turn, is attached to the grips of a test machine that will
provide the capability of applying a tensile force perpendicular
This test method is under the jurisdiction ofASTM Committee F03 on Gaskets
to the plane of the platen surface. See Fig. 1. Standard platen
and is the direct responsibility of Subcommittee F03.40 on Chemical Test Methods.
Test apparatus prints are available at ASTM Headquarters. surface is smooth (as obtained using 8/0 dry garnet paper, refer
Current edition approved May 1, 2019. Published June 2019. Originally
to section 6.2), however, other surface finishes may be speci-
approved in 1979. Last previous edition approved in 2014 as F607 – 03 (2014).
fied as agreed upon between the user and the producer.
DOI: 10.1520/F0607-03R19.
For referenced ASTM standards, visit the ASTM website, www.astm.org, or
contact ASTM Customer Service at service@astm.org. For Annual Book of ASTM
Standards volume information, refer to the standard’s Document Summary page on Composite test fixture including yokes available from Metal Samples Co. Inc.,
the ASTM website. P.O. Box 8, Munford, AL 36268, have been found suitable.
Copyright © ASTM International, 100 Barr Harbor Drive, PO Box C700, West Conshohocken, PA 19428-2959. United States
F607 − 03 (2019)
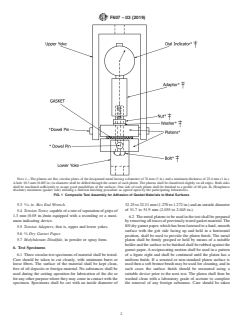
NOTE 1—The platens are flat, circular plates of the designated metal having a diameter of 76 mm (3 in.) and a minimum thickness of 25.4 mm (1 in.).
Ahole 10.3 mm (0.405 in.) in diameter shall be drilled through the center of each platen. The platens shall be chamfered slightly on all edges. Both sides
shall be machined sufficiently to assure good parallelism of the surfaces. One side of each platen shall be finished to a profile of 60 µin. R (Roughness
a
absolute) maximum (gasket side) utilizing a uniform finishing procedure as agreed upon by the participating laboratories.
FIG. 1 Composite Test Assembly for Adhesion of Gasket Materials to Metal Surfaces
5.3 ⁄16 in. Box End Wrench. 32.25 to 32.31 mm (1.270 to 1.272 in.) and an outside diameter
of 51.7 to 51.9 mm (2.035 to 2.045 in.).
5.4 Tension Tester, capable of a rate of separation of grips of
1.3 mm (0.05 in.)/min equipped with a recording or a maxi-
6.2 The metal platens to be used in the test shall be prepared
mum indicating device.
byremovingalltracesofpreviouslytestedgasketmaterial.The
8/0drygarnetpaper,whichhasbeenfastenedtoahard,smooth
5.5 Tension Adapters, that is, upper and lower yokes.
surface with the grit side facing up and held in a horizontal
5.6 ⁄0 Dry Garnet Paper.
position, shall be used to provide the platen finish. The metal
5.7 Molybdenum Disulfide, in powder or spray form. platen shall be firmly grasped or held by means of a suitable
holderandthesurfacetobefinishedshallberubbedagainstthe
6. Test Specimens
garnet paper. A reciprocating motion shall be used in a pattern
6.1 Three circular test specimens of material shall be tested. of a figure eight and shall be continued until the platen has a
Care should be taken to cut cleanly, with minimum burrs or uniform finish. If a s
...


Questions, Comments and Discussion
Ask us and Technical Secretary will try to provide an answer. You can facilitate discussion about the standard in here.
Loading comments...