ASTM E345-24
(Test Method)Standard Test Methods of Tension Testing of Metallic Foil
Standard Test Methods of Tension Testing of Metallic Foil
SIGNIFICANCE AND USE
4.1 Tension tests provide information on the strength and ductility of materials under uniaxial tensile stresses. This information may be useful in comparisons of materials, alloy development, quality control, and design.
4.2 The results of tension tests from selected portions of a part or material may not totally represent the strength and ductility of the entire end product of its in-service behavior in different environments.
4.3 These test methods are considered satisfactory for acceptance testing of commercial shipments, since the methods have been used extensively for these purposes.
4.4 Tension tests provide a means to determine the ductility of materials through the measurement of elongation or reduction of area. However, as specimen thickness is reduced, tension tests may become less useful for determining ductility. For these purposes Test Method E796 is an alternative procedure for measuring ductility.
4.5 Different industries differentiate between foil and sheet at different thicknesses.
Note 1: In 2013, to harmonize with international standards, the Aluminum Association revised its definition of foil to include thicknesses less than or equal to 0.2 mm (0.008 in.).
4.6 This standard differs from Test Methods E8/E8M in that it permits determining the specimen thickness by weighing (7.3) and determining the elongation from crosshead displacement for some specimens (7.8).
4.7 It is impossible for this standard to define the thickness range for every possible alloy where this standard should be used instead of Test Methods E8/E8M or other tensile test standards. Superior results for a specific alloy and thickness could be obtained by measuring the specimen thickness by weighing (7.3) to avoid damaging the material and to obtain sufficient accuracy. In addition, it may be acceptable for a given alloy and thickness to determine the elongation from crosshead displacement in cases where conventional extensometers that contact the specimen or...
SCOPE
1.1 These test methods cover the tension testing of metallic foil at room temperature. Exception to these methods may be necessary in individual specifications or test methods for a particular material.
1.2 Units—The values stated in SI units are to be regarded as standard. The values given in parentheses are mathematical conversions to inch-pound units that are provided for information only and are not considered standard.
1.3 This standard does not purport to address all of the safety concerns, if any, associated with its use. It is the responsibility of the user of this standard to establish appropriate safety, health, and environmental practices and determine the applicability of regulatory limitations prior to use.
1.4 This international standard was developed in accordance with internationally recognized principles on standardization established in the Decision on Principles for the Development of International Standards, Guides and Recommendations issued by the World Trade Organization Technical Barriers to Trade (TBT) Committee.
General Information
- Status
- Published
- Publication Date
- 31-Dec-2023
- Technical Committee
- E28 - Mechanical Testing
- Drafting Committee
- E28.04 - Uniaxial Testing
Relations
- Effective Date
- 01-Jan-2024
- Effective Date
- 01-Jan-2024
- Effective Date
- 01-Jan-2024
- Effective Date
- 01-Jan-2024
- Effective Date
- 01-Jan-2024
- Effective Date
- 01-Jan-2024
- Effective Date
- 01-Jan-2024
- Effective Date
- 01-Jan-2024
- Effective Date
- 01-Jan-2024
Overview
ASTM E345-24, Standard Test Methods of Tension Testing of Metallic Foil, provides comprehensive guidelines for performing tension tests on metallic foil at room temperature. Developed by ASTM International, this standard establishes best practices for assessing the tensile strength and ductility of very thin metallic materials, which are essential for quality control, material comparison, and research and development in a wide range of industries. The test methods described are widely used for acceptance testing of commercial shipments and support consistency in material properties evaluation.
Key Topics
- Tensile Strength and Ductility Measurement
Tension tests according to ASTM E345 determine key mechanical properties of metallic foils, including tensile strength, yield strength, and ductility (often measured by elongation or reduction of area). - Applicability to Thin Foils
E345 recognizes that, as metallic materials become thinner, some conventional ductility assessment methods may become less effective. Alternatives, such as ASTM E796, may be recommended for very thin materials. - Specimen Preparation and Measurement
Detailed requirements are provided for the preparation and measurement of test specimens. These include specifications for specimen dimensions, proper edge finishing, and precise measurement of width and thickness, which may be determined by weighing according to ASTM E252. - Testing Machine and Gripping Devices
The standard mandates that testing machines conform to ASTM E4 for force calibration and requires appropriate gripping devices (wedge or smooth-face grips) based on foil thickness. - Test Procedures
Instructions include speed of testing, methods of yield strength determination (offset or extension-under-load), and use of suitable extensometry or displacement measurement, particularly for fragile or very thin foils. - Reporting Requirements
Guidance includes what information to report, such as metal or alloy type, heat/lot numbers, specimen orientation and type, yield and tensile strength, and elongation.
Applications
ASTM E345-24 is vital across sectors that utilize metallic foils, including:
- Aerospace and Defense
Ensures reliability by verifying material strength and ductility for lightweight metallic foils used in shielding, insulation, or electronics. - Electronics Manufacturing
Critical for quality control of foils in circuit boards, batteries, and capacitors, where thin metallic materials are prevalent. - Packaging Industry
Used to evaluate the mechanical properties of foils in food, pharmaceutical, and industrial packaging, providing assurance of performance throughout the product lifecycle. - Materials Research and Alloy Development
Facilitates accurate comparison among foil alloys during product development or optimization of fabrication processes. - Quality Assurance and Procurement
Comprehensive test methods ensure shipments meet agreed-upon mechanical properties, mitigating risk in supply chains.
Related Standards
For a robust approach to metallic foil testing and related measurements, consider these ASTM standards:
- ASTM E8/E8M: Standard Test Methods for Tension Testing of Metallic Materials (commonly used for thicker materials)
- ASTM E4: Practices for Force Calibration and Verification of Testing Machines
- ASTM E252: Test Method for Thickness of Foil, Thin Sheet, and Film by Mass Measurement
- ASTM E796 (Withdrawn): Alternative ductility testing for foil
- ASTM E2309: Practices for Verification of Displacement Measuring Systems
- ASTM B193: Test Method for Resistivity of Electrical Conductor Materials
Practical Value
By following ASTM E345-24, organizations achieve:
- Confidence in Product Quality
Reliable, repeatable testing procedures for metallic foil help ensure end-use performance and compliance with industry requirements. - International Alignment
Harmonized definitions (such as foil thickness) and conformance to World Trade Organization TBT principles support global commerce. - Accurate Quality Assessment
Detailed procedures for specimen handling, testing, and reporting enable effective comparisons and decision-making in manufacturing, R&D, and procurement.
For any operation involving metallic foil, ASTM E345-24 is the essential reference for accurate tensile property determination.
Buy Documents
ASTM E345-24 - Standard Test Methods of Tension Testing of Metallic Foil
REDLINE ASTM E345-24 - Standard Test Methods of Tension Testing of Metallic Foil
Get Certified
Connect with accredited certification bodies for this standard

Element Materials Technology
Materials testing and product certification.

Inštitut za kovinske materiale in tehnologije
Institute of Metals and Technology. Materials testing, metallurgical analysis, NDT.
Sponsored listings
Frequently Asked Questions
ASTM E345-24 is a standard published by ASTM International. Its full title is "Standard Test Methods of Tension Testing of Metallic Foil". This standard covers: SIGNIFICANCE AND USE 4.1 Tension tests provide information on the strength and ductility of materials under uniaxial tensile stresses. This information may be useful in comparisons of materials, alloy development, quality control, and design. 4.2 The results of tension tests from selected portions of a part or material may not totally represent the strength and ductility of the entire end product of its in-service behavior in different environments. 4.3 These test methods are considered satisfactory for acceptance testing of commercial shipments, since the methods have been used extensively for these purposes. 4.4 Tension tests provide a means to determine the ductility of materials through the measurement of elongation or reduction of area. However, as specimen thickness is reduced, tension tests may become less useful for determining ductility. For these purposes Test Method E796 is an alternative procedure for measuring ductility. 4.5 Different industries differentiate between foil and sheet at different thicknesses. Note 1: In 2013, to harmonize with international standards, the Aluminum Association revised its definition of foil to include thicknesses less than or equal to 0.2 mm (0.008 in.). 4.6 This standard differs from Test Methods E8/E8M in that it permits determining the specimen thickness by weighing (7.3) and determining the elongation from crosshead displacement for some specimens (7.8). 4.7 It is impossible for this standard to define the thickness range for every possible alloy where this standard should be used instead of Test Methods E8/E8M or other tensile test standards. Superior results for a specific alloy and thickness could be obtained by measuring the specimen thickness by weighing (7.3) to avoid damaging the material and to obtain sufficient accuracy. In addition, it may be acceptable for a given alloy and thickness to determine the elongation from crosshead displacement in cases where conventional extensometers that contact the specimen or... SCOPE 1.1 These test methods cover the tension testing of metallic foil at room temperature. Exception to these methods may be necessary in individual specifications or test methods for a particular material. 1.2 Units—The values stated in SI units are to be regarded as standard. The values given in parentheses are mathematical conversions to inch-pound units that are provided for information only and are not considered standard. 1.3 This standard does not purport to address all of the safety concerns, if any, associated with its use. It is the responsibility of the user of this standard to establish appropriate safety, health, and environmental practices and determine the applicability of regulatory limitations prior to use. 1.4 This international standard was developed in accordance with internationally recognized principles on standardization established in the Decision on Principles for the Development of International Standards, Guides and Recommendations issued by the World Trade Organization Technical Barriers to Trade (TBT) Committee.
SIGNIFICANCE AND USE 4.1 Tension tests provide information on the strength and ductility of materials under uniaxial tensile stresses. This information may be useful in comparisons of materials, alloy development, quality control, and design. 4.2 The results of tension tests from selected portions of a part or material may not totally represent the strength and ductility of the entire end product of its in-service behavior in different environments. 4.3 These test methods are considered satisfactory for acceptance testing of commercial shipments, since the methods have been used extensively for these purposes. 4.4 Tension tests provide a means to determine the ductility of materials through the measurement of elongation or reduction of area. However, as specimen thickness is reduced, tension tests may become less useful for determining ductility. For these purposes Test Method E796 is an alternative procedure for measuring ductility. 4.5 Different industries differentiate between foil and sheet at different thicknesses. Note 1: In 2013, to harmonize with international standards, the Aluminum Association revised its definition of foil to include thicknesses less than or equal to 0.2 mm (0.008 in.). 4.6 This standard differs from Test Methods E8/E8M in that it permits determining the specimen thickness by weighing (7.3) and determining the elongation from crosshead displacement for some specimens (7.8). 4.7 It is impossible for this standard to define the thickness range for every possible alloy where this standard should be used instead of Test Methods E8/E8M or other tensile test standards. Superior results for a specific alloy and thickness could be obtained by measuring the specimen thickness by weighing (7.3) to avoid damaging the material and to obtain sufficient accuracy. In addition, it may be acceptable for a given alloy and thickness to determine the elongation from crosshead displacement in cases where conventional extensometers that contact the specimen or... SCOPE 1.1 These test methods cover the tension testing of metallic foil at room temperature. Exception to these methods may be necessary in individual specifications or test methods for a particular material. 1.2 Units—The values stated in SI units are to be regarded as standard. The values given in parentheses are mathematical conversions to inch-pound units that are provided for information only and are not considered standard. 1.3 This standard does not purport to address all of the safety concerns, if any, associated with its use. It is the responsibility of the user of this standard to establish appropriate safety, health, and environmental practices and determine the applicability of regulatory limitations prior to use. 1.4 This international standard was developed in accordance with internationally recognized principles on standardization established in the Decision on Principles for the Development of International Standards, Guides and Recommendations issued by the World Trade Organization Technical Barriers to Trade (TBT) Committee.
ASTM E345-24 is classified under the following ICS (International Classification for Standards) categories: 77.040.10 - Mechanical testing of metals. The ICS classification helps identify the subject area and facilitates finding related standards.
ASTM E345-24 has the following relationships with other standards: It is inter standard links to ASTM E345-16, ASTM E8/E8M-24, ASTM B386/B386M-19e1, ASTM B479-19, ASTM B557M-15(2023), ASTM B557-15(2023), ASTM E8/E8M-22, ASTM F688-19, ASTM B373-19. Understanding these relationships helps ensure you are using the most current and applicable version of the standard.
ASTM E345-24 is available in PDF format for immediate download after purchase. The document can be added to your cart and obtained through the secure checkout process. Digital delivery ensures instant access to the complete standard document.
Standards Content (Sample)
This international standard was developed in accordance with internationally recognized principles on standardization established in the Decision on Principles for the
Development of International Standards, Guides and Recommendations issued by the World Trade Organization Technical Barriers to Trade (TBT) Committee.
Designation: E345 − 24
Standard Test Methods of
Tension Testing of Metallic Foil
This standard is issued under the fixed designation E345; the number immediately following the designation indicates the year of
original adoption or, in the case of revision, the year of last revision. A number in parentheses indicates the year of last reapproval. A
superscript epsilon (´) indicates an editorial change since the last revision or reapproval.
This standard has been approved for use by agencies of the U.S. Department of Defense.
1. Scope* E252 Test Method for Thickness of Foil, Thin Sheet, and
Film by Mass Measurement
1.1 These test methods cover the tension testing of metallic
E796 Test Method for Ductility Testing of Metallic Foil
foil at room temperature. Exception to these methods may be
(Withdrawn 2009)
necessary in individual specifications or test methods for a
E2309 Practices for Verification of Displacement Measuring
particular material.
Systems and Devices Used in Material Testing Machines
1.2 Units—The values stated in SI units are to be regarded
as standard. The values given in parentheses are mathematical 3. Terminology
conversions to inch-pound units that are provided for informa-
3.1 Refer to Terminology E6 for the definitions of the
tion only and are not considered standard.
following terms used in this standard: accuracy, ductility,
1.3 This standard does not purport to address all of the
elongation, elongation after fracture, elongation at fracture,
safety concerns, if any, associated with its use. It is the
extensometer, gauge length, length of the reduced parallel
responsibility of the user of this standard to establish appro-
section, reduced parallel section, reduction of area, stress-strain
priate safety, health, and environmental practices and deter-
diagram, tensile strength, yield strength, and upper yield
mine the applicability of regulatory limitations prior to use.
strength.
1.4 This international standard was developed in accor-
4. Significance and Use
dance with internationally recognized principles on standard-
ization established in the Decision on Principles for the
4.1 Tension tests provide information on the strength and
Development of International Standards, Guides and Recom-
ductility of materials under uniaxial tensile stresses. This
mendations issued by the World Trade Organization Technical
information may be useful in comparisons of materials, alloy
Barriers to Trade (TBT) Committee.
development, quality control, and design.
4.2 The results of tension tests from selected portions of a
2. Referenced Documents
part or material may not totally represent the strength and
2.1 ASTM Standards:
ductility of the entire end product of its in-service behavior in
B193 Test Method for Resistivity of Electrical Conductor
different environments.
Materials
4.3 These test methods are considered satisfactory for ac-
E4 Practices for Force Calibration and Verification of Test-
ceptance testing of commercial shipments, since the methods
ing Machines
have been used extensively for these purposes.
E6 Terminology Relating to Methods of Mechanical Testing
E8/E8M Test Methods for Tension Testing of Metallic Ma- 4.4 Tension tests provide a means to determine the ductility
terials of materials through the measurement of elongation or reduc-
E29 Practice for Using Significant Digits in Test Data to tion of area. However, as specimen thickness is reduced,
Determine Conformance with Specifications tension tests may become less useful for determining ductility.
For these purposes Test Method E796 is an alternative proce-
dure for measuring ductility.
These test methods are under the jurisdiction of ASTM Committee E28 on
4.5 Different industries differentiate between foil and sheet
Mechanical Testing and are the direct responsibility of Subcommittee E28.04 on
Uniaxial Testing. at different thicknesses.
Current edition approved Jan. 1, 2024. Published February 2024. Originally
NOTE 1—In 2013, to harmonize with international standards, the
approved in 1968. Last previous edition approved in 2016 as E345 – 16. DOI:
Aluminum Association revised its definition of foil to include thicknesses
10.1520/E0345-24.
For referenced ASTM standards, visit the ASTM website, www.astm.org, or
contact ASTM Customer Service at service@astm.org. For Annual Book of ASTM
Standards volume information, refer to the standard’s Document Summary page on The last approved version of this historical standard is referenced on
the ASTM website. www.astm.org.
*A Summary of Changes section appears at the end of this standard
Copyright © ASTM International, 100 Barr Harbor Drive, PO Box C700, West Conshohocken, PA 19428-2959. United States
E345 − 24
less than or equal to 0.2 mm (0.008 in.).
within the gauge length, the axis of the test specimen should
coincide with the center line of the heads of the testing
4.6 This standard differs from Test Methods E8/E8M in that
machine.
it permits determining the specimen thickness by weighing
(7.3) and determining the elongation from crosshead displace-
NOTE 2—Any departure from this center line could introduce bending
ment for some specimens (7.8).
stresses that are not included in the usual stress computation (force divided
by cross-sectional area).
4.7 It is impossible for this standard to define the thickness
5.2.2 Wedge grips may be used.
range for every possible alloy where this standard should be
used instead of Test Methods E8/E8M or other tensile test
NOTE 3—Testing machines usually are equipped with wedge grips.
standards. Superior results for a specific alloy and thickness
These wedge grips generally furnish a satisfactory means of gripping long
could be obtained by measuring the specimen thickness by specimens of ductile materials in the thicker foil gauges. If, for any reason,
one wedge or jaw of a pair advances farther than the other as the grip
weighing (7.3) to avoid damaging the material and to obtain
tightens, an undesirable bending stress could be introduced.
sufficient accuracy. In addition, it may be acceptable for a
given alloy and thickness to determine the elongation from 5.2.2.1 When liners are used behind the wedges, they shall
crosshead displacement in cases where conventional extensom- be of the same thickness and their faces shall be flat and
eters that contact the specimen or scribed gauge marks could parallel.
damage the specimen or affect the test results.
5.2.2.2 For proper gripping, the entire length of the serrated
face of each wedge should be in contact with the specimen. A
5. Apparatus
buffer material such as 320-grit silicon carbide paper may be
inserted between the specimen and serrated faces to minimize
5.1 Testing Machines:
tearing of specimens.
5.1.1 The force-measuring system of the testing machine
5.2.3 Smooth-face grips may be used.
shall conform to the requirements of Practices E4. The forces
used in determining tensile strength, yield strength, and upper
NOTE 4—For foils less than 0.076 mm (0.0030 in.) thickness, smooth-
yield strength shall be within the verified range of forces of the
face grips have been used successfully with gripping pressure of about
testing machine as defined in Practices E4. 0.7 MPa (100 psi) for each 0.025 mm (0.00098 in.) of specimen thickness.
5.1.2 If Type B specimens are used, the displacement-
6. Test Specimen
measuring system of the testing machine shall conform to
Practices E2309 Class D.
6.1 General—Test specimens shall be prescribed in the
5.2 Gripping Devices: product specification for the material being tested. If a Type A
5.2.1 General—Various types of gripping devices may be specimen is used, all specimen dimensions, test procedures,
used to transmit the measured force applied by the testing and calculations shall comply with those shown in Test
machine to the test specimen. To ensure axial tensile stress Methods E8/E8M.
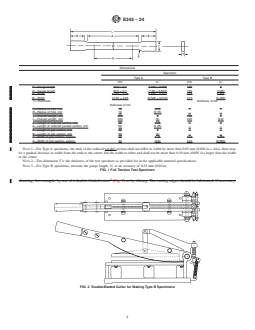
Dimensions
Specimen
Type A Type B
mm in. mm in.
G—Gauge length 50.0 ± 0.1 (1.96 ± 0.004) 125 (5.00)
W—Width 12.50 ± 0.25 (0.500 ± 0.010) 12.5 (0.500)
T—Thickness thickness of foil thickness of foil
R—Radius of fillet, min 19 (0.75) . .
L—Overall Length, min 200 (8) 230 (9.0)
A—Length of reduced parallel section, min 60 (2.25) . .
B—Length of grip section, min 50 (2) . .
C—Width of grip section, approx. 20 (0.8) 12.5 (0.500)
NOTE 1—For Type A specimens, the ends of the reduced parallel section shall not differ in width by more than 0.05 mm (0.002 in.). Also, there may
be a gradual decrease in width from the ends to the center, but the width at either end shall not be more than 0.10 mm (0.005 in.) larger than the width
at the center.
NOTE 2—The dimension T is the thickness of the test specimen as provided for in the applicable material specifications.
NOTE 3—For Type B specimens, measure the gauge length, G, to an accuracy of 0.25 mm (0.01in).
FIG. 1 Foil Tension Test Specimen
E345 − 24
6.2 Type A Specimen—Type A specimens shall be in accor- 7.2.2 Examine the finished specimens under about 20×
dance with the 12.5 mm (0.500 in.) sheet-type specimen shown magnification to determine that the edges are smooth and there
in Fig. 1. To avoid lateral buckling in tests of some materials, are no surface scratches or creases. Reject specimens that show
the minimum radius of the fillet should be 19 mm (0.75 in.), or discernible surface scratches, creases, or edge discontinuities.
the width of the grip ends should be only slightly larger than
7.3 Specimen Measurement:
the width of the reduced parallel section, or both.
7.3.1 Thickness:
6.3 Type B Specimens—Type B specimens shall be in
7.3.1.1 The thickness of hard or soft foils may be deter-
accordance with the 12.5 mm (0.500 in.) wide parallel sided mined by weighing using Test Method E252 or by the use of
specimen shown in Fig. 1.
other measuring devices such as an optimeter, an electrical-
type measuring device, or a micrometer.
7. Procedures
7.3.1.2 When determining the thickness by weighing using
Test Method E252, weigh at least two specimens together
7.1 Type A Specimen Preparation:
when it is practical. When Type B specimens are not used, a
7.1.1 The specimens may be machined in packs by use of a
milling-type cutter. sample in accordance with Test Method E252 may be used if it
is taken from an area adjacent to the area from which the test
7.1.2 Examine the machined specimens under about 20×
magnification to determine that the edges are smooth and that specimens were taken.
7.3.1.3 When Type B tension test specimens or samples are
there are no surface scratches or creases. Reject specimens that
show discernible scratches, creases, or edge discontinuities. weighed to determine their thickness, the established value of
density for the material should be use
...
This document is not an ASTM standard and is intended only to provide the user of an ASTM standard an indication of what changes have been made to the previous version. Because
it may not be technically possible to adequately depict all changes accurately, ASTM recommends that users consult prior editions as appropriate. In all cases only the current version
of the standard as published by ASTM is to be considered the official document.
Designation: E345 − 16 E345 − 24
Standard Test Methods of
Tension Testing of Metallic Foil
This standard is issued under the fixed designation E345; the number immediately following the designation indicates the year of
original adoption or, in the case of revision, the year of last revision. A number in parentheses indicates the year of last reapproval. A
superscript epsilon (´) indicates an editorial change since the last revision or reapproval.
This standard has been approved for use by agencies of the U.S. Department of Defense.
1. Scope Scope*
1.1 These test methods cover the tension testing of metallic foil at room temperature. Exception to these methods may be
necessary in individual specifications or test methods for a particular material.
1.2 Units—The values stated in SI units are to be regarded as standard. The values given in parentheses are mathematical
conversions to inch-pound units that are provided for information only and are not considered standard.
1.3 This standard does not purport to address all of the safety concerns, if any, associated with its use. It is the responsibility
of the user of this standard to establish appropriate safety and healthsafety, health, and environmental practices and determine
the applicability of regulatory limitations prior to use.
1.4 This international standard was developed in accordance with internationally recognized principles on standardization
established in the Decision on Principles for the Development of International Standards, Guides and Recommendations issued
by the World Trade Organization Technical Barriers to Trade (TBT) Committee.
2. Referenced Documents
2.1 ASTM Standards:
B193 Test Method for Resistivity of Electrical Conductor Materials
E4 Practices for Force Calibration and Verification of Testing Machines
E6 Terminology Relating to Methods of Mechanical Testing
E8/E8M Test Methods for Tension Testing of Metallic Materials
E29 Practice for Using Significant Digits in Test Data to Determine Conformance with Specifications
E252 Test Method for Thickness of Foil, Thin Sheet, and Film by Mass Measurement
E796 Test Method for Ductility Testing of Metallic Foil (Withdrawn 2009)
E2309 Practices for Verification of Displacement Measuring Systems and Devices Used in Material Testing Machines
3. Terminology
3.1 The definitions of terms relating to tension testing appearing in Refer to Terminology E6 apply to the for the definitions of
the following terms used in these methods of tension testing.this standard: accuracy, ductility, elongation, elongation after fracture,
These test methods are under the jurisdiction of ASTM Committee E28 on Mechanical Testing and are the direct responsibility of Subcommittee E28.04 on Uniaxial
Testing.
Current edition approved July 15, 2016Jan. 1, 2024. Published August 2016February 2024. Originally approved in 1968. Last previous edition approved in 20132016 as
ɛ1
E345 – 93 (2013)E345 – 16. . DOI: 10.1520/E0345-16.10.1520/E0345-24.
For referenced ASTM standards, visit the ASTM website, www.astm.org, or contact ASTM Customer Service at service@astm.org. For Annual Book of ASTM Standards
volume information, refer to the standard’s Document Summary page on the ASTM website.
The last approved version of this historical standard is referenced on www.astm.org.
*A Summary of Changes section appears at the end of this standard
Copyright © ASTM International, 100 Barr Harbor Drive, PO Box C700, West Conshohocken, PA 19428-2959. United States
E345 − 24
elongation at fracture, extensometer, gauge length, length of the reduced parallel section, reduced parallel section, reduction of
area, stress-strain diagram, tensile strength, yield strength, and upper yield strength.
4. Significance and Use
4.1 Tension tests provide information on the strength and ductility of materials under uniaxial tensile stresses. This information
may be useful in comparisons of materials, alloy development, quality control, and design.
4.2 The results of tension tests from selected portions of a part or material may not totally represent the strength and ductility of
the entire end product of its in-service behavior in different environments.
4.3 These test methods are considered satisfactory for acceptance testing of commercial shipments, since the methods have been
used extensively for these purposes.
4.4 Tension tests provide a means to determine the ductility of materials through the measurement of elongation or reduction of
area. However, as specimen thickness is reduced, tension tests may become less useful for determining ductility. For these purposes
Test Method E796 is an alternative procedure for measuring ductility.
4.5 Different industries differentiate between foil and sheet at different thicknesses.
NOTE 1—In 2013, to harmonize with international standards, the Aluminum Association revised its definition of foil to include thicknesses less than or
equal to 0.2 mm (0.0079(0.008 in.).
4.6 This standard differs from Test Methods E8/E8M in that it permits determining the specimen thickness by weighing (7.3) and
determining the elongation from crosshead displacement for some specimens (7.8).
4.7 It is impossible for this standard to define the thickness range for every possible alloy where this standard should be used
instead of Test Methods E8/E8M or other tensile test standards. Superior results for a specific alloy and thickness could be obtained
by measuring the specimen thickness by weighing (7.3) to avoid damaging the material and to obtain sufficient accuracy. In
addition, it may be acceptable for a given alloy and thickness to determine the elongation from crosshead displacement in cases
where conventional extensometers that contact the specimen or scribed fiducialgauge marks could damage the specimen or affect
the test results.
5. Apparatus
5.1 Testing Machines—Machines: Machines used for tension testing shall conform to the requirements of Practices E4. The forces
used in determining tensile strength, yield strength, and yield point shall be within the verified loading range of the testing machine
as defined in Practices E4.
5.1.1 The force-measuring system of the testing machine shall conform to the requirements of Practices E4. The forces used in
determining tensile strength, yield strength, and upper yield strength shall be within the verified range of forces of the testing
machine as defined in Practices E4.
5.1.2 If Type B specimens are used, the displacement-measuring system of the testing machine shall conform to Practices E2309
Class D.
5.2 Gripping Devices:
5.2.1 General—Various types of gripping devices may be used to transmit the measured force applied by the testing machine to
the test specimen. To ensure axial tensile stress within the gauge length, the axis of the test specimen shallshould coincide with
the center line of the heads of the testing machine. Any departure from this center line could introduce bending stresses that are
not included in the usual stress computation (force divided by cross-sectional area).
NOTE 2—Any departure from this center line could introduce bending stresses that are not included in the usual stress computation (force divided by
cross-sectional area).
E345 − 24
5.2.2 Wedge Grips—Testing machines usually are equipped with wedge grips. These wedge grips generally furnish a satisfactory
means of gripping long specimens of ductile materials in the thicker foil gauges. If, for any reason, one grip of a pair advances
farther than the other as the grips tighten, an undesirable bending stress could be introduced. When liners are used behind the
wedges, they shall be of the same thickness and their faces shall be flat and parallel. For proper gripping, it is desirable that the
entire length of the serrated face of each wedge be in contact with the specimen. A buffer material such as 320-grit silicon carbide
paper may be inserted between the specimen and serrated faces to minimize tearing of specimens.Wedge grips may be used.
NOTE 3—Testing machines usually are equipped with wedge grips. These wedge grips generally furnish a satisfactory means of gripping long specimens
of ductile materials in the thicker foil gauges. If, for any reason, one wedge or jaw of a pair advances farther than the other as the grip tightens, an
undesirable bending stress could be introduced.
5.2.2.1 When liners are used behind the wedges, they shall be of the same thickness and their faces shall be flat and parallel.
5.2.2.2 For proper gripping, the entire length of the serrated face of each wedge should be in contact with the specimen. A buffer
material such as 320-grit silicon carbide paper may be inserted between the specimen and serrated faces to minimize tearing of
specimens.
5.2.3 Smooth Face Grips—For foils less than 0.076 mm (0.003 in.) thickness, it may be desirable Smooth-face grips may be used.
NOTE 4—For foils less than 0.076 mm (0.0030 in.) thickness, smooth-face grips have been used successfully with gripping pressure of about 0.7 MPa
(100 psi) for each 0.025 mm (0.00098 in.) of specimen thickness.that the grips have smooth faces and that the gripping pressure be about
0.7 MPa (100 psi) for each 0.025 mm (0.001 in.) of specimen thickness.
6. Test Specimen
6.1 General—Test specimens shall be prescribed in the product specification for the material being tested. If a Type A specimen
is used, all specimen dimensions, test procedures, and calculations shall comply with those shown in Test Methods E8/E8M.
6.2 Type A Specimen—Type A specimens shall be in accordance with the 12.5-mm12.5 mm (0.500 in.) sheet-type specimen shown
in Fig. 1. To avoid lateral buckling in tests of some materials, the minimum radius of the fillet should be 19 mm (0.75 in.), or the
width of the grip ends should be only slightly larger than the width of the reduced parallel section, or both.
6.3 Type B Specimens—Type B specimens shall be in accordance with the 12.5-mm12.5 mm (0.500 in.) wide parallel sided
specimen shown in Fig. 1.
7. Procedures
7.1 Type A Specimen Preparation—Preparation: The specimens may be machined in packs by use of a milling-type cutter.
Examine the machined specimens under about 20× magnification to determine that the edges are smooth and that there are no
surface scratches or creases. Reject specimens that show discernible scratches, creases, or edge discontinuities. Sharpened or renew
the milling-type cutter when necessary. When machining some thicknesses and tempers of material the samples may be interleaved
with hard aluminum sheet, a plastic, or other suitable material. For some materials the edges of the specimens may be polished,
either mechanically or by electropolishing.
7.1.1 The specimens may be machined in packs by use of a milling-type cutter.
7.1.2 Examine the machined specimens under about 20× magnification to determine that the edges are smooth and that there are
no surface scratches or creases. Reject specimens that show discernible scratches, creases, or edge discontinuities.
NOTE 5—Periodically sharpening or renewing the milling-type cutter will reduce scratches, creases, and edge discontinuities.
7.1.3 The specimens may be interleaved with hard aluminum sheet, a plastic, or other suitable material.
7.2 Type B Specimen Preparation—Preparation: The specimens, particularly of soft and of thin hard metals, may be prepared by
E345 − 24
Dimensions
Specimen
Type A Type B
mm in. mm in.
G—Gauge length 50.0 ± 0.1 2.000 ± 0.005 125 5
G—Gauge length 50.0 ± 0.1 (1.96 ± 0.004) 125 (5.00)
W—Width 12.50 ± 0.25 0.500 ± 0.010 12.5 0.500
W—Width 12.50 ± 0.25 (0.500 ± 0.010) 12.5 (0.500)
T—Thickness thickness of foil
thickness of foil
R—Radius of fillet, min 19 0.75 . .
R—Radius of fillet, min 19 (0.75) . .
L—Overall Length, min 200 8 230 9
L—Overall Length, min 200 (8) 230 (9.0)
A—Length of reduced section, min 60 2.25 . .
A—Length of reduced parallel section, min 60 (2.25) . .
B—Length of grip section, min 50 2 . .
B—Length of grip section, min 50 (2) . .
C—Width of grip section, approx. 20 0.75 12.5 0.500
C—Width of grip section, approx. 20 (0.8) 12.5 (0.500)
NOTE 1—For Type A specimens, the ends of the reduced parallel section shall not differ in width by more than 0.05 mm (0.002 in.). Also, there may
be a gradual decrease in width from the ends to the center, but the width at either end shall not be more than 0.10 mm (0.005 in.) larger than the width
at the center.
NOTE 2—The dimension T is the thickness of the test specimen as provided for in the applicable material specifications.
NOTE 3—For Type B specimens, measure the gauge length, G, to an accuracy of 0.25 mm (0.01in).
FIG. 1 Foil Tension Test Specimen
shearing, for example, by use of a double-bladed cutter (Fig. 2) or by slitting. The cutting edges should be lubricated, if necessary,
FIG. 2 Double-Bladed Cutter for Making Type B Specimens
E345 − 24
with a material such as stearic acid in alcohol or another suitable material. Examine the finished specimens under about 20×
magnification to determine that the edges are smooth and there are no surface scratches or creases. Reject specimens that show
discernibl
...
Questions, Comments and Discussion
Ask us and Technical Secretary will try to provide an answer. You can facilitate discussion about the standard in here.
Loading comments...