ASTM F548-19
(Test Method)Standard Test Method for Intensity of Scratches on Aerospace Transparent Plastics
Standard Test Method for Intensity of Scratches on Aerospace Transparent Plastics
SIGNIFICANCE AND USE
4.1 Scratches exist on all transparent plastic surfaces. Usually they are very fine scratches from cleaning operations that are not visible when looking through the plastic. Deeper scratches may result from careless cleaning or handling. While these may not be deep enough to affect the structural integrity of the part, their appearance in certain locations may be distracting to the observer looking through the plastic. Therefore, a procedure to define these scratches is useful.
SCOPE
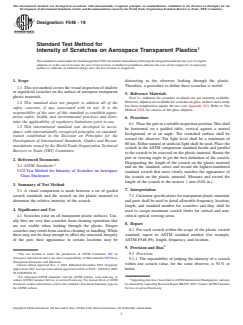
1.1 This test method covers the visual inspection of shallow or superficial scratches on the surface of aerospace transparent plastic materials.
1.2 This standard does not purport to address all of the safety concerns, if any, associated with its use. It is the responsibility of the user of this standard to establish appropriate safety, health, and environmental practices and determine the applicability of regulatory limitations prior to use.
1.3 This international standard was developed in accordance with internationally recognized principles on standardization established in the Decision on Principles for the Development of International Standards, Guides and Recommendations issued by the World Trade Organization Technical Barriers to Trade (TBT) Committee.
General Information
- Status
- Published
- Publication Date
- 31-Oct-2019
- Technical Committee
- F07 - Aerospace and Aircraft
- Drafting Committee
- F07.08 - Transparent Enclosures and Materials
Relations
- Effective Date
- 01-Nov-2019
- Effective Date
- 01-Nov-2019
- Refers
ASTM F428-09(2014) - Standard Test Method for Intensity of Scratches on Aerospace Glass Enclosures - Effective Date
- 01-Dec-2014
- Effective Date
- 15-May-2009
- Effective Date
- 01-Oct-2003
- Refers
ASTM F428-83(1997)e1 - Standard Test Method for Intensity of Scratches on Aerospace Glass Enclosures - Effective Date
- 10-Nov-2001
- Effective Date
- 10-Nov-2001
- Effective Date
- 10-Nov-2001
- Refers
ASTM F428-83(1997)e2 - Standard Test Method for Intensity of Scratches on Aerospace Glass Enclosures - Effective Date
- 10-Nov-2001
- Referred By
ASTM F790-23 - Standard Guide for Testing Materials for Aerospace Plastic Transparent Enclosures - Effective Date
- 01-Nov-2019
Overview
ASTM F548-19 is the internationally recognized standard test method for evaluating the intensity of scratches on aerospace transparent plastics. Developed by ASTM International, this standard provides precise guidance for the visual inspection and grading of shallow or superficial scratches on transparent plastic surfaces commonly used in aerospace applications. The standard is crucial for ensuring both the optical performance and quality assurance of these materials, where even minor surface imperfections can impact safety, usability, and aesthetics.
Key Topics
- Visual Scratches Inspection: The primary focus is on visually comparing scratches on plastic materials against graded scratch standards to assess their intensity.
- Assessment Procedure: The test involves placing the inspected part in a suitable position and under specific lighting conditions, then matching the observed scratch with the closest ASTM comparison standard.
- Reporting Requirements: Users must report the ASTM standard number, length, frequency, and location of each scratch for comprehensive documentation.
- Precision and Reliability: The method delivers high repeatability and reproducibility, especially for more pronounced scratch values, supporting consistent quality evaluation.
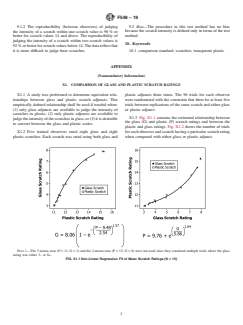
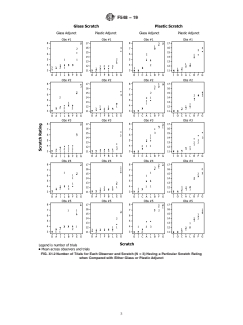
- Comparison with Glass Standards: When plastic scratch standards are unavailable, the standard guides using glass adjuncts (referencing ASTM F428) and conversion between plastic and glass scratch measurements when necessary.
- Customer Specifications: It allows end-users to specify acceptable scratch intensities and locations, catering to both critical and non-critical optical viewing areas.
Applications
ASTM F548-19 is widely applicable in industries where aerospace transparent plastics are integral, including:
- Aircraft Manufacturing and Maintenance: Used for quality control of cockpit canopies, windows, instrument panels, and other transparent enclosures.
- Aerospace Component Suppliers: Ensures components meet stringent optical clarity and surface integrity requirements.
- Material Laboratories: Supports research and development of new transparent plastics and coatings with enhanced scratch resistance.
- Regulatory Compliance: Assists organizations in meeting international aviation standards and customer requirements for transparent plastic parts.
Practical Use Cases
- During production, manufacturers rely on ASTM F548-19 to screen out parts with unacceptable cosmetic defects before assembly.
- In maintenance inspections, technicians use the standard to evaluate service-related surface wear and determine the need for repair or replacement.
- For supplier qualification, adherence to this standard demonstrates a commitment to consistent quality and customer-specific requirements.
Related Standards
- ASTM F428 - Standard Test Method for Intensity of Scratches on Aerospace Glass Enclosures: Referenced for comparison and cross-calibration when plastic standards are unavailable.
- International Aviation Standards - Supports harmonization with global quality assurance and product certification efforts.
- ISO Standards for Plastics Inspection - Complements global practices for transparent material evaluation.
Conclusion
Applying ASTM F548-19 ensures the reliable and standardized assessment of scratches on aerospace transparent plastics, facilitating improved quality control, enhanced safety, and greater customer satisfaction. By following this method, aerospace manufacturers, material suppliers, and inspectors can objectively determine scratch intensity, maintain high visual standards, and comply with industry best practices for transparent components. For organizations seeking robust scratch evaluation protocols for transparent plastics, referencing ASTM F548-19 is essential for quality assurance and regulatory compliance in aerospace and related industries.
Buy Documents
ASTM F548-19 - Standard Test Method for Intensity of Scratches on Aerospace Transparent Plastics
REDLINE ASTM F548-19 - Standard Test Method for Intensity of Scratches on Aerospace Transparent Plastics
Get Certified
Connect with accredited certification bodies for this standard

DEKRA North America
DEKRA certification services in North America.

Eagle Registrations Inc.
American certification body for aerospace and defense.

Element Materials Technology
Materials testing and product certification.
Sponsored listings
Frequently Asked Questions
ASTM F548-19 is a standard published by ASTM International. Its full title is "Standard Test Method for Intensity of Scratches on Aerospace Transparent Plastics". This standard covers: SIGNIFICANCE AND USE 4.1 Scratches exist on all transparent plastic surfaces. Usually they are very fine scratches from cleaning operations that are not visible when looking through the plastic. Deeper scratches may result from careless cleaning or handling. While these may not be deep enough to affect the structural integrity of the part, their appearance in certain locations may be distracting to the observer looking through the plastic. Therefore, a procedure to define these scratches is useful. SCOPE 1.1 This test method covers the visual inspection of shallow or superficial scratches on the surface of aerospace transparent plastic materials. 1.2 This standard does not purport to address all of the safety concerns, if any, associated with its use. It is the responsibility of the user of this standard to establish appropriate safety, health, and environmental practices and determine the applicability of regulatory limitations prior to use. 1.3 This international standard was developed in accordance with internationally recognized principles on standardization established in the Decision on Principles for the Development of International Standards, Guides and Recommendations issued by the World Trade Organization Technical Barriers to Trade (TBT) Committee.
SIGNIFICANCE AND USE 4.1 Scratches exist on all transparent plastic surfaces. Usually they are very fine scratches from cleaning operations that are not visible when looking through the plastic. Deeper scratches may result from careless cleaning or handling. While these may not be deep enough to affect the structural integrity of the part, their appearance in certain locations may be distracting to the observer looking through the plastic. Therefore, a procedure to define these scratches is useful. SCOPE 1.1 This test method covers the visual inspection of shallow or superficial scratches on the surface of aerospace transparent plastic materials. 1.2 This standard does not purport to address all of the safety concerns, if any, associated with its use. It is the responsibility of the user of this standard to establish appropriate safety, health, and environmental practices and determine the applicability of regulatory limitations prior to use. 1.3 This international standard was developed in accordance with internationally recognized principles on standardization established in the Decision on Principles for the Development of International Standards, Guides and Recommendations issued by the World Trade Organization Technical Barriers to Trade (TBT) Committee.
ASTM F548-19 is classified under the following ICS (International Classification for Standards) categories: 49.045 - Structure and structure elements. The ICS classification helps identify the subject area and facilitates finding related standards.
ASTM F548-19 has the following relationships with other standards: It is inter standard links to ASTM F548-09(2014), ASTM F428-19, ASTM F428-09(2014), ASTM F428-09, ASTM F428-03a, ASTM F428-83(1997)e1, ASTM F428-01, ASTM F428-03, ASTM F428-83(1997)e2, ASTM F790-23. Understanding these relationships helps ensure you are using the most current and applicable version of the standard.
ASTM F548-19 is available in PDF format for immediate download after purchase. The document can be added to your cart and obtained through the secure checkout process. Digital delivery ensures instant access to the complete standard document.
Standards Content (Sample)
This international standard was developed in accordance with internationally recognized principles on standardization established in the Decision on Principles for the
Development of International Standards, Guides and Recommendations issued by the World Trade Organization Technical Barriers to Trade (TBT) Committee.
Designation: F548 − 19
Standard Test Method for
Intensity of Scratches on Aerospace Transparent Plastics
ThisstandardisissuedunderthefixeddesignationF548;thenumberimmediatelyfollowingthedesignationindicatestheyearoforiginal
adoption or, in the case of revision, the year of last revision.Anumber in parentheses indicates the year of last reapproval.Asuperscript
epsilon (´) indicates an editorial change since the last revision or reapproval.
1. Scope distracting to the observer looking through the plastic.
Therefore, a procedure to define these scratches is useful.
1.1 This test method covers the visual inspection of shallow
or superficial scratches on the surface of aerospace transparent
5. Reference Materials
plastic materials.
NOTE 1—Adjuncts for scratches on plastic are not currently available.
However,adjunctsareavailableforscratchesonglasssurfacesandastudy
1.2 This standard does not purport to address all of the
has been completed to equate the two (see Appendix X1). Refer to Test
safety concerns, if any, associated with its use. It is the
Method F428 for sources of the glass adjuncts.
responsibility of the user of this standard to establish appro-
priate safety, health, and environmental practices and deter-
6. Procedure
mine the applicability of regulatory limitations prior to use.
6.1 Placethepartinasuitableinspectionposition.Thisshall
1.3 This international standard was developed in accor-
be horizontal on a padded table, vertical against a neutral
dance with internationally recognized principles on standard-
background, or at an angle. The scratched surface shall be
ization established in the Decision on Principles for the
toward the observer. The light level shall be a minimum of
Development of International Standards, Guides and Recom-
80 lux. Either natural or artificial light shall be used. Place the
mendations issued by the World Trade Organization Technical
scratch in the ASTM comparison standard beside and parallel
Barriers to Trade (TBT) Committee.
to the scratch to be assessed on the plastic material. Rotate the
part or viewing angle to get the best definition of the scratch.
2. Referenced Documents
Disregarding the length of the scratch on the plastic material
2.1 ASTM Standards:
and on the standard, select and record the highest-numbered
F428 Test Method for Intensity of Scratches on Aerospace
standard scratch that most clearly matches the appearance of
Glass Enclosures
the scratch on the plastic material. Measure and record the
length of the scratch to the nearest 1 mm (0.04 in.).
3. Summary of Test Method
7. Interpretation
3.1 A visual comparison is made between a set of graded
scratch standards and the scratch on the plastic material to 7.1 Customer specifications for transparent plastic materials
determine the relative intensity of the scratch.
and parts shall be used to detail allowable frequency, location,
length, and standard number for scratches and they shall be
4. Significance and Use
used to assign maximum scratch limits for critical and non-
critical optical viewing areas.
4.1 Scratches exist on all transparent plastic surfaces. Usu-
ally they are very fine scratches from cleaning operations that
8. Report
are not visible when looking through the plastic. Deeper
8.1 For each scratch within the scope of the plastic scratch
scratches may result from careless cleaning or handling. While
standard, report its ASTM standard number (for example,
these may not be deep enough to affect the structural integrity
ASTM F548-09), length, frequency, and location.
of the part, their appearance in certain locations may be
9. Precision and Bias
This test method is under the jurisdiction of ASTM Committee F07 on
9.1 Precision:
Aerospace and Aircraft and is the direct responsibility of Subcommittee F07.08 on
9.1.1 The repeatability of judging the intensity of a scratch
Transparent Enclosures and Materials.
within one scratch value, for the same observer, is 92 % or
Current edition approved Nov. 1, 2019. Published November 2019. Originally
better.
approvedin1981.Lastpreviouseditionapprovedin2014asF548 – 0
...
This document is not an ASTM standard and is intended only to provide the user of an ASTM standard an indication of what changes have been made to the previous version. Because
it may not be technically possible to adequately depict all changes accurately, ASTM recommends that users consult prior editions as appropriate. In all cases only the current version
of the standard as published by ASTM is to be considered the official document.
Designation: F548 − 09 (Reapproved 2014) F548 − 19
Standard Test Method for
Intensity of Scratches on Aerospace Transparent Plastics
This standard is issued under the fixed designation F548; the number immediately following the designation indicates the year of original
adoption or, in the case of revision, the year of last revision. A number in parentheses indicates the year of last reapproval. A superscript
epsilon (´) indicates an editorial change since the last revision or reapproval.
1. Scope
1.1 This test method covers the visual inspection of shallow or superficial scratches on the surface of aerospace transparent
plastic materials.
1.2 This standard does not purport to address all of the safety concerns, if any, associated with its use. It is the responsibility
of the user of this standard to establish appropriate safety safety, health, and healthenvironmental practices and determine the
applicability of regulatory limitations prior to use.
1.3 This international standard was developed in accordance with internationally recognized principles on standardization
established in the Decision on Principles for the Development of International Standards, Guides and Recommendations issued
by the World Trade Organization Technical Barriers to Trade (TBT) Committee.
2. Referenced Documents
2.1 ASTM Standards:
F428 Test Method for Intensity of Scratches on Aerospace Glass Enclosures
3. Summary of Test Method
3.1 A visual comparison is made between a set of graded scratch standards and the scratch on the plastic material to determine
the relative intensity of the scratch.
4. Significance and Use
4.1 Scratches exist on all transparent plastic surfaces. Usually they are very fine scratches from cleaning operations that are not
visible when looking through the plastic. Deeper scratches may result from careless cleaning or handling. While these may not be
deep enough to affect the structural integrity of the part, their appearance in certain locations may be distracting to the observer
looking through the plastic. Therefore, a procedure to define these scratches is useful.
5. Reference Materials
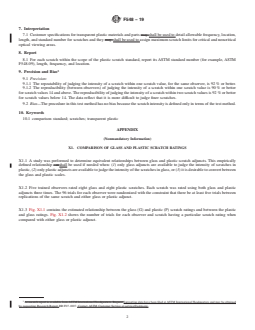
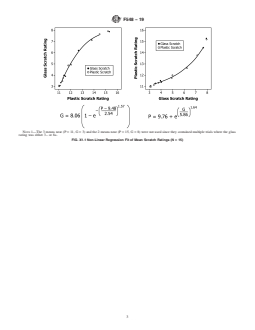
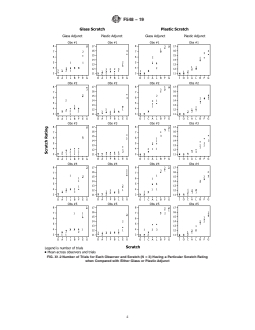
NOTE 1—Adjuncts for scratches on plastic are not currently available. However, adjuncts are available for scratches on glass surfaces and a study has
been donecompleted to equate the two (see Appendix X1the Appendix). ). Refer to Test Method F428 for sources of the glass adjuncts.
6. Procedure
6.1 Place the part in a suitable inspection position. This mayshall be horizontal on a padded table, vertical against a neutral
background, or at an angle. The scratched surface shall be toward the observer. The light level shall be a minimum of 80 lux.
80 lux. Either natural or artificial light mayshall be used. Place the scratch in the ASTM comparison standard beside and parallel
to the scratch to be assessed on the plastic material. Rotate the part or viewing angle to get the best definition of the scratch.
Disregarding the length of the scratch on the plastic material and on the standard, select and record the highest-numbered standard
scratch that most clearly matches the appearance of the scratch on the plastic material. Measure and record the length of the scratch
to the nearest 1 mm (0.04 in.).
This test method is under the jurisdiction of ASTM Committee F07 on Aerospace and Aircraft and is the direct responsibility of Subcommittee F07.08 on Transparent
Enclosures and Materials.
Current edition approved Dec. 1, 2014Nov. 1, 2019. Published December 2014November 2019. Originally publishedapproved in 1981. Last previous edition approved in
20092014 as F548 – 09.F548 – 09(2014). DOI: 10.1520/F0548-09R14.10.1520/F0548-19.
For referenced ASTM standards, visit the ASTM website, www.astm.org, or contact ASTM Customer Service at service@astm.org. For Annual Book of ASTM Standards
volume information, refer to the standard’s Document Summary page on the ASTM website.
Copyright © ASTM International, 100 Barr Harbor Drive, PO Box C700, West Conshohocken, PA 19428-2959. United States
F548 − 19
7. Interpretation
7.1 Customer specifications for transparent plastic materials and parts may shall be used to detail allowab
...

Questions, Comments and Discussion
Ask us and Technical Secretary will try to provide an answer. You can facilitate discussion about the standard in here.
Loading comments...