ASTM F36-15(2021)
(Test Method)Standard Test Method for Compressibility and Recovery of Gasket Materials
Standard Test Method for Compressibility and Recovery of Gasket Materials
ABSTRACT
This test method covers determination of the short-time compressibility and recovery at room temperature of sheet-gasket materials, form-in-place gaskets, and in certain cases, gaskets cut from sheets. The test shall be conducted with both specimen and apparatus at a required temperature. The compressibility and recovery shall be calculated.
SCOPE
1.1 This test method covers determination of the short-time compressibility and recovery at room temperature of sheet-gasket materials, form-in-place gaskets, and in certain cases, gaskets cut from sheets. It is not intended as a test for compressibility under prolonged stress application, generally referred to as “creep,” or for recovery following such prolonged stress application, the inverse of which is generally referred to as “compression set.” Also, it is not intended for tests at other than room temperature. A resiliency characteristic (the amount recovered expressed as a percentage of the compressed thickness) may also be calculated from the test data where desired.
1.2 The values stated in SI units are to be regarded as the standard. The values given in parentheses are for information only.
1.3 This standard does not purport to address all of the safety concerns, if any, associated with its use. It is the responsibility of the user of this standard to establish appropriate safety, health, and environmental practices and determine the applicability of regulatory limitations prior to use.
1.4 This international standard was developed in accordance with internationally recognized principles on standardization established in the Decision on Principles for the Development of International Standards, Guides and Recommendations issued by the World Trade Organization Technical Barriers to Trade (TBT) Committee.
General Information
- Status
- Published
- Publication Date
- 31-Mar-2021
- Technical Committee
- F03 - Gaskets
- Drafting Committee
- F03.20 - Mechanical Test Methods
Relations
- Effective Date
- 01-Jan-2020
- Effective Date
- 01-May-2013
- Effective Date
- 01-Nov-2011
- Effective Date
- 01-Apr-2011
- Effective Date
- 01-Oct-2009
- Effective Date
- 01-Oct-2008
- Effective Date
- 01-Nov-2005
- Effective Date
- 10-Apr-2003
- Effective Date
- 10-Oct-2002
- Effective Date
- 10-Oct-2000
- Effective Date
- 10-May-1999
Overview
ASTM F36-15(2021) - Standard Test Method for Compressibility and Recovery of Gasket Materials is a widely recognized international standard developed by ASTM International. This test method establishes procedures to determine the short-time compressibility and recovery properties of various gasket materials, including sheet-gasket materials, form-in-place gaskets, and in some cases, gaskets cut from sheets. The evaluation occurs at room temperature and provides essential information for qualifying the elasticity and sealing reliability of gasket materials, supporting consistent product quality across industries.
Key Topics
- Compressibility: The reduction in thickness of a gasket specimen when subjected to a specified preload and major load for a short period.
- Recovery: The amount by which the gasket material regains its original thickness after the removal of the major load.
- Test Specimens: Includes single or multiple plies of sheet-gasket materials, cork composition, cork and rubber, cellular rubber, treated/untreated papers, and fluorocarbon polymers, conditioned according to specific procedures.
- Temperature Control: Both the specimen and the test apparatus must be at room temperature (21 to 30°C) during the procedure.
- Reporting: Results include the identification and classification of the tested material, nominal thickness, test procedure, temperature, and numerical results for compressibility and recovery.
Applications
ASTM F36-15(2021) is frequently used in industries where gasket performance is critical, such as:
- Automotive manufacturing: Ensures the reliability and longevity of gaskets in engines and exhaust systems.
- Aerospace applications: Verifies the standard performance of gasket materials used in aircraft and spacecraft assemblies.
- Industrial machinery: Helps manufacturers and maintenance teams select materials with predictable compressibility and recovery, enhancing safety and reducing the risk of leaks.
- Material qualification and quality control: Provides a standard benchmark for suppliers and buyers to evaluate the resilience and deformation characteristics of nonmetallic gasket materials.
- Compliance and certification: Adoption of the standard supports regulatory compliance and international trade by harmonizing testing methods according to WTO TBT Committee principles.
Related Standards
When employing ASTM F36-15(2021), it is often beneficial to consider related ASTM standards for further material characterization and additional context:
- ASTM F104: Classification system for nonmetallic gasket materials.
- ASTM D3297: Practice for molding and machining tolerances for PTFE resin parts.
- ASTM E691: Practice for conducting an interlaboratory study to determine the precision of a test method.
Practical Value
Implementing ASTM F36-15(2021) in routine testing:
- Enhances confidence in gasket selection for a range of temperatures and loading scenarios.
- Promotes consistency in gasket specification, helping to minimize downtime caused by seal failure.
- Enables manufacturers and users to communicate material properties effectively, aiding in procurement and compliance auditing.
By following this standard, organizations ensure that gasket materials deliver reliable sealing performance, optimize maintenance cycles, and meet the rapidly evolving requirements of modern industrial operations.
Keywords: compressibility, gasket materials, recovery, resiliency, ASTM F36, standard test method, nonmetallic gaskets, material testing, industrial sealing, quality control
Buy Documents
ASTM F36-15(2021) - Standard Test Method for Compressibility and Recovery of Gasket Materials
Frequently Asked Questions
ASTM F36-15(2021) is a standard published by ASTM International. Its full title is "Standard Test Method for Compressibility and Recovery of Gasket Materials". This standard covers: ABSTRACT This test method covers determination of the short-time compressibility and recovery at room temperature of sheet-gasket materials, form-in-place gaskets, and in certain cases, gaskets cut from sheets. The test shall be conducted with both specimen and apparatus at a required temperature. The compressibility and recovery shall be calculated. SCOPE 1.1 This test method covers determination of the short-time compressibility and recovery at room temperature of sheet-gasket materials, form-in-place gaskets, and in certain cases, gaskets cut from sheets. It is not intended as a test for compressibility under prolonged stress application, generally referred to as “creep,” or for recovery following such prolonged stress application, the inverse of which is generally referred to as “compression set.” Also, it is not intended for tests at other than room temperature. A resiliency characteristic (the amount recovered expressed as a percentage of the compressed thickness) may also be calculated from the test data where desired. 1.2 The values stated in SI units are to be regarded as the standard. The values given in parentheses are for information only. 1.3 This standard does not purport to address all of the safety concerns, if any, associated with its use. It is the responsibility of the user of this standard to establish appropriate safety, health, and environmental practices and determine the applicability of regulatory limitations prior to use. 1.4 This international standard was developed in accordance with internationally recognized principles on standardization established in the Decision on Principles for the Development of International Standards, Guides and Recommendations issued by the World Trade Organization Technical Barriers to Trade (TBT) Committee.
ABSTRACT This test method covers determination of the short-time compressibility and recovery at room temperature of sheet-gasket materials, form-in-place gaskets, and in certain cases, gaskets cut from sheets. The test shall be conducted with both specimen and apparatus at a required temperature. The compressibility and recovery shall be calculated. SCOPE 1.1 This test method covers determination of the short-time compressibility and recovery at room temperature of sheet-gasket materials, form-in-place gaskets, and in certain cases, gaskets cut from sheets. It is not intended as a test for compressibility under prolonged stress application, generally referred to as “creep,” or for recovery following such prolonged stress application, the inverse of which is generally referred to as “compression set.” Also, it is not intended for tests at other than room temperature. A resiliency characteristic (the amount recovered expressed as a percentage of the compressed thickness) may also be calculated from the test data where desired. 1.2 The values stated in SI units are to be regarded as the standard. The values given in parentheses are for information only. 1.3 This standard does not purport to address all of the safety concerns, if any, associated with its use. It is the responsibility of the user of this standard to establish appropriate safety, health, and environmental practices and determine the applicability of regulatory limitations prior to use. 1.4 This international standard was developed in accordance with internationally recognized principles on standardization established in the Decision on Principles for the Development of International Standards, Guides and Recommendations issued by the World Trade Organization Technical Barriers to Trade (TBT) Committee.
ASTM F36-15(2021) is classified under the following ICS (International Classification for Standards) categories: 21.140 - Seals, glands. The ICS classification helps identify the subject area and facilitates finding related standards.
ASTM F36-15(2021) has the following relationships with other standards: It is inter standard links to ASTM F104-11(2020), ASTM E691-13, ASTM E691-11, ASTM F104-11, ASTM F104-03(2009), ASTM E691-08, ASTM E691-05, ASTM F104-03, ASTM F104-02e1, ASTM F104-00, ASTM E691-99. Understanding these relationships helps ensure you are using the most current and applicable version of the standard.
ASTM F36-15(2021) is available in PDF format for immediate download after purchase. The document can be added to your cart and obtained through the secure checkout process. Digital delivery ensures instant access to the complete standard document.
Standards Content (Sample)
This international standard was developed in accordance with internationally recognized principles on standardization established in the Decision on Principles for the
Development of International Standards, Guides and Recommendations issued by the World Trade Organization Technical Barriers to Trade (TBT) Committee.
Designation: F36 − 15 (Reapproved 2021)
Standard Test Method for
Compressibility and Recovery of Gasket Materials
This standard is issued under the fixed designation F36; the number immediately following the designation indicates the year of original
adoption or, in the case of revision, the year of last revision.Anumber in parentheses indicates the year of last reapproval.Asuperscript
epsilon (´) indicates an editorial change since the last revision or reapproval.
This standard has been approved for use by agencies of the U.S. Department of Defense.
1. Scope PTFE Resin Parts (Withdrawn 1997)
E691 Practice for Conducting an Interlaboratory Study to
1.1 This test method covers determination of the short-time
Determine the Precision of a Test Method
compressibility and recovery at room temperature of sheet-
F104 Classification System for Nonmetallic Gasket Materi-
gasket materials, form-in-place gaskets, and in certain cases,
als
gaskets cut from sheets. It is not intended as a test for
compressibility under prolonged stress application, generally
3. Apparatus
referred to as “creep,” or for recovery following such pro-
3.1 The testing machine shall consist of the following
longed stress application, the inverse of which is generally
components:
referred to as “compression set.” Also, it is not intended for
3.1.1 Anvil—A hardened and ground surface of 31.7 mm
tests at other than room temperature.Aresiliency characteristic
(1.250 in.) minimum diameter.
(the amount recovered expressed as a percentage of the
3.1.2 Penetrator—A steel cylinder of diameter (within 6
compressed thickness) may also be calculated from the test
0.025 mm (0.001 in.)) specified for the type of material being
data where desired.
tested, with the cylinder end hardened and ground. Penetrator
1.2 The values stated in SI units are to be regarded as the
diameters for various types of gasket materials are as shown in
standard. The values given in parentheses are for information
Table 1, unless otherwise specified.
only.
3.1.3 Dial—An indicating dial, or dials, graduated in 0.025
1.3 This standard does not purport to address all of the mm (0.001 in.) to show the thickness of the specimen during
the test. Readings shall be estimated to the nearest 0.002 mm
safety concerns, if any, associated with its use. It is the
responsibility of the user of this standard to establish appro- (0.0001 in.).
3.1.4 Preload—Apreload which shall include the weight of
priate safety, health, and environmental practices and deter-
the penetrator itself and added weights to give the value
mine the applicability of regulatory limitations prior to use.
specified within 61 %. Preloads for various types of gasket
1.4 This international standard was developed in accor-
materials are as shown in Table 1, unless otherwise specified.
dance with internationally recognized principles on standard-
3.1.5 Loading Device—A device for applying a specified
ization established in the Decision on Principles for the
major load to the upper end of the penetrator, which may
Development of International Standards, Guides and Recom-
consist of an arrangement of dead weights, a hydraulic
mendations issued by the World Trade Organization Technical
cylinder, an air cylinder, or any other device capable of
Barriers to Trade (TBT) Committee.
applying the major load at a slow uniform rate and to an
accuracy of 61 %. The major load shall be in addition to the
2. Referenced Documents
specified preload. Major loads for various types of gasket
2.1 ASTM Standards:
materials are as shown in Table 1, unless otherwise specified.
D3297 Practice for Molding and Machining Tolerances for
4. Test Specimen
4.1 The test specimen in ProceduresAthrough K, inclusive,
This test method is under the jurisdiction ofASTM Committee F03 on Gaskets
as described in Table 1, shall have a minimum area of 6.5 cm
and is the direct responsibility of Subcommittee F03.20 on Mechanical Test 2
(1 in. ) in the form of a square, except in the case of cork
Methods.
composition, and cork and cellular rubber materials, which
Current edition approved April 1, 2021. Published April 2021. Originally
approved in 1951. Redesignated F36 in 1963. Last previous edition approved in shall have a test specimen in the form of a circle 6.5 cm in
2015 as F36 – 15. DOI: 10.1520/F0036-15R21.
For referenced ASTM standards, visit the ASTM website, www.astm.org, or
contact ASTM Customer Service at service@astm.org. For Annual Book of ASTM The last approved version of this historical standard is referenced on
Standards volume information, refer to the standard’s Document Summary page on www.astm.org.
the ASTM website. Contact ASTM for a list of recommended suppliers.
Copyright © ASTM International, 100 Barr Harbor Drive, PO Box C700, West Conshohocken, PA 19428-2959. United States
F36 − 15 (2021)
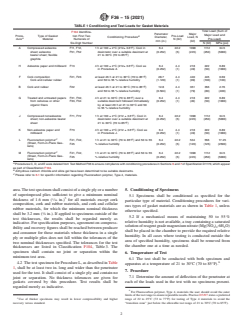
TABLE 1 Conditioning and Test Loads for Gasket Materials
Total Load (Sum of
F104 Identifica-
Penetrator Major
Major Load and
Proce- Type of Gasket tion First Two Pre-Load
B
Conditioning Procedure Diameter, Load, N
A
Pre-Load)
dure Material Numerals of N (lbf)
mm (in.) (lbf)
Six-Digit Number
N (lbf) MPa (psi)
A Compressed asbestos F11, F12, 1 h at 100 ± 2°C (212± 3.6°F). Cool in 6.4 22.2 1090 1112 34.5
sheet; asbestos F51, F52 desiccator over a suitable desiccant at (0.252) (5) (245) (250) (5000)
beater sheet; flexible 21 to 30°C (70 to 85°F)
graphite
H Asbestos paper and millboard F13 4 h at 100 ± 2°C (212± 3.6°F). Cool as 6.4 4.4 218 222 6.89
in Procedure A (0.252) (1) (49) (50) (1000)
F Cork composition F21, F23 at least 46 h at 21 to 30°C (70 to 85°F) 28.7 4.4 440 445 0.69
Cork and cellular rubber and 50 to 55 % relative humidity (1.129) (1) (99) (100) (100)
B Cork and rubber F22 at least 46 h at 21 to 30°C (70 to 85°F) 12.8 4.4 351 356 2.76
and 50 to 55 % relative humidity (0.504) (1) (79) (80) (400)
G Treated and untreated papers F31, F32, 4 h at 21 to 30°C (70 to 85°F) over a 6.4 4.4 218 222 6.89
from cellulose or other F33, F34 suitable desiccant followed immediately (0.252) (1) (49) (50) (1000)
organic fibers by at least 20 h at 21 to 30°C and 50
to 55 % relative humidity
J Compressed nonasbestos F71, F72 1 h at 100 ± 2°C (212 ± 3.6°F). Cool in 6.4 22.2 1090 1112 34.5
sheet; non-asbestos beater desiccator over a suitable desiccant at (0.252) (5) (245) (250) (5000)
sheet 21 to 30°C (70 to 85°F)
K Non-asbestos paper and F73 4 h at 100 ± 2°C (212 ± 3.6°F). Cool as 6.4 4.4 218 222 6.89
millboard in Procedure J. (0.252) (1) (49) (50) (1000)
C
L Fluorocarbon polymer F41, F42, 1 h at 21 to 30°C (70 to 85°F) and 50 to 55 6.4 22.2 534 556 17.25
(Sheet, Form-in-Place Gas-
F45 % relative humidity (0.252) (5) (120) (125) (2500)
kets)
C
M Fluorocarbon polymer F41, F42, 1 h at 21 to 30°C (70 to 85°F) and 50 to 55 6.4 22.2 1090 1112 34.5
(Sheet, Form-in-Place Gas-
F45 % relative humidity (0.252) (5) (245) (250) (5000)
kets)
A
ProceduresC,D,andEweredeletedfromTestMethodF36toensurecompliancewithconditioningproceduresinSections6and7ofSpecificationD1170,whichappear
as part of Classification F104.
B
Anhydrous calcium chloride and silica gel have been determined to be suitable desiccants.
C
Please refer to 6.1 for specific information regarding Fluorocarbon polymer, Type 4, materials.
area.Thetestspecimenshallconsistofasingleplyoranumber 5. Conditioning of Specim
...


Questions, Comments and Discussion
Ask us and Technical Secretary will try to provide an answer. You can facilitate discussion about the standard in here.
Loading comments...