ASTM F1470-24
(Practice)Standard Practice for Fastener Sampling for Specified Mechanical Properties and Performance Inspection
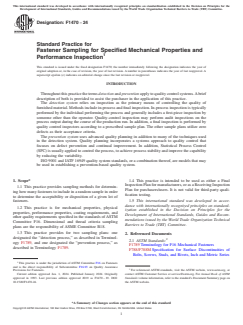
Standard Practice for Fastener Sampling for Specified Mechanical Properties and Performance Inspection
SIGNIFICANCE AND USE
4.1 Sampling shall be selected in a random manner, ensuring that any unit in the lot has an equal chance of being chosen. Sampling should not be localized by selections being taken from the top of a container or from only one container of multi-container lots.
4.2 The purchaser should be aware of the supplier's quality assurance system. This can be accomplished by auditing the supplier's quality system, if qualified auditors are available, or by third-party assessment certification, such as provided by IATF 16949, or ISO 9001.
SCOPE
1.1 This practice provides sampling methods for determining how many fasteners to include in a random sample in order to determine the acceptability or disposition of a given lot of fasteners.
1.2 This practice is for mechanical properties, physical properties, performance properties, coating requirements, and other quality requirements specified in the standards of ASTM Committee F16. Dimensional and thread criteria sampling plans are the responsibility of ASME Committee B18.
1.3 This practice provides for two sampling plans: one designated the “detection process,” as described in Terminology F1789, and one designated the “prevention process,” as described in Terminology F1789.
1.4 This practice is intended to be used as either a Final Inspection Plan for manufacturers, or as a Receiving Inspection Plan for purchasers/users. It is not valid for third-party qualification testing.
1.5 This international standard was developed in accordance with internationally recognized principles on standardization established in the Decision on Principles for the Development of International Standards, Guides and Recommendations issued by the World Trade Organization Technical Barriers to Trade (TBT) Committee.
General Information
- Status
- Published
- Publication Date
- 31-Dec-2023
- Technical Committee
- F16 - Fasteners
- Drafting Committee
- F16.93 - Quality Assurance Provisions for Fasteners
Relations
- Effective Date
- 01-Jan-2024
- Referred By
ASTM B635-00(2023) - Standard Specification for Coatings of Cadmium-Tin Mechanically Deposited - Effective Date
- 01-Jan-2024
- Effective Date
- 01-Jan-2024
- Referred By
ASTM F2832-11(2021) - Standard Guide for Accelerated Corrosion Testing for Mechanical Fasteners - Effective Date
- 01-Jan-2024
- Effective Date
- 01-Jan-2024
- Effective Date
- 01-Jan-2024
- Effective Date
- 01-Jan-2024
- Effective Date
- 01-Jan-2024
- Effective Date
- 01-Jan-2024
- Referred By
ASTM F844-19 - Standard Specification for Washers, Steel, Plain (Flat), Unhardened for General Use - Effective Date
- 01-Jan-2024
- Effective Date
- 01-Jan-2024
- Effective Date
- 01-Jan-2024
- Referred By
ASTM B633-23 - Standard Specification for Electrodeposited Coatings of Zinc on Iron and Steel - Effective Date
- 01-Jan-2024
- Referred By
ASTM A31-14(2020) - Standard Specification for Steel Rivets and Bars for Rivets, Pressure Vessels - Effective Date
- 01-Jan-2024
- Effective Date
- 01-Jan-2024
Overview
ASTM F1470-24: Standard Practice for Fastener Sampling for Specified Mechanical Properties and Performance Inspection is an international standard developed by ASTM Committee F16. This practice outlines procedures for sampling fasteners in order to determine the acceptability or disposition of a lot based on their mechanical, physical, performance properties, and coating requirements. It supports manufacturers, purchasers, and users in achieving consistent fastener quality through both detection and prevention sampling processes.
ASTM F1470-24 is intended for use in final inspection plans by manufacturers and receiving inspection plans by purchasers or users. It is not valid for third-party qualification testing. The standard emphasizes random selection of samples to avoid bias, ensuring that all items in a lot have an equal chance of selection.
Key Topics
Random Sampling Requirements
- All fastener samples must be selected randomly from the entire lot to ensure unbiased inspection.
- Avoid localized sampling from only the top or from a single container of a multi-container lot.
Sampling Plans
- Detection Process: Uses inspection as the primary quality control method, including in-process and final inspections.
- Prevention Process: Focuses on advanced quality planning, integrating methods such as statistical process control to prevent defects and achieve continuous improvement.
Quality Assurance Systems
- Purchasers are encouraged to verify supplier quality systems. Acceptable verification methods include audits by qualified personnel or third-party certifications like ISO 9001 or IATF 16949.
Sample Size Determination
- The standard provides specific guidelines for determining sample sizes based on lot size and fastener characteristics.
Acceptance Criteria
- Lots are accepted if zero nonconforming parts are found in the sample; a single defect results in rejection.
Disposition of Nonconforming Lots
- Options include scrapping, sorting and reworking, concession procedures, or downgrading for alternate applications, always with traceable documentation.
Control of Measuring and Test Equipment
- All measurement and test equipment must be properly controlled and maintained per established quality management standards.
Applications
Manufacturing
- Final Inspection Plans: Manufacturers apply ASTM F1470-24 to confirm each lot meets the required mechanical and performance properties before shipment.
- Quality Control: Supports implementation of robust detection and prevention quality processes, leading to improved overall product reliability.
Procurement and Receiving
- Receiving Inspection Plans: Purchasers use this standard to inspect incoming fastener lots, ensuring compliance and reducing the risk of nonconforming products entering use.
- Supplier Assessment: Enables purchasers to audit or request third-party certification of supplier quality systems.
Industry Sectors
- Automotive, Aerospace, Construction: Ensures critical fastener performance and safety through consistent sampling and inspection practices.
- Distribution: Distributors use the standard to manage the quality and disposition of fasteners within their inventory and supply chain.
Related Standards
- ASTM F1789: Terminology for F16 Mechanical Fasteners
- ASTM F788/F788M, F812/F812M: Specifications for surface discontinuities on bolts, screws, studs, nuts, and rivets
- ASME B18.18 Series: Inspection and quality assurance plans for fasteners
- ISO 9001: Quality Management Systems - Requirements
- IATF 16949: Quality management systems for automotive production
- ASQ Q9001: Quality management systems guidelines
For those involved in fastener manufacturing, quality assurance, and procurement, ASTM F1470-24 provides a comprehensive and reliable framework for fastener sampling, supporting compliance with international quality standards and promoting consistent, high-quality outcomes in fastening applications.
Buy Documents
ASTM F1470-24 - Standard Practice for Fastener Sampling for Specified Mechanical Properties and Performance Inspection
REDLINE ASTM F1470-24 - Standard Practice for Fastener Sampling for Specified Mechanical Properties and Performance Inspection
Get Certified
Connect with accredited certification bodies for this standard

IMP NDT d.o.o.
Non-destructive testing services. Radiography, ultrasonic, magnetic particle, penetrant, visual inspection.

Inštitut za kovinske materiale in tehnologije
Institute of Metals and Technology. Materials testing, metallurgical analysis, NDT.

Q Techna d.o.o.
NDT and quality assurance specialist. 30+ years experience. NDT personnel certification per ISO 9712, nuclear and thermal power plant inspections, QA/
Sponsored listings
Frequently Asked Questions
ASTM F1470-24 is a standard published by ASTM International. Its full title is "Standard Practice for Fastener Sampling for Specified Mechanical Properties and Performance Inspection". This standard covers: SIGNIFICANCE AND USE 4.1 Sampling shall be selected in a random manner, ensuring that any unit in the lot has an equal chance of being chosen. Sampling should not be localized by selections being taken from the top of a container or from only one container of multi-container lots. 4.2 The purchaser should be aware of the supplier's quality assurance system. This can be accomplished by auditing the supplier's quality system, if qualified auditors are available, or by third-party assessment certification, such as provided by IATF 16949, or ISO 9001. SCOPE 1.1 This practice provides sampling methods for determining how many fasteners to include in a random sample in order to determine the acceptability or disposition of a given lot of fasteners. 1.2 This practice is for mechanical properties, physical properties, performance properties, coating requirements, and other quality requirements specified in the standards of ASTM Committee F16. Dimensional and thread criteria sampling plans are the responsibility of ASME Committee B18. 1.3 This practice provides for two sampling plans: one designated the “detection process,” as described in Terminology F1789, and one designated the “prevention process,” as described in Terminology F1789. 1.4 This practice is intended to be used as either a Final Inspection Plan for manufacturers, or as a Receiving Inspection Plan for purchasers/users. It is not valid for third-party qualification testing. 1.5 This international standard was developed in accordance with internationally recognized principles on standardization established in the Decision on Principles for the Development of International Standards, Guides and Recommendations issued by the World Trade Organization Technical Barriers to Trade (TBT) Committee.
SIGNIFICANCE AND USE 4.1 Sampling shall be selected in a random manner, ensuring that any unit in the lot has an equal chance of being chosen. Sampling should not be localized by selections being taken from the top of a container or from only one container of multi-container lots. 4.2 The purchaser should be aware of the supplier's quality assurance system. This can be accomplished by auditing the supplier's quality system, if qualified auditors are available, or by third-party assessment certification, such as provided by IATF 16949, or ISO 9001. SCOPE 1.1 This practice provides sampling methods for determining how many fasteners to include in a random sample in order to determine the acceptability or disposition of a given lot of fasteners. 1.2 This practice is for mechanical properties, physical properties, performance properties, coating requirements, and other quality requirements specified in the standards of ASTM Committee F16. Dimensional and thread criteria sampling plans are the responsibility of ASME Committee B18. 1.3 This practice provides for two sampling plans: one designated the “detection process,” as described in Terminology F1789, and one designated the “prevention process,” as described in Terminology F1789. 1.4 This practice is intended to be used as either a Final Inspection Plan for manufacturers, or as a Receiving Inspection Plan for purchasers/users. It is not valid for third-party qualification testing. 1.5 This international standard was developed in accordance with internationally recognized principles on standardization established in the Decision on Principles for the Development of International Standards, Guides and Recommendations issued by the World Trade Organization Technical Barriers to Trade (TBT) Committee.
ASTM F1470-24 is classified under the following ICS (International Classification for Standards) categories: 19.060 - Mechanical testing. The ICS classification helps identify the subject area and facilitates finding related standards.
ASTM F1470-24 has the following relationships with other standards: It is inter standard links to ASTM F1470-19, ASTM B635-00(2023), ASTM F2833-11(2017), ASTM F2832-11(2021), ASTM F959/F959M-17a(2023), ASTM F3329-18, ASTM F468M-06(2018), ASTM F3148-17a, ASTM B994/B994M-22, ASTM F844-19, ASTM A962/A962M-23a, ASTM F912-11(2017), ASTM B633-23, ASTM A31-14(2020), ASTM A574-21. Understanding these relationships helps ensure you are using the most current and applicable version of the standard.
ASTM F1470-24 is available in PDF format for immediate download after purchase. The document can be added to your cart and obtained through the secure checkout process. Digital delivery ensures instant access to the complete standard document.
Standards Content (Sample)
This international standard was developed in accordance with internationally recognized principles on standardization established in the Decision on Principles for the
Development of International Standards, Guides and Recommendations issued by the World Trade Organization Technical Barriers to Trade (TBT) Committee.
Designation: F1470 − 24
Standard Practice for
Fastener Sampling for Specified Mechanical Properties and
Performance Inspection
This standard is issued under the fixed designation F1470; the number immediately following the designation indicates the year of
original adoption or, in the case of revision, the year of last revision. A number in parentheses indicates the year of last reapproval. A
superscript epsilon (´) indicates an editorial change since the last revision or reapproval.
INTRODUCTION
Throughout this practice the terms detection and prevention apply to quality control systems. A brief
description of both is provided to assist the purchaser in the application of this practice.
The detection system relies on inspection as the primary means of controlling the quality of
furnished material. Methods include in-process and final inspection. In-process inspection is typically
performed by the individual performing the process and generally includes a first-piece inspection by
someone other than the operator. Quality-control inspection may perform audit inspections on the
process output during the course of the production run. In addition, a final inspection is performed by
quality control inspectors according to a prescribed sample plan. The other sample plans utilize zero
defects as their acceptance criteria.
The prevention system uses advanced quality planning in addition to many of the techniques used
in the detection system. Quality planning incorporates a systems approach to quality control that
focuses on defect prevention and continual improvement. In addition, Statistical Process Control
(SPC) is usually applied to control the process, to achieve process stability and improve the capability
by reducing the variability.
ISO 9001 and IATF 16949 quality system standards, or a combination thereof, are models that may
be used in establishing a prevention-based quality system.
1. Scope* 1.4 This practice is intended to be used as either a Final
Inspection Plan for manufacturers, or as a Receiving Inspection
1.1 This practice provides sampling methods for determin-
Plan for purchasers/users. It is not valid for third-party quali-
ing how many fasteners to include in a random sample in order
fication testing.
to determine the acceptability or disposition of a given lot of
1.5 This international standard was developed in accor-
fasteners.
dance with internationally recognized principles on standard-
1.2 This practice is for mechanical properties, physical
ization established in the Decision on Principles for the
properties, performance properties, coating requirements, and
Development of International Standards, Guides and Recom-
other quality requirements specified in the standards of ASTM
mendations issued by the World Trade Organization Technical
Committee F16. Dimensional and thread criteria sampling
Barriers to Trade (TBT) Committee.
plans are the responsibility of ASME Committee B18.
1.3 This practice provides for two sampling plans: one
2. Referenced Documents
designated the “detection process,” as described in Terminol-
2.1 ASTM Standards:
ogy F1789, and one designated the “prevention process,” as
F1789 Terminology for F16 Mechanical Fasteners
described in Terminology F1789.
F788/F788M Specification for Surface Discontinuities of
Bolts, Screws, Studs, and Rivets, Inch and Metric Series
This practice is under the jurisdiction of ASTM Committee F16 on Fasteners
and is the direct responsibility of Subcommittee F16.93 on Quality Assurance
Provisions for Fasteners. For referenced ASTM standards, visit the ASTM website, www.astm.org, or
Current edition approved Jan. 1, 2024. Published January 2024. Originally contact ASTM Customer Service at service@astm.org. For Annual Book of ASTM
approved in 1993. Last previous edition approved 2019 as F1470 – 19. DOI: Standards volume information, refer to the standard’s Document Summary page on
10.1520/F1470-24. the ASTM website.
*A Summary of Changes section appears at the end of this standard
Copyright © ASTM International, 100 Barr Harbor Drive, PO Box C700, West Conshohocken, PA 19428-2959. United States
F1470 − 24
F812/F812M Specification for Surface Discontinuities of inspection and test purposes. Purchasers shall retain the right to
Nuts, Inch and Metric Series specify the Prevention or Detection process at the time of
2.2 ASME Standards: inquiry or order (see Table 2).
ASME B18.18.2M Inspection and Quality Assurance for
7. Acceptance Criteria
High-Volume Machine Assembly Fasteners
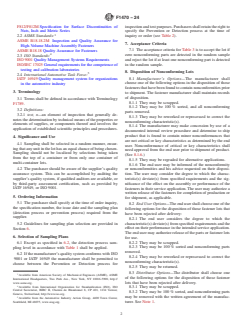
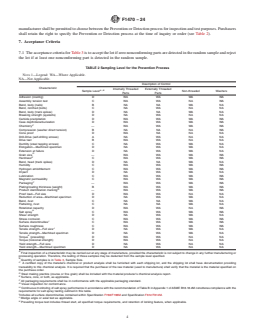
7.1 The acceptance criteria for Table 3 is to accept the lot if
ASME B18.18 Quality Assurance for Fasteners
zero nonconforming parts are detected in the random sample
2.3 ISO Standards:
and reject the lot if at least one nonconforming part is detected
ISO 9001 Quality Management Systems Requirements
in the random sample.
ISO/IEC 17025 General requirements for the competence of
testing and calibration laboratories
8. Disposition of Nonconforming Lots
2.4 International Automotive Task Force:
8.1 Manufacturer’s Options—The manufacturer shall
IATF 16949 Quality management system for organizations
choose one of the following options in the disposition of those
in the automotive industry
fasteners that have been found to contain nonconformities prior
3. Terminology
to shipment. The fastener manufacturer shall maintain records
of disposition.
3.1 Terms shall be defined in accordance with Terminology
8.1.1 They may be scrapped.
F1789.
8.1.2 They may be 100 % sorted, and all nonconforming
3.2 Definitions:
parts removed.
3.2.1 test, n—an element of inspection that generally de-
8.1.3 They may be reworked or reprocessed to correct the
notes the determination by technical means of the properties or
nonconforming characteristic(s).
elements of supplies, or components thereof and involves the
8.1.4 The manufacturer may make concession by use of a
application of established scientific principles and procedures.
documented internal review procedure and determine to ship
product that is found to contain minor nonconformances that
4. Significance and Use
are not critical or key characteristics as determined by the end
4.1 Sampling shall be selected in a random manner, ensur-
user. Nonconformance of critical or key characteristics shall
ing that any unit in the lot has an equal chance of being chosen.
need approval from the end user prior to shipment of product.
Sampling should not be localized by selections being taken
(See 8.1.6.)
from the top of a container or from only one container of
8.1.5 They may be regraded for alternative applications.
multi-container lots.
8.1.6 The end user may be informed of the nonconformity
4.2 The purchaser should be aware of the supplier’s quality or nonconformities and his advice requested on their disposi-
assurance system. This can be accomplished by auditing the tion. The user may consider the degree to which the charac-
supplier’s quality system, if qualified auditors are available, or teristic(s) deviate(s) from specified requirements and the sig-
by third-party assessment certification, such as provided by nificance of the effect on the assembly or performance of the
IATF 16949, or ISO 9001. fasteners in their service application. The user may authorize a
written release of the fasteners for completion of production or
5. Ordering Information
for shipment, as applicable.
5.1 The purchaser shall specify at the time of order inquiry,
8.2 End User Options—The end user shall choose one of the
the specification number, the issue date and the sampling plan
following options for the disposition of those fastener lots that
(detection process or prevention process) required from the
have been rejected after delivery:
supplier.
8.2.1 The end user considers the degree to which the
5.2 Guidelines for sampling plan selection are provided in characteristic(s) deviate(s) from specified requirements and the
Section 6. effect on their performance in the intended service application.
The end user may authorize release of the parts or fastener lots
6. Selection of Sampling Plans
for use.
8.2.2 They may be scrapped.
6.1 Except as specified in 6.2, the detection process sam-
8.2.3 They may be 100 % sorted and nonconforming parts
pling level in accordance with Table 1 shall be applied.
removed.
6.2 If the manufacturer’s quality system conforms with ISO
8.2.4 They may be reworked or reprocessed to correct the
9001 or IATF 16949 the manufacturer shall be permitted to
nonconforming characteristic(s).
choose between the Prevention or Detection process for
8.2.5 They may be returned.
8.3 Distributor Options—The distributor shall choose one
Available from American Society of Mechanical Engineers (ASME), ASME
of the following options for the disposition of those fastener
International Headquarters, Two Park Ave., New York, NY 10016-5990, http://
lots that have been rejected after delivery.
www.asme.org.
Available from International Organization for Standardization (ISO), ISO
8.3.1 They may be scrapped.
Central Secretariat, BIBC II, Chemin de Blandonnet 8, CP 401, 1214 Vernier,
8.3.2 They may be 100 % sorted, and nonconforming parts
Geneva, Switzerland, http://www.iso.org.
may be removed with the written agreement of the manufac-
Available from the Automotive Industry Action Group, 4400 Town Center,
Southfield, MI 48075, www.aiag.org. turer. See Note 1.
F1470 − 24
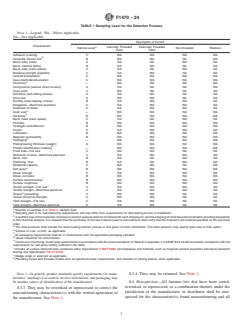
TABLE 1 Sampling Level for the Detection Process
NOTE 1—Legend: WA—Where Applicable.
NA—Not Applicable.
Description of Control
Characteristic
Internally Threaded Externally Threaded
A
Sample Level Non-threaded Washers
Parts Parts
Adhesion (coating) C WA WA WA WA
B
Assembly tension test B WA WA NA WA
Bend, body (nails) A NA NA WA NA
Bend, notched (bolts) B NA WA NA NA
Bend, body (track spikes) C NA NA WA NA
Brea
...
This document is not an ASTM standard and is intended only to provide the user of an ASTM standard an indication of what changes have been made to the previous version. Because
it may not be technically possible to adequately depict all changes accurately, ASTM recommends that users consult prior editions as appropriate. In all cases only the current version
of the standard as published by ASTM is to be considered the official document.
Designation: F1470 − 19 F1470 − 24
Standard Practice for
Fastener Sampling for Specified Mechanical Properties and
Performance Inspection
This standard is issued under the fixed designation F1470; the number immediately following the designation indicates the year of
original adoption or, in the case of revision, the year of last revision. A number in parentheses indicates the year of last reapproval. A
superscript epsilon (´) indicates an editorial change since the last revision or reapproval.
INTRODUCTION
Throughout this practice the terms detection and prevention apply to quality control systems. A brief
description of both is provided to assist the purchaser in the application of this practice.
The detection system relies on inspection as the primary means of controlling the quality of
furnished material. Methods include in-process and final inspection. In-process inspection is typically
performed by the individual performing the process and generally includes a first-piece inspection by
someone other than the operator. Quality-control inspection may perform audit inspections on the
process output during the course of the production run. In addition, a final inspection is performed by
quality control inspectors according to a prescribed sample plan. The other sample plans utilize zero
defects as their acceptance criteria.
The prevention system uses advanced quality planning in addition to many of the techniques used
in the detection system. Quality planning incorporates a systems approach to quality control that
focuses on defect prevention and continual improvement. In addition, Statistical Process Control
(SPC) is usually applied to control the process, to achieve process stability and improve the capability
by reducing the variability.
ISO 9001, ISO/TS 16949, ASQ Q9001, and GuideISO 9001 and IATF F268816949 quality system
standards, or a combination thereof, are models that may be used in establishing a prevention-based
quality system.
1. Scope*
1.1 This practice provides sampling methods for determining how many fasteners to include in a random sample in order to
determine the acceptability or disposition of a given lot of fasteners.
1.2 This practice is for mechanical properties, physical properties, performance properties, coating requirements, and other quality
requirements specified in the standards of ASTM Committee F16. Dimensional and thread criteria sampling plans are the
responsibility of ASME Committees B18.1 and B18.18.2M-B18.18.6M. Committee B18.
1.3 This practice provides for two sampling plans: one designated the “detection process,” as described in Terminology F1789,
and one designated the “prevention process,” as described in Terminology F1789.
1.4 This practice is intended to be used as either a Final Inspection Plan for manufacturers, or as a Receiving Inspection Plan for
purchasers/users. It is not valid for third-party qualification testing.
This practice is under the jurisdiction of ASTM Committee F16 on Fasteners and is the direct responsibility of Subcommittee F16.93 on Quality Assurance Provisions
for Fasteners.
Current edition approved Aug. 1, 2019Jan. 1, 2024. Published August 2019January 2024. Originally approved in 1993. Last previous edition approved 20182019 as
F1470F1470 – 19.–18. DOI: 10.1520/F1470-19.10.1520/F1470-24.
*A Summary of Changes section appears at the end of this standard
Copyright © ASTM International, 100 Barr Harbor Drive, PO Box C700, West Conshohocken, PA 19428-2959. United States
F1470 − 24
1.5 This international standard was developed in accordance with internationally recognized principles on standardization
established in the Decision on Principles for the Development of International Standards, Guides and Recommendations issued
by the World Trade Organization Technical Barriers to Trade (TBT) Committee.
2. Referenced Documents
2.1 ASTM Standards:
F1789 Terminology for F16 Mechanical Fasteners
F788/F788M Specification for Surface Discontinuities of Bolts, Screws, Studs, and Rivets, Inch and Metric Series
F812/F812M Specification for Surface Discontinuities of Nuts, Inch and Metric Series
F2688 Guide for System-Based, Customer-Centered Quality Plan for Manufacturers (Withdrawn 2019)
2.2 ASME Standards:
ASME B18.18.1 Inspection and Quality Assurance for General Purpose Fasteners
ASME B18.18.2M Inspection and Quality Assurance for High-Volume Machine Assembly Fasteners
ASME B18.18.3MB18.18 Inspection and Quality Assurance for Special Purpose Fasteners
ASME B18.18.5M Inspection and Quality Assurance Plan Requiring In-Process Inspection and Controls
ASME B18.18.6M Quality Assurance Plan for Fasteners Produced in Third Party Accreditation System
2.3 ASQ Standards:
ASQ Q9001 Quality Management Systems
2.3 ISO Standards:
ISO 9001 Quality Management Systems Requirements
ISO/TS 16949ISO/IEC 17025 Quality management systems—Particular General requirements for the application of ISO 9001:
2000 for automotive production and relevant service part organizations.competence of testing and calibration laboratories
2.4 International Automotive Task Force:
IATF 16949 Quality management system for organizations in the automotive industry
3. Terminology
3.1 Terms shall be defined in accordance with Terminology F1789.
3.2 Definitions:
3.2.1 test, n—an element of inspection that generally denotes the determination by technical means of the properties or elements
of supplies, or components thereof and involves the application of established scientific principles and procedures.
4. Significance and Use
4.1 Sampling shall be selected in a random manner, ensuring that any unit in the lot has an equal chance of being chosen. Sampling
should not be localized by selections being taken from the top of a container or from only one container of multi-container lots.
4.2 The purchaser should be aware of the supplier’s quality assurance system. This can be accomplished by auditing the supplier’s
quality system, if qualified auditors are available, or by third-party assessment certification, such as provided by ISO/TS 16949,
IATF 16949, or ISO 9001.
5. Ordering Information
5.1 The purchaser shall specify at the time of order inquiry, the specification number, the issue date and the sampling plan
(detection process or prevention process) required from the supplier.
5.2 Guidelines for sampling plan selection are provided in Section 6.
For referenced ASTM standards, visit the ASTM website, www.astm.org, or contact ASTM Customer Service at service@astm.org. For Annual Book of ASTM Standards
volume information, refer to the standard’s Document Summary page on the ASTM website.
Available from American Society of Mechanical Engineers (ASME), ASME International Headquarters, Two Park Ave., New York, NY 10016-5990, http://
www.asme.org.
Available from International Organization for Standardization (ISO), ISO Central Secretariat, BIBC II, Chemin de Blandonnet 8, CP 401, 1214 Vernier, Geneva,
Switzerland, http://www.iso.org.
Available from the Automotive Industry Action Group, 4400 Town Center, Southfield, MI 48075, www.aiag.org.
F1470 − 24
6. Selection of Sampling Plans
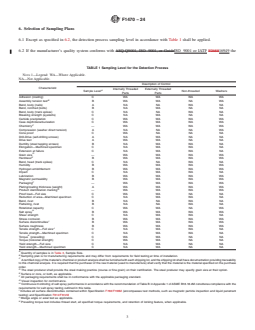
6.1 Except as specified in 6.2, the detection process sampling level in accordance with Table 1 shall be applied.
6.2 If the manufacturer’s quality system conforms with ASQ Q9001, ISO 9001, or GuideISO 9001 or IATF F268816949 the
TABLE 1 Sampling Level for the Detection Process
NOTE 1—Legend: WA—Where Applicable.
NA—Not Applicable.
Description of Control
Characteristic
Internally Threaded Externally Threaded
A
Sample Level Non-threaded Washers
Parts Parts
Adhesion (coating) C WA WA WA WA
B
Assembly tension test B WA WA NA WA
Bend, body (nails) A NA NA WA NA
Bend, notched (bolts) B NA WA NA NA
Bend, body (track spikes) C NA NA WA NA
Breaking strength (eyebolts) C NA WA NA NA
Carbide precipitation C WA WA WA WA
Case depth/decarburization C WA WA WA WA
C
Chemistry — WA WA WA WA
Compression (washer direct tension) A NA NA NA WA
Cone proof C WA NA NA NA
Drill-Drive (self-drilling screws) A NA WA NA NA
Drive test A WA WA NA NA
Ductility (steel tapping screws) B NA WA WA NA
Elongation—Machined specimen C NA WA WA NA
Extension at failure C NA WA WA NA
D
Grain size — WA WA WA WA
E
Hardness B WA WA WA WA
Bend, head (track spikes) C NA NA WA NA
Humidity B WA WA WA WA
Hydrogen embrittlement B WA WA WA WA
Impact C NA WA WA NA
Lubrication B WA WA WA WA
Magnetic permeability B WA WA WA WA
F
Packaging — WA WA WA WA
Plating/coating thickness (weight) A WA WA WA WA
G
Product identification marking — WA WA WA WA
Proof load—Full size C WA WA NA NA
Reduction of area—Machined specimen C NA WA WA NA
Bend, rivet B NA NA WA NA
Flattening, rivet B NA NA WA NA
Rotational capacity C WA WA NA WA
H
Salt spray B WA WA WA WA
Shear strength C NA WA WA NA
Stress corrosion B WA WA WA WA
I
Surface discontinuities B WA WA WA WA
Surface roughness B WA WA WA WA
J
Tensile strength—Full size C NA WA WA NA
Tensile strength—Machined specimen C NA WA WA NA
K
Torque (prevailing) C WA WA NA NA
Torque (torsional strength) C WA WA NA NA
Yield strength—Full size C NA WA NA NA
Yield strength—Machined specimen C NA WA NA NA
A
Quantity of samples is in Table 3, Sample Size.
B
Sampling plan is for manufacturing requirements and may differ from requirements for field testing at time of installation.
C
A certified copy of the material’s chemical or product analysis shall be furnished with each shipping lot, and the shipping lot shall have documentation providing traceability
to this chemical analysis. It is required that the purchaser of the raw material (used to manufacture) shall verify that the material is the material specified on the purchase
order.
D
The steel producer shall provide the steel making practice (course or fine grain) on their certification. The steel producer may specify grain size at their option.
E
Surface or core, or both, as applicable.
F
All packaging requirements shall be in conformance with the applicable packaging standard.
G
Visual inspection for conformance.
H
Continuous monitoring of salt spray performance in accordance with the recommendation of Table B in Appendix 1 of ASME B18.18.2M constitutes compliance with the
requirements for salt spray testing outlined in this table.
I
Includes all surface discontinuities contained within Specification F788/F788M (encompasses test methods, such as magnetic particle inspection and liquid penetrant
testing) and Specification F812/F812M
J
Wedge angle or axial test as applicable.
K
Prevailing torque test includes thread start, all specified torque requirements, and retention of locking feature, when applicable.
F1470 − 24
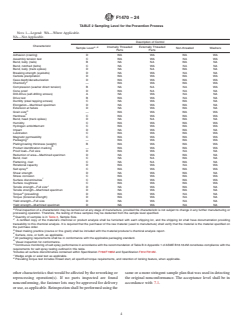
manufacturer shall be permitted to choose b
...
Questions, Comments and Discussion
Ask us and Technical Secretary will try to provide an answer. You can facilitate discussion about the standard in here.
Loading comments...