ASTM D3929-03(2010)e1
(Test Method)Standard Test Method for Evaluating Stress Cracking of Plastics by Adhesives Using the Bent-Beam Method
Standard Test Method for Evaluating Stress Cracking of Plastics by Adhesives Using the Bent-Beam Method
SIGNIFICANCE AND USE
This test method is designed for obtaining a qualitative estimate of the compatibility of plastics and adhesives. Due to the many process variables associated with the fabrication of plastic parts, it is not possible to use this test as a substitute for compatibility tests on actual parts.
The detection of cracks or crazes may be determined with or without optical aid. Make comparisons only among tests employing crack detection methods of equivalent sensitivity.
SCOPE
1.1 This test method describes a procedure for determining the compatibility of adhesives with plastics based on whether the adhesive causes cracking of stressed samples.
1.2 Specimen configurations and test fixture designs are given.
1.3 This test method is suitable for products in the form of sheet or strip. It can also be used on injection molded tensile specimens or flexural bars.
1.4 The values stated in SI units are to be regarded as the standard. The inch-pound units given in parentheses are for information only.
1.5 This standard does not purport to address all of the safety concerns, if any, associated with its use. It is the responsibility of the user of this standard to establish appropriate safety and health practices and determine the applicability of regulatory limitations prior to use.
General Information
Relations
Standards Content (Sample)
NOTICE: This standard has either been superseded and replaced by a new version or withdrawn.
Contact ASTM International (www.astm.org) for the latest information
´1
Designation: D3929 − 03(Reapproved 2010)
Standard Test Method for
Evaluating Stress Cracking of Plastics by Adhesives Using
the Bent-Beam Method
This standard is issued under the fixed designation D3929; the number immediately following the designation indicates the year of
original adoption or, in the case of revision, the year of last revision. A number in parentheses indicates the year of last reapproval. A
superscript epsilon (´) indicates an editorial change since the last revision or reapproval.
´ NOTE—Captions of Figures 3, 4, 5, and 6 were corrected editorially in April 2010.
1. Scope 3. Terminology
1.1 This test method describes a procedure for determining 3.1 Definitions—Many of the terms in this test method are
the compatibility of adhesives with plastics based on whether defined in Terminology D907.
the adhesive causes cracking of stressed samples.
3.2 Definitions of Terms Specific to This Standard:
1.2 Specimen configurations and test fixture designs are 3.2.1 cracking, n—a continuous localized failure of the
given. plastic, leading to loss of structural integrity.
3.2.2 crazing, n—apparent fine cracks at or under the
1.3 This test method is suitable for products in the form of
sheet or strip. It can also be used on injection molded tensile surface of a plastic.
3.2.2.1 Discussion—This is a form of localized yielding of
specimens or flexural bars.
theplasticduetothecombinedactionofstressandanattacking
1.4 The values stated in SI units are to be regarded as the
medium. Initial crazing may be detectable only by inspection
standard. The inch-pound units given in parentheses are for
under magnification.
information only.
3.2.3 failure, n—an arbitrary point defined by the initial
1.5 This standard does not purport to address all of the
detection of cracks or crazes.
safety concerns, if any, associated with its use. It is the
responsibility of the user of this standard to establish appro-
4. Summary of Test Method
priate safety and health practices and determine the applica-
bility of regulatory limitations prior to use.
4.1 This test method involves the qualitative determination
of the compatibility of adhesives with plastics by observing the
2. Referenced Documents
effect of adhesives applied in the liquid state on stressed plastic
2.1 ASTM Standards: specimens. Bars of plastic are bent in a three-point loading
D638 Test Method for Tensile Properties of Plastics fixture to cause a predetermined initial tensile stress on the
D790 Test Methods for Flexural Properties of Unreinforced surface of the bar. The liquid adhesive is then applied to the
area of maximum stress which is checked periodically for
and Reinforced Plastics and Electrical Insulating Materi-
als crazing or cracking.
D907 Terminology of Adhesives 4.1.1 Due to the stress relaxation behavior of certain
plastics, initial stress only can be determined and the stress
level may decrease significantly during the course of the test.
This test method is under the jurisdiction of ASTM Committee D14 on
AdhesivesandisthedirectresponsibilityofSubcommitteeD14.40onAdhesivesfor
Plastics.
5. Significance and Use
Current edition approved April 1, 2010. Published April 2010. Originally
5.1 This test method is designed for obtaining a qualitative
approved in 1980. Last previous edition approved in 2003 as D3929 – 03. DOI:
10.1520/D3929-03R10E01.
estimate of the compatibility of plastics and adhesives. Due to
For referenced ASTM standards, visit the ASTM website, www.astm.org, or
the many process variables associated with the fabrication of
contact ASTM Customer Service at service@astm.org. For Annual Book of ASTM
plastic parts, it is not possible to use this test as a substitute for
Standards volume information, refer to the standard’s Document Summary page on
the ASTM website. compatibility tests on actual parts.
Copyright © ASTM International, 100 Barr Harbor Drive, PO Box C700, West Conshohocken, PA 19428-2959. United States
´1
D3929 − 03 (2010)
7.3 Carefully cut or machine specimens in accordance with
the plastic manufacturers’ recommended procedures to avoid
introducing stresses at machined surfaces.
8. Procedure
8.1 Place the plastic test specimen in the test fixture at the
required loading (see Fig. 6).
8.2 Apply adhesive to be tested to the center point on the
length of the loaded specimen. Cover a specimen length of
approximately 25 mm (1 in.). In general, apply the adhesive
only once, as would be the case in an actual end-use applica-
tion.
8.2.1 Iftheadhesivecontainsasolvent,allowittoevaporate
at a normal rate.
8.2.2 If the adhesive is a curing type, cure in a normal
fashion.
8.2.3 If the adhesive is a hot melt, apply at the normal
application temperature and then allow to cool. This is a less
severe condition than would occur if the adhesive were
continually applied, but is more consistent with situations that
occur in actual adhesive use.
FIG. 1 Test Fixture with Plastic Bar in Place
8.3 Control Specimens—Concurrently run one control
specimen with the test specimens in the same location. Exces-
sive molded-in stresses or airborne solvent vapors may cause
5.2 The detection of cracks or crazes may be determined
stress cracking even without application of adhesive.
with or without optical aid. Make comparisons only among
tests employing crack detection methods of equivalent sensi-
9. Stress Calculations
tivity.
9.1 The equation given below is valid only for specimens of
rectangular cross section at stresses below the elastic limit of
6. Apparatus
the material. The deflection is based on initial stress only. The
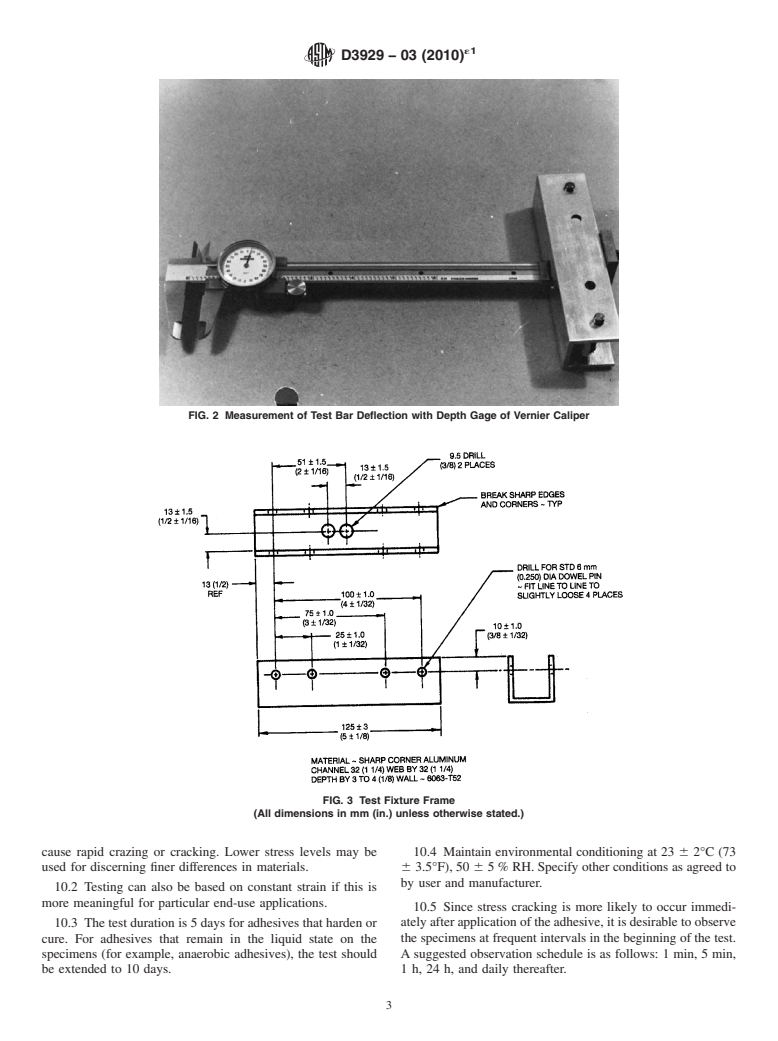
6.1 Test Fixtures—Bent beam test fixtures (see Fig. 1) are
level of stress will normally decrease with time as the plastic
designed to place the specimen in three-point bending. The
undergoes relaxation. Deflection is calculated based on the
amount of deflection is adjustable as well as the loading span.
desired stress level as follows:
Other fixtures may
...


Questions, Comments and Discussion
Ask us and Technical Secretary will try to provide an answer. You can facilitate discussion about the standard in here.