ASTM D5706-23
(Test Method)Standard Test Method for Determining Extreme Pressure Properties of Lubricating Greases Using a High-Frequency, Linear-Oscillation (SRV) Test Machine
Standard Test Method for Determining Extreme Pressure Properties of Lubricating Greases Using a High-Frequency, Linear-Oscillation (SRV) Test Machine
SIGNIFICANCE AND USE
5.1 This laboratory test method can be used to quickly determine extreme pressure properties of lubricating greases at selected temperatures specified for use in applications where high-speed vibrational or start-stop motions are present with high Hertzian point contact. This test method has found wide application in qualifying lubricating greases used in constant velocity joints of front-wheel-drive automobiles. Users of this test method should determine whether results correlate with field performance or other applications.
SCOPE
1.1 This test method covers a procedure for determining extreme pressure properties of lubricating greases under high-frequency linear-oscillation motion using the SRV test machine. This test method can also be used for evaluating extreme pressure properties of lubricating fluid.
1.2 The values stated in SI units are to be regarded as standard. No other units of measurement are included in this standard.
1.3 This standard does not purport to address all of the safety concerns, if any, associated with its use. It is the responsibility of the user of this standard to establish appropriate safety, health, and environmental practices and determine the applicability of regulatory limitations prior to use.
1.4 This international standard was developed in accordance with internationally recognized principles on standardization established in the Decision on Principles for the Development of International Standards, Guides and Recommendations issued by the World Trade Organization Technical Barriers to Trade (TBT) Committee.
General Information
- Status
- Published
- Publication Date
- 30-Nov-2023
- Technical Committee
- D02 - Petroleum Products, Liquid Fuels, and Lubricants
- Drafting Committee
- D02.G0.04 - Functional Tests - Tribology
Relations
- Effective Date
- 01-Dec-2023
- Effective Date
- 01-Nov-2023
- Effective Date
- 01-Nov-2023
- Effective Date
- 15-Dec-2019
- Effective Date
- 01-Dec-2019
- Effective Date
- 01-Dec-2023
- Effective Date
- 01-Dec-2023
- Effective Date
- 01-Dec-2023
- Effective Date
- 01-Dec-2023
- Effective Date
- 01-Dec-2023
- Effective Date
- 01-Dec-2023
- Effective Date
- 01-Dec-2023
- Effective Date
- 01-Dec-2023
- Effective Date
- 01-Dec-2023
- Effective Date
- 01-Dec-2023
Overview
ASTM D5706-23 establishes a standard test method for determining the extreme pressure (EP) properties of lubricating greases using a high-frequency, linear-oscillation (SRV) test machine. This method allows laboratories to quickly and reliably evaluate the load-carrying capacity of greases and lubricating fluids when subjected to conditions that simulate high-speed vibrational or start-stop motion with high Hertzian point contact. The results from this test are particularly important for applications such as constant velocity joints in front-wheel-drive vehicles, where EP performance is critical.
Key Topics
- Extreme Pressure Testing: The test measures the ability of greases to withstand severe loading conditions without failure, focusing on seizure threshold under oscillating point contact.
- SRV Test Machine: The SRV (Schwingung, Reibung, Verschleiß – oscillation, friction, wear) machine provides a controlled environment for linear-oscillation testing, ensuring repeatability and precise data recording.
- Standardized Procedures: The method includes clear instructions for specimen preparation, test execution, and parameters such as stroke length, frequency, test temperatures, and load increments.
- Seizure Detection: Criteria for test failure are based on both friction increase and stroke signal changes, enabling accurate identification of the EP limit.
- Reporting and Interpretation: The standard requires detailed reporting of test parameters and results, including examination of wear scar geometry to validate test integrity.
Applications
ASTM D5706-23 is widely used in the automotive, industrial, and lubricant manufacturing sectors for:
- Grease Qualification: Assessing the suitability of greases for high-stress, oscillating, or vibrational applications, such as front-wheel-drive automotive joints and other high-performance mechanical systems.
- Research and Development: Supporting R&D for lubricants by measuring improvements in EP properties and friction reduction.
- Quality Control: Routine laboratory analysis of grease batches for consistency, compliance with product specifications, and benchmarking against industry standards.
- Comparative Testing: Comparing various lubricating greases or fluids under controlled, repeatable conditions to inform application-specific lubricant selection.
- Field Performance Correlation: Providing laboratory data that can be correlated with real-world performance in dynamic or oscillating equipment.
Related Standards
For comprehensive lubricating grease and lubricant evaluation, consider the following related ASTM standards:
- ASTM D217: Test Methods for Cone Penetration of Lubricating Grease
- ASTM D6425: Test Method for Measuring Friction and Wear Properties of Extreme Pressure (EP) Lubricating Oils Using an SRV Test Machine
- ASTM D7421: Test Method for Determining Extreme Pressure Properties of Lubricating Oils Using High-Frequency, Linear-Oscillation (SRV) Test Machine
- ASTM D4175: Terminology Relating to Petroleum Products, Liquid Fuels, and Lubricants
- DIN EN ISO 683-17: Heat-treated and bearing steel specifications relevant to SRV test specimens
Practical Value
Utilizing ASTM D5706-23 ensures:
- Reliable Data: High repeatability and reproducibility for grease performance evaluation.
- Safety and Suitability: Identification of lubricants that deliver protection under extreme pressure and oscillatory conditions, reducing the potential for mechanical failure.
- Standardization: Consistency in test methodology across laboratories, supporting global quality assurance and product comparison.
- Regulatory Compliance: Alignment with internationally recognized standardization principles and market requirements for lubricant performance.
Adherence to ASTM D5706-23 supports the consistent evaluation and improvement of extreme pressure lubricating greases, enabling performance-driven selection and innovation in demanding mechanical applications.
Buy Documents
ASTM D5706-23 - Standard Test Method for Determining Extreme Pressure Properties of Lubricating Greases Using a High-Frequency, Linear-Oscillation (SRV) Test Machine
REDLINE ASTM D5706-23 - Standard Test Method for Determining Extreme Pressure Properties of Lubricating Greases Using a High-Frequency, Linear-Oscillation (SRV) Test Machine
Get Certified
Connect with accredited certification bodies for this standard

ABS Quality Evaluations Inc.
American Bureau of Shipping quality certification.

Element Materials Technology
Materials testing and product certification.

ABS Group Brazil
ABS Group certification services in Brazil.
Sponsored listings
Frequently Asked Questions
ASTM D5706-23 is a standard published by ASTM International. Its full title is "Standard Test Method for Determining Extreme Pressure Properties of Lubricating Greases Using a High-Frequency, Linear-Oscillation (SRV) Test Machine". This standard covers: SIGNIFICANCE AND USE 5.1 This laboratory test method can be used to quickly determine extreme pressure properties of lubricating greases at selected temperatures specified for use in applications where high-speed vibrational or start-stop motions are present with high Hertzian point contact. This test method has found wide application in qualifying lubricating greases used in constant velocity joints of front-wheel-drive automobiles. Users of this test method should determine whether results correlate with field performance or other applications. SCOPE 1.1 This test method covers a procedure for determining extreme pressure properties of lubricating greases under high-frequency linear-oscillation motion using the SRV test machine. This test method can also be used for evaluating extreme pressure properties of lubricating fluid. 1.2 The values stated in SI units are to be regarded as standard. No other units of measurement are included in this standard. 1.3 This standard does not purport to address all of the safety concerns, if any, associated with its use. It is the responsibility of the user of this standard to establish appropriate safety, health, and environmental practices and determine the applicability of regulatory limitations prior to use. 1.4 This international standard was developed in accordance with internationally recognized principles on standardization established in the Decision on Principles for the Development of International Standards, Guides and Recommendations issued by the World Trade Organization Technical Barriers to Trade (TBT) Committee.
SIGNIFICANCE AND USE 5.1 This laboratory test method can be used to quickly determine extreme pressure properties of lubricating greases at selected temperatures specified for use in applications where high-speed vibrational or start-stop motions are present with high Hertzian point contact. This test method has found wide application in qualifying lubricating greases used in constant velocity joints of front-wheel-drive automobiles. Users of this test method should determine whether results correlate with field performance or other applications. SCOPE 1.1 This test method covers a procedure for determining extreme pressure properties of lubricating greases under high-frequency linear-oscillation motion using the SRV test machine. This test method can also be used for evaluating extreme pressure properties of lubricating fluid. 1.2 The values stated in SI units are to be regarded as standard. No other units of measurement are included in this standard. 1.3 This standard does not purport to address all of the safety concerns, if any, associated with its use. It is the responsibility of the user of this standard to establish appropriate safety, health, and environmental practices and determine the applicability of regulatory limitations prior to use. 1.4 This international standard was developed in accordance with internationally recognized principles on standardization established in the Decision on Principles for the Development of International Standards, Guides and Recommendations issued by the World Trade Organization Technical Barriers to Trade (TBT) Committee.
ASTM D5706-23 is classified under the following ICS (International Classification for Standards) categories: 75.100 - Lubricants, industrial oils and related products. The ICS classification helps identify the subject area and facilitates finding related standards.
ASTM D5706-23 has the following relationships with other standards: It is inter standard links to ASTM D5706-16, ASTM D7421-23, ASTM D6425-23, ASTM D6425-19, ASTM D7421-19, ASTM D8227-20, ASTM D5707-23, ASTM D7217-22, ASTM D8316-20a, ASTM D7420-23, ASTM D8503-23, ASTM D7755-11(2022), ASTM D6185-11(2017), ASTM D8324-21, ASTM D7594-19. Understanding these relationships helps ensure you are using the most current and applicable version of the standard.
ASTM D5706-23 is available in PDF format for immediate download after purchase. The document can be added to your cart and obtained through the secure checkout process. Digital delivery ensures instant access to the complete standard document.
Standards Content (Sample)
This international standard was developed in accordance with internationally recognized principles on standardization established in the Decision on Principles for the
Development of International Standards, Guides and Recommendations issued by the World Trade Organization Technical Barriers to Trade (TBT) Committee.
Designation: D5706 − 23
Standard Test Method for
Determining Extreme Pressure Properties of Lubricating
Greases Using a High-Frequency, Linear-Oscillation (SRV)
Test Machine
This standard is issued under the fixed designation D5706; the number immediately following the designation indicates the year of
original adoption or, in the case of revision, the year of last revision. A number in parentheses indicates the year of last reapproval. A
superscript epsilon (´) indicates an editorial change since the last revision or reapproval.
1. Scope* D6425 Test Method for Measuring Friction and Wear Prop-
erties of Extreme Pressure (EP) Lubricating Oils Using
1.1 This test method covers a procedure for determining
SRV Test Machine
extreme pressure properties of lubricating greases under high-
D7421 Test Method for Determining Extreme Pressure
frequency linear-oscillation motion using the SRV test ma-
Properties of Lubricating Oils Using High-Frequency,
chine. This test method can also be used for evaluating extreme
Linear-Oscillation (SRV) Test Machine
pressure properties of lubricating fluid.
E45 Test Methods for Determining the Inclusion Content of
1.2 The values stated in SI units are to be regarded as
Steel
standard. No other units of measurement are included in this
G40 Terminology Relating to Wear and Erosion
standard.
2.2 Other Standards:
1.3 This standard does not purport to address all of the
DIN 51631:1999 Mineral spirits, special boiling point spir-
safety concerns, if any, associated with its use. It is the
its; requirements
responsibility of the user of this standard to establish appro-
DIN EN ISO 683-17 Heat-treated Steels, alloy steels and
priate safety, health, and environmental practices and deter-
free-cutting steels—Part 17 : Ball and roller bearing steels
mine the applicability of regulatory limitations prior to use.
DIN EN ISO 13565-2:1998 Geometrical Product Specifica-
1.4 This international standard was developed in accor-
tions (GPS)—Surface texture: Profile method; Surfaces
dance with internationally recognized principles on standard-
having stratified functional properties—Part 2: Height
ization established in the Decision on Principles for the
characterization using linear material ratio curve [Re-
Development of International Standards, Guides and Recom-
places DIN 4776:1990: Measurement of surface rough-
mendations issued by the World Trade Organization Technical
ness; parameters R , R , R , M , M for the
K PK VK r1 r2
Barriers to Trade (TBT) Committee.
description of the material portion]
2. Referenced Documents
3. Terminology
2.1 ASTM Standards:
3.1 Definitions:
A295/A295M Specification for High-Carbon Anti-Friction
3.1.1 For definitions of terms used in this test method, refer
Bearing Steel
to Terminology D4175.
D217 Test Methods for Cone Penetration of Lubricating
3.1.2 break-in, n—in tribology, an initial transition process
Grease
occurring in newly established wearing contacts, often accom-
D235 Specification for Mineral Spirits (Petroleum Spirits)
panied by transients in coefficient of friction or wear rate, or
(Hydrocarbon Dry Cleaning Solvent)
both, which are uncharacteristic of the given tribological
D4175 Terminology Relating to Petroleum Products, Liquid
system’s long-term behavior. G40
Fuels, and Lubricants
3.1.3 coeffıcient of friction, μ or f, n—in tribology, the
dimensionless ratio of the friction force (F) between two
This test method is under the jurisdiction of ASTM Committee D02 on
bodies to the normal force (N) pressing these bodies together.
Petroleum Products, Liquid Fuels, and Lubricants and is the direct responsibility of
G40
Subcommittee D02.G0.04 on Functional Tests - Tribology.
Current edition approved Dec. 1, 2023. Published January 2024. Originally
3.1.4 Hertzian contact area, n—the apparent area of contact
approved in 1995. Last previous edition approved in 2016 as D5706 – 16. DOI:
between two nonconforming solid bodies pressed against each
10.1520/D5706-23.
For referenced ASTM standards, visit the ASTM website, www.astm.org, or
contact ASTM Customer Service at service@astm.org. For Annual Book of ASTM
Standards volume information, refer to the standard’s Document Summary page on Available from Deutsches Institut fur Normung e.V.(DIN), Burggrafenstrasse 6,
the ASTM website. 10787 Berlin, Germany, http://www.din.de.
*A Summary of Changes section appears at the end of this standard
Copyright © ASTM International, 100 Barr Harbor Drive, PO Box C700, West Conshohocken, PA 19428-2959. United States
D5706 − 23
other, as calculated from Hertz’s equations of elastic
deformation. G40
3.1.5 Hertzian contact pressure, n—magnitude of the pres-
sure at any specified location in a Hertzian contact area, as
calculated from Hertz’s equations of elastic deformation. The
Hertzian contact pressure can also be calculated and reported
as maximum value P in the centre of the contact or as
max
P as average over the total contact area. D7421
average
3.1.6 lubricant, n—any material interposed between two
surfaces that reduces the friction or wear, or both, between
them.
3.1.7 lubricating grease, n—a semi-fluid to solid product of
a dispersion of a thickener in a liquid lubricant. D217
3.1.7.1 Discussion—The dispersion of the thickener forms a
two-phase system and immobilizes the liquid lubricant by
surface tension and other physical forces. Other ingredients are
FIG. 1 SRV Test Machine, Model III
commonly included to impart special properties.
3.1.8 thickener, n—in lubricating grease, a substance com-
posed of finely divided solid particles dispersed in a liquid
and Appendix X1 for more detailed information). In severe
lubricant to form the grease structure. D217
cases, a stoppage in the motor will occur.
3.1.8.1 Discussion—The thickener can be fibers (such as
3.3 Abbreviations:
various metallic soaps) or plates or spheres (such as certain
3.3.1 SRV, n—Schwingung, Reibung, Verschleiss (German);
non-soap thickeners) which are insoluble or, at most, only very
oscillating, friction, wear (English translation).
slightly soluble in the liquid lubricant. The general require-
ments are that the solid particles be extremely small, uniformly
4. Summary of Test Method
dispersed, and capable of forming a relatively stable, gel-like
structure with the liquid lubricant.
4.1 This test method is performed on an SRV test machine
3.1.9 Ra (C.L.A.), n—in measuring surface finish, the arith- using a steel test ball oscillating against a stationary steel test
disk with lubricant between them. Test load is increased in
metic average of the absolute distances of all profile points
from the mean line for a given distance. 100 N increments until seizure occurs. The load, immediately
prior to the load at which seizure occurs, is measured and
3.1.9.1 Discussion—C.L.A. means center line average, and
it is a synonym for Ra. reported.
3.1.10 Rpk, n—reduced peak height according to DIN EN
NOTE 1—Test frequency, stroke length, temperature, and ball and disk
ISO 13565-2:1998. Rpk is the mean height of the peak sticking material can be varied to simulate field conditions. The test ball yields
point-contact geometry. To obtain line or area contact, test pieces of
out above the core profile section.
differing configurations can be substituted for the test balls.
3.1.11 Rvk, n—reduced valley height according to DIN EN
ISO 13565-2:1998. Rvk is the mean depth of the valley
5. Significance and Use
reaching into the material below the core profile section.
5.1 This laboratory test method can be used to quickly
3.1.12 Rz (DIN), n—in measuring surface finish, the average
determine extreme pressure properties of lubricating greases at
of all Ry values (peak to valley heights) in the assessment
selected temperatures specified for use in applications where
length.
high-speed vibrational or start-stop motions are present with
3.2 Definitions of Terms Specific to This Standard: high Hertzian point contact. This test method has found wide
3.2.1 extreme pressure, adj—in lubrication—characterized application in qualifying lubricating greases used in constant
by metal surfaces in contact under high-stress rubbing condi- velocity joints of front-wheel-drive automobiles. Users of this
tions. test method should determine whether results correlate with
field performance or other applications.
3.2.2 seizure, n—localized fusion of metal between the
rubbing surfaces of the test pieces.
6. Apparatus
3.2.2.1 Discussion—In this test method, seizure is indicated
by a sharp rise in the coefficient of friction, over steady state,
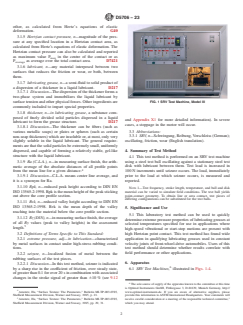
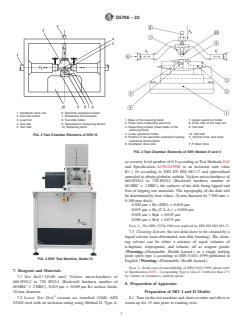
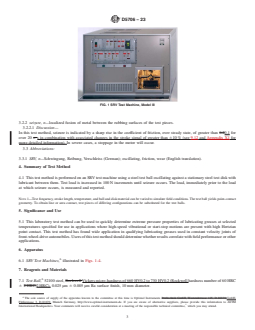
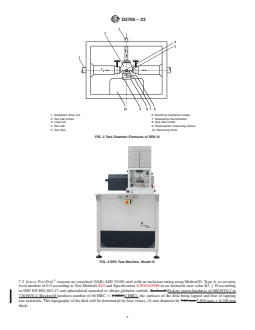
6.1 SRV Test Machines, illustrated in Figs. 1-4.
of greater than 0.1 for over 20 s in combination with associated
changes in the stroke signal of greater than 610 % (see 9.12
The sole source of supply of the apparatus known to the committee at this time
is Optimol Instruments GmbH, Flößergasse 3, D-81639, Munich Germany, http://
Amstutz, Hu, “Surface Texture: The Parameters,” Bulletin MI-TP-003-0785, www.optimol-instruments.de. If you are aware of alternative suppliers, please
Sheffield Measurement Division, Warner and Swasey, 1985, p. 21. provide this information to ASTM International Headquarters. Your comments will
5 1
Amstutz, Hu, “Surface Texture: The Parameters,” Bulletin MI-TP-003-0785, receive careful consideration at a meeting of the responsible technical committee,
Sheffield Measurement Division, Warner and Swasey, 1985, pp. 29, 31. which you may attend.
D5706 − 23
1. Oscillation drive rod 6. Electrical resistance heater
2. Test ball holder 7. Resistance thermometer
1. Base of the receiving block 7. Upper specimen holder
3. Load rod 8. Test disk holder
2. Piezo force measuring elements 8. Drive rods of the load unit
4. Test ball 9. Piezoelectric measuring device
3. Supporting surface (head plate) of the 9. Test disk
5. Test disk 10. Receiving block
receiving block
4. Lower specimen holder 10. Test ball
FIG. 2 Test Chamber Elements of SRV III
5. Position of the electrical resistance heating F Normal force (test load)
n
resistance thermometer
6. Oscillation drive rods F Friction force
f
FIG. 4 Test Chamber Elements of SRV Models IV and V
as severity level number of 0.5 according to Test Methods E45
and Specification A295/A295M or an inclusion sum value
K1 ≤ 10 according to DIN EN ISO 683-17 and spherodized
annealed to obtain globular carbide, Vickers micro-hardness of
660 HV0.2 to 730 HV0.2 (Rockwell hardness number of
60 HRC 6 2 HRC), the surfaces of the disk being lapped and
free of lapping raw materials. The topography of the disk will
be determined by four values, 24 mm diameter by 7.850 mm 6
0.100 mm thick:
0.500 μm < Rz (DIN) < 0.650 μm
0.035 μm < Ra (C.L.A.) < 0.050 μm
0.020 μm < Rpk < 0.035 μm
0.050 μm < Rvk < 0.075 μm
NOTE 2—The DIN 17230-1980 was replaced by DIN EN ISO 683-17.
7.3 Cleaning Solvent, the test disks have to be cleaned by a
liquid solvent (non-chlorinated, non-film forming). The clean-
ing solvent can be either a mixture of equal volumes of
n-heptane, isopropanol, and toluene, all as reagent grades
(Warning—Flammable. Health hazard.) or a single boiling
point spirit type 2 according to DIN 51631:1999 published in
FIG. 3 SRV Test Machine, Model IV
English (Warning—Flammable. Health hazard.)
NOTE 3—In the case of unavailability of DIN 51631:1999, please refer
7. Reagents and Materials
to Specification D235 – 12 regarding Type I, Class C (with less than 2 %
by volume of aromatics), mineral spirits.
7.1 Test Ball, 52100 steel, Vickers micro-hardness of
660 HV0.2 to 730 HV0.2 (Rockwell hardness number of
8. Preparation of Apparatus
60 HRC 6 2 HRC), 0.025 μm 6 0.005 μm Ra surface finish,
10 mm diameter. Preparation of SRV I and II Models
7.2 Lower Test Disk, vacuum arc remelted (VAR) AISI 8.1 Turn on the test machine and chart recorder and allow to
52100 steel with an inclusion rating using Method D, Type A, warm-up for 15 min prior to running tests.
D5706 − 23
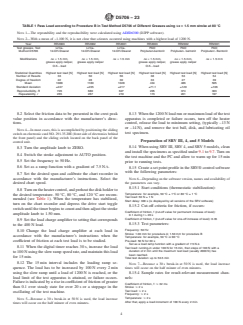
TABLE 1 Pass Load according to Procedure B in Test Method D5706 of Different Greases using Δx = 1.5 mm stroke at 80 °C
NOTE 1—The repeatability and the reproducibility were calculated using ADJD6300 (D2PP software).
NOTE 2—With a mean of ~1.100 N, it is not clear that seizures occurred using machines with a highest load of 1200 N.
Year RR2003 RR2002 RR2001 RR2003 RR2002 RR2001
Test greases, Test Li/Ca- Li/Ca- Li/Ca- PAO PAO PAO
Method D5706 12-OH-Stearat 12-OH-Stearat 12-OH-Stearat Polybuten-bentonit Polybuten- bentonit Polybuten/- Bentonit
Modifications Δx = 1.5 mm, Δx = 1.5 mm, Δx = 1.5 mm Δx = 1.5 mm, Δx = 1.5 mm, Δx = 1.5 mm
grease apply caliper, grease apply caliper grease apply caliper, grease apply caliper
O.K.- load O.K.- load
Statistical Quantities Highest test load [N] Highest test load [N] Highest test load [N] Highest test load [N] Highest test load [N] Highest test load [N]
Number of Results 33 50 56 38 53 54
Degree of freedom 22 28 30 33 27 39
Mean 1088 1180 1028 434 486 505
Standard deviation ±247 ±235 ±217 ±71.1 ±129 ±106
Reproducibility, R 726 680 627 205 374 303
Repeatability, r 265 267 219 173 201 197
8.2 Select the friction data to be presented in the crest peak 8.13 When the 1200 N load run or maximum load of the test
value position in accordance with the manufacturer’s direc- apparatus is completed or failure occurs, turn off the heater
tions. control, release the load to minimum setting, (typically –13 N
or –14 N), and remove the test ball, disk, and lubricating oil
NOTE 4—In most cases, this is accomplished by positioning the sliding
test specimen.
switch on electronic card NO. 291.35.20E (front side of electronics behind
the front panel) and the sliding switch located on the back panel of the
Preparation of SRV III, 4, and 5 Models
control unit.
8.14 When using SRV III, SRV 4, and SRV 5 models, clean
8.3 Turn the amplitude knob to ZERO.
and install the specimens as specified under 9.1 to 9.7. Turn on
8.4 Switch the stroke adjustment to AUTO position.
the test machine and the PC and allow to warm up for 15 min
8.5 Set the frequency to 50 Hz.
prior to running tests.
8.6 Set as a ramp function with a gradient of 7.5 N ⁄s. 8.15 Create a set point profile in the SRV® control software
with the following parameters:
8.7 Set the desired span and calibrate the chart recorder in
accordance with the manufacturer’s instructions. Select the NOTE 6—Depending on the software version, names and availability of
the parameters can vary.
desired chart speed.
8.15.1 Start conditions (thermostatic stabilization):
8.8 Turn on the heater control, and preheat the disk holder to
Temperature: for example, 50 °C ± 1°C or 80 °C ± 1 °C
the desired temperature. 50 °C, 80 °C, and 120 °C are recom-
Test load: 50 N ± 1 N
mended (see Table 1). When the temperature has stabilized,
Start delay: 300 s (is displayed by all versions of the SRV software)
turn on the chart recorder and depress the drive start toggle
8.15.2 Cut-off criteria for friction, if occurs:
switch until the timer begins to count and then adjust the stroke
Coefficient of friction, f (cut-off value for permanent increase of level):
amplitude knob to 1.50 mm.
0.1 during t > 20 s
Coefficient of friction, f (cut-off value for one-off increase of level): 0.35
8.9 Set the load charge amplifier to setting that corresponds
8.15.3 Test parameters:
to the 400 N load.
Frequency: 50 Hz
8.10 Change the load charge amplifier at each load in
Stroke: 1.00 mm for procedure A; 1.50 mm for procedure B
accordance with the manufacturer’s instructions when the
Temperature: for example, 50 °C or 80 °C
coefficient of friction at each test load is to be studied. Pre-load: 50 N for 30 s
Set as a load ramp function with a gradient of 7.5 N ⁄s
8.11 When the digital timer reaches 30 s, increase the load
Test load: running-in under 100 N for 15 min, then steps of 100 N with a
duration of 2 min until the maximum test load (usually 2000 N) has
to 100 N using the slow ramp speed rate, and maintain this load
been reached.
for 15 min.
Total test duration: up to 53.5 min
8.12 The 15 min interval includes the loading ramp se-
NOTE 7—Because a 30 s break-in at 50 N is used, the load in
...
This document is not an ASTM standard and is intended only to provide the user of an ASTM standard an indication of what changes have been made to the previous version. Because
it may not be technically possible to adequately depict all changes accurately, ASTM recommends that users consult prior editions as appropriate. In all cases only the current version
of the standard as published by ASTM is to be considered the official document.
Designation: D5706 − 16 D5706 − 23
Standard Test Method for
Determining Extreme Pressure Properties of Lubricating
Greases Using a High-Frequency, Linear-Oscillation (SRV)
Test Machine
This standard is issued under the fixed designation D5706; the number immediately following the designation indicates the year of
original adoption or, in the case of revision, the year of last revision. A number in parentheses indicates the year of last reapproval. A
superscript epsilon (´) indicates an editorial change since the last revision or reapproval.
1. Scope*
1.1 This test method covers a procedure for determining extreme pressure properties of lubricating greases under high-frequency
linear-oscillation motion using the SRV test machine. This test method can also be used for evaluating extreme pressure properties
of lubricating fluid.
1.2 The values stated in SI units are to be regarded as standard. No other units of measurement are included in this standard.
1.3 This standard does not purport to address all of the safety concerns, if any, associated with its use. It is the responsibility
of the user of this standard to establish appropriate safety and healthsafety, health, and environmental practices and determine
the applicability of regulatory limitations prior to use.
1.4 This international standard was developed in accordance with internationally recognized principles on standardization
established in the Decision on Principles for the Development of International Standards, Guides and Recommendations issued
by the World Trade Organization Technical Barriers to Trade (TBT) Committee.
2. Referenced Documents
2.1 ASTM Standards:
A295/A295M Specification for High-Carbon Anti-Friction Bearing Steel
D217 Test Methods for Cone Penetration of Lubricating Grease
D235 Specification for Mineral Spirits (Petroleum Spirits) (Hydrocarbon Dry Cleaning Solvent)
D4175 Terminology Relating to Petroleum Products, Liquid Fuels, and Lubricants
D6425 Test Method for Measuring Friction and Wear Properties of Extreme Pressure (EP) Lubricating Oils Using SRV Test
Machine
D7421 Test Method for Determining Extreme Pressure Properties of Lubricating Oils Using High-Frequency, Linear-Oscillation
(SRV) Test Machine
E45 Test Methods for Determining the Inclusion Content of Steel
G40 Terminology Relating to Wear and Erosion
2.2 Other Standards:
DIN 51631:1999 Mineral spirits, special boiling point spirits; requirements
DIN EN ISO 683-17 Heat-treated Steels, alloy steels and free-cutting steels—Part 17 : Ball and roller bearing steels
This test method is under the jurisdiction of ASTM Committee D02 on Petroleum Products, Liquid Fuels, and Lubricants and is the direct responsibility of Subcommittee
D02.G0.04 on Functional Tests - Tribology.
Current edition approved Nov. 15, 2016Dec. 1, 2023. Published February 2017January 2024. Originally approved in 1995. Last previous edition approved in 20112016
as D5706 – 11.D5706 – 16. DOI: 10.1520/D5706-16.10.1520/D5706-23.
For referenced ASTM standards, visit the ASTM website, www.astm.org, or contact ASTM Customer Service at service@astm.org. For Annual Book of ASTM Standards
volume information, refer to the standard’s Document Summary page on the ASTM website.
Available from Deutsches Institut fur Normung e.V.(DIN), Burggrafenstrasse 6, 10787 Berlin, Germany, http://www.din.de.
*A Summary of Changes section appears at the end of this standard
Copyright © ASTM International, 100 Barr Harbor Drive, PO Box C700, West Conshohocken, PA 19428-2959. United States
D5706 − 23
DIN EN ISO 13565-2:1998 Geometrical Product Specifications (GPS)—Surface texture: Profile method; Surfaces having
stratified functional properties—Part 2: Height characterization using linear material ratio curve [Replaces DIN 4776:1990:
Measurement of surface roughness; parameters R , R , R , M , M for the description of the material portion]
K PK VK r1 r2
3. Terminology
3.1 Definitions:
3.1.1 For definitions of terms used in this test method, refer to Terminology D4175.
3.1.2 break-in, n—in tribology, an initial transition process occurring in newly established wearing contacts, often accompanied
by transients in coefficient of friction or wear rate, or both, which are uncharacteristic of the given tribological system’s long-term
behavior. G40
3.1.3 coeffıcient of friction, μ or f, n—in tribology, the dimensionless ratio of the friction force (F) between two bodies to the
normal force (N) pressing these bodies together. G40
3.1.4 Hertzian contact area, n—the apparent area of contact between two nonconforming solid bodies pressed against each other,
as calculated from Hertz’s equations of elastic deformation. G40
3.1.5 Hertzian contact pressure, n—magnitude of the pressure at any specified location in a Hertzian contact area, as calculated
from Hertz’s equations of elastic deformation. The Hertzian contact pressure can also be calculated and reported as maximum value
P in the centre of the contact or as P as average over the total contact area. D7421
max average
3.1.6 lubricant, n—any material interposed between two surfaces that reduces the friction or wear, or both, between them. D4175
3.1.7 lubricating grease, n—a semi-fluid to solid product of a dispersion of a thickener in a liquid lubricant. D217
3.1.7.1 Discussion—
The dispersion of the thickener forms a two-phase system and immobilizes the liquid lubricant by surface tension and other
physical forces. Other ingredients are commonly included to impart special properties.
3.1.8 thickener, n—in lubricating grease, a substance composed of finely divided solid particles dispersed in a liquid lubricant to
form the grease structure. D217
3.1.8.1 Discussion—
The thickener can be fibers (such as various metallic soaps) or plates or spheres (such as certain non-soap thickeners) which are
insoluble or, at most, only very slightly soluble in the liquid lubricant. The general requirements are that the solid particles be
extremely small, uniformly dispersed, and capable of forming a relatively stable, gel-like structure with the liquid lubricant.
3.1.9 Ra (C.L.A.), n—in measuring surface finish, the arithmetic average of the absolute distances of all profile points from the
mean line for a given distance.
3.1.9.1 Discussion—
C.L.A. means center line average, and it is a synonym for Ra.
3.1.10 Rpk, n—reduced peak height according to DIN EN ISO 13565-2:1998. Rpk is the mean height of the peak sticking out
above the core profile section.
3.1.11 Rvk, n—reduced valley height according to DIN EN ISO 13565-2:1998. Rvk is the mean depth of the valley reaching into
the material below the core profile section.
3.1.12 Rz (DIN), n—in measuring surface finish, the average of all Ry values (peak to valley heights) in the assessment length.
3.2 Definitions of Terms Specific to This Standard:
3.2.1 extreme pressure, adj—in lubrication—characterized by metal surfaces in contact under high-stress rubbing conditions.
Amstutz, Hu, “Surface Texture: The Parameters,” Bulletin MI-TP-003-0785, Sheffield Measurement Division, Warner and Swasey, 1985, p. 21.
Amstutz, Hu, “Surface Texture: The Parameters,” Bulletin MI-TP-003-0785, Sheffield Measurement Division, Warner and Swasey, 1985, pp. 29, 31.
D5706 − 23
FIG. 1 SRV Test Machine, Model III
3.2.2 seizure, n—localized fusion of metal between the rubbing surfaces of the test pieces.
3.2.2.1 Discussion—
In this test method, seizure is indicated by a sharp rise in the coefficient of friction, over steady state, of greater than 0.20.1 for
over 20 s. s in combination with associated changes in the stroke signal of greater than 610 % (see 9.12 and Appendix X1 for
more detailed information). In severe cases, a stoppage in the motor will occur.
3.3 Abbreviations:
3.3.1 SRV, n—Schwingung, Reibung, Verschleiss (German); oscillating, friction, wear (English translation).
4. Summary of Test Method
4.1 This test method is performed on an SRV test machine using a steel test ball oscillating against a stationary steel test disk with
lubricant between them. Test load is increased in 100 N increments until seizure occurs. The load, immediately prior to the load
at which seizure occurs, is measured and reported.
NOTE 1—Test frequency, stroke length, temperature, and ball and disk material can be varied to simulate field conditions. The test ball yields point-contact
geometry. To obtain line or area contact, test pieces of differing configurations can be substituted for the test balls.
5. Significance and Use
5.1 This laboratory test method can be used to quickly determine extreme pressure properties of lubricating greases at selected
temperatures specified for use in applications where high-speed vibrational or start-stop motions are present with high Hertzian
point contact. This test method has found wide application in qualifying lubricating greases used in constant velocity joints of
front-wheel-drive automobiles. Users of this test method should determine whether results correlate with field performance or other
applications.
6. Apparatus
6.1 SRV Test Machines, illustrated in Figs. 1-4.
7. Reagents and Materials
7.1 Test Ball, 52100 steel, Rockwell Vickers micro-hardness of 660 HV0.2 to 730 HV0.2 (Rockwell hardness number of 60 HRC
6 2 HRC,2 HRC), 0.025 μm 6 0.005 μm Ra surface finish, 10 mm diameter.
The sole source of supply of the apparatus known to the committee at this time is Optimol Instruments Prüftechnik GmbH, Westendstrasse 125, D-80339,GmbH,
Flößergasse 3, D-81639, Munich Germany, http://www.optimol-instruments.de. If you are aware of alternative suppliers, please provide this information to ASTM
International Headquarters. Your comments will receive careful consideration at a meeting of the responsible technical committee, which you may attend.
D5706 − 23
1. Oscillation drive rod 6. Electrical resistance heater
2. Test ball holder 7. Resistance thermometer
3. Load rod 8. Test disk holder
4. Test ball 9. Piezoelectric measuring device
5. Test disk 10. Receiving block
FIG. 2 Test Chamber Elements of SRV III
FIG. 3 SRV Test Machine, Model IV
7.2 Lower Test Disk, vacuum arc remelted (VAR) AISI 52100 steel with an inclusion rating using Method D, Type A, as severity
level number of 0.5 according to Test Methods E45 and Specification A295/A295M or an inclusion sum value K1 ≤ 10 according
to DIN EN ISO 683-17 and spherodized annealed to obtain globular carbide, Rockwell Vickers micro-hardness of 660 HV0.2 to
730 HV0.2 (Rockwell hardness number of 60 HRC 6 2 HRC,2 HRC), the surfaces of the disk being lapped and free of lapping
raw materials. The topography of the disk will be determined by four values, 24 mm diameter by 7.85 mm 7.850 mm 6 0.100 mm
thick:
D5706 − 23
1. Base of the receiving block 7. Upper specimen holder
2. Piezo force measuring elements 8. Drive rods of the load unit
3. Supporting surface (head plate) of the 9. Test disk
receiving block
4. Lower specimen holder 10. Test ball
5. Position of the electrical resistance heating F Normal force (test load)
n
resistance thermometer
6. Oscillation drive rods F Friction force
f
FIG. 4 Test Chamber Elements of SRV Models IV and V
0.5 μm 0.500 μm < Rz (DIN) < 0.650 μm
0.035 μm 0.035 μm < Ra (C.L.A.) < 0.050 μm
0.020 μm 0.020 μm < Rpk < 0.035 μm
0.050 μm 0.050 μm < Rvk < 0.075 μm
NOTE 2—The DIN 17230-1980 was replaced by DIN EN ISO 683-17.
7.3 n-Heptane, reagent grade. (Warning—Flammable. Health hazard.)
7.4 Isopropanol, reagent grade. (Warning—Flammable. Health hazard.)
7.5 Toluene, reagent grade. (Warning—Flammable. Health hazard)
7.3 Cleaning Solvent, the test disks have to be cleaned by a liquid solvent (non-chlorinated, non-film forming). The cleaning
solvent can be either a mixture of equal volumes of n-heptane, isopropanol, and toluene, all as reagent grades (Warning—
Flammable. Health hazard.) or a single boiling point spirit type 2 according to DIN 51631:1999 published in English
(Warning—Flammable. Health hazard.)
NOTE 3—It is recommended to use a mixture of equal volumes In the case of unavailability of nDIN-heptane, isopropanol, and toluene, all as 51631:1999,
please refer to Specification D235reagent grades. ( – 12 regarding TypeWarning—Flammable. Health hazard.) I, Class C (with less than 2 % by volume
of aromatics), mineral spirits.
8. Preparation of Apparatus
Preparation of SRV I and II Models
8.1 Turn on the test machine and chart recorder and allow to warm up warm-up for 15 min prior to running tests.
D5706 − 23
TABLE 1 Pass Load according to Procedure B in Test Method D5706 of Different Greases using Δx = 1.5 mm stroke at 80 °C
NOTE 1—The repeatability and the reproducibility were calculated using ADJD6300 (D2PP software).
NOTE 2—With a mean of ~1.100 N, it is not clear that seizures occurred using machines with a highest load of 1200 N.
Year RR2003 RR2002 RR2001 RR2003 RR2002 RR2001
Test greases, Test Li/Ca- Li/Ca- Li/Ca- PAO PAO PAO
Method D5706 12-OH-Stearat 12-OH-Stearat 12-OH-Stearat Polybuten-bentonit Polybuten- bentonit Polybuten/- Bentonit
Modifications Δx = 1.5 mm, Δx = 1.5 mm, Δx = 1.5 mm Δx = 1.5 mm, Δx = 1.5 mm, Δx = 1.5 mm
grease apply caliper, grease apply caliper grease apply caliper, grease apply caliper
O.K.- load O.K.- load
Statistical Quantities Highest test load [N] Highest test load [N] Highest test load [N] Highest test load [N] Highest test load [N] Highest test load [N]
Number of Results 33 50 56 38 53 54
Degree of freedom 22 28 30 33 27 39
Mean 1088 1180 1028 434 486 505
Standard deviation ±247 ±235 ±217 ±71.1 ±129 ±106
Reproducibility, R 726 680 627 205 374 303
Repeatability, r 265 267 219 173 201 197
8.2 Select the friction data to be presented in the crest peak value position in accordance with the manufacturer’s directions.
NOTE 4—In most cases, this is accomplished by positioning the sliding switch on electronic card NO. 291.35.20E (front side of electronics behind the
front panel) and the sliding switch located on the back panel of the control unit.
8.3 Turn the amplitude knob to ZERO.
8.4 Switch the stroke adjustment to AUTO position.
8.5 Set the frequency to 50 Hz.50 Hz.
8.6 Set as a ramp function with a gradient of 7.5 N ⁄s.
8.7 Set the desired span and calibrate the chart recorder in accordance with the manufacturer’s instructions. Select the desired chart
speed.
8.8 Turn on the heater control, and preheat the disk holder to the desired temperature. 50 °C, 80 °C, and 120 °C are recommended
(see Table 1). When the temperature has stabilized, turn on the chart recorder and depress the drive start toggle switch until the
timer begins to count and then adjust the stroke amplitude knob to 2.00 mm.1.50 mm.
8.9 Set the load charge amplifier to setting that corresponds to the 400 N load.
8.10 Change the load charge amplifier at each load in accordance with the manufacturer’s instructions when the coefficient of
friction at each test load is to be studied.
8.11 When the digital timer reaches 30 s, increase the load to 100 N using the slow ramp speed rate, and maintain this load for
15 min.
8.12 The 15 min interval includes the loading ramp sequence. The load has to be increased by 100 N every 2 min using the slow
ramp until a load of 1200 N is reached, or the load limit of the test apparatus is attained, or failure occurs. Failure is indicated by
a rise in coefficient of friction of greater than 0.20.1 over steady state for over 20 s or a stoppage in the oscillating of the test
machine (see Test Method machine.D5706 or D6425.
NOTE 5—Because a 30 s break-in at 50 N is used, the load increase times will occur on the half minute of even minutes.
D5706 − 23
8.13 When the 1200 N load run or maximum load of the test apparatus is completed or failure occurs, turn off the heater control,
release the load to minimum setting, (typically –13 N or –14 N), and remove the test ball, disk, and lubricating oil test specimen.
Preparation of SRV III, IV, and V4, and 5 Models
8.14 When using SRV III, SRV IV,4, and SRV V5 models, clean and install the specimens as specified under 9.1 to 9.7. Turn on
the test machine and the PC and allow to warm up for 15 min prior to running tests.
8.15 Create a set point profile in the SRVSRV® control software with the following parameters:
NOTE 6—Depending on the software version, names and availability of the parameters can vary.
8.15.1 Start conditions (thermostatic stabilization):
Temperature: for example, 50 °C ± 1 K or 80 °C ± 1 K
Temperature: for example, 50 °C ± 1°C or 80 °C ± 1 °C
Test load: 50 N ± 1 N
Start delay: 300 s (is displayed by all versions of the SRV software)
8.15.2 Cut-off criteria for friction, if occurs:
Coefficient of friction, f (cut-off value for permanent increase of level):
0.3 during t > 20 s
Coefficient of friction, f (cut-off value for permanent increase of level):
0.1 during t > 20 s
Coefficient of friction, f (cut-off value for one-off increase of level): 0.35
8.15.3 Test parameters:
Frequency: 50 Hz
Stroke: 1.00 mm for procedure A with 2 min run-in; 1.50 mm for procedure B with 15 min run-in
Stroke: 1.00 mm for procedure A; 1.50 mm for procedure B
Temperature: for example, 50 °C or 80 °C
Pre-load: 50 N for 30 s
Set as a load ramp function with a gradient of 7.5 N ⁄s
Test load: running-in under 100 N for 15 min, then steps of 100 N with a
duration of 2 min until the maximum test load (usually 2000 N) has
been reached.
Test load: running-in under 100 N for 15 min, then steps of 100 N with a
duration of 2 min until the maximum test load (usually 2000 N) has
been reached.
Total test duration: up to 53.5 min
NOTE 7—Because a 30 s break-in at 50 N is used, the load increase times will occur on the half minute of even minutes.
NOTE 8—For optimal comparability with older SRV models I and II, the test load should be set as a ramp function with a gradient of 7.5 N ⁄s.
8.15.4 Sample rates for result-relevant measuremen
...
Questions, Comments and Discussion
Ask us and Technical Secretary will try to provide an answer. You can facilitate discussion about the standard in here.
Loading comments...