ASTM C1027-19
(Test Method)Standard Test Method for Determining Visible Abrasion Resistance of Glazed Ceramic Tile
Standard Test Method for Determining Visible Abrasion Resistance of Glazed Ceramic Tile
SIGNIFICANCE AND USE
3.1 The abrasion resistance of tile surfaces is determined by rotation of an abrasive load on the surface and the assessment of the resultant wear by means of visual comparison of the abraded test specimens and nonabraded tiles. A staining agent in light oil may be used to help determine whether abrasion surface is likely to result in mechanical entrapment of dirt particles.
SCOPE
1.1 This test method is designed to measure the resistance of tile surfaces to visible surface abrasion.
1.2 This procedure may be used to compare tiles of like color and finish. No provisions are made for comparing tiles of dissimilar colors and/or finishes.
1.3 Certain irregular surfaces may not be evaluated properly by this test method because of wear patterns.
1.4 This procedure does not optimally evaluate loss of gloss with abrasion.
1.5 The values stated in SI units are to be regarded as standard. No other units of measurement are included in this standard.
1.6 This standard does not purport to address all of the safety concerns, if any, associated with its use. It is the responsibility of the user of this standard to establish appropriate safety, health, and environmental practices and determine the applicability of regulatory limitations prior to use.
1.7 This international standard was developed in accordance with internationally recognized principles on standardization established in the Decision on Principles for the Development of International Standards, Guides and Recommendations issued by the World Trade Organization Technical Barriers to Trade (TBT) Committee.
General Information
- Status
- Published
- Publication Date
- 31-May-2019
- Technical Committee
- C21 - Ceramic Whitewares and Related Products
- Drafting Committee
- C21.06 - Ceramic Tile
Relations
- Effective Date
- 01-Jun-2019
- Effective Date
- 01-Jun-2019
Overview
ASTM C1027-19, Standard Test Method for Determining Visible Abrasion Resistance of Glazed Ceramic Tile, is an internationally recognized standard published by ASTM International. This method is designed to evaluate the visible abrasion resistance of glazed ceramic tile surfaces by simulating wear under controlled conditions. The results help manufacturers, specifiers, and consumers understand how glazed ceramic tiles will perform under abrasive forces, ensuring suitable tile selection for varying applications and environments.
The standard outlines procedures for assessing visible surface wear by rotating an abrasive load on tile specimens and evaluating the resultant wear through visual comparison. The use of staining agents assists in determining the potential for dirt entrapment on abraded surfaces.
Key Topics
- Abrasion Resistance Assessment: The method determines the ability of glazed ceramic tiles to resist visible wear, using a mechanical abrasion apparatus and well-defined procedures.
- Test Procedure: Tiles are subjected to rotating abrasive loads under specific weights, with incremental revolution stages to ascertain the threshold at which visible abrasion appears.
- Visual Evaluation: Abraded and unabraded tiles are compared under standardized viewing conditions using a neutral gray, illuminated viewing box for consistent evaluation.
- Stain Resistance: For tiles demonstrating high abrasion resistance, additional staining tests evaluate the ability to resist mechanical entrapment and removal of stains.
- Limitations: The test is valid only for tiles of similar color and finish. It does not account for gloss loss, nor is it optimal for irregular surfaces or for comparing tiles of different finishes or colors.
- Classification System: Tiles are classified into classes (0 to V) based on the abrasion stage at which visible failure is detected, aiding in product specification.
Applications
ASTM C1027-19 is widely utilized in the ceramic tile industry for product development, quality control, and regulatory compliance. Key applications include:
- Product Specification: Architects, designers, and manufacturers specify tile abrasion resistance classes to ensure suitability for residential, commercial, or heavy-traffic installations.
- Comparative Testing: The standard allows comparison of abrasion resistance for tiles of similar color and finish, ensuring product consistency in different lots or batches.
- Consumer Assurance: Clearly defined abrasion resistance classes support end-user confidence in tile performance and longevity.
- Quality Control: Manufacturers use this method to monitor production consistency and maintain high quality standards for glazed ceramic tiles.
- Performance Validation: Facilities managers and building owners use classification data when selecting tiles for spaces subject to varying degrees of foot traffic and maintenance protocols.
Related Standards
When working with ASTM C1027-19 for abrasion resistance of glazed ceramic tiles, the following standards and methods may also be relevant:
- ISO 10545-14: International standard for determining chemical resistance of ceramic tiles, referenced in stain resistance testing within ASTM C1027-19.
- ASTM C373: For determining water absorption, bulk density, apparent porosity, and apparent specific gravity of fired ceramic tile.
- ASTM C650: For chemical resistance of ceramic tile to household cleaners and other chemicals.
- ASTM C499: Standard for dimensional tolerances of ceramic tiles, often used in conjunction with wear resistance measurements.
- EN 154: European guideline for ceramic tiles, including performance and abrasion resistance protocols.
Practical Value
The robust methodology presented in ASTM C1027-19 ensures that stakeholders across the supply chain can reliably assess and compare the visible abrasion resistance of glazed ceramic tiles. By following this standard, industry professionals can meet regulatory requirements, deliver durable products, minimize warranty claims, and provide transparent, comparable data to consumers and clients.
Keywords: ASTM C1027-19, abrasion resistance, glazed ceramic tile, visible abrasion, tile wear, tile testing, ceramic tile standards, tile performance, abrasion classification, quality control
Buy Documents
ASTM C1027-19 - Standard Test Method for Determining Visible Abrasion Resistance of Glazed Ceramic Tile
REDLINE ASTM C1027-19 - Standard Test Method for Determining Visible Abrasion Resistance of Glazed Ceramic Tile
Get Certified
Connect with accredited certification bodies for this standard

ICC Evaluation Service
Building products evaluation and certification.

QAI Laboratories
Building and construction product testing and certification.

Aboma Certification B.V.
Specialized in construction, metal, and transport sectors.
Sponsored listings
Frequently Asked Questions
ASTM C1027-19 is a standard published by ASTM International. Its full title is "Standard Test Method for Determining Visible Abrasion Resistance of Glazed Ceramic Tile". This standard covers: SIGNIFICANCE AND USE 3.1 The abrasion resistance of tile surfaces is determined by rotation of an abrasive load on the surface and the assessment of the resultant wear by means of visual comparison of the abraded test specimens and nonabraded tiles. A staining agent in light oil may be used to help determine whether abrasion surface is likely to result in mechanical entrapment of dirt particles. SCOPE 1.1 This test method is designed to measure the resistance of tile surfaces to visible surface abrasion. 1.2 This procedure may be used to compare tiles of like color and finish. No provisions are made for comparing tiles of dissimilar colors and/or finishes. 1.3 Certain irregular surfaces may not be evaluated properly by this test method because of wear patterns. 1.4 This procedure does not optimally evaluate loss of gloss with abrasion. 1.5 The values stated in SI units are to be regarded as standard. No other units of measurement are included in this standard. 1.6 This standard does not purport to address all of the safety concerns, if any, associated with its use. It is the responsibility of the user of this standard to establish appropriate safety, health, and environmental practices and determine the applicability of regulatory limitations prior to use. 1.7 This international standard was developed in accordance with internationally recognized principles on standardization established in the Decision on Principles for the Development of International Standards, Guides and Recommendations issued by the World Trade Organization Technical Barriers to Trade (TBT) Committee.
SIGNIFICANCE AND USE 3.1 The abrasion resistance of tile surfaces is determined by rotation of an abrasive load on the surface and the assessment of the resultant wear by means of visual comparison of the abraded test specimens and nonabraded tiles. A staining agent in light oil may be used to help determine whether abrasion surface is likely to result in mechanical entrapment of dirt particles. SCOPE 1.1 This test method is designed to measure the resistance of tile surfaces to visible surface abrasion. 1.2 This procedure may be used to compare tiles of like color and finish. No provisions are made for comparing tiles of dissimilar colors and/or finishes. 1.3 Certain irregular surfaces may not be evaluated properly by this test method because of wear patterns. 1.4 This procedure does not optimally evaluate loss of gloss with abrasion. 1.5 The values stated in SI units are to be regarded as standard. No other units of measurement are included in this standard. 1.6 This standard does not purport to address all of the safety concerns, if any, associated with its use. It is the responsibility of the user of this standard to establish appropriate safety, health, and environmental practices and determine the applicability of regulatory limitations prior to use. 1.7 This international standard was developed in accordance with internationally recognized principles on standardization established in the Decision on Principles for the Development of International Standards, Guides and Recommendations issued by the World Trade Organization Technical Barriers to Trade (TBT) Committee.
ASTM C1027-19 is classified under the following ICS (International Classification for Standards) categories: 91.100.25 - Terracotta building products. The ICS classification helps identify the subject area and facilitates finding related standards.
ASTM C1027-19 has the following relationships with other standards: It is inter standard links to ASTM C1027-09(2017), ASTM C1243-93(2015)e2. Understanding these relationships helps ensure you are using the most current and applicable version of the standard.
ASTM C1027-19 is available in PDF format for immediate download after purchase. The document can be added to your cart and obtained through the secure checkout process. Digital delivery ensures instant access to the complete standard document.
Standards Content (Sample)
This international standard was developed in accordance with internationally recognized principles on standardization established in the Decision on Principles for the
Development of International Standards, Guides and Recommendations issued by the World Trade Organization Technical Barriers to Trade (TBT) Committee.
Designation: C1027 − 19
Standard Test Method for
Determining Visible Abrasion Resistance of Glazed Ceramic
Tile
This standard is issued under the fixed designation C1027; the number immediately following the designation indicates the year of
original adoption or, in the case of revision, the year of last revision. A number in parentheses indicates the year of last reapproval. A
superscript epsilon (´) indicates an editorial change since the last revision or reapproval.
1. Scope abraded test specimens and nonabraded tiles. A staining agent
in light oil may be used to help determine whether abrasion
1.1 Thistestmethodisdesignedtomeasuretheresistanceof
surface is likely to result in mechanical entrapment of dirt
tile surfaces to visible surface abrasion.
particles.
1.2 This procedure may be used to compare tiles of like
color and finish. No provisions are made for comparing tiles of
4. Abrasive Load
dissimilar colors and/or finishes.
4.1 The total load on each test specimen consists of the
1.3 Certain irregular surfaces may not be evaluated properly
following:
by this test method because of wear patterns.
4.1.1 Grade 25 chrome steel balls of various diameters:
1.4 This procedure does not optimally evaluate loss of gloss
4.1.1.1 70.0 g of 5-mm diameter steel balls.
with abrasion.
4.1.1.2 52.5 g of 3-mm diameter steel balls.
4.1.1.3 43.75 g of 2-mm diameter steel balls.
1.5 The values stated in SI units are to be regarded as
4.1.1.4 8.75 g of 1-mm diameter steel balls.
standard. No other units of measurement are included in this
4.1.2 3.0 g No. 80 grit aluminum oxide, and
standard.
4.1.3 20 6 0.5-mL demineralized water.
1.6 This standard does not purport to address all of the
safety concerns, if any, associated with its use. It is the
5. Reagents and Apparatus
responsibility of the user of this standard to establish appro-
priate safety, health, and environmental practices and deter-
5.1 AbrasionApparatus—The abrasion apparatus shall con-
mine the applicability of regulatory limitations prior to use.
sist of a steel case with a built-in electrical drive to a horizontal
1.7 This international standard was developed in accor-
supporting plate with positions for a maximum of nine test
dance with internationally recognized principles on standard-
specimens of dimensions at least 100 by 100 mm (see Fig. 1),
ization established in the Decision on Principles for the
but an apparatus with fewer positions may be used. The
Development of International Standards, Guides and Recom-
distance between the center of each position shall be 195 mm.
mendations issued by the World Trade Organization Technical
There shall be equal distance between each adjacent position.
Barriers to Trade (TBT) Committee.
The supporting plate rotates at 300 revolutions/min with an
eccentricity of 22.5 mm so that every part of each test
2. Referenced Documents
specimen describes a circular motion of 45-mm diameter. The
2.1 ISO Standard:
test specimens are held down with the aid of metal holders,
ISO 10545–14
which are provided with rubber seals (see Fig. 2). The internal
diameter of the holders is 83 mm, thus providing a test area of
3. Significance and Use 2
about 54 cm . The thickness of the rubber is 2.5 mm and the
3.1 The abrasion resistance of tile surfaces is determined by
height of the space under the holder is 25.5 mm.The apparatus
rotation of an abrasive load on the surface and the assessment switches off automatically after completion of a preset number
of the resultant wear by means of visual comparison of the
of revolutions. The supporting plate with holders and test
specimens should have a cover during operation.
ThistestmethodisunderthejurisdictionofASTMCommitteeC21onCeramic
5.2 Apparatus for Visual Assessment—A viewing box (see
Whitewares and Related Productsand is the direct responsibility of Subcommittee
Fig. 3) equipped with fluorescent lighting of color temperature
C21.06 on Ceramic Tile.
5000 to 6500K placed vertically above the surface to be
Current edition approved June 1, 2019. Published June 2019. Originally
approved 1984. Last previous edition approved in 2017 as C1027 – 09 (2017). DOI: observed providing 300-lux illumination. The interior of the
10.1520/C1027-19.
box shall be painted a neutral gray.
Available from American National Standards Institute (ANSI), 25 W. 43rd St.,
4th Floor, New York, NY 10036, http://www.ansi.org. 5.3 Drying Oven, capable of operation at (110 + 5)°C.
Copyright © ASTM International, 100 Barr Harbor Drive, PO Box C700, West Conshohocken, PA 19428-2959. United States
C1027 − 19
5.4 10% (v/v) Hydrochloric Acid Solution, prepared by subsequently shall be tested for stain resistance in accordance
adding 263 mL of 38 % hydrochloric acid to 837 mL of with the staining procedure in following section (based on ISO
distilled or demineralized water. 10545-14).
7.1.4 After use, the metal bases and chrome steel ball
bearings should be cleaned with water followed by methylated
6. Test Specimen
spirits and then thoroughly dried to prevent rusting.
6.1 Types of Test Specimens—Test specimens shall be rep-
7.2 Cleaning Procedure—The resistance to staining of the
resentative of the sample. Where tiles have different colors or
decorative effects in parts of the surface, care should be taken abraded tile surfaces is determined by maintaining test solu-
tions and materials in contact with the proper surface of the
to include all distinctive parts.
tiles for a suitable length of time; the surface are then subjected
6.2 The usual facial dimensions of test specimens are 10 cm
to defined cleaning methods, and finally, inspected for visual
by 10 cm, but any size that fits securely in the apparatus shall
change.
suffice (for example, a common “four by four” in. tile shall
7.2.1 Test Specimens—Only one abraded tile is required for
suffice).Test specimens with smaller facial dimensions shall be
each of the abrasion stages to be tested.
fastened close together on a suitable supporting material. Edge
7.2.2 StainingAgents—Greenstainingagentinlightoil and
effects at the narrow joints shall be ignored.
red staining agent in light oil (for green-colored tile only).
6.3 Number of Test Specimens—Eleven test specimens are
7.2.3 Cleaning Agents:
required. Eight test specimens also are required for the visual
7.2.3.1 Hot Water.
assessment. The procedure requires one test specimen for each
7.2.3.2 Weak Cleaning Agent, a commercial agent, not
stage of abrasion, and subsequently, an additional three test
containing abrasive, with a pH of 6.5 to 7.5.
specimens to verify the result at the visual fail point.
7.2.3.3 StrongCleaningAgent, a commercial cleaning agent
6.4 Preparation—The surfaces, of the test specimens to be containing abrasive, with a pH of 9 to 10.
7.2.4 Suggested Solvents:
tested, are to be clean and dry.
7. Procedure
Green staining agent is a paste consisting of 40 % by mass commercial grade
7.1 Abrasion Procedure—Clamp a metal holder on to the
of chrome oxide, Cr O (95 % + chrome oxide) of the following approximate
2 3
glazed surface of each test specimen on the abrasion apparatus.
particle size distribution, suspended in propanetriol monodecanoate dioctanoate
Introduce the abrasive
...
This document is not an ASTM standard and is intended only to provide the user of an ASTM standard an indication of what changes have been made to the previous version. Because
it may not be technically possible to adequately depict all changes accurately, ASTM recommends that users consult prior editions as appropriate. In all cases only the current version
of the standard as published by ASTM is to be considered the official document.
Designation: C1027 − 09 (Reapproved 2017) C1027 − 19
Standard Test Method for
Determining Visible Abrasion Resistance of Glazed Ceramic
Tile
This standard is issued under the fixed designation C1027; the number immediately following the designation indicates the year of
original adoption or, in the case of revision, the year of last revision. A number in parentheses indicates the year of last reapproval. A
superscript epsilon (´) indicates an editorial change since the last revision or reapproval.
1. Scope
1.1 This test method is designed to measure the resistance of tile surfaces to visible surface abrasion. Certain irregular surfaces
may not be evaluated properly by this test method because of wear patterns.
1.2 This procedure does not make provisions for the apparent difference in abrasion values between light and dark colored
tile.may be used to compare tiles of like color and finish. No provisions are made for comparing tiles of dissimilar colors and/or
finishes.
1.3 Certain irregular surfaces may not be evaluated properly by this test method because of wear patterns.
1.4 This procedure does not optimally evaluate loss of gloss with abrasion.
1.5 The values stated in SI units are to be regarded as standard. No other units of measurement are included in this standard.
1.6 This standard does not purport to address all of the safety concerns, if any, associated with its use. It is the responsibility
of the user of this standard to establish appropriate safety, health, and environmental practices and determine the applicability of
regulatory limitations prior to use.
1.7 This international standard was developed in accordance with internationally recognized principles on standardization
established in the Decision on Principles for the Development of International Standards, Guides and Recommendations issued
by the World Trade Organization Technical Barriers to Trade (TBT) Committee.
2. Referenced Documents
2.1 ISO Standard:
ISO 10545–14
3. Significance and Use
3.1 The abrasion resistance of tile surfaces is determined by rotation of an abrasive load on the surface and the assessment of
the resultant wear by means of visual comparison of the abraded test specimens and nonabraded tiles. A staining agent in light oil
may be used to help determine whether abrasion surface is likely to result in mechanical entrapment of dirt particles.
4. Abrasive Load
4.1 The total load on each test specimen consists of the following:
4.1.1 Grade 25 chrome steel balls of various diameters:
4.1.1.1 70.0 g of 5-mm diameter steel balls.
4.1.1.2 52.5 g of 3-mm diameter steel balls.
4.1.1.3 43.75 g of 2-mm diameter steel balls.
4.1.1.4 8.75 g of 1-mm diameter steel balls.
4.1.2 3.0 g No. 80 grit aluminum oxide, and
4.1.3 20 6 0.5-mL demineralized water.
This test method is under the jurisdiction of ASTM Committee C21 on Ceramic Whitewares and Related Productsand is the direct responsibility of Subcommittee C21.06
on Ceramic Tile.
Current edition approved June 1, 2019. Published November 2017June 2019. Originally approved 1984. Last previous edition approved in 20092017 as
C1027 – 09.C1027 – 09 (2017). DOI: 10.1520/C1027-09R17.10.1520/C1027-19.
Available from American National Standards Institute (ANSI), 25 W. 43rd St., 4th Floor, New York, NY 10036, http://www.ansi.org.
Copyright © ASTM International, 100 Barr Harbor Drive, PO Box C700, West Conshohocken, PA 19428-2959. United States
C1027 − 19
5. Reagents and Apparatus
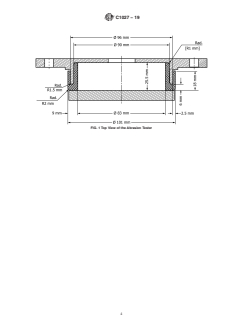
5.1 Abrasion Apparatus—The abrasion apparatus shall consist of a steel case with a built-in electrical drive to a horizontal
supporting plate with positions for a maximum of nine test specimens of dimensions at least 100 by 100 mm (see Fig. 1), but an
apparatus with fewer positions may be used. The distance between the center of each position shall be 195 mm. There shall be
equal distance between each adjacent position. The supporting plate rotates at 300 revolutions/min with an eccentricity of 22.5 mm
so that every part of each test specimen describes a circular motion of 45-mm diameter. The test specimens are held down with
the aid of metal holders, which are provided with rubber seals (see Fig. 2). The internal diameter of the holders is 83 mm, thus
providing a test area of about 54 cm . The thickness of the rubber is 2.5 mm and the height of the space under the holder is 25.5
mm. The apparatus switches off automatically after completion of a preset number of revolutions. The supporting plate with
holders and test specimens should have a cover during operation.
5.2 Apparatus for Visual Assessment—A viewing box (see Fig. 3) equipped with fluorescent lighting of color temperature 5000
to 6500K placed vertically above the surface to be observed providing 300-lux illumination. The interior of the box shall be painted
a neutral gray.
5.3 Drying Oven, capable of operation at (110 + 5)°C.
5.4 10 % (v/v) Hydrochloric Acid Solution, prepared by adding 263 mL of 38 % hydrochloric acid to 837 mL of distilled or
demineralized water.
6. Test Specimen
6.1 Types of Test Specimens—Test specimens shall be representative of the sample. Where tiles have different colors or
decorative effects in parts of the surface, care should be taken to include all distinctive parts.
6.2 The usual facial dimensions of test specimens are 10 cm by 10 cm, but any size that fits securely in the apparatus shall suffice
(for example, a common “four by four” in. tile shall suffice). Test specimens with smaller facial dimensions shall be fastened close
together on a suitable supporting material. Edge effects at the narrow joints shall be ignored.
6.3 Number of Test Specimens—Eleven test specimens are required. Eight test specimens also are required for the visual
assessment. The procedure requires one test specimen for each stage of abrasion, and subsequently, an additional three test
specimens to verify the result at the visual fail point.
6.4 Preparation—The surfaces, of the test specimens to be tested, are to be clean and dry.
7. Procedure
7.1 Abrasion Procedure—Clamp a metal holder on to the glazed surface of each test specimen on the abrasion apparatus.
Introduce the abrasive load, as described in Section 4, into the holder through the hole in its upper surface. The hole may be sealed
to prevent loss from the abrasive load. The number of revolutions of the preset counter for each abrasion stage of the test is 100,
150, 600, 750, 1500, 2100, 6000, and 12 000.
7.1.1 After abrasion, rinse the test specimens under running water and dry in the oven at (110 + 5)°C. If the test specimens are
stained with iron oxide, they may be cleaned with 10 % (v/v) hydrochloric acid, as described in 5.4, before rinsing under running
water and drying.
7.1.2 Evaluation of Surface Abrasion—For visual comparison, a viewing box, as described in 5.2, shall be used (see Fig. 3). The
eight unabraded tile should be cleaned with a soft damp cloth to remove surface dust and after air drying should be placed in a
hollow square pattern in the viewing box. The abraded tile should be placed in the center of the hollow square and the array of
tile should be directly viewed from approximately 2 m at an angle of approximately 40°. The array should not be viewed for more
than 10 s to avoid a studied observation of the surface. The lowest number of abrading cycles that show an apparent visual
difference between the abrading tile and the unabraded tile shall be recorded.
7.1.3 The result is verified by retesting at the abrasion stage when failure is observed and the next higher and lower abrasion
stages. If the result is not the same, the lower of the two abrasion stages shall be used to decide the classification. Abraded tiles,
which have passed 1500, 2100, an
...
Questions, Comments and Discussion
Ask us and Technical Secretary will try to provide an answer. You can facilitate discussion about the standard in here.
Loading comments...