ASTM F2837-11(2018)
(Test Method)Standard Test Method for Hot Compression Properties of Gasket Materials
Standard Test Method for Hot Compression Properties of Gasket Materials
SIGNIFICANCE AND USE
5.1 The hot compression properties of a gasket material, including creep resistance and compression set, are a major factor with regard to the selection of a given material for use in a particular sealing application. The significance of the test method is based, in part; on the assumption that if a material exhibits too much creep at elevated temperature that it will no longer function as effectively as a seal. This assumption can only be used as a guide; however, since exact yield or failure points are difficult to define for gasket materials (which are usually viscoelastic in nature). Two or more materials can be compared to determine differences in their hot compression properties. A sample of material can be compared to an established standard or previously determined characteristics on original lots of the same material, for quality assurance purposes.
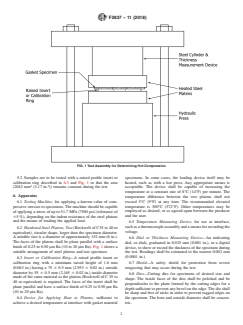
5.2 Samples are to be tested with a raised profile insert or calibration ring described in 6.3 and Fig. 1 so that the area (2042 mm2 (3.17 in.2)) remains constant during the test.
FIG. 1 Test Assembly for Determining Hot Compression
SCOPE
1.1 This test method covers a means of measuring the hot compression properties of a gasket material by measuring its creep under a constant load at both room temperature and while increasing the temperature. Short term creep properties including both cold and hot creep, total creep and compression set of a gasket material can be determined.
1.2 The values stated in SI units are to be regarded as standard. The values given in parentheses are for information only.
1.3 This standard does not purport to address all of the safety concerns, if any, associated with its use. It is the responsibility of the user of this standard to establish appropriate safety, health, and environmental practices and determine the applicability of regulatory limitations prior to use.
1.4 This international standard was developed in accordance with internationally recognized principles on standardization established in the Decision on Principles for the Development of International Standards, Guides and Recommendations issued by the World Trade Organization Technical Barriers to Trade (TBT) Committee.
General Information
- Status
- Published
- Publication Date
- 31-Jul-2018
- Technical Committee
- F03 - Gaskets
- Drafting Committee
- F03.40 - Chemical Test Methods
Relations
- Effective Date
- 01-Aug-2018
- Effective Date
- 01-Jan-2020
- Effective Date
- 01-May-2014
- Effective Date
- 01-May-2013
- Effective Date
- 01-May-2013
- Effective Date
- 01-Nov-2011
- Effective Date
- 01-Apr-2011
- Effective Date
- 01-Oct-2010
- Effective Date
- 01-Oct-2009
- Effective Date
- 01-Oct-2008
- Effective Date
- 01-Oct-2008
- Refers
ASTM E177-06b - Standard Practice for Use of the Terms Precision and Bias in ASTM Test Methods - Effective Date
- 15-Nov-2006
- Refers
ASTM E177-06a - Standard Practice for Use of the Terms Precision and Bias in ASTM Test Methods - Effective Date
- 01-Nov-2006
- Effective Date
- 01-Nov-2005
- Effective Date
- 01-Nov-2004
Overview
ASTM F2837-11(2018) – Standard Test Method for Hot Compression Properties of Gasket Materials is an internationally recognized standard developed by ASTM International. This test method provides a systematic approach to measuring the hot compression properties of gasket materials, focusing on properties such as creep resistance and compression set. These factors are critical when selecting gasket materials for effective and reliable sealing applications, particularly those exposed to elevated temperatures and constant loads.
This standard supports the comparison of short-term creep performance, both at room temperature and under increased thermal conditions, ensuring that material selection for gaskets meets quality assurance requirements and application demands.
Key Topics
- Hot Compression Properties: Measures how gasket materials withstand compressive forces while being exposed to rising temperatures.
- Creep Resistance: Evaluates the ability of a gasket material to resist deformation or "creep" under sustained load and elevated temperature.
- Compression Set: Assesses the permanent deformation remaining after a compressive force is removed, indicating the long-term sealing capability of the material.
- Test Procedure: Involves subjecting gasket specimens to a constant load at ambient and elevated temperatures, utilizing calibrated equipment such as hardened steel platens, calibration rings, and precise thickness measuring devices.
- Quality Assurance: Enables manufacturers and users to compare new materials with established standards or prior batches, ensuring consistent material performance for critical applications.
- Data Reporting: Requires detailed reporting of material identification, testing conditions, measured thicknesses, and results for comprehensive analysis.
Applications
ASTM F2837-11(2018) is vital in various industries where reliable gaskets and seals are essential for operational safety and efficiency. Practical applications include:
- Automotive and Transportation: Selecting gasket materials for engines, exhaust systems, or heat-prone assemblies where hot compression and creep resistance affect performance and lifespan.
- Chemical Processing: Ensuring gasket materials used in process equipment maintain their sealing integrity under fluctuating and often high-temperature conditions.
- Industrial Equipment: Specifying gasket materials for pumps, piping, compressors, and valves where pressure and temperature cycles could compromise sealing performance.
- Quality Control: Supporting manufacturers in quality assurance protocols, comparing new lots of gasket material against specified hot compression and creep benchmarks.
- Material Development: Assisting R&D teams in evaluating and developing advanced nonmetallic gasket materials with enhanced hot compression properties.
Related Standards
For a comprehensive approach to gasket material evaluation and standardization, the following related ASTM standards are commonly referenced alongside ASTM F2837-11(2018):
- ASTM F104: Classification System for Nonmetallic Gasket Materials – Provides a classification framework for various gasket materials, which can be utilized in conjunction with hot compression testing.
- ASTM E691: Practice for Conducting an Interlaboratory Study to Determine the Precision of a Test Method – Ensures the reliability and reproducibility of test results.
- ASTM E177: Practice for Use of the Terms Precision and Bias in ASTM Test Methods – Establishes definitions and guidance for reporting test accuracy and repeatability.
Summary
Implementing ASTM F2837-11(2018) allows organizations to rigorously evaluate the hot compression properties of gasket materials, directly impacting the reliability and longevity of seals in demanding environments. By standardizing testing and reporting practices, this method ensures the selection of optimal sealing materials and supports ongoing material quality assurance and improvement efforts.
Buy Documents
ASTM F2837-11(2018) - Standard Test Method for Hot Compression Properties of Gasket Materials
Frequently Asked Questions
ASTM F2837-11(2018) is a standard published by ASTM International. Its full title is "Standard Test Method for Hot Compression Properties of Gasket Materials". This standard covers: SIGNIFICANCE AND USE 5.1 The hot compression properties of a gasket material, including creep resistance and compression set, are a major factor with regard to the selection of a given material for use in a particular sealing application. The significance of the test method is based, in part; on the assumption that if a material exhibits too much creep at elevated temperature that it will no longer function as effectively as a seal. This assumption can only be used as a guide; however, since exact yield or failure points are difficult to define for gasket materials (which are usually viscoelastic in nature). Two or more materials can be compared to determine differences in their hot compression properties. A sample of material can be compared to an established standard or previously determined characteristics on original lots of the same material, for quality assurance purposes. 5.2 Samples are to be tested with a raised profile insert or calibration ring described in 6.3 and Fig. 1 so that the area (2042 mm2 (3.17 in.2)) remains constant during the test. FIG. 1 Test Assembly for Determining Hot Compression SCOPE 1.1 This test method covers a means of measuring the hot compression properties of a gasket material by measuring its creep under a constant load at both room temperature and while increasing the temperature. Short term creep properties including both cold and hot creep, total creep and compression set of a gasket material can be determined. 1.2 The values stated in SI units are to be regarded as standard. The values given in parentheses are for information only. 1.3 This standard does not purport to address all of the safety concerns, if any, associated with its use. It is the responsibility of the user of this standard to establish appropriate safety, health, and environmental practices and determine the applicability of regulatory limitations prior to use. 1.4 This international standard was developed in accordance with internationally recognized principles on standardization established in the Decision on Principles for the Development of International Standards, Guides and Recommendations issued by the World Trade Organization Technical Barriers to Trade (TBT) Committee.
SIGNIFICANCE AND USE 5.1 The hot compression properties of a gasket material, including creep resistance and compression set, are a major factor with regard to the selection of a given material for use in a particular sealing application. The significance of the test method is based, in part; on the assumption that if a material exhibits too much creep at elevated temperature that it will no longer function as effectively as a seal. This assumption can only be used as a guide; however, since exact yield or failure points are difficult to define for gasket materials (which are usually viscoelastic in nature). Two or more materials can be compared to determine differences in their hot compression properties. A sample of material can be compared to an established standard or previously determined characteristics on original lots of the same material, for quality assurance purposes. 5.2 Samples are to be tested with a raised profile insert or calibration ring described in 6.3 and Fig. 1 so that the area (2042 mm2 (3.17 in.2)) remains constant during the test. FIG. 1 Test Assembly for Determining Hot Compression SCOPE 1.1 This test method covers a means of measuring the hot compression properties of a gasket material by measuring its creep under a constant load at both room temperature and while increasing the temperature. Short term creep properties including both cold and hot creep, total creep and compression set of a gasket material can be determined. 1.2 The values stated in SI units are to be regarded as standard. The values given in parentheses are for information only. 1.3 This standard does not purport to address all of the safety concerns, if any, associated with its use. It is the responsibility of the user of this standard to establish appropriate safety, health, and environmental practices and determine the applicability of regulatory limitations prior to use. 1.4 This international standard was developed in accordance with internationally recognized principles on standardization established in the Decision on Principles for the Development of International Standards, Guides and Recommendations issued by the World Trade Organization Technical Barriers to Trade (TBT) Committee.
ASTM F2837-11(2018) is classified under the following ICS (International Classification for Standards) categories: 21.140 - Seals, glands. The ICS classification helps identify the subject area and facilitates finding related standards.
ASTM F2837-11(2018) has the following relationships with other standards: It is inter standard links to ASTM F2837-11, ASTM F104-11(2020), ASTM E177-14, ASTM E177-13, ASTM E691-13, ASTM E691-11, ASTM F104-11, ASTM E177-10, ASTM F104-03(2009), ASTM E177-08, ASTM E691-08, ASTM E177-06b, ASTM E177-06a, ASTM E691-05, ASTM E177-06. Understanding these relationships helps ensure you are using the most current and applicable version of the standard.
ASTM F2837-11(2018) is available in PDF format for immediate download after purchase. The document can be added to your cart and obtained through the secure checkout process. Digital delivery ensures instant access to the complete standard document.
Standards Content (Sample)
This international standard was developed in accordance with internationally recognized principles on standardization established in the Decision on Principles for the
Development of International Standards, Guides and Recommendations issued by the World Trade Organization Technical Barriers to Trade (TBT) Committee.
Designation: F2837 − 11 (Reapproved 2018)
Standard Test Method for
Hot Compression Properties of Gasket Materials
This standard is issued under the fixed designation F2837; the number immediately following the designation indicates the year of
original adoption or, in the case of revision, the year of last revision. A number in parentheses indicates the year of last reapproval. A
superscript epsilon (´) indicates an editorial change since the last revision or reapproval.
1. Scope T = cold thickness under load (specimen thickness after a
5-min hold under load at room temperature)
1.1 This test method covers a means of measuring the hot
T = hot thickness under load (specimen thickness at maxi-
compression properties of a gasket material by measuring its
mum test temperature under load)
creepunderaconstantloadatbothroomtemperatureandwhile
T = final specimen thickness (after specimen has been
increasing the temperature. Short term creep properties includ-
removed from the machine and cooled)
ing both cold and hot creep, total creep and compression set of
T = original calibration ring thickness
s0
a gasket material can be determined.
T = calibration ring thickness (after a 5-min hold under
s1
1.2 The values stated in SI units are to be regarded as
load at room temperature)
standard. The values given in parentheses are for information
T = calibration ring thickness (at maximum test tempera-
s2
only.
ture under load)
1.3 This standard does not purport to address all of the T = final calibration ring thickness (after specimen has
s3
safety concerns, if any, associated with its use. It is the
been removed from the machine and cooled)
responsibility of the user of this standard to establish appro-
4. Summary of Test Method
priate safety, health, and environmental practices and deter-
mine the applicability of regulatory limitations prior to use.
4.1 Specimens cut from gasket material are subjected to a
1.4 This international standard was developed in accor-
stress perpendicular to the flat surface of the specimen for a
dance with internationally recognized principles on standard-
specified time at room temperature, and then the temperature is
ization established in the Decision on Principles for the
increased at a defined rate while the stress remains constant.
Development of International Standards, Guides and Recom-
The recommended maximum temperature limit for the test is
mendations issued by the World Trade Organization Technical
300°C(572°F).Thedesiredgasketloadforthetestis25.5MPa
Barriers to Trade (TBT) Committee.
(3700 psi). Dimensional changes to the thickness are deter-
mined while the gasket is under stress and after the stress has
2. Referenced Documents
been removed. Tests may be performed on a gasket material at
various temperatures or stresses as agreed upon between the
2.1 ASTM Standards:
producer and the user, to determine the relationship between
E177 Practice for Use of the Terms Precision and Bias in
temperatures at a constant stress.
ASTM Test Methods
E691 Practice for Conducting an Interlaboratory Study to
5. Significance and Use
Determine the Precision of a Test Method
5.1 The hot compression properties of a gasket material,
F104 Classification System for Nonmetallic Gasket Materi-
als including creep resistance and compression set, are a major
factor with regard to the selection of a given material for use in
3. Terminology a particular sealing application. The significance of the test
method is based, in part; on the assumption that if a material
3.1 Symbols: T = original specimen thickness
exhibits too much creep at elevated temperature that it will no
longer function as effectively as a seal. This assumption can
only be used as a guide; however, since exact yield or failure
This test method is under the jurisdiction ofASTM Committee F03 on Gaskets
points are difficult to define for gasket materials (which are
and is the direct responsibility of Subcommittee F03.40 on Chemical Test Methods.
usually viscoelastic in nature). Two or more materials can be
Current edition approved Aug. 1, 2018. Published September 2018. Originally
compared to determine differences in their hot compression
approved in 2010. Last previous edition approved in 2011 as F2837 – 11. DOI:
10.1520/F2837-11R18.
properties. A sample of material can be compared to an
For referenced ASTM standards, visit the ASTM website, www.astm.org, or
established standard or previously determined characteristics
contact ASTM Customer Service at service@astm.org. For Annual Book of ASTM
on original lots of the same material, for quality assurance
Standards volume information, refer to the standard’s Document Summary page on
the ASTM website. purposes.
Copyright © ASTM International, 100 Barr Harbor Drive, PO Box C700, West Conshohocken, PA 19428-2959. United States
F2837 − 11 (2018)
FIG. 1 Test Assembly for Determining Hot Compression
5.2 Samples are to be tested with a raised profile insert or specimens. In some cases, the loading device itself may be
calibration ring described in 6.3 and Fig. 1 so that the area heated, such as with a hot press. Any appropriate means is
2 2
(2042 mm (3.17 in. )) remains constant during the test. acceptable. The device shall be capable of increasing the
temperature at a constant rate of 8°C (14°F) per minute. The
6. Apparatus
temperature difference between the two platens shall not
exceed 5°C (9°F) at any time. The recommended elevated
6.1 Testing Machine, for applying a known value of com-
temperature is 300°C (572°F). Other temperatures may be
pressive stresses to specimens. The machine should be capable
employed as desired, or as agreed upon between the producer
of applying a stress of up to 51.7 MPa (7500 psi) (tolerance of
and the user.
65 %), depending on the indent resistance of the steel platens
and the means of reading the applied load.
6.5 Temperature Measuring Device, for use at interface,
suchasathermocoupleassemblyandameansforrecordingthe
6.2 Hardened Steel Platens, Two (Rockwell of C35 to 40 or
voltage.
equivalent), circular shape, larger than the specimen diameter.
Asuitable size is a diameter of approximately 152 mm (6 in.).
6.6 Dial or Thickness Measuring Device—An indicating
The faces of the platens shall be plane parallel with a surface
dial, or dials, graduated in 0.025 mm (0.001 in.), or a digital
finish of 0.25 to 0.50 µm Ra (10 to 20 µin Ra). Fig. 1 shows a
device, to show or record the thickness of the specimen during
suitable arrangement of steel platens and test specimen.
the test. Readings shall be estimated to the nearest 0.002 mm
(0.0001 in.).
6.3 Insert or Calibration Ring—A raised profile insert or
calibration ring with a minimum raised height of 1.6 mm
6.7 Shield—A safety shield for protection from severe
(0.063 in.) having a 75 6 0.5 mm (2.953 6 0.02 in.) outside
outgassing that may occur during the test.
diameter by 55 6 0.5 mm (2.165 6 0.02 in.) inside diameter
6.8 Dies—Cutting dies for specimens of desired size and
made of the same material as the platens (Rockwell of C 35 to
shape. The inside faces of the dies shall be polished and be
40 or equivalent) is required. The faces of the insert shall be
perpendicular to the plane formed by the cutting edges for a
plane parallel and have a surface finish of 0.25 to 0.50 µm Ra
depth sufficient to prevent any bevel on the edge. The die shall
(10 to 20 µin Ra).
be sharp and free of nicks in order to prevent ragged edges on
6.4 Device for Applying Heat to Platens, sufficient to the specimen. The bore and outside diameter shall be concen-
achieve a desired temperature at interface with gasket material tric.
F2837 − 11 (2018)
6.9 Micrometer, for making specimen thickness measure- 8.3 It is recommended that the test machine be calibrated
ments in accordance with Classification F104. approximately every 100 cycles and between these periods the
calibration results from the previous test be used in Section 10.
6.10 Water-Cooled Disc—Ametal disc cooled by water that
acts as a heat exchanger that can be placed between the platens
9. Conditioning
to lower the temperature between tests, is recommended to
9.1 Condition the cut specimens in accordance with the
shorten the cycle time between tests.Water-cooled platens may
appropriate procedure specified in Classification F104 with
be used as well.
respecttothetypeofgasketmaterialfromwhichthespecimens
6.11 Metal Foil (for example, Inconel, nickel, stainless
are cut.
steel), capable of low creep at the desired maximum test
temperature may be used to prevent the sample from sticking 10. Procedure
to the platens. Recommended thickness is 0.025 mm (0.001
10.1 Original Thickness Measurement, T —Measure the
in.).
thickness of the conditioned gasket specimen according to
Classification F104, section 9.1. The specimen thickness is
7. Test Specimen
measured with the micrometer at three equally spaced places
approximately 120° apart, the result is averaged and recorded
7.1 Sheet-Type Gasketing (see Classification F104)—The
as the thickness T .
gasket shall be die cut in the shape of an annulus with clean
smooth edges. The bore and outside diameter shall be concen- 10.2 The test shall begin with the platens and specimen at
tric.
room temperature. For subsequent tests the platens shall be
cooled to room temperature.
7.1.1 The recommended annular specimen size is 90 6 0.5
mm (3.55 6 0.02 in.) outside diameter by 50 6 0.5 mm (1.97
10.3 If sticking is a problem the specimen may be placed
6 0.02 in.) inside diameter. Three specimens should be
between new pieces of metal foil. Center the specimen or the
prepared for
...


Questions, Comments and Discussion
Ask us and Technical Secretary will try to provide an answer. You can facilitate discussion about the standard in here.
Loading comments...