ASTM D5707-23
(Test Method)Standard Test Method for Measuring Friction and Wear Properties of Lubricating Grease Using a High-Frequency, Linear-Oscillation (SRV) Test Machine
Standard Test Method for Measuring Friction and Wear Properties of Lubricating Grease Using a High-Frequency, Linear-Oscillation (SRV) Test Machine
SIGNIFICANCE AND USE
5.1 This test method can be used to determine wear properties and coefficient of friction of lubricating greases at selected temperatures and loads specified for use in applications where high-speed vibrational or start-stop motions are present for extended periods of time under initial high Hertzian point contact pressures. This test method has found application in qualifying lubricating greases used in constant velocity joints of front-wheel-drive automobiles and for lubricating greases used in roller bearings. Users of this test method should determine whether results correlate with field performance or other applications.
SCOPE
1.1 This test method covers a procedure for determining a lubricating grease's coefficient of friction and its ability to protect against wear when subjected to high-frequency, linear-oscillation motion using an SRV test machine at a test load of 200 N, frequency of 50 Hz, stroke amplitude of 1.00 mm, duration of 2 h, and temperature within the range of the test machine, specifically, ambient to 280 °C. Other test loads (10 N to 1200 N for SRVI-model, 10 N to 1400 N for SRVII-model, and 10 N to 2000 N for SRVIII-model), frequencies (5 Hz to 500 Hz) and stroke amplitudes (0.1 mm up to 4.0 mm) can be used, if specified. The precision of this test method is based on the stated parameters and test temperatures of 50 °C and 80 °C. Average wear scar dimensions on ball and coefficient of friction are determined and reported.
Note 1: Optimol Instruments supplies an upgrade kit to allow SRVI/II-machines to operate with 1600 N, if needed.
1.2 This test method can also be used for determining a fluid lubricant's ability to protect against wear and its coefficient of friction under similar test conditions.
1.3 The values stated in SI units are to be regarded as standard. No other units of measurement are included in this standard.
1.4 This standard does not purport to address all of the safety concerns, if any, associated with its use. It is the responsibility of the user of this standard to establish appropriate safety, health, and environmental practices and determine the applicability of regulatory limitations prior to use.
1.5 This international standard was developed in accordance with internationally recognized principles on standardization established in the Decision on Principles for the Development of International Standards, Guides and Recommendations issued by the World Trade Organization Technical Barriers to Trade (TBT) Committee.
General Information
- Status
- Published
- Publication Date
- 31-Oct-2023
- Technical Committee
- D02 - Petroleum Products, Liquid Fuels, and Lubricants
- Drafting Committee
- D02.G0.04 - Functional Tests - Tribology
Relations
- Effective Date
- 01-Nov-2023
- Refers
ASTM D4175-23a - Standard Terminology Relating to Petroleum Products, Liquid Fuels, and Lubricants - Effective Date
- 15-Dec-2023
- Effective Date
- 01-Dec-2023
- Effective Date
- 01-Nov-2023
- Effective Date
- 01-Nov-2023
- Refers
ASTM D4175-23e1 - Standard Terminology Relating to Petroleum Products, Liquid Fuels, and Lubricants - Effective Date
- 01-Jul-2023
- Refers
ASTM D4175-23 - Standard Terminology Relating to Petroleum Products, Liquid Fuels, and Lubricants - Effective Date
- 01-Jul-2023
- Effective Date
- 15-Dec-2019
- Effective Date
- 01-Jun-2018
- Effective Date
- 15-Nov-2016
- Effective Date
- 01-Nov-2023
- Effective Date
- 01-Nov-2023
- Effective Date
- 01-Nov-2023
Overview
ASTM D5707-23 is the international standard test method for measuring the friction and wear properties of lubricating greases using a high-frequency, linear-oscillation (SRV) test machine. Established by ASTM International, this test method provides a reliable procedure to determine both the coefficient of friction and wear resistance of lubricating greases under controlled oscillating motion, temperature, and load conditions. The method is essential for evaluating greases intended for high-speed, vibrational, or start-stop motions subjected to high Hertzian contact pressures, ensuring their suitability in demanding automotive and industrial applications.
Key Topics
Scope of the Test Method
- Measures both coefficient of friction and wear scar dimensions on steel balls under varying conditions.
- Performs tests using an SRV machine under default parameters: 200 N load, 50 Hz frequency, 1.00 mm stroke amplitude, for 2 hours at temperatures from ambient up to 280°C.
- Allows for variation in test loads (from 10 N to 2000 N, model-dependent), frequencies (5 Hz to 500 Hz), and stroke amplitudes (0.1 mm to 4.0 mm) as specified.
Significance and Use
- Suitable for applications involving high-frequency vibration or repeated start-stop motion, such as constant velocity (CV) joints in front-wheel-drive vehicles and rolling element bearings.
- Results may be used to compare lubricating grease formulations and their ability to minimize friction and wear, contributing to longer component life and improved performance.
- Enables users to verify correlation to field performance for specific applications.
Test Apparatus and Procedures
- Utilizes SRV test machines; test specimens include hardened steel balls and disks with precisely defined surface finish and hardness.
- Includes cleaning, sample preparation, and data collection (wear scar measurement, friction monitoring, and temperature control).
- Provides guidance on reporting results, including all test parameters and outcomes.
Applications
ASTM D5707-23 is widely applicable in:
- Automotive Industry
- Qualification and comparison of lubricating greases for CV joints, bearings, and other high-wear components operating under oscillating movements and vibrations.
- Bearings Manufacturing
- Quality control and research for greases used in roller and ball bearings, especially those expected to perform under severe dynamic loads.
- Industrial Machinery
- Evaluation of lubricants for equipment experiencing frequent stops, starts, or oscillatory motion, ensuring effective protection from wear and minimizing downtime.
- Lubricant Formulation and R&D
- Fundamental tribological testing for grease development and benchmarking, guiding the selection of additives and base oils for optimal friction and wear performance.
Related Standards
For a comprehensive assessment of lubricating grease performance, the following standards are commonly referenced alongside ASTM D5707-23:
- ASTM D5706 – Test Method for Determining Extreme Pressure Properties of Lubricating Greases Using an SRV Test Machine
- ASTM D6425 – Test Method for Measuring Friction and Wear Properties of Extreme Pressure Lubricating Oils Using the SRV Test Machine
- ASTM D217 – Test Methods for Cone Penetration of Lubricating Grease
- DIN EN ISO 683-17 – Specification for Ball and Roller Bearing Steels
- DIN 51834-3 – Testing of Lubricants – Tribological test in translatory oscillation apparatus (SRV)
Practical Value
Implementing ASTM D5707-23 allows manufacturers and end-users to:
- Select the optimal lubricating grease for components subjected to oscillating and vibrational stresses.
- Reduce equipment downtime by preventing premature wear or failure.
- Benchmark products for performance claims or compliance with customer requirements.
- Correlate laboratory data with real-world durability, supporting predictive maintenance and improved equipment reliability.
Keywords: lubricating grease, friction measurement, wear properties, SRV test, ASTM D5707-23, oscillation, tribology, bearing lubrication, grease qualification, coefficient of friction.
Buy Documents
ASTM D5707-23 - Standard Test Method for Measuring Friction and Wear Properties of Lubricating Grease Using a High-Frequency, Linear-Oscillation (SRV) Test Machine
REDLINE ASTM D5707-23 - Standard Test Method for Measuring Friction and Wear Properties of Lubricating Grease Using a High-Frequency, Linear-Oscillation (SRV) Test Machine
Get Certified
Connect with accredited certification bodies for this standard

ABS Quality Evaluations Inc.
American Bureau of Shipping quality certification.

Element Materials Technology
Materials testing and product certification.

ABS Group Brazil
ABS Group certification services in Brazil.
Sponsored listings
Frequently Asked Questions
ASTM D5707-23 is a standard published by ASTM International. Its full title is "Standard Test Method for Measuring Friction and Wear Properties of Lubricating Grease Using a High-Frequency, Linear-Oscillation (SRV) Test Machine". This standard covers: SIGNIFICANCE AND USE 5.1 This test method can be used to determine wear properties and coefficient of friction of lubricating greases at selected temperatures and loads specified for use in applications where high-speed vibrational or start-stop motions are present for extended periods of time under initial high Hertzian point contact pressures. This test method has found application in qualifying lubricating greases used in constant velocity joints of front-wheel-drive automobiles and for lubricating greases used in roller bearings. Users of this test method should determine whether results correlate with field performance or other applications. SCOPE 1.1 This test method covers a procedure for determining a lubricating grease's coefficient of friction and its ability to protect against wear when subjected to high-frequency, linear-oscillation motion using an SRV test machine at a test load of 200 N, frequency of 50 Hz, stroke amplitude of 1.00 mm, duration of 2 h, and temperature within the range of the test machine, specifically, ambient to 280 °C. Other test loads (10 N to 1200 N for SRVI-model, 10 N to 1400 N for SRVII-model, and 10 N to 2000 N for SRVIII-model), frequencies (5 Hz to 500 Hz) and stroke amplitudes (0.1 mm up to 4.0 mm) can be used, if specified. The precision of this test method is based on the stated parameters and test temperatures of 50 °C and 80 °C. Average wear scar dimensions on ball and coefficient of friction are determined and reported. Note 1: Optimol Instruments supplies an upgrade kit to allow SRVI/II-machines to operate with 1600 N, if needed. 1.2 This test method can also be used for determining a fluid lubricant's ability to protect against wear and its coefficient of friction under similar test conditions. 1.3 The values stated in SI units are to be regarded as standard. No other units of measurement are included in this standard. 1.4 This standard does not purport to address all of the safety concerns, if any, associated with its use. It is the responsibility of the user of this standard to establish appropriate safety, health, and environmental practices and determine the applicability of regulatory limitations prior to use. 1.5 This international standard was developed in accordance with internationally recognized principles on standardization established in the Decision on Principles for the Development of International Standards, Guides and Recommendations issued by the World Trade Organization Technical Barriers to Trade (TBT) Committee.
SIGNIFICANCE AND USE 5.1 This test method can be used to determine wear properties and coefficient of friction of lubricating greases at selected temperatures and loads specified for use in applications where high-speed vibrational or start-stop motions are present for extended periods of time under initial high Hertzian point contact pressures. This test method has found application in qualifying lubricating greases used in constant velocity joints of front-wheel-drive automobiles and for lubricating greases used in roller bearings. Users of this test method should determine whether results correlate with field performance or other applications. SCOPE 1.1 This test method covers a procedure for determining a lubricating grease's coefficient of friction and its ability to protect against wear when subjected to high-frequency, linear-oscillation motion using an SRV test machine at a test load of 200 N, frequency of 50 Hz, stroke amplitude of 1.00 mm, duration of 2 h, and temperature within the range of the test machine, specifically, ambient to 280 °C. Other test loads (10 N to 1200 N for SRVI-model, 10 N to 1400 N for SRVII-model, and 10 N to 2000 N for SRVIII-model), frequencies (5 Hz to 500 Hz) and stroke amplitudes (0.1 mm up to 4.0 mm) can be used, if specified. The precision of this test method is based on the stated parameters and test temperatures of 50 °C and 80 °C. Average wear scar dimensions on ball and coefficient of friction are determined and reported. Note 1: Optimol Instruments supplies an upgrade kit to allow SRVI/II-machines to operate with 1600 N, if needed. 1.2 This test method can also be used for determining a fluid lubricant's ability to protect against wear and its coefficient of friction under similar test conditions. 1.3 The values stated in SI units are to be regarded as standard. No other units of measurement are included in this standard. 1.4 This standard does not purport to address all of the safety concerns, if any, associated with its use. It is the responsibility of the user of this standard to establish appropriate safety, health, and environmental practices and determine the applicability of regulatory limitations prior to use. 1.5 This international standard was developed in accordance with internationally recognized principles on standardization established in the Decision on Principles for the Development of International Standards, Guides and Recommendations issued by the World Trade Organization Technical Barriers to Trade (TBT) Committee.
ASTM D5707-23 is classified under the following ICS (International Classification for Standards) categories: 75.100 - Lubricants, industrial oils and related products. The ICS classification helps identify the subject area and facilitates finding related standards.
ASTM D5707-23 has the following relationships with other standards: It is inter standard links to ASTM D5707-19, ASTM D4175-23a, ASTM D5706-23, ASTM E45-18a(2023), ASTM D6425-23, ASTM D4175-23e1, ASTM D4175-23, ASTM D6425-19, ASTM E45-18a, ASTM D5706-16, ASTM D8324-21, ASTM D7755-11(2022), ASTM D6185-11(2017). Understanding these relationships helps ensure you are using the most current and applicable version of the standard.
ASTM D5707-23 is available in PDF format for immediate download after purchase. The document can be added to your cart and obtained through the secure checkout process. Digital delivery ensures instant access to the complete standard document.
Standards Content (Sample)
This international standard was developed in accordance with internationally recognized principles on standardization established in the Decision on Principles for the
Development of International Standards, Guides and Recommendations issued by the World Trade Organization Technical Barriers to Trade (TBT) Committee.
Designation: D5707 − 23
Standard Test Method for
Measuring Friction and Wear Properties of Lubricating
Grease Using a High-Frequency, Linear-Oscillation (SRV)
Test Machine
This standard is issued under the fixed designation D5707; the number immediately following the designation indicates the year of
original adoption or, in the case of revision, the year of last revision. A number in parentheses indicates the year of last reapproval. A
superscript epsilon (´) indicates an editorial change since the last revision or reapproval.
1. Scope* 2. Referenced Documents
1.1 This test method covers a procedure for determining a 2.1 ASTM Standards:
lubricating grease’s coefficient of friction and its ability to A295/A295M Specification for High-Carbon Anti-Friction
protect against wear when subjected to high-frequency, linear- Bearing Steel
oscillation motion using an SRV test machine at a test load of D217 Test Methods for Cone Penetration of Lubricating
200 N, frequency of 50 Hz, stroke amplitude of 1.00 mm, Grease
duration of 2 h, and temperature within the range of the test D235 Specification for Mineral Spirits (Petroleum Spirits)
machine, specifically, ambient to 280 °C. Other test loads (Hydrocarbon Dry Cleaning Solvent)
(10 N to 1200 N for SRVI-model, 10 N to 1400 N for SRVII- D4175 Terminology Relating to Petroleum Products, Liquid
model, and 10 N to 2000 N for SRVIII-model), frequencies Fuels, and Lubricants
(5 Hz to 500 Hz) and stroke amplitudes (0.1 mm up to 4.0 mm) D5706 Test Method for Determining Extreme Pressure
can be used, if specified. The precision of this test method is Properties of Lubricating Greases Using a High-
based on the stated parameters and test temperatures of 50 °C Frequency, Linear-Oscillation (SRV) Test Machine
and 80 °C. Average wear scar dimensions on ball and coeffi- D6425 Test Method for Measuring Friction and Wear Prop-
cient of friction are determined and reported. erties of Extreme Pressure (EP) Lubricating Oils Using
NOTE 1—Optimol Instruments supplies an upgrade kit to allow SRVI/
SRV Test Machine
II-machines to operate with 1600 N, if needed.
D7755 Practice for Determining the Wear Volume on Stan-
1.2 This test method can also be used for determining a fluid dard Test Pieces Used by High-Frequency, Linear-
lubricant’s ability to protect against wear and its coefficient of Oscillation (SRV) Test Machine
friction under similar test conditions. E45 Test Methods for Determining the Inclusion Content of
Steel
1.3 The values stated in SI units are to be regarded as
G40 Terminology Relating to Wear and Erosion
standard. No other units of measurement are included in this
2.2 Other Standards:
standard.
DIN EN ISO 683-17 Heat-treated Steels, alloy steels and
1.4 This standard does not purport to address all of the
free-cutting steels—Part 17 : Ball and roller bearing steels
safety concerns, if any, associated with its use. It is the
DIN 51631:1999 Special boiling point spirits: Requirements
responsibility of the user of this standard to establish appro-
and testing
priate safety, health, and environmental practices and deter-
DIN 51834-3 Testing of lubricants—Tribological test in
mine the applicability of regulatory limitations prior to use.
translatory oscillation apparatus—Part 3: Determination
1.5 This international standard was developed in accor-
of tribological behaviour of materials in cooperation with
dance with internationally recognized principles on standard-
lubricants
ization established in the Decision on Principles for the
DIN EN ISO 13565-2:1998 Geometrical Product Specifica-
Development of International Standards, Guides and Recom-
tions (GPS)—Surface texture: Profile method; Surfaces
mendations issued by the World Trade Organization Technical
having stratified functional properties —Part 2: Height
Barriers to Trade (TBT) Committee.
1 2
This test method is under the jurisdiction of ASTM Committee D02 on For referenced ASTM standards, visit the ASTM website, www.astm.org, or
Petroleum Products, Liquid Fuels, and Lubricants and is the direct responsibility of contact ASTM Customer Service at service@astm.org. For Annual Book of ASTM
Subcommittee D02.G0.04 on Functional Tests - Tribology. Standards volume information, refer to the standard’s Document Summary page on
Current edition approved Nov. 1, 2023. Published November 2023. Originally the ASTM website.
approved in 1995. Last previous edition approved in 2019 as D5707 – 19. DOI: Available from Deutsches Institut fur Normung e.V.(DIN), Burggrafenstrasse 6,
10.1520/D5707-23. 10787 Berlin, Germany, http://www.din.de.
*A Summary of Changes section appears at the end of this standard
Copyright © ASTM International, 100 Barr Harbor Drive, PO Box C700, West Conshohocken, PA 19428-2959. United States
D5707 − 23
characterization using linear material ratio curve [Re- 3.1.11 thickener, n—in lubricating grease, a substance com-
places DIN 4776:1990: Measurement of surface rough- posed of finely divided particles dispersed in a liquid lubricant
ness; parameters R , R , R , M , M for the descrip- to form the product’s structure.
K PK VK r1 r2
tion of the material portion]
3.1.11.1 Discussion—The thickener can be fibers (such as
various metallic soaps) or plates or spheres (such as certain
3. Terminology
non-soap thickeners) which are insoluble or, at most, only very
slightly soluble in the liquid lubricant. The general require-
3.1 Definitions:
ments are that the solid particles be extremely small, uniformly
3.1.1 break-in, n—in tribology, an initial transition process
dispersed, and capable of forming a relatively stable, gel-like
occurring in newly established wearing contacts, often accom-
structure with the liquid lubricant. D217
panied by transients in coefficient of friction or wear rate, or
both, which are uncharacteristic of the given tribological
3.1.12 wear, n—damage to a solid surface, generally involv-
system’s long-term behavior. G40
ing progressive loss of material, due to the relative motion
between that surface and a contacting substance or substances.
3.1.2 coeffıcient of friction, n— in tribology, the dimension-
G40
less ratio of the friction force (F) between two bodies to the
normal force (N) pressing these bodies together. G40
3.1.13 Wv, n—Wear volume is the loss of volume to the ball
3.1.3 Hertzian contact area, n—the apparent area of contact
after a test. D6425
between two nonconforming solid bodies pressed against each
3.2 Definitions of Terms Specific to This Standard:
other, as calculated from Hertz’s equations of elastic
3.2.1 seizure, n—localized fusion of metal between the
deformation. G40
rubbing surfaces of the test pieces.
3.1.4 Hertzian contact pressure, n—magnitude of the pres-
3.2.1.1 Discussion—Seizure is usually indicated by a sharp
sure at any specified location in a Hertzian contact area, as
increase in coefficient of friction, wear, or unusual noise and
calculated from Hertz’s equations of elastic deformation. The
vibration. In this test method, increase in coefficient of friction
Hertzian contact pressure can also be calculated and reported
is displayed on the chart recorder as a permanent rise in the
as maximum value P in the centre of the contact or as
max
coefficient of friction from a steady state value.
P as average over the total contact area. G40
average
3.3 Abbreviations:
3.1.5 lubricant, n—any material interposed between two
3.3.1 SRV, n—Schwingung, Reibung, Verschleiss, (Ger-
surfaces that reduces the friction or wear between them. D217
man); oscillating, friction, wear, (English translation). D5706
3.1.6 lubricating grease, n—a semifluid to solid product of
a dispersion of a thickener in a liquid lubricant.
4. Summary of Test Method
3.1.6.1 Discussion—The dispersion of the thickener forms a
4.1 This test method is performed on an SRV test machine
two-phase system and immobilizes the liquid lubricant by
surface tension and other physical forces. Other ingredients are using a test ball oscillated under constant load against a test
disk.
commonly included to impart special properties. D217
3.1.7 Ra (C.L.A), n—measuring surface finish, the arithme-
NOTE 2—The frequency of oscillation, stroke length, test temperature,
tic average of the absolute distances of all profile points from
test load, and test ball and disk material can be varied from those specified
in this test method. The test ball yields Hertzian point contact geometry.
the mean line for a given distance.
To obtain line or area contact, test pieces of differing configurations can be
3.1.7.1 Discussion—C.L.A. means center line average, and
substituted for the test ball.
it is a synonym for Ra.
4.2 The wear scar on the test ball and coefficient of friction
3.1.8 Rpk, n—reduced peak height according to DIN EN
are measured. If a profilometer is available, a trace of the wear
ISO 13565-2:1998. Rpk is the mean height of the peak sticking
scar on the test disk can also be used to obtain additional wear
out above the core profile section.
information in order to calculate the wear volumes of ball and
3.1.9 Rvk, n—reduced valley height according to DIN EN
disk by using Practice D7755 or DIN 51834, part 3.
ISO 13565-2:1998. Rvk is the mean depth of the valley
reaching into the material below the core profile section.
5. Significance and Use
3.1.10 Rz (DIN), n—in measuring surface finish, the average
5.1 This test method can be used to determine wear prop-
of all Ry values (peak to valley heights) in the assessment
erties and coefficient of friction of lubricating greases at
length.
selected temperatures and loads specified for use in applica-
tions where high-speed vibrational or start-stop motions are
present for extended periods of time under initial high Hertzian
Amstutz, Hu, “Surface Texture: The Parameters,” Bulletin MI-TP-003-0785,
point contact pressures. This test method has found application
Sheffield Measurement Division, Warner and Swasey, 1985, p. 21.
5 in qualifying lubricating greases used in constant velocity
Amstutz, Hu, “Surface Texture: The Parameters,” Bulletin MI-TP-003-0785,
Sheffield Measurement Division, Warner and Swasey, 1985, pp. 29, 31. joints of front-wheel-drive automobiles and for lubricating
D5707 − 23
FIG. 1 SRV Test Machine (Model III)
greases used in roller bearings. Users of this test method should
determine whether results correlate with field performance or
other applications.
6. Apparatus
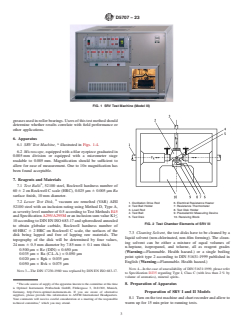
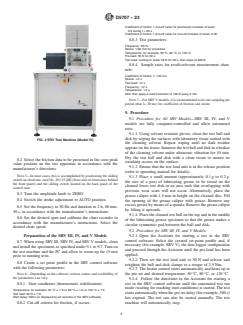
6.1 SRV Test Machine, illustrated in Figs. 1-4.
6.2 Microscope, equipped with a filar eyepiece graduated in
0.005 mm division or equipped with a micrometer stage
readable to 0.005 mm. Magnification should be sufficient to
allow for ease of measurement. One to 10× magnification has
been found acceptable.
7. Reagents and Materials
7.1 Test Balls , 52100 steel, Rockwell hardness number of
60 6 2 on Rockwell C scale (HRC), 0.025 μm 6 0.005 μm Ra
surface finish, 10 mm diameter.
7.2 Lower Test Disk, vacuum arc remelted (VAR) AISI
1. Oscillation Drive Rod 6. Electrical Resistance Heater
2. Test Ball Holder 7. Resistance Thermometer
52100 steel with an inclusion rating using Method D, Type A,
3. Load Rod 8. Test Disk Holder
as severity level number of 0.5 according to Test Methods E45
4. Test Ball 9. Piezoelectric Measuring Device
and Specification A295/A295M or an inclusion sum value K1≤
5. Test Disk 10. Receiving Block
10 according to DIN EN ISO 683-17 and spherodized annealed
FIG. 2 Test Chamber Elements of SRV III
to obtain globular carbide, Rockwell hardness number of
60 HRC 6 2 HRC on Rockwell C scale, the surfaces of the
7.3 Cleaning Solvent, the test disks have to be cleaned by a
disk being lapped and free of lapping raw materials. The
liquid solvent (non-chlorinated, non-film forming). The clean-
topography of the disk will be determined by four values,
ing solvent can be either a mixture of equal volumes of
24 mm 6 0.5 mm diameter by 7.85 mm 6 0.1 mm thick:
n-heptane, isopropanol, and toluene, all as reagent grades
0.500 μm < Rz (DIN) < 0.650 μm
(Warning—Flammable. Health hazard.) or a single boiling
0.035 μm < Ra (C.L.A.) < 0.050 μm
point spirit type 2 according to DIN 51631:1999 published in
0.020 μm < Rpk < 0.035 μm
English (Warning—Flammable. Health hazard.)
0.050 μm < Rvk < 0.075 μm
NOTE 4—In the case of unavailability of DIN 51631:1999, please refer
NOTE 3—The DIN 17230-1980 was replaced by DIN EN ISO 683-17.
to Specification D235 regarding Type I, Class C (with less than 2 % by
volume of aromatics), mineral spirits.
8. Preparation of Apparatus
The sole source of supply of the apparatus known to the committee at this time
is Optimol Instruments Prüftechnik GmbH, Flößergasse 3, D-81369, Munich,
Germany, http://www.optimol-instruments.de. If you are aware of alternative Preparation of SRV I and II Models
suppliers, please provide this information to ASTM International Headquarters.
8.1 Turn on the test machine and chart recorder and allow to
Your comments will receive careful consideration at a meeting of the responsible
technical committee, which you may attend. warm up for 15 min prior to running tests.
D5707 − 23
Coefficient of friction, f (cut-off value for permanent increase of level):
0.3 during t > 20 s
Coefficient of friction, f (cut-off value for one-off increase of level): 0.35
8.8.3 Test parameters:
Frequency: 50 Hz
Stroke: 1.00 mm for procedure
Temperature: for example, 50 °C, 80 °C, or 120 °C
Pre-load: 50 N for 30 s
Test load: running-in under 50 N for 30 s, then steps of 200 N
8.8.4 Sample rates for result-relevant measurement chan-
nels:
Coefficient of friction, f: #32 ms.
Stroke: #2 s
Test load: #2 s
Frequency: #2 s
Temperature: #2 s
After that, apply a load increment of 10
...
This document is not an ASTM standard and is intended only to provide the user of an ASTM standard an indication of what changes have been made to the previous version. Because
it may not be technically possible to adequately depict all changes accurately, ASTM recommends that users consult prior editions as appropriate. In all cases only the current version
of the standard as published by ASTM is to be considered the official document.
Designation: D5707 − 19 D5707 − 23
Standard Test Method for
Measuring Friction and Wear Properties of Lubricating
Grease Using a High-Frequency, Linear-Oscillation (SRV)
Test Machine
This standard is issued under the fixed designation D5707; the number immediately following the designation indicates the year of
original adoption or, in the case of revision, the year of last revision. A number in parentheses indicates the year of last reapproval. A
superscript epsilon (´) indicates an editorial change since the last revision or reapproval.
1. Scope*
1.1 This test method covers a procedure for determining a lubricating grease’s coefficient of friction and its ability to protect
against wear when subjected to high-frequency, linear-oscillation motion using an SRV test machine at a test load of 200 N,
frequency of 50 Hz, stroke amplitude of 1.00 mm, duration of 2 h, and temperature within the range of the test machine,
specifically, ambient to 280 °C. Other test loads (10 N to 1200 N for SRVI-model, 10 N to 1400 N for SRVII-model, and 10 N to
2000 N for SRVIII-model), frequencies (5 Hz to 500 Hz) and stroke amplitudes (0.1 mm up to 4.0 mm) can be used, if specified.
The precision of this test method is based on the stated parameters and test temperatures of 50 °C and 80 °C. Average wear scar
dimensions on ball and coefficient of friction are determined and reported.
NOTE 1—Optimol Instruments supplies an upgrade kit to allow SRVI/II-machines to operate with 1600 N, if needed.
1.2 This test method can also be used for determining a fluid lubricant’s ability to protect against wear and its coefficient of friction
under similar test conditions.
1.3 The values stated in SI units are to be regarded as standard. No other units of measurement are included in this standard.
1.4 This standard does not purport to address all of the safety concerns, if any, associated with its use. It is the responsibility
of the user of this standard to establish appropriate safety, health, and environmental practices and determine the applicability of
regulatory limitations prior to use.
1.5 This international standard was developed in accordance with internationally recognized principles on standardization
established in the Decision on Principles for the Development of International Standards, Guides and Recommendations issued
by the World Trade Organization Technical Barriers to Trade (TBT) Committee.
2. Referenced Documents
2.1 ASTM Standards:
A295/A295M Specification for High-Carbon Anti-Friction Bearing Steel
D217 Test Methods for Cone Penetration of Lubricating Grease
D235 Specification for Mineral Spirits (Petroleum Spirits) (Hydrocarbon Dry Cleaning Solvent)
D4175 Terminology Relating to Petroleum Products, Liquid Fuels, and Lubricants
This test method is under the jurisdiction of ASTM Committee D02 on Petroleum Products, Liquid Fuels, and Lubricants and is the direct responsibility of Subcommittee
D02.G0.04 on Functional Tests - Tribology.
Current edition approved Dec. 1, 2019Nov. 1, 2023. Published January 2020November 2023. Originally approved in 1995. Last previous edition approved in 20162019
as D5707 – 16.D5707 – 19. DOI: 10.1520/D5707-19.10.1520/D5707-23.
For referenced ASTM standards, visit the ASTM website, www.astm.org, or contact ASTM Customer Service at service@astm.org. For Annual Book of ASTM Standards
volume information, refer to the standard’s Document Summary page on the ASTM website.
*A Summary of Changes section appears at the end of this standard
Copyright © ASTM International, 100 Barr Harbor Drive, PO Box C700, West Conshohocken, PA 19428-2959. United States
D5707 − 23
D5706 Test Method for Determining Extreme Pressure Properties of Lubricating Greases Using a High-Frequency, Linear-
Oscillation (SRV) Test Machine
D6425 Test Method for Measuring Friction and Wear Properties of Extreme Pressure (EP) Lubricating Oils Using SRV Test
Machine
D7755 Practice for Determining the Wear Volume on Standard Test Pieces Used by High-Frequency, Linear-Oscillation (SRV)
Test Machine
E45 Test Methods for Determining the Inclusion Content of Steel
G40 Terminology Relating to Wear and Erosion
2.2 Other Standards:
DIN EN ISO 683-17 Heat-treated Steels, alloy steels and free-cutting steels—Part 17 : Ball and roller bearing steels
DIN 51631:1999 Special boiling point spirits: Requirements and testing
DIN 51834-3 Testing of lubricants—Tribological test in translatory oscillation apparatus—Part 3: Determination of tribological
behaviour of materials in cooperation with lubricants
DIN EN ISO 13565-2:1998 Geometrical Product Specifications (GPS)—Surface texture: Profile method; Surfaces having
stratified functional properties —Part 2: Height characterization using linear material ratio curve [Replaces DIN 4776:1990:
Measurement of surface roughness; parameters R , R , R , M , M for the description of the material portion]
K PK VK r1 r2
3. Terminology
3.1 Definitions:
3.1.1 break-in, n—in tribology, an initial transition process occurring in newly established wearing contacts, often accompanied
by transients in coefficient of friction or wear rate, or both, which are uncharacteristic of the given tribological system’s long-term
behavior. G40
3.1.2 coeffıcient of friction, n— in tribology, the dimensionless ratio of the friction force (F) between two bodies to the normal
force (N) pressing these bodies together. G40
3.1.3 Hertzian contact area, n—the apparent area of contact between two nonconforming solid bodies pressed against each other,
as calculated from Hertz’s equations of elastic deformation. G40
3.1.4 Hertzian contact pressure, n—magnitude of the pressure at any specified location in a Hertzian contact area, as calculated
from Hertz’s equations of elastic deformation. The Hertzian contact pressure can also be calculated and reported as maximum value
P in the centre of the contact or as P as average over the total contact area. G40
max average
3.1.5 lubricant, n—any material interposed between two surfaces that reduces the friction or wear between them. D217
3.1.6 lubricating grease, n—a semifluid to solid product of a dispersion of a thickener in a liquid lubricant.
3.1.6.1 Discussion—
The dispersion of the thickener forms a two-phase system and immobilizes the liquid lubricant by surface tension and other
physical forces. Other ingredients are commonly included to impart special properties. D217
3.1.7 Ra (C.L.A), n—measuring surface finish, the arithmetic average of the absolute distances of all profile points from the mean
line for a given distance.
3.1.7.1 Discussion—
C.L.A. means center line average, and it is a synonym for Ra.
3.1.8 Rpk, n—reduced peak height according to DIN EN ISO 13565-2:1998. Rpk is the mean height of the peak sticking out above
the core profile section.
3.1.9 Rvk, n—reduced valley height according to DIN EN ISO 13565-2:1998. Rvk is the mean depth of the valley reaching into
the material below the core profile section.
Available from Deutsches Institut fur Normung e.V.(DIN), Burggrafenstrasse 6, 10787 Berlin, Germany, http://www.din.de.
Amstutz, Hu, “Surface Texture: The Parameters,” Bulletin MI-TP-003-0785, Sheffield Measurement Division, Warner and Swasey, 1985, p. 21.
D5707 − 23
3.1.10 Rz (DIN), n—in measuring surface finish, the average of all Ry values (peak to valley heights) in the assessment length.
3.1.11 thickener, n—in lubricating grease, a substance composed of finely divided particles dispersed in a liquid lubricant to form
the product’s structure.
3.1.11.1 Discussion—
The thickener can be fibers (such as various metallic soaps) or plates or spheres (such as certain non-soap thickeners) which are
insoluble or, at most, only very slightly soluble in the liquid lubricant. The general requirements are that the solid particles be
extremely small, uniformly dispersed, and capable of forming a relatively stable, gel-like structure with the liquid lubricant. D217
3.1.12 wear, n—damage to a solid surface, generally involving progressive loss of material, due to the relative motion between
that surface and a contacting substance or substances. G40
3.1.13 Wv, n—Wear volume is the loss of volume to the ball after a test. D6425
3.2 Definitions of Terms Specific to This Standard:
3.2.1 seizure, n—localized fusion of metal between the rubbing surfaces of the test pieces.
3.2.1.1 Discussion—
Seizure is usually indicated by a sharp increase in coefficient of friction, wear, or unusual noise and vibration. In this test method,
increase in coefficient of friction is displayed on the chart recorder as a permanent rise in the coefficient of friction from a steady
state value.
3.3 Abbreviations:
3.3.1 SRV, n—Schwingung, Reibung, Verschleiss, (German); oscillating, friction, wear, (English translation). D5706
4. Summary of Test Method
4.1 This test method is performed on an SRV test machine using a test ball oscillated under constant load against a test disk.
NOTE 2—The frequency of oscillation, stroke length, test temperature, test load, and test ball and disk material can be varied from those specified in this
test method. The test ball yields Hertzian point contact geometry. To obtain line or area contact, test pieces of differing configurations can be substituted
for the test ball.
4.2 The wear scar on the test ball and coefficient of friction are measured. If a profilometer is available, a trace of the wear scar
on the test disk can also be used to obtain additional wear information in order to calculate the wear volumes of ball and disk by
using Practice D7755 or DIN 51834, part 3.
5. Significance and Use
5.1 This test method can be used to determine wear properties and coefficient of friction of lubricating greases at selected
temperatures and loads specified for use in applications where high-speed vibrational or start-stop motions are present for extended
periods of time under initial high Hertzian point contact pressures. This test method has found application in qualifying lubricating
greases used in constant velocity joints of front-wheel-drive automobiles and for lubricating greases used in roller bearings. Users
of this test method should determine whether results correlate with field performance or other applications.
6. Apparatus
6.1 SRV Test Machine, illustrated in Figs. 1-4.
6.2 Microscope, equipped with a filar eyepiece graduated in 0.005 mm division or equipped with a micrometer stage readable to
0.005 mm. Magnification should be sufficient to allow for ease of measurement. One to 10× magnification has been found
acceptable.
Amstutz, Hu, “Surface Texture: The Parameters,” Bulletin MI-TP-003-0785, Sheffield Measurement Division, Warner and Swasey, 1985, pp. 29, 31.
The sole source of supply of the apparatus known to the committee at this time is Optimol Instruments Prüftechnik GmbH, Flößergasse 3, D-81369, Munich, Germany,
http://www.optimol-instruments.de. If you are aware of alternative suppliers, please provide this information to ASTM International Headquarters. Your comments will receive
careful consideration at a meeting of the responsible technical committee, which you may attend.
D5707 − 23
FIG. 1 SRV Test Machine (Model III)
1. Oscillation Drive Rod 6. Electrical Resistance Heater
2. Test Ball Holder 7. Resistance Thermometer
3. Load Rod 8. Test Disk Holder
4. Test Ball 9. Piezoelectric Measuring Device
5. Test Disk 10. Receiving Block
FIG. 2 Test Chamber Elements of SRV III
7. Reagents and Materials
7.1 Test Balls , 52100 steel, Rockwell hardness number of 60 6 2 on Rockwell C scale (HRC), 0.025 μm 6 0.005 μm Ra surface
finish, 10 mm diameter.
7.2 Lower Test Disk, vacuum arc remelted (VAR) AISI 52100 steel with an inclusion rating using Method D, Type A, as severity
level number of 0.5 according to Test Methods E45 and Specification A295/A295M or an inclusion sum value K1≤ 10 according
to DIN EN ISO 683-17 and spherodized annealed to obtain globular carbide, Rockwell hardness number of 60 HRC 6 2 HRC on
Rockwell C scale, the surfaces of the disk being lapped and free of lapping raw materials. The topography of the disk will be
determined by four values, 24 mm 6 0.5 mm diameter by 7.85 mm 6 0.1 mm thick:
0.500 μm < Rz (DIN) < 0.650 μm
0.035 μm < Ra (C.L.A.) < 0.050 μm
0.020 μm < Rpk < 0.035 μm
0.050 μm < Rvk < 0.075 μm
D5707 − 23
FIG. 3 SRV Test Machine (Model IV)
NOTE 3—The DIN 17230-1980 was replaced by DIN EN ISO 683-17.
7.3 n-Heptane, reagent grade. (Warning—Flammable. Health hazard.)
7.4 Isopropanol, reagent grade. (Warning—Flammable. Health hazard.)
7.5 Toluene, reagent grade. (Warning—Flammable. Health hazard.)
7.3 Cleaning Solvent, the test disks have to be cleaned by a liquid solvent (non-chlorinated, non-film forming). The cleaning
solvent can be either a mixture of equal volumes of n-heptane, isopropanol, and toluene, all as reagent grades (Warning—
Flammable. Health hazard.) or a single boiling point spirit type 2 according to DIN 51631:1999 published in English
(Warning—Flammable. Health hazard.)
NOTE 4—It is recommended to use a mixture of equal volumes In the case of unavailability of nDIN-heptane, isopropanol, and toluene, all as reagent
51631:1999, please refer to Specification D235 grades. (regarding TypeWarning—Flammable. Health hazard.) I, Class C (with less than 2 % by volume
of aromatics), mineral spirits.
8. Preparation of Apparatus
Preparation of SRV I and II Models
8.1 Turn on the test machine and chart recorder and allow to warm up for 15 min prior to running tests.
8.2 Select the friction data to be presented in the crest peak value position on the test apparatus in accordance with the
manufacturer’s directions.
NOTE 5—In most cases, this is accomplished by positioning the sliding switch on electronic card No. 291.35.20E (front side of electronics behind the front
panel) and the sliding switch located on the back panel of the control unit.
...
Questions, Comments and Discussion
Ask us and Technical Secretary will try to provide an answer. You can facilitate discussion about the standard in here.
Loading comments...