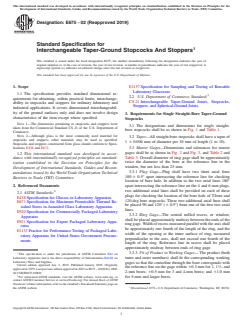
ASTM E675-02(2019)
(Specification)Standard Specification for Interchangeable Taper-Ground Stopcocks And Stoppers
Standard Specification for Interchangeable Taper-Ground Stopcocks And Stoppers
ABSTRACT
The specification provides the standard dimensional requirements for obtaining, within practical limits, interchangeability in stopcocks and stoppers for ordinary laboratory and industrial applications. It solely covers ground surfaces dimensional interchangeability, and does not involve design characteristics of the item except where specified. Materials shall be tested and shall conform to the specified values of design, dimension, designation, tolerances, taper, and master gages; as stated in the requirements for Single Straight-Bore Taper-Ground Stopcocks, Single Oblique-Bore Stopcocks, Double Oblique-Bore (Three-Way) Stopcocks, T-Bore and 120-deg Bore Stopcocks, Taper-Ground Flask Stoppers, and Taper-Ground Bottle Stoppers.
SCOPE
1.1 The specification provides standard dimensional requirements for obtaining, within practical limits, interchangeability in stopcocks and stoppers for ordinary laboratory and industrial applications. It covers dimensional interchangeability of the ground surfaces only and does not involve design characteristics of the item except where specified.
Note 1: The dimensions pertaining to stopcocks and stoppers were taken from the Commercial Standard CS 21 of the U.S. Department of Commerce.
Note 2: Although glass is the most commonly used material for stopcocks and stoppers, other materials may be used as specified. Stopcocks and stoppers constructed from glass should conform to Specifications E438 and E671.
1.2 This international standard was developed in accordance with internationally recognized principles on standardization established in the Decision on Principles for the Development of International Standards, Guides and Recommendations issued by the World Trade Organization Technical Barriers to Trade (TBT) Committee.
General Information
- Status
- Published
- Publication Date
- 31-Dec-2018
- Technical Committee
- E41 - Laboratory Apparatus
- Drafting Committee
- E41.01 - Laboratory Ware and Supplies
Relations
- Replaces
ASTM E675-02(2012) - Standard Specification for Interchangeable Taper-Ground Stopcocks And Stoppers - Effective Date
- 01-Jan-2019
- Effective Date
- 01-Feb-2024
- Effective Date
- 01-Jul-2019
- Effective Date
- 01-Jan-2018
- Effective Date
- 01-Nov-2013
- Effective Date
- 01-Dec-2011
- Effective Date
- 01-Dec-2011
- Effective Date
- 01-Dec-2011
- Effective Date
- 01-Sep-2010
- Effective Date
- 15-May-2010
- Effective Date
- 01-Apr-2010
- Effective Date
- 01-Nov-2008
- Effective Date
- 01-Nov-2006
- Effective Date
- 01-Nov-2006
- Effective Date
- 01-Oct-2005
Overview
ASTM E675-02(2019) is the internationally recognized standard specification for interchangeable taper-ground stopcocks and stoppers, published by ASTM International. This standard outlines the comprehensive dimensional requirements necessary to achieve interchangeability of ground stopcocks and stoppers, primarily used in laboratory and industrial settings. By focusing specifically on the standardized ground surfaces, ASTM E675 ensures reliable assembly and replacement of components, contributing to the efficiency and safety of laboratory operations. The specification applies to ground stopcocks and stoppers of various configurations, including single straight-bore, single and double oblique-bore, T-bore, 120-degree bore stopcocks, as well as flask and bottle stoppers.
Key Topics
Dimensional Interchangeability:
The standard provides the critical dimensional parameters-such as taper, diameter, tolerances, and alignment-for the ground surfaces of stopcocks and stoppers to ensure they are interchangeable across different products and manufacturers.Types Covered:
- Single straight-bore stopcocks
- Single oblique-bore stopcocks
- Double oblique-bore (three-way) stopcocks
- T-bore and 120-degree bore stopcocks
- Taper-ground flask stoppers
- Taper-ground reagent bottle stoppers
Applicable Materials:
Although glass is the most frequently used material, the standard allows for the use of other suitable materials as specified. For glass components, compliance with ASTM E438 and ASTM E671 is required to ensure quality and durability.Tolerances and Gages:
Specific tolerances, plug gages, and ring gages are detailed for precise conformity, supporting quality control and consistent performance.Marking and Packaging:
Guidance is provided for marking interchangeable items and selecting appropriate packaging based on related ASTM specifications.
Applications
ASTM E675-02(2019) is widely adopted in:
Scientific Laboratories:
Ensuring compatibility between glassware parts, such as burettes, flasks, and bottles, for chemical experiments, storage, and sample handling.Industrial Laboratories:
Used in process industries-such as pharmaceuticals, petrochemicals, and food sciences-where reliable laboratory glassware interconnection is essential for process control, research, and quality assurance.Manufacturing and Procurement:
Glassware manufacturers rely on ASTM E675 to guarantee product interchangeability and customer satisfaction. Procurement professionals and quality managers use the standard as a reference for specifying and verifying labware conformity during sourcing.Government and Regulation:
Recognized by organizations such as the U.S. Department of Defense and others, the specification supports standardization in government and accredited laboratory operations.
Related Standards
Several other ASTM standards are referenced in conjunction with ASTM E675-02(2019) to ensure a comprehensive approach:
- ASTM E438: Specification for Glasses in Laboratory Apparatus
- ASTM E671: Specification for Maximum Permissible Thermal Residual Stress in Annealed Glass Laboratory Apparatus
- ASTM E1157: Specification for Sampling and Testing of Reusable Laboratory Glassware
- ASTM E920: Specification for Commercially Packaged Laboratory Apparatus
- ASTM E921: Specification for Export Packaged Laboratory Apparatus
- ASTM E1133: Practice for Performance Testing of Packaged Laboratory Apparatus for United States Government Procurements
- U.S. Department of Commerce CS 21: Commercial Standard for Interchangeable Taper-Ground Joints, Stopcocks, Stoppers, and Spherical-Ground Joints
Conclusion
Adhering to the ASTM E675-02(2019) Standard Specification is crucial for ensuring dimensional interchangeability, performance, and safety of taper-ground stopcocks and stoppers used in laboratories and industrial markets. By following this standard, organizations benefit from enhanced product reliability, streamlined procurement, and compatibility across equipment, supporting global best practices in laboratory operations.
Buy Documents
ASTM E675-02(2019) - Standard Specification for Interchangeable Taper-Ground Stopcocks And Stoppers
Get Certified
Connect with accredited certification bodies for this standard

ECOCERT
Organic and sustainability certification.

Eurofins Food Testing Global
Global leader in food, environment, and pharmaceutical product testing.

Intertek Bangladesh
Intertek certification and testing services in Bangladesh.
Sponsored listings
Frequently Asked Questions
ASTM E675-02(2019) is a technical specification published by ASTM International. Its full title is "Standard Specification for Interchangeable Taper-Ground Stopcocks And Stoppers". This standard covers: ABSTRACT The specification provides the standard dimensional requirements for obtaining, within practical limits, interchangeability in stopcocks and stoppers for ordinary laboratory and industrial applications. It solely covers ground surfaces dimensional interchangeability, and does not involve design characteristics of the item except where specified. Materials shall be tested and shall conform to the specified values of design, dimension, designation, tolerances, taper, and master gages; as stated in the requirements for Single Straight-Bore Taper-Ground Stopcocks, Single Oblique-Bore Stopcocks, Double Oblique-Bore (Three-Way) Stopcocks, T-Bore and 120-deg Bore Stopcocks, Taper-Ground Flask Stoppers, and Taper-Ground Bottle Stoppers. SCOPE 1.1 The specification provides standard dimensional requirements for obtaining, within practical limits, interchangeability in stopcocks and stoppers for ordinary laboratory and industrial applications. It covers dimensional interchangeability of the ground surfaces only and does not involve design characteristics of the item except where specified. Note 1: The dimensions pertaining to stopcocks and stoppers were taken from the Commercial Standard CS 21 of the U.S. Department of Commerce. Note 2: Although glass is the most commonly used material for stopcocks and stoppers, other materials may be used as specified. Stopcocks and stoppers constructed from glass should conform to Specifications E438 and E671. 1.2 This international standard was developed in accordance with internationally recognized principles on standardization established in the Decision on Principles for the Development of International Standards, Guides and Recommendations issued by the World Trade Organization Technical Barriers to Trade (TBT) Committee.
ABSTRACT The specification provides the standard dimensional requirements for obtaining, within practical limits, interchangeability in stopcocks and stoppers for ordinary laboratory and industrial applications. It solely covers ground surfaces dimensional interchangeability, and does not involve design characteristics of the item except where specified. Materials shall be tested and shall conform to the specified values of design, dimension, designation, tolerances, taper, and master gages; as stated in the requirements for Single Straight-Bore Taper-Ground Stopcocks, Single Oblique-Bore Stopcocks, Double Oblique-Bore (Three-Way) Stopcocks, T-Bore and 120-deg Bore Stopcocks, Taper-Ground Flask Stoppers, and Taper-Ground Bottle Stoppers. SCOPE 1.1 The specification provides standard dimensional requirements for obtaining, within practical limits, interchangeability in stopcocks and stoppers for ordinary laboratory and industrial applications. It covers dimensional interchangeability of the ground surfaces only and does not involve design characteristics of the item except where specified. Note 1: The dimensions pertaining to stopcocks and stoppers were taken from the Commercial Standard CS 21 of the U.S. Department of Commerce. Note 2: Although glass is the most commonly used material for stopcocks and stoppers, other materials may be used as specified. Stopcocks and stoppers constructed from glass should conform to Specifications E438 and E671. 1.2 This international standard was developed in accordance with internationally recognized principles on standardization established in the Decision on Principles for the Development of International Standards, Guides and Recommendations issued by the World Trade Organization Technical Barriers to Trade (TBT) Committee.
ASTM E675-02(2019) is classified under the following ICS (International Classification for Standards) categories: 71.040.20 - Laboratory ware and related apparatus. The ICS classification helps identify the subject area and facilitates finding related standards.
ASTM E675-02(2019) has the following relationships with other standards: It is inter standard links to ASTM E675-02(2012), ASTM E438-92(2024), ASTM E920-97(2019), ASTM E438-92(2018), ASTM E920-97(2013), ASTM E438-92(2011), ASTM E1157-87(2011), ASTM E1157-87(2018)e1, ASTM E1133-86(2010), ASTM E921-97(2010), ASTM E671-98(2010), ASTM E920-97(2008), ASTM E1157-87(2006), ASTM E438-92(2006), ASTM E1133-86(2005). Understanding these relationships helps ensure you are using the most current and applicable version of the standard.
ASTM E675-02(2019) is available in PDF format for immediate download after purchase. The document can be added to your cart and obtained through the secure checkout process. Digital delivery ensures instant access to the complete standard document.
Standards Content (Sample)
This international standard was developed in accordance with internationally recognized principles on standardization established in the Decision on Principles for the
Development of International Standards, Guides and Recommendations issued by the World Trade Organization Technical Barriers to Trade (TBT) Committee.
Designation: E675 −02 (Reapproved 2019)
Standard Specification for
Interchangeable Taper-Ground Stopcocks And Stoppers
This standard is issued under the fixed designation E675; the number immediately following the designation indicates the year of
original adoption or, in the case of revision, the year of last revision. A number in parentheses indicates the year of last reapproval. A
superscript epsilon (´) indicates an editorial change since the last revision or reapproval.
This standard has been approved for use by agencies of the U.S. Department of Defense.
1. Scope E1157 Specification for Sampling and Testing of Reusable
Laboratory Glassware
1.1 The specification provides standard dimensional re-
2.2 U.S. Department of Commerce Standard:
quirements for obtaining, within practical limits, interchange-
CS 21 Interchangeable Taper-Ground Joints, Stopcocks,
ability in stopcocks and stoppers for ordinary laboratory and
Stoppers, and Spherical-Ground Joints
industrial applications. It covers dimensional interchangeabil-
ity of the ground surfaces only and does not involve design
3. Requirements for Single Straight-Bore Taper-Ground
characteristics of the item except where specified.
Stopcocks
NOTE 1—The dimensions pertaining to stopcocks and stoppers were
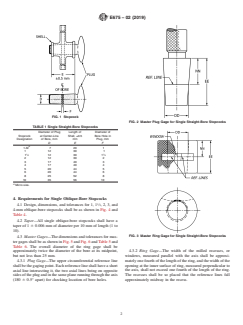
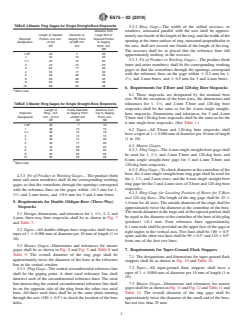
3.1 The designations and dimensions for single straight-
taken from the Commercial Standard CS 21 of the U.S. Department of
bore stopcocks shall be as shown in Fig. 1 and Table 1.
Commerce.
NOTE 2—Although glass is the most commonly used material for
3.2 Taper—All straight-bore stopcocks shall have a taper of
stopcocks and stoppers, other materials may be used as specified.
1 6 0.006 mm of diameter per 10 mm of length (1 to 10).
Stopcocks and stoppers constructed from glass should conform to Speci-
fications E438 and E671. 3.3 Master Gages—Dimensions and tolerances for master
gages shall be as shown in Fig. 2 and Fig. 3, and Table 2 and
1.2 This international standard was developed in accor-
Table 3. Overall diameter of ring gage shall be approximately
dance with internationally recognized principles on standard-
twice the diameter of the bore at the reference line in the
ization established in the Decision on Principles for the
window, but not less than 25 mm.
Development of International Standards, Guides and Recom-
3.3.1 Plug Gage—Plug shall have two short axial lines
mendations issued by the World Trade Organization Technical
180 6 0.5° apart intersecting the reference line for checking
Barriers to Trade (TBT) Committee.
location of bore hole. In addition to the two axial lines 180°
2. Referenced Documents apart intersecting the reference line on the 4 and 6-mm plugs,
two additional axial lines shall be provided on each of these
2.1 ASTM Standards:
plugs for checking the location of the bore hole of T-bore and
E438 Specification for Glasses in Laboratory Apparatus
120-deg bore stopcocks. These two additional axial lines shall
E671 Specification for Maximum Permissible Thermal Re-
be placed 90 and 120° (6 0.5°) from one of the first two axial
sidual Stress in Annealed Glass Laboratory Apparatus
lines.
E920 Specification for Commercially Packaged Laboratory
3.3.2 Ring Gage—The central milled recess, or window,
Apparatus
shall be placed approximately midway between the ends of the
E921 Specification for Export Packaged Laboratory Appa-
ring gage.Width of recess measured parallel with the axis shall
ratus
be approximately one fourth of the length of the ring, and the
E1133 Practice for Performance Testing of Packaged Labo-
width of the opening at the inner surface of ring, measured
ratory Apparatus for United States Government Procure-
perpendicular to the axis, shall not exceed one fourth of the
ments
length of the ring. Reference line in recess shall be placed
approximately midway between ends of ring gage.
3.3.3 Fit of Product in Working Gages— The product (both
This specification is under the jurisdiction of ASTM Committee E41 on
Laboratory Apparatus and is the direct responsibility of Subcommittee E41.01 on inner and outer members) shall fit the corresponding working
Laboratory Ware and Supplies.
gages so that the centerline through the bore corresponds with
Current edition approved Jan. 1, 2019. Published January 2019. Originally
the reference line on the gage within 60.3 mm for 1, 1 ⁄2, and
approvedin1979.Lastpreviouseditionapprovedin2012asE675 – 02(2012).DOI:
2-mm bores; 60.5 mm for 3 and 4-mm bores; and 61.0 mm
10.1520/E0675-02R19.
For referenced ASTM standards, visit the ASTM website, www.astm.org, or
for 5-mm and larger bores.
contact ASTM Customer Service at service@astm.org. For Annual Book of ASTM
Standards volume information, refer to the standard’s Document Summary page on
the ASTM website. Discontinued 1979—U.S. Department of Commerce, Washington, DC 20234.
Copyright © ASTM International, 100 Barr Harbor Drive, PO Box C700, West Conshohocken, PA 19428-2959. United States
E675 − 02 (2019)
FIG. 1 Stopcock
FIG. 2 Master Plug Gage for Single Straight-Bore Stopcocks
TABLE 1 Single Straight-Bore Stopcocks
Diameter of Plug Length of Diameter of
Stopcock at Center-Line Shell, ±0.5 Bore Hole in
Designation of Bore, mm mm Plug, mm
D E F
A
1-M 720 1
112 30 1
1 1
1 ⁄2 12 30 1 ⁄2
212 30 2
317 40 3
417 40 4
520 44 5
620 44 6
825 52 8
10 35 56 10
A
Micro size.
4. Requirements for Single Oblique-Bore Stopcocks
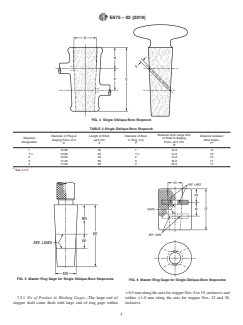
4.1 Design, dimensions, and tolerances for 1, 1 ⁄2,2,3,and
4-mm oblique-bore stopcocks shall be as shown in Fig. 4 and
Table 4.
4.2 Taper—All single oblique-bore stopcocks shall have a
taper of 1 6 0.006 mm of diameter per 10 mm of length (1 to
10).
FIG. 3 Master Ring Gage for Single Straight-Bore Stopcocks
4.3 MasterGages—The dimensions and tolerances for mas-
ter gages shall be as shown in Fig. 5 and Fig. 6 and Table 5 and
Table 6. The overall diameter of the ring gage shall be
approximately twice the diameter of the bore at its midpoint, 4.3.2 Ring Gage—The width of the milled recesses, or
but not less than 25 mm. windows, measured parallel with the axis shall be approxi-
4.3.1 Plug Gage—The upper circumferential reference line mately one fourth of the length of the ring, and the width of the
shall be the gaging point. Each reference line shall have a short opening at the inner surface of ring, measured perpendicular to
axial line intersecting it, the two axial lines being on opposite the axis, shall not exceed one fourth of the length of the ring.
sidesoftheplugandinthesameplanerunningthroughtheaxis The recesses shall be so placed that the reference lines fall
(180 6 0.5° apart) for checking location of bore holes. approximately midway in the recess.
E675 − 02 (2019)
TABLE 2 Master Plug Gages for Single Straight-Bore Stopcocks
5.3.2 Ring Gage—The width of the milled recesses, or
Distance from windows, measured parallel with the axis shall be approxi-
Length of Tapered Diameter at Large End of
mately one fourth of the length of the ring, and the width of the
Stopcock Portion +2.0 mm, Gaging Point Tapered Portion
opening at the inner surface of ring, measured perpendicular to
Designation −0 mm ±0.003 mm to Gaging
EE DD Point, mm the axis, shall not exceed one fourth of the length of the ring.
NN
The recesses shall be so placed that the reference lines fall
A
1-M 32 7 20
approximately midway in the recesses.
142 12 25
1 5.3.3 Fit of Product in Working Gages— The product (both
1 ⁄2 42 12 25
242 12 25
inner and outer members) shall fit the corresponding working
352 17 30
gages so that the centerlines through the openings correspond
452 17 30
with the reference lines on the gage within 6 0.3 mm for 1,
556 20 32
656 20 32
1 ⁄2, and 2-mm bores, and 6 0.5 mm for 3 and 4-mm bores.
864 25 36
10 68 35 38
6. Requirements for T-Bore and 120-deg Bore Stopcocks
A
Micro size.
6.1 These stopcocks are designated by the nominal bore
size. With the exception of the bore sizes, the dimensions and
TABLE 3 Master Ring Gages for Single Straight-Bore Stopcocks tolerances for 1, 1 ⁄2, and 2-mm T-bore and 120-deg bore
stopcocks shall be the same as for the 4-mm single straight-
Length of Inside Diameter Distance from
Stopcock Ring, +0.2 at Gaging Point, Top to Gaging bore stopcocks. Dimensions and tolerances for 3 and 4-mm
Designation mm, −0 mm ±0.003 mm Point, mm
T-bore and 120-deg bore stopcocks shall be the same as for the
EE DD NN
6-mm single-bore stopcocks. (See Table 1.)
A
1-M 20 7 10
1 301215
6.2 Taper—All T-bore and 120-deg bore stopcocks shall
1 ⁄2 30 12 15
have a taper of 1 6 0.006 mm of diameter per 10 mm of length
2 301215
3 401720 (1 to 10).
4 401720
6.3 Master Gages:
5 442022
6 442022
6.3.1 Plug Gage—The 4-mm single straight-bore gage shall
8 522526
be used for 1, 1 ⁄2, and 2-mm T-bore and 120-deg bore, and
10 56 35 28
6-mm single straight-bore gage for 3 and 4-mm T-bore and
A
Micro size.
120-deg bore stopcocks.
6.3.2 RingGage—To check diameter at the centerline of the
bore, the 4-mm single straight-bore ring gage shall be used for
4.3.3 Fit of Product in Working Gages— The product (both
the 1, 1 ⁄2, and 2-mm sizes; and the 6-mm single straight-bore
inner and outer members) shall fit the corresponding working
ring gage for the 3 and 4-mm sizes of T-bore and 120-deg bore
gages so that the centerlines through the openings correspond
stopcocks.
with the reference lines on the gages within 60.3 mm for 1,
1 6.3.3 Ring Gage for Locating Position of Bores for T-Bore
1 ⁄2, and 2-mm bores, and 60.5 mm for 3 and 4-mm bores.
and 120-deg Bore—The length of the ring gage shall be 25 6
5. Requirements for Double Oblique-Bore (Three-Way)
1.0 mm for all sizes. The outside diameter of the rings shall be
Stopcocks
approximately twice the diameter at the centerline of the bore.
1 The inside diameter at the large end of the tapered portion shall
5.1 Design, dimensions, and tolerances for 1, 1 ⁄2,2,3,and
be equal to the diameter at the centerline of the bore of the plug
4-mm, three-way bore stopcocks shall be as shown in Fig. 7
(product) 60.1 mm. Four reference lines approximately
and Table 7.
0.1 mm wide shall be provided on the upper face of the gage at
5.2 Taper—All double oblique-bore stopcocks shall have a
right angles to the vertical axis. Two lines shall be 180 6 0.5°
taper of 1 6 0.006 mm of diameter per 10 mm of length (1 to
apart,andtheothertwolinesshallbe90 60.5°and120 60.5°
10).
from one of the first two lines.
5.3
...


Questions, Comments and Discussion
Ask us and Technical Secretary will try to provide an answer. You can facilitate discussion about the standard in here.
Loading comments...