ASTM D3929-03(2023)
(Test Method)Standard Test Method for Evaluating Stress Cracking of Plastics by Adhesives Using the Bent-Beam Method
Standard Test Method for Evaluating Stress Cracking of Plastics by Adhesives Using the Bent-Beam Method
SIGNIFICANCE AND USE
5.1 This test method is designed for obtaining a qualitative estimate of the compatibility of plastics and adhesives. Due to the many process variables associated with the fabrication of plastic parts, it is not possible to use this test as a substitute for compatibility tests on actual parts.
5.2 The detection of cracks or crazes may be determined with or without optical aid. Make comparisons only among tests employing crack detection methods of equivalent sensitivity.
SCOPE
1.1 This test method describes a procedure for determining the compatibility of adhesives with plastics based on whether the adhesive causes cracking of stressed samples.
1.2 Specimen configurations and test fixture designs are given.
1.3 This test method is suitable for products in the form of sheet or strip. It can also be used on injection molded tensile specimens or flexural bars.
1.4 The values stated in SI units are to be regarded as the standard. The inch-pound units given in parentheses are for information only.
1.5 This standard does not purport to address all of the safety concerns, if any, associated with its use. It is the responsibility of the user of this standard to establish appropriate safety, health, and environmental practices and determine the applicability of regulatory limitations prior to use.
1.6 This international standard was developed in accordance with internationally recognized principles on standardization established in the Decision on Principles for the Development of International Standards, Guides and Recommendations issued by the World Trade Organization Technical Barriers to Trade (TBT) Committee.
General Information
- Status
- Published
- Publication Date
- 30-Apr-2023
- Technical Committee
- D14 - Adhesives
- Drafting Committee
- D14.40 - Adhesives for Plastics
Relations
- Effective Date
- 01-Jul-2017
- Effective Date
- 01-Dec-2015
- Effective Date
- 01-Dec-2015
- Effective Date
- 01-Jul-2012
- Effective Date
- 01-May-2012
- Effective Date
- 01-Dec-2011
- Effective Date
- 01-Jan-2011
- Effective Date
- 15-May-2010
- Effective Date
- 01-Oct-2008
- Effective Date
- 15-Aug-2008
- Effective Date
- 01-Mar-2008
- Effective Date
- 01-Sep-2007
- Effective Date
- 01-Sep-2007
- Effective Date
- 01-Dec-2006
- Effective Date
- 01-Apr-2005
Overview
ASTM D3929-03(2023): Standard Test Method for Evaluating Stress Cracking of Plastics by Adhesives Using the Bent-Beam Method is an internationally recognized methodology for assessing the compatibility between plastics and adhesives. Developed by ASTM International, this standard provides a qualitative test to determine whether a liquid adhesive will induce stress cracking or crazing in stressed plastic specimens. It is widely used to help manufacturers, product designers, and quality assurance teams identify potential material incompatibilities before going into full-scale production, especially important in industries relying on adhesive bonding of plastic components.
Key Topics
- Compatibility Assessment: The test method assesses the chemical compatibility of adhesives with plastics under stress, identifying if adhesives might cause cracking or crazing.
- Bent-Beam Technique: Plastic bars are bent in a three-point loading fixture to introduce surface stress. The adhesive is then applied to the stressed area to observe possible failure.
- Specimen Types: Suitable for sheet, strip, and injection-molded plastics, including flexural or tensile bars.
- Observation Methods: Detection of cracks or crazes may be performed with the naked eye or with optical aids; results must be compared among tests with comparable detection sensitivity.
- Control and Environmental Conditions: Control specimens are run alongside each test to monitor background effects. Standard environmental conditions, such as 23°C and 50% relative humidity, are recommended unless otherwise specified.
- Reporting Requirements: Reports include details about test specimens, adhesives, achieved stress levels, test duration, and observed results.
Applications
ASTM D3929-03(2023) is essential for a range of practical scenarios, including:
- Material Selection: Assisting in the selection of adhesives and plastics that are compatible, reducing the risk of product failure from environmental stress cracking.
- Product Development: Used during R&D phases to preemptively identify and mitigate adhesive-induced failures in new plastic assemblies.
- Quality Control: Employed by manufacturers to ensure that adhesives used in assembly lines do not compromise plastic integrity under typical service stresses.
- Industry Sectors: Particularly valuable in automotive, consumer electronics, packaging, medical devices, and construction, where bonded plastic parts are subject to mechanical stress and environmental factors.
- Regulatory Compliance: Supports compliance with internal standards and international regulations regarding safety and product durability.
Related Standards
For comprehensive evaluation and testing of plastics and adhesives, ASTM D3929-03(2023) is often used in conjunction with the following standards:
- ASTM D638 - Test Method for Tensile Properties of Plastics
- ASTM D790 - Test Methods for Flexural Properties of Unreinforced and Reinforced Plastics and Electrical Insulating Materials
- ASTM D907 - Terminology of Adhesives
These related standards provide additional methodologies and definitions critical for advanced materials characterization and quality assessment.
By following the ASTM D3929-03(2023) standard, organizations ensure thorough evaluation of adhesive-plastic compatibility, helping prevent product failures due to stress cracking or crazing and supporting the development of safe, high-performance plastic assemblies. This standard is crucial for businesses seeking to optimize product performance, achieve regulatory compliance, and maintain competitive quality in global markets.
Buy Documents
ASTM D3929-03(2023) - Standard Test Method for Evaluating Stress Cracking of Plastics by Adhesives Using the Bent-Beam Method
Get Certified
Connect with accredited certification bodies for this standard

Smithers Quality Assessments
US management systems and product certification.

DIN CERTCO
DIN Group product certification.
Sponsored listings
Frequently Asked Questions
ASTM D3929-03(2023) is a standard published by ASTM International. Its full title is "Standard Test Method for Evaluating Stress Cracking of Plastics by Adhesives Using the Bent-Beam Method". This standard covers: SIGNIFICANCE AND USE 5.1 This test method is designed for obtaining a qualitative estimate of the compatibility of plastics and adhesives. Due to the many process variables associated with the fabrication of plastic parts, it is not possible to use this test as a substitute for compatibility tests on actual parts. 5.2 The detection of cracks or crazes may be determined with or without optical aid. Make comparisons only among tests employing crack detection methods of equivalent sensitivity. SCOPE 1.1 This test method describes a procedure for determining the compatibility of adhesives with plastics based on whether the adhesive causes cracking of stressed samples. 1.2 Specimen configurations and test fixture designs are given. 1.3 This test method is suitable for products in the form of sheet or strip. It can also be used on injection molded tensile specimens or flexural bars. 1.4 The values stated in SI units are to be regarded as the standard. The inch-pound units given in parentheses are for information only. 1.5 This standard does not purport to address all of the safety concerns, if any, associated with its use. It is the responsibility of the user of this standard to establish appropriate safety, health, and environmental practices and determine the applicability of regulatory limitations prior to use. 1.6 This international standard was developed in accordance with internationally recognized principles on standardization established in the Decision on Principles for the Development of International Standards, Guides and Recommendations issued by the World Trade Organization Technical Barriers to Trade (TBT) Committee.
SIGNIFICANCE AND USE 5.1 This test method is designed for obtaining a qualitative estimate of the compatibility of plastics and adhesives. Due to the many process variables associated with the fabrication of plastic parts, it is not possible to use this test as a substitute for compatibility tests on actual parts. 5.2 The detection of cracks or crazes may be determined with or without optical aid. Make comparisons only among tests employing crack detection methods of equivalent sensitivity. SCOPE 1.1 This test method describes a procedure for determining the compatibility of adhesives with plastics based on whether the adhesive causes cracking of stressed samples. 1.2 Specimen configurations and test fixture designs are given. 1.3 This test method is suitable for products in the form of sheet or strip. It can also be used on injection molded tensile specimens or flexural bars. 1.4 The values stated in SI units are to be regarded as the standard. The inch-pound units given in parentheses are for information only. 1.5 This standard does not purport to address all of the safety concerns, if any, associated with its use. It is the responsibility of the user of this standard to establish appropriate safety, health, and environmental practices and determine the applicability of regulatory limitations prior to use. 1.6 This international standard was developed in accordance with internationally recognized principles on standardization established in the Decision on Principles for the Development of International Standards, Guides and Recommendations issued by the World Trade Organization Technical Barriers to Trade (TBT) Committee.
ASTM D3929-03(2023) is classified under the following ICS (International Classification for Standards) categories: 83.080.01 - Plastics in general; 83.180 - Adhesives. The ICS classification helps identify the subject area and facilitates finding related standards.
ASTM D3929-03(2023) has the following relationships with other standards: It is inter standard links to ASTM D790-17, ASTM D790-15e1, ASTM D790-15, ASTM D907-12a, ASTM D907-12, ASTM D907-11a, ASTM D907-11, ASTM D638-10, ASTM D907-08b, ASTM D907-08a, ASTM D907-08, ASTM D790-07, ASTM D790-07e1, ASTM D907-06, ASTM D907-05e1. Understanding these relationships helps ensure you are using the most current and applicable version of the standard.
ASTM D3929-03(2023) is available in PDF format for immediate download after purchase. The document can be added to your cart and obtained through the secure checkout process. Digital delivery ensures instant access to the complete standard document.
Standards Content (Sample)
This international standard was developed in accordance with internationally recognized principles on standardization established in the Decision on Principles for the
Development of International Standards, Guides and Recommendations issued by the World Trade Organization Technical Barriers to Trade (TBT) Committee.
Designation: D3929 − 03 (Reapproved 2023)
Standard Test Method for
Evaluating Stress Cracking of Plastics by Adhesives Using
the Bent-Beam Method
This standard is issued under the fixed designation D3929; the number immediately following the designation indicates the year of
original adoption or, in the case of revision, the year of last revision. A number in parentheses indicates the year of last reapproval. A
superscript epsilon (´) indicates an editorial change since the last revision or reapproval.
1. Scope 3. Terminology
1.1 This test method describes a procedure for determining
3.1 Definitions—Many of the terms in this test method are
the compatibility of adhesives with plastics based on whether
defined in Terminology D907.
the adhesive causes cracking of stressed samples.
3.2 Definitions of Terms Specific to This Standard:
1.2 Specimen configurations and test fixture designs are
3.2.1 cracking, n—a continuous localized failure of the
given.
plastic, leading to loss of structural integrity.
1.3 This test method is suitable for products in the form of
3.2.2 crazing, n—apparent fine cracks at or under the
sheet or strip. It can also be used on injection molded tensile
surface of a plastic.
specimens or flexural bars.
3.2.2.1 Discussion—This is a form of localized yielding of
1.4 The values stated in SI units are to be regarded as the
the plastic due to the combined action of stress and an attacking
standard. The inch-pound units given in parentheses are for
medium. Initial crazing may be detectable only by inspection
information only.
under magnification.
1.5 This standard does not purport to address all of the
3.2.3 failure, n—an arbitrary point defined by the initial
safety concerns, if any, associated with its use. It is the
detection of cracks or crazes.
responsibility of the user of this standard to establish appro-
priate safety, health, and environmental practices and deter-
4. Summary of Test Method
mine the applicability of regulatory limitations prior to use.
1.6 This international standard was developed in accor-
4.1 This test method involves the qualitative determination
dance with internationally recognized principles on standard-
of the compatibility of adhesives with plastics by observing the
ization established in the Decision on Principles for the
effect of adhesives applied in the liquid state on stressed plastic
Development of International Standards, Guides and Recom-
specimens. Bars of plastic are bent in a three-point loading
mendations issued by the World Trade Organization Technical
fixture to cause a predetermined initial tensile stress on the
Barriers to Trade (TBT) Committee.
surface of the bar. The liquid adhesive is then applied to the
area of maximum stress which is checked periodically for
2. Referenced Documents
crazing or cracking.
2.1 ASTM Standards:
4.1.1 Due to the stress relaxation behavior of certain
D638 Test Method for Tensile Properties of Plastics
plastics, initial stress only can be determined and the stress
D790 Test Methods for Flexural Properties of Unreinforced
level may decrease significantly during the course of the test.
and Reinforced Plastics and Electrical Insulating Materi-
als
5. Significance and Use
D907 Terminology of Adhesives
5.1 This test method is designed for obtaining a qualitative
estimate of the compatibility of plastics and adhesives. Due to
This test method is under the jurisdiction of ASTM Committee D14 on
the many process variables associated with the fabrication of
Adhesives and is the direct responsibility of Subcommittee D14.40 on Adhesives for
plastic parts, it is not possible to use this test as a substitute for
Plastics.
Current edition approved May 1, 2023. Published May 2023. Originally
compatibility tests on actual parts.
approved in 1980. Last previous edition approved in 2015 as D3929 – 03 (2015).
DOI: 10.1520/D3929-03R23.
5.2 The detection of cracks or crazes may be determined
For referenced ASTM standards, visit the ASTM website, www.astm.org, or
with or without optical aid. Make comparisons only among
contact ASTM Customer Service at service@astm.org. For Annual Book of ASTM
tests employing crack detection methods of equivalent sensi-
Standards volume information, refer to the standard’s Document Summary page on
the ASTM website. tivity.
Copyright © ASTM International, 100 Barr Harbor Drive, PO Box C700, West Conshohocken, PA 19428-2959. United States
D3929 − 03 (2023)
8. Procedure
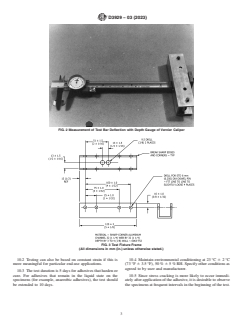
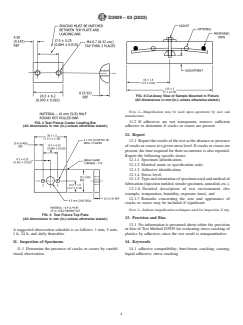
8.1 Place the plastic test specimen in the test fixture at the
required loading (see Fig. 6).
8.2 Apply adhesive to be tested to the center point on the
length of the loaded specimen. Cover a specimen length of
approximately 25 mm (1 in.). In general, apply the adhesive
only once, as would be the case in an actual end-use applica-
tion.
8.2.1 If the adhesive contains a solvent, allow it to evaporate
at a normal rate.
8.2.2 If the adhesive is a curing type, cure in a normal
fashion.
8.2.3 If the adhesive is a hot melt, apply at the normal
application temperature and then allow to cool. This is a less
severe condition than would occur if the adhesive were
continually applied, but is more consistent with situations that
occur in actual adhesive use.
8.3 Control Specimens—Concurrently run one control
specimen with the test specimens in the same location. Exces-
sive molded-in stresses or airborne solvent vapors may cause
stress cracking even without application of adhesive.
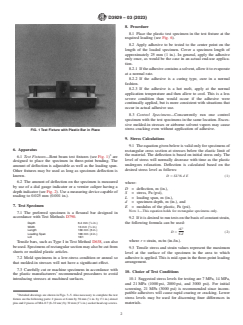
FIG. 1 Test Fixture with Plastic Bar in Place
9. Stress Calculations
9.1 The equation given below is valid only for specimens of
6. Apparatus
rectangular cross section at stresses below the elastic limit of
the material. The deflection is based on initial stress only. The
6.1 Test Fixtures—Bent beam test fixtures (see Fig. 1) are
level of stress will normally decrease with time as the plastic
designed to place the specimen in three-point bending. The
undergoes relaxation. Deflection is calculated based on the
amount of deflection is adjustable as well as the loading span.
desired stress level as follows:
Other fixtures may be used as long as s
...


Questions, Comments and Discussion
Ask us and Technical Secretary will try to provide an answer. You can facilitate discussion about the standard in here.
Loading comments...