ASTM B648-23
(Test Method)Standard Test Method for Indentation Hardness of Aluminum Alloys by Means of a Barcol Impressor
Standard Test Method for Indentation Hardness of Aluminum Alloys by Means of a Barcol Impressor
SIGNIFICANCE AND USE
4.1 The Barcol Impressor is portable and therefore useful for in situ determination of the hardness of fabricated parts and individual test specimens for production control purposes.
4.2 This test method should be used only as cited in applicable material specifications.
SCOPE
1.1 This test method covers the determination of indentation hardness of aluminum alloys using a Barcol Impressor.
1.2 The values stated in SI units are to be regarded as standard. The values given in parentheses after SI units are provided for information only and are not considered standard.
1.2.1 Some Barcol Impressors are for use on plastics and are not included in this test method and should not be used for aluminum alloys.
1.3 This standard does not purport to address all of the safety concerns, if any, associated with its use. It is the responsibility of the user of this standard to establish appropriate safety, health, and environmental practices and determine the applicability of regulatory limitations prior to use.
1.4 This international standard was developed in accordance with internationally recognized principles on standardization established in the Decision on Principles for the Development of International Standards, Guides and Recommendations issued by the World Trade Organization Technical Barriers to Trade (TBT) Committee.
General Information
- Status
- Published
- Publication Date
- 31-May-2023
- Technical Committee
- B07 - Light Metals and Alloys
- Drafting Committee
- B07.05 - Testing
Relations
- Effective Date
- 01-Jul-2018
- Effective Date
- 01-Jul-2017
- Effective Date
- 01-May-2014
- Effective Date
- 01-May-2014
- Effective Date
- 01-May-2013
- Effective Date
- 01-May-2013
- Effective Date
- 01-Dec-2012
- Effective Date
- 01-Jan-2012
- Effective Date
- 01-Nov-2011
- Effective Date
- 01-Nov-2011
- Effective Date
- 01-Oct-2010
- Effective Date
- 01-Jun-2010
- Effective Date
- 15-May-2009
- Effective Date
- 15-May-2009
- Effective Date
- 01-Apr-2009
Overview
ASTM B648-23: Standard Test Method for Indentation Hardness of Aluminum Alloys by Means of a Barcol Impressor specifies the procedure for determining the indentation hardness of aluminum alloys using a Barcol Impressor. This portable device enables rapid, on-site hardness measurements of fabricated aluminum parts and production specimens, making it an essential tool in quality control and production monitoring. ASTM B648-23 is widely recognized for its practical value in non-destructive testing of aluminum alloy hardness, particularly where laboratory-based methods are not feasible.
Key Topics
- Scope of Use: The method is specifically intended for testing aluminum alloys. Barcol Impressors designed for plastics are excluded from this standard and should not be used with aluminum alloys.
- Portability: The Barcol Impressor is portable, making it suitable for in situ hardness testing in manufacturing environments, field inspections, and for testing large or assembled components.
- Testing Procedure:
- Only use smooth, clean, undamaged surfaces.
- Ensure a minimum specimen thickness and distance from the edge to achieve accurate readings.
- Calibration of the device is required before use, using standardized reference disks for both hard and soft aluminum alloys.
- Measurements must be perpendicular to the test surface to prevent skewed results, especially on curved or irregular surfaces.
- Reporting Requirements: Results should include the identification of the tested material, the impressor’s model and serial number, the number of readings, the averaged hardness value, and the test date.
Applications
The ASTM B648-23 test method is widely used across various industries because of its speed, portability, and minimal impact on tested components. Typical applications include:
- Production Control: Quick, reliable verification of aluminum alloy hardness during fabrication or after heat treatment.
- Quality Assurance: Ensuring consistency and conformity with specified alloy properties in manufacturing and inspection processes.
- Maintenance and Inspection: Non-destructive field testing for service parts, components under repair, and on-site hardness verification.
- Research and Development: Characterizing material properties during alloy development or comparative studies.
This method is especially valuable for applications where traditional laboratory hardness testers like Brinell or Rockwell are impractical due to the size, shape, or location of the component.
Related Standards
When using ASTM B648-23, professionals may also reference other pertinent ASTM standards, including:
- ASTM E6: Terminology Relating to Methods of Mechanical Testing
- ASTM E10: Test Method for Brinell Hardness of Metallic Materials
- ASTM E18: Test Methods for Rockwell Hardness of Metallic Materials
- ASTM E177: Practice for Use of the Terms Precision and Bias in ASTM Test Methods
- ASTM E691: Practice for Conducting an Interlaboratory Study to Determine the Precision of a Test Method
These standards provide terminology, alternative hardness test methods, and best practices for ensuring measurement accuracy and reproducibility.
Keywords: ASTM B648-23, Barcol hardness, aluminum alloys, indentation hardness, portable hardness testing, production control, quality assurance, non-destructive testing, mechanical testing standards.
Buy Documents
ASTM B648-23 - Standard Test Method for Indentation Hardness of Aluminum Alloys by Means of a Barcol Impressor
REDLINE ASTM B648-23 - Standard Test Method for Indentation Hardness of Aluminum Alloys by Means of a Barcol Impressor
Get Certified
Connect with accredited certification bodies for this standard

Element Materials Technology
Materials testing and product certification.

Inštitut za kovinske materiale in tehnologije
Institute of Metals and Technology. Materials testing, metallurgical analysis, NDT.
Sponsored listings
Frequently Asked Questions
ASTM B648-23 is a standard published by ASTM International. Its full title is "Standard Test Method for Indentation Hardness of Aluminum Alloys by Means of a Barcol Impressor". This standard covers: SIGNIFICANCE AND USE 4.1 The Barcol Impressor is portable and therefore useful for in situ determination of the hardness of fabricated parts and individual test specimens for production control purposes. 4.2 This test method should be used only as cited in applicable material specifications. SCOPE 1.1 This test method covers the determination of indentation hardness of aluminum alloys using a Barcol Impressor. 1.2 The values stated in SI units are to be regarded as standard. The values given in parentheses after SI units are provided for information only and are not considered standard. 1.2.1 Some Barcol Impressors are for use on plastics and are not included in this test method and should not be used for aluminum alloys. 1.3 This standard does not purport to address all of the safety concerns, if any, associated with its use. It is the responsibility of the user of this standard to establish appropriate safety, health, and environmental practices and determine the applicability of regulatory limitations prior to use. 1.4 This international standard was developed in accordance with internationally recognized principles on standardization established in the Decision on Principles for the Development of International Standards, Guides and Recommendations issued by the World Trade Organization Technical Barriers to Trade (TBT) Committee.
SIGNIFICANCE AND USE 4.1 The Barcol Impressor is portable and therefore useful for in situ determination of the hardness of fabricated parts and individual test specimens for production control purposes. 4.2 This test method should be used only as cited in applicable material specifications. SCOPE 1.1 This test method covers the determination of indentation hardness of aluminum alloys using a Barcol Impressor. 1.2 The values stated in SI units are to be regarded as standard. The values given in parentheses after SI units are provided for information only and are not considered standard. 1.2.1 Some Barcol Impressors are for use on plastics and are not included in this test method and should not be used for aluminum alloys. 1.3 This standard does not purport to address all of the safety concerns, if any, associated with its use. It is the responsibility of the user of this standard to establish appropriate safety, health, and environmental practices and determine the applicability of regulatory limitations prior to use. 1.4 This international standard was developed in accordance with internationally recognized principles on standardization established in the Decision on Principles for the Development of International Standards, Guides and Recommendations issued by the World Trade Organization Technical Barriers to Trade (TBT) Committee.
ASTM B648-23 is classified under the following ICS (International Classification for Standards) categories: 77.120.10 - Aluminium and aluminium alloys. The ICS classification helps identify the subject area and facilitates finding related standards.
ASTM B648-23 has the following relationships with other standards: It is inter standard links to ASTM E18-18, ASTM E18-17, ASTM E10-14, ASTM E177-14, ASTM E691-13, ASTM E177-13, ASTM E18-12, ASTM E10-12, ASTM E18-11, ASTM E691-11, ASTM E177-10, ASTM E10-10, ASTM E6-09b, ASTM E6-09be1, ASTM E6-09a. Understanding these relationships helps ensure you are using the most current and applicable version of the standard.
ASTM B648-23 is available in PDF format for immediate download after purchase. The document can be added to your cart and obtained through the secure checkout process. Digital delivery ensures instant access to the complete standard document.
Standards Content (Sample)
This international standard was developed in accordance with internationally recognized principles on standardization established in the Decision on Principles for the
Development of International Standards, Guides and Recommendations issued by the World Trade Organization Technical Barriers to Trade (TBT) Committee.
Designation: B648 − 23
Standard Test Method for
Indentation Hardness of Aluminum Alloys by Means of a
Barcol Impressor
This standard is issued under the fixed designation B648; the number immediately following the designation indicates the year of
original adoption or, in the case of revision, the year of last revision. A number in parentheses indicates the year of last reapproval. A
superscript epsilon (´) indicates an editorial change since the last revision or reapproval.
1. Scope 3. Terminology
3.1 Definitions—The definitions of terms relating to hard-
1.1 This test method covers the determination of indentation
hardness of aluminum alloys using a Barcol Impressor. ness testing appearing in Terminology E6 shall be considered
as applying to the terms used in this test method.
1.2 The values stated in SI units are to be regarded as
standard. The values given in parentheses after SI units are
4. Significance and Use
provided for information only and are not considered standard.
4.1 The Barcol Impressor is portable and therefore useful
1.2.1 Some Barcol Impressors are for use on plastics and are
for in situ determination of the hardness of fabricated parts and
not included in this test method and should not be used for
individual test specimens for production control purposes.
aluminum alloys.
4.2 This test method should be used only as cited in
1.3 This standard does not purport to address all of the
applicable material specifications.
safety concerns, if any, associated with its use. It is the
responsibility of the user of this standard to establish appro-
5. Apparatus
priate safety, health, and environmental practices and deter-
mine the applicability of regulatory limitations prior to use.
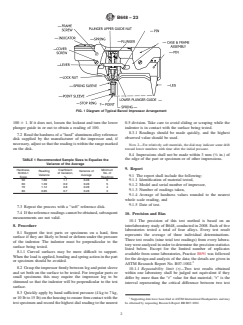
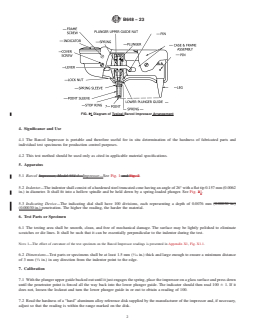
5.1 Barcol Impressor—See Fig. 1.
1.4 This international standard was developed in accor-
5.2 Indentor—The indentor shall consist of a hardened steel
dance with internationally recognized principles on standard-
truncated cone having an angle of 26° with a flat tip 0.157 mm
ization established in the Decision on Principles for the
(0.0062 in.) in diameter. It shall fit into a hollow spindle and be
Development of International Standards, Guides and Recom-
held down by a spring-loaded plunger. See Fig. 1.
mendations issued by the World Trade Organization Technical
5.3 Indicating Device—The indicating dial shall have 100
Barriers to Trade (TBT) Committee.
divisions, each representing a depth of 0.0076 mm
(0.00030 in.) penetration. The higher the reading, the harder
2. Referenced Documents
the material.
2.1 ASTM Standards:
E6 Terminology Relating to Methods of Mechanical Testing
6. Test Parts or Specimen
E10 Test Method for Brinell Hardness of Metallic Materials
6.1 The testing area shall be smooth, clean, and free of
E18 Test Methods for Rockwell Hardness of Metallic Ma-
mechanical damage. The surface may be lightly polished to
terials
eliminate scratches or die lines. It shall be such that it can be
E177 Practice for Use of the Terms Precision and Bias in
essentially perpendicular to the indentor during the test.
ASTM Test Methods
E691 Practice for Conducting an Interlaboratory Study to
NOTE 1—The effect of curvature of the test specimen on the Barcol
Impressor readings is presented in Appendix X1, Fig. X1.1.
Determine the Precision of a Test Method
6.2 Dimensions—Test parts or specimens shall be at least
1.5 mm ( ⁄16 in.) thick and large enough to ensure a minimum
1 distance of 3 mm ( ⁄8 in.) in any direction from the indentor
This test method is under the jurisdiction of ASTM Committee B07 on Light
Metals and Alloys and is the direct responsibility of Subcommittee B07.05 on point to the edge.
Testing.
Current edition approved June 1, 2023. Published June 2023. Originally
7. Calibration
ɛ1
approved in 1978. Last previous edition approved in 2015 as B648 – 10 (2015) .
DOI: 10.1520/B0648-23.
7.1 With the plunger upper guide backed out until it just
For referenced ASTM standards, visit the ASTM website, www.astm.org, or
engages the spring, place the impressor on a glass surface and
contact ASTM Customer Service at service@astm.org. For Annual Book of ASTM
press down until the penetrator point is forced all the way back
Standards volume information, refer to the standard’s Document Summary page on
the ASTM website. into the lower plunger guide. The indicator should then read
Copyright © ASTM International, 100 Barr Harbor Drive, PO Box C700, West Conshohocken, PA 19428-2959. United States
B648 − 23
FIG. 1 Diagram of Typical Barcol Impressor Arrangement
100 6 1. If it does not, loosen the locknut and turn the lower 0.5 division. Take care to avoid sliding or scraping while the
plunger guide in or out to obtain a reading of 100. indentor is in contact with the surface being tested.
8.3.1 Readings should be made quickly, and the highest
7.2 Read the hardness of a “hard” aluminum alloy reference
observed value should be used.
disk supplied by the manufacturer of the impressor and, if
necessary, adjust so that the reading is within the range marked
NOTE 2—For relatively soft materials, the dial may indicate some drift
toward lower numbers with time after the initial pressure.
on the disk.
8.4 Impressions shall not be made within 3 mm ( ⁄8 in.) of
the edge of the part or specimen or of other impressions.
TABLE 1 Recommended Sample Sizes to Equalize the
Variance of the Average
9. Report
Hardness, Coefficient Minimum
Reading Variance of
M-934-1 of Variation, No. of
Variance Average
9.1 The report shall include the following:
Scale % Readings
50 1.66 1.1 0.28 6 9.1.1 Identification of material tested,
60 1.39 0.9 0.28 5
9.1.2 Model and serial number of impressor,
70 1.12 0.8 0.28 4
9.1.3 Number of readings taken,
80 0.85 0.7 0.28 3
9.1.4 Average of hardness values rounded to the nearest
whole scale reading, and
9.1.5 Date of test.
7.3 Repeat the process with a “soft” reference disk.
7.4 If the reference readings cannot be obtained, subsequent
10. Precision and Bias
measurements are not valid.
10.1 The precision of this test
...
This document is not an ASTM standard and is intended only to provide the user of an ASTM standard an indication of what changes have been made to the previous version. Because
it may not be technically possible to adequately depict all changes accurately, ASTM recommends that users consult prior editions as appropriate. In all cases only the current version
of the standard as published by ASTM is to be considered the official document.
´1
Designation: B648 − 10 (Reapproved 2015) B648 − 23
Standard Test Method for
Indentation Hardness of Aluminum Alloys by Means of a
Barcol Impressor
This standard is issued under the fixed designation B648; the number immediately following the designation indicates the year of
original adoption or, in the case of revision, the year of last revision. A number in parentheses indicates the year of last reapproval. A
superscript epsilon (´) indicates an editorial change since the last revision or reapproval.
ε NOTE—Appendix X1 was moved to appear one page in October 2015.
1. Scope
1.1 This test method covers the determination of indentation hardness of aluminum alloys using a Barcol Impressor, Model No.
934-1.Impressor.
1.2 The values stated in SI units are to be regarded as standard. No other units of measurement are included in this The values
given in parentheses after SI units are provided for information only and are not considered standard.
1.2.1 Exception—The values given in parentheses are for information only.Some Barcol Impressors are for use on plastics and are
not included in this test method and should not be used for aluminum alloys.
NOTE 1—Another model, No. 935, is for use on plastics but is not included in this test method and should not be used for aluminum alloys.
1.3 This standard does not purport to address all of the safety concerns, if any, associated with its use. It is the responsibility
of the user of this standard to establish appropriate safety and healthsafety, health, and environmental practices and determine
the applicability of regulatory limitations prior to use.
1.4 This international standard was developed in accordance with internationally recognized principles on standardization
established in the Decision on Principles for the Development of International Standards, Guides and Recommendations issued
by the World Trade Organization Technical Barriers to Trade (TBT) Committee.
2. Referenced Documents
2.1 ASTM Standards:
E6 Terminology Relating to Methods of Mechanical Testing
E10 Test Method for Brinell Hardness of Metallic Materials
E18 Test Methods for Rockwell Hardness of Metallic Materials
E177 Practice for Use of the Terms Precision and Bias in ASTM Test Methods
E691 Practice for Conducting an Interlaboratory Study to Determine the Precision of a Test Method
3. Terminology
3.1 Definitions—The definitions of terms relating to hardness testing appearing in Terminology E6 shall be considered as
applying to the terms used in this test method.
This test method is under the jurisdiction of ASTM Committee B07 on Light Metals and Alloys and is the direct responsibility of Subcommittee B07.05 on Testing.
Current edition approved Oct. 1, 2015June 1, 2023. Published October 2015June 2023. Originally approved in 1978. Last previous edition approved in 20102015 as
ɛ1
B648 – 10.B648 – 10 (2015) . DOI: 10.1520/B0648-10R15E01.10.1520/B0648-23.
For referenced ASTM standards, visit the ASTM website, www.astm.org, or contact ASTM Customer Service at service@astm.org. For Annual Book of ASTM Standards
volume information, refer to the standard’s Document Summary page on the ASTM website.
Copyright © ASTM International, 100 Barr Harbor Drive, PO Box C700, West Conshohocken, PA 19428-2959. United States
B648 − 23
FIG. 21 Diagram of Typical Barcol Impressor Arrangement
4. Significance and Use
4.1 The Barcol Impressor is portable and therefore useful for in situ determination of the hardness of fabricated parts and
individual test specimens for production control purposes.
4.2 This test method should be used only as cited in applicable material specifications.
5. Apparatus
5.1 Barcol Impressor, Model 934-1—Impressor—See Fig. 1 and Fig. 2.
5.2 Indentor—The indentor shall consist of a hardened steel truncated cone having an angle of 26° with a flat tip 0.157 mm (0.0062
in.) in diameter. It shall fit into a hollow spindle and be held down by a spring-loaded plunger. See Fig. 21.
5.3 Indicating Device—The indicating dial shall have 100 divisions, each representing a depth of 0.0076 mm (0.00030 in.)
(0.00030 in.) penetration. The higher the reading, the harder the material.
6. Test Parts or Specimen
6.1 The testing area shall be smooth, clean, and free of mechanical damage. The surface may be lightly polished to eliminate
scratches or die lines. It shall be such that it can be essentially perpendicular to the indentor during the test.
NOTE 1—The effect of curvature of the test specimen on the Barcol Impressor readings is presented in Appendix X1, Fig. X1.1.
6.2 Dimensions—Test parts or specimens shall be at least 1.5 mm ( ⁄16 in.) thick and large enough to ensure a minimum distance
of 3 mm ( ⁄8 in.) in any direction from the indentor point to the edge.
7. Calibration
7.1 With the plunger upper guide backed out until it just engages the spring, place the impressor on a glass surface and press down
until the penetrator point is forced all the way back into the lower plunger guide. The indicator should then read 100 6 1. If it
does not, loosen the locknut and turn the lower plunger guide in or out to obtain a reading of 100.
7.2 Read the hardness of a “hard” aluminum alloy reference disk supplied by the manufacturer of the impressor and, if necessary,
adjust so that the reading is within the range marked on the disk.
B648 − 23
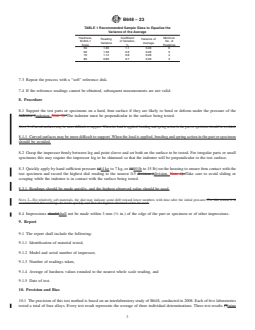
TABLE 1 Recommended Sample Sizes to Equalize the
Variance of the Average
Hardness, Coefficient Minimum
Reading Variance of
M-934-1 of Variation, No. of
Variance Average
Scale % Readings
50 1.66 1.1 0.28 6
60 1.39 0.9 0.28 5
70 1.12 0.8 0.28 4
80 0.85 0.7 0.28 3
7.3 Repeat the process with a “soft” reference disk.
7.4 If the reference readings cannot be obtained, subsequent measurements are not valid.
8. Procedure
8.1 Support the test parts or specimens on a hard, firm surface if they are likely to bend or deform under the pressure of the
indentor (indentor. Note 3). The indentor must be perpendicular to the surface being tested.
NOTE 3—Curved surfaces may be more difficult to support. When the load is applied, bending and spring action in the part or specimen should be avoided.
8.1.1 Curved surfaces may be more difficult to support. When the load is applied, bending and spring action in the part or specimen
should be avoided.
8.2 Grasp the impressor firmly between leg and point sleeve and set both on the surface to be tested. For irregular parts or small
specimens this may require the impressor leg to be shimmed so that the indentor will be perpendicular to the test surf
...

Questions, Comments and Discussion
Ask us and Technical Secretary will try to provide an answer. You can facilitate discussion about the standard in here.
Loading comments...