ASTM E2448-22
(Test Method)Standard Test Method for Determining the Superplastic Properties of Metallic Sheet Materials
Standard Test Method for Determining the Superplastic Properties of Metallic Sheet Materials
SIGNIFICANCE AND USE
4.1 The determination of the superplastic properties of a metallic sheet material is important for the observation, development and comparison of superplastic materials. It is also necessary to predict the correct forming parameters during an SPF process. SPF tensile testing has peculiar characteristics compared to conventional mechanical testing, which distort the true values of stress, strain, strain hardening, and strain rate at the very large elongations encountered in an SPF pull test, consequently conventional mechanical test methods cannot be used. This test method addresses those characteristics by optimizing the shape of the test specimen and specifying a new test procedure.
4.2 The evaluation of a superplastic material can be divided into two parts. Firstly, the basic superplastic-forming (SPF) properties of the material are measured using the four parameters of stress, temperature, strain, and strain rate. These are obtained using conversions from the raw data of a tensile test. Secondly, derived properties useful to define an SPF material are obtained from the basic properties using specific equations.
4.3 The test specimen undergoes an essentially uniform and constant necking along its length, and S and e are assumed in this standard to be valid. However at the junction to the clamp sections of the test specimen the cross section reduces from the original value to the final value, over a length of approximately 4 % at each end. Also, there are local small instabilities of cross section over the gauge length. These contribute to an error in the calculated values of ε and σ. In the absence of currently available extensometers that could operate in the elevated-temperature environment of an SPF test, ε and σ are to be inferred from crosshead extension and force.
4.4 The derived term m is widely used to describe the SPF properties of a material. It should be used with caution, as it is dependent on strain, strain rate and temperature. Many referenc...
SCOPE
1.1 This test method describes the procedure for determining the superplastic forming properties (SPF) of a metallic sheet material. It includes tests both for the basic SPF properties and also for derived SPF properties. The test for basic properties encompasses effects due to strain hardening or softening.
1.2 This test method covers sheet materials with thicknesses of at least 0.5 mm but not greater than 6 mm. It characterizes the material under a uni-axial tensile stress condition.
Note 1: Most industrial applications of superplastic forming involve a multi-axial stress condition in a sheet; however it is more convenient to characterize a material under a uni-axial tensile stress condition. Tests should be performed in different orientations to the rolling direction of the sheet to ascertain initial anisotropy.
1.3 This method has been used successfully between strain rates of 10-5 mm/mm/s to 10-1 mm/mm/s second.
1.4 This method has been used successfully on Aluminum and Titanium alloys. The use of the method with other metals should be verified.
1.5 The values stated in SI units are to be regarded as standard. No other units of measurement are included in this standard.
1.6 This standard does not purport to address all of the safety concerns, if any, associated with its use. It is the responsibility of the user of this standard to establish appropriate safety, health, and environmental practices and determine the applicability of regulatory limitations prior to use.
1.7 This international standard was developed in accordance with internationally recognized principles on standardization established in the Decision on Principles for the Development of International Standards, Guides and Recommendations issued by the World Trade Organization Technical Barriers to Trade (TBT) Committee.
General Information
- Status
- Published
- Publication Date
- 14-Jun-2022
- Technical Committee
- E28 - Mechanical Testing
- Drafting Committee
- E28.02 - Ductility and Formability
Relations
- Effective Date
- 01-Feb-2016
- Effective Date
- 15-Nov-2015
- Effective Date
- 01-Jun-2014
- Effective Date
- 01-May-2014
- Effective Date
- 01-May-2013
- Effective Date
- 01-May-2013
- Effective Date
- 01-Nov-2011
- Effective Date
- 01-Oct-2010
- Effective Date
- 01-Jun-2010
- Effective Date
- 01-Nov-2009
- Effective Date
- 15-May-2009
- Effective Date
- 15-May-2009
- Refers
ASTM E21-09 - Standard Test Methods for Elevated Temperature Tension Tests of Metallic Materials - Effective Date
- 01-Apr-2009
- Effective Date
- 01-Apr-2009
- Effective Date
- 01-Apr-2009
Overview
ASTM E2448-22: Standard Test Method for Determining the Superplastic Properties of Metallic Sheet Materials establishes procedures for evaluating the superplastic forming (SPF) properties of metallic sheets. This internationally recognized standard is critical for the development, observation, and comparison of superplastic materials. It is also essential for accurately predicting forming parameters during SPF processes, ensuring optimal performance, and material efficiency.
ASTM E2448-22 is designed specifically for metallic sheet materials with thicknesses between 0.5 mm and 6 mm, focusing on uniaxial tensile testing methods that properly account for the unique behaviors and properties exhibited during SPF. The method accommodates the significant elongation and associated measurement challenges inherent in superplasticity, making it superior to conventional mechanical test methods that do not provide accurate stress and strain values under these conditions.
Key Topics
- Superplastic Forming (SPF) Properties: The standard details how to derive both fundamental and secondary SPF properties based on parameters such as stress, strain, temperature, and strain rate.
- Optimized Test Procedure: Special specimen geometry and a unique procedure are specified, addressing the distortions in stress and strain measurement that emerge during superplastic elongation.
- Test Parameters:
- Strain rates from 10^-5 to 10^-1 mm/mm/s are supported.
- Applicable to a wide range of metallic sheet materials, including aluminum and titanium alloys.
- Focus on uniaxial tensile stress for characterization, despite most industrial applications involving multi-axial stress.
- Data Interpretation: The method outlines how to infer true strain (ε) and true stress (σ) from crosshead extension and force, given the absence of extensometers suitable for elevated temperatures.
- Measurement of Strain Rate Sensitivity (m): The derived m value, a key indicator of superplastic response, is widely used in materials science and forming process optimization.
- Repeatability and Reproducibility: Precision data reinforce the reliability of the method across different laboratories and operators, supporting quality control and research reproducibility.
Applications
- Material Development and Comparison: Enables manufacturers, researchers, and developers to observe and compare the superplastic properties of metallic sheet materials, fostering advancements in high-performance alloys.
- Process Optimization for Superplastic Forming: Supports the prediction and selection of appropriate forming parameters, reducing trial-and-error during SPF processes used in aerospace, automotive, and advanced manufacturing.
- Quality Control: Offers standardized data collection and reporting formats, enhancing consistency in quality assurance practices for superplastic materials.
- Research and Academic Use: Facilitates fundamental research into the mechanics of superplasticity and aids in the development of constitutive models for material behavior under extreme deformation conditions.
- Industry-Specific Uses: Commonly applied in industries utilizing superplastic forming for lightweight and complex-shaped components, particularly with aluminum and titanium sheet alloys.
Related Standards
- ASTM E4: Practices for Force Calibration and Verification of Testing Machines
- ASTM E6: Terminology Relating to Methods of Mechanical Testing
- ASTM E21: Test Methods for Elevated Temperature Tension Tests of Metallic Materials
- ASTM E177: Practice for Use of the Terms Precision and Bias in ASTM Test Methods
- ASTM E646: Test Method for Tensile Strain-Hardening Exponents (n-Values) of Metallic Sheet Materials
- ASTM E691: Practice for Conducting an Interlaboratory Study to Determine the Precision of a Test Method
Keywords: superplastic forming, ASTM E2448-22, metallic sheet materials, strain rate sensitivity, superplastic properties, tensile test, material characterization, SPF, aluminum alloys, titanium alloys, true strain, true stress, quality control.
By following ASTM E2448-22, industry professionals can achieve consistent, reliable measurement of superplastic properties, ensuring materials are appropriately characterized for advanced forming applications and supporting continued innovation in metallic sheet manufacturing.
Buy Documents
ASTM E2448-22 - Standard Test Method for Determining the Superplastic Properties of Metallic Sheet Materials
REDLINE ASTM E2448-22 - Standard Test Method for Determining the Superplastic Properties of Metallic Sheet Materials
Get Certified
Connect with accredited certification bodies for this standard

Element Materials Technology
Materials testing and product certification.

Inštitut za kovinske materiale in tehnologije
Institute of Metals and Technology. Materials testing, metallurgical analysis, NDT.
Sponsored listings
Frequently Asked Questions
ASTM E2448-22 is a standard published by ASTM International. Its full title is "Standard Test Method for Determining the Superplastic Properties of Metallic Sheet Materials". This standard covers: SIGNIFICANCE AND USE 4.1 The determination of the superplastic properties of a metallic sheet material is important for the observation, development and comparison of superplastic materials. It is also necessary to predict the correct forming parameters during an SPF process. SPF tensile testing has peculiar characteristics compared to conventional mechanical testing, which distort the true values of stress, strain, strain hardening, and strain rate at the very large elongations encountered in an SPF pull test, consequently conventional mechanical test methods cannot be used. This test method addresses those characteristics by optimizing the shape of the test specimen and specifying a new test procedure. 4.2 The evaluation of a superplastic material can be divided into two parts. Firstly, the basic superplastic-forming (SPF) properties of the material are measured using the four parameters of stress, temperature, strain, and strain rate. These are obtained using conversions from the raw data of a tensile test. Secondly, derived properties useful to define an SPF material are obtained from the basic properties using specific equations. 4.3 The test specimen undergoes an essentially uniform and constant necking along its length, and S and e are assumed in this standard to be valid. However at the junction to the clamp sections of the test specimen the cross section reduces from the original value to the final value, over a length of approximately 4 % at each end. Also, there are local small instabilities of cross section over the gauge length. These contribute to an error in the calculated values of ε and σ. In the absence of currently available extensometers that could operate in the elevated-temperature environment of an SPF test, ε and σ are to be inferred from crosshead extension and force. 4.4 The derived term m is widely used to describe the SPF properties of a material. It should be used with caution, as it is dependent on strain, strain rate and temperature. Many referenc... SCOPE 1.1 This test method describes the procedure for determining the superplastic forming properties (SPF) of a metallic sheet material. It includes tests both for the basic SPF properties and also for derived SPF properties. The test for basic properties encompasses effects due to strain hardening or softening. 1.2 This test method covers sheet materials with thicknesses of at least 0.5 mm but not greater than 6 mm. It characterizes the material under a uni-axial tensile stress condition. Note 1: Most industrial applications of superplastic forming involve a multi-axial stress condition in a sheet; however it is more convenient to characterize a material under a uni-axial tensile stress condition. Tests should be performed in different orientations to the rolling direction of the sheet to ascertain initial anisotropy. 1.3 This method has been used successfully between strain rates of 10-5 mm/mm/s to 10-1 mm/mm/s second. 1.4 This method has been used successfully on Aluminum and Titanium alloys. The use of the method with other metals should be verified. 1.5 The values stated in SI units are to be regarded as standard. No other units of measurement are included in this standard. 1.6 This standard does not purport to address all of the safety concerns, if any, associated with its use. It is the responsibility of the user of this standard to establish appropriate safety, health, and environmental practices and determine the applicability of regulatory limitations prior to use. 1.7 This international standard was developed in accordance with internationally recognized principles on standardization established in the Decision on Principles for the Development of International Standards, Guides and Recommendations issued by the World Trade Organization Technical Barriers to Trade (TBT) Committee.
SIGNIFICANCE AND USE 4.1 The determination of the superplastic properties of a metallic sheet material is important for the observation, development and comparison of superplastic materials. It is also necessary to predict the correct forming parameters during an SPF process. SPF tensile testing has peculiar characteristics compared to conventional mechanical testing, which distort the true values of stress, strain, strain hardening, and strain rate at the very large elongations encountered in an SPF pull test, consequently conventional mechanical test methods cannot be used. This test method addresses those characteristics by optimizing the shape of the test specimen and specifying a new test procedure. 4.2 The evaluation of a superplastic material can be divided into two parts. Firstly, the basic superplastic-forming (SPF) properties of the material are measured using the four parameters of stress, temperature, strain, and strain rate. These are obtained using conversions from the raw data of a tensile test. Secondly, derived properties useful to define an SPF material are obtained from the basic properties using specific equations. 4.3 The test specimen undergoes an essentially uniform and constant necking along its length, and S and e are assumed in this standard to be valid. However at the junction to the clamp sections of the test specimen the cross section reduces from the original value to the final value, over a length of approximately 4 % at each end. Also, there are local small instabilities of cross section over the gauge length. These contribute to an error in the calculated values of ε and σ. In the absence of currently available extensometers that could operate in the elevated-temperature environment of an SPF test, ε and σ are to be inferred from crosshead extension and force. 4.4 The derived term m is widely used to describe the SPF properties of a material. It should be used with caution, as it is dependent on strain, strain rate and temperature. Many referenc... SCOPE 1.1 This test method describes the procedure for determining the superplastic forming properties (SPF) of a metallic sheet material. It includes tests both for the basic SPF properties and also for derived SPF properties. The test for basic properties encompasses effects due to strain hardening or softening. 1.2 This test method covers sheet materials with thicknesses of at least 0.5 mm but not greater than 6 mm. It characterizes the material under a uni-axial tensile stress condition. Note 1: Most industrial applications of superplastic forming involve a multi-axial stress condition in a sheet; however it is more convenient to characterize a material under a uni-axial tensile stress condition. Tests should be performed in different orientations to the rolling direction of the sheet to ascertain initial anisotropy. 1.3 This method has been used successfully between strain rates of 10-5 mm/mm/s to 10-1 mm/mm/s second. 1.4 This method has been used successfully on Aluminum and Titanium alloys. The use of the method with other metals should be verified. 1.5 The values stated in SI units are to be regarded as standard. No other units of measurement are included in this standard. 1.6 This standard does not purport to address all of the safety concerns, if any, associated with its use. It is the responsibility of the user of this standard to establish appropriate safety, health, and environmental practices and determine the applicability of regulatory limitations prior to use. 1.7 This international standard was developed in accordance with internationally recognized principles on standardization established in the Decision on Principles for the Development of International Standards, Guides and Recommendations issued by the World Trade Organization Technical Barriers to Trade (TBT) Committee.
ASTM E2448-22 is classified under the following ICS (International Classification for Standards) categories: 77.140.50 - Flat steel products and semi-products. The ICS classification helps identify the subject area and facilitates finding related standards.
ASTM E2448-22 has the following relationships with other standards: It is inter standard links to ASTM E646-16, ASTM E646-15, ASTM E4-14, ASTM E177-14, ASTM E691-13, ASTM E177-13, ASTM E691-11, ASTM E177-10, ASTM E4-10, ASTM E4-09a, ASTM E6-09be1, ASTM E6-09b, ASTM E21-09, ASTM E4-09, ASTM E6-09a. Understanding these relationships helps ensure you are using the most current and applicable version of the standard.
ASTM E2448-22 is available in PDF format for immediate download after purchase. The document can be added to your cart and obtained through the secure checkout process. Digital delivery ensures instant access to the complete standard document.
Standards Content (Sample)
This international standard was developed in accordance with internationally recognized principles on standardization established in the Decision on Principles for the
Development of International Standards, Guides and Recommendations issued by the World Trade Organization Technical Barriers to Trade (TBT) Committee.
Designation: E2448 − 22
Standard Test Method for
Determining the Superplastic Properties of Metallic Sheet
Materials
This standard is issued under the fixed designation E2448; the number immediately following the designation indicates the year of
original adoption or, in the case of revision, the year of last revision. A number in parentheses indicates the year of last reapproval. A
superscript epsilon (´) indicates an editorial change since the last revision or reapproval.
1. Scope 2. Referenced Documents
2.1 ASTM Standards:
1.1 This test method describes the procedure for determin-
E4 Practices for Force Calibration and Verification of Test-
ing the superplastic forming properties (SPF) of a metallic
ing Machines
sheet material. It includes tests both for the basic SPF proper-
E6 Terminology Relating to Methods of Mechanical Testing
ties and also for derived SPF properties. The test for basic
E21 TestMethodsforElevatedTemperatureTensionTestsof
properties encompasses effects due to strain hardening or
Metallic Materials
softening.
E177 Practice for Use of the Terms Precision and Bias in
1.2 This test method covers sheet materials with thicknesses
ASTM Test Methods
of at least 0.5 mm but not greater than 6 mm. It characterizes
E646 Test Method for Tensile Strain-Hardening Exponents
the material under a uni-axial tensile stress condition.
(n -Values) of Metallic Sheet Materials
NOTE 1—Most industrial applications of superplastic forming involve a
E691 Practice for Conducting an Interlaboratory Study to
multi-axial stress condition in a sheet; however it is more convenient to
Determine the Precision of a Test Method
characterize a material under a uni-axial tensile stress condition. Tests
should be performed in different orientations to the rolling direction of the
3. Terminology
sheet to ascertain initial anisotropy.
3.1 Definitions:
1.3 This method has been used successfully between strain
-5 -1
3.1.1 engineering strain, e, n—a dimensionless value that is
rates of 10 mm⁄mm⁄s to 10 mm⁄mm⁄s second.
the change in length (∆L) per unit length of original linear
1.4 This method has been used successfully on Aluminum
dimension (L ) along the loading axis of the specimen; that is,
and Titanium alloys. The use of the method with other metals
e=(∆L) ⁄L .
should be verified.
-2
3.1.2 engineering stress, S [FL ],n—the normal stress,
1.5 The values stated in SI units are to be regarded as
expressed in units of applied force, F, per unit of original
standard. No other units of measurement are included in this
cross-sectional area, A ; that is, S = F⁄A .
0 0
standard.
3.1.3 true strain, ε,n—the natural logarithm of the ratio of
1.6 This standard does not purport to address all of the
instantaneous gauge length, L, to the original gauge length, L ;
safety concerns, if any, associated with its use. It is the
that is, ε=ln(L ⁄L)or ε=ln(1+e).
responsibility of the user of this standard to establish appro-
-2
3.1.4 true stress, σ [FL ],n—the instantaneous normal
priate safety, health, and environmental practices and deter-
stress, calculated on the basis of the instantaneous cross-
mine the applicability of regulatory limitations prior to use.
sectional area, A; that is, σ = F/A; if no necking has occurred,
1.7 This international standard was developed in accor-
σ = S(1+e).
dance with internationally recognized principles on standard-
3.1.5 Refer to Terminology E6 for the definitions of the
ization established in the Decision on Principles for the
terms extensometer system, indicated temperature, necking,
Development of International Standards, Guides and Recom-
specified temperature, strain hardening, and stress-strain dia-
mendations issued by the World Trade Organization Technical
gram.
Barriers to Trade (TBT) Committee.
3.2 Definitions of Terms Specific to This Standard:
3.2.1 gauge length, L, [L],n—the instantaneous distance
between the shoulders of the test specimen during the test
This test method is under the jurisdiction of ASTM Committee E28 on
Mechanical Testing and is the direct responsibility of Subcommittee E28.02 on
Ductility and Formability. For referenced ASTM standards, visit the ASTM website, www.astm.org, or
Current edition approved June 15, 2022. Published January 2023. Originally contact ASTM Customer Service at service@astm.org. For Annual Book of ASTM
approved in 2005. Last previous edition approved in 2018 as E2448–18. DOI: Standards volume information, refer to the standard’s Document Summary page on
10.1520/E2448-22. the ASTM website.
Copyright © ASTM International, 100 Barr Harbor Drive, PO Box C700, West Conshohocken, PA 19428-2959. United States
E2448 − 22
3.2.2 testing machine crosshead velocity, V, [L/T],n—the materialsasstrainhardeninginthelatterisusuallyacoefficient
velocity of the traveling member of the testing machine to of strain, rather than an exponent. The mechanism of strain
which one of the test specimen clamps is attached. hardening in superplastic flow is essentially due to grain
growth, and although the stress/strain relationship is often
3.2.3 strain rate, ε˙, [1/T],n—the time rate of change of the
linear, it is not universal for all superplastic materials.
V
true strain in the test specimen, measured as:
Consequently, there is no simple definition of a strain harden-
L 11e
~ !
ing coefficient and this standard does not define one. Consid-
where:
eration of strain hardening in superplastic deformation is
L = original gauge length
discussed in Ghosh and Hamilton’s, “Influences of Material
V = machine crosshead velocity 3
Parameters and Microstructure on Superplastic Forming.”
3.2.3.1 Discussion—This is an operational definition of
4.6 It is assumed no local necking takes place and the cross
strain rate.
section of the test specimen is constant over the entire gauge
3.2.4 strain rate sensitivity, m, n—(ln ∆σ)/ (ln ∆ε)ԑ˙.
˙
length.
ln σ ⁄ σ
~ !
2 1
NOTE 2—For some materials, cavitation inside the material increases
3.2.4.1 Discussion—In practical terms, m5 under
ln~ε˙ ⁄ ε˙ !
2 1
the volume of the gauge section as the test progresses and changes the true
stated test conditions, see 7.2.1.
cross-sectional area. For other materials, the test specimen develops a
ribbed or other local texture, and changes the minimum cross section.
4. Significance and Use
4.7 It is assumed that the increasingly non uniform cross
4.1 The determination of the superplastic properties of a
sectionthatdevelopsateachendofthetestspecimenwherethe
metallic sheet material is important for the observation, devel-
gauge section transitions to the original width at the clamp
opment and comparison of superplastic materials. It is also
section is small and can be ignored.
necessary to predict the correct forming parameters during an
SPF process. SPF tensile testing has peculiar characteristics
5. Apparatus
comparedtoconventionalmechanicaltesting,whichdistortthe
5.1 Theforce-measuringsystemofthetestingmachineshall
true values of stress, strain, strain hardening, and strain rate at
conform to the requirements of Practices E4.
the very large elongations encountered in an SPF pull test,
consequently conventional mechanical test methods cannot be
5.2 The apparatus shall be calibrated according to appropri-
used. This test method addresses those characteristics by
ate standards or manufacturer instructions.
optimizing the shape of the test specimen and specifying a new
5.3 No extensometer system is used in this test method, and
test procedure.
the extension of the test specimen is measured at the testing
4.2 The evaluation of a superplastic material can be divided
machine crosshead. The accuracy of the recorded crosshead
into two parts. Firstly, the basic superplastic-forming (SPF)
position shall be better than 0.25 mm. The testing machine
properties of the material are measured using the four param-
compliance shall be determined before testing, and the amount
eters of stress, temperature, strain, and strain rate. These are
of compliance subtracted from the crosshead position if it
obtained using conversions from the raw data of a tensile test.
exceeds 1 % of the original gauge length of the test specimen.
Secondly, derived properties useful to define an SPF material
NOTE 3—One method of determining compliance is to mounta6mm
are obtained from the basic properties using specific equations.
thick test specimen in the clamps without heating, then load the testing
4.3 The test specimen undergoes an essentially uniform and
machine to the estimated maximum force of the test and measure the
constant necking along its length, and S and e are assumed in
movement of the crosshead. Due to the low forces of these tests (typically
100 N maximum) compliance is likely to be small.
this standard to be valid. However at the junction to the clamp
sections of the test specimen the cross section reduces from the
5.4 Thetensiletestingmachineshallbecomputercontrolled
original value to the final value, over a length of approximately
and capable of varying the testing machine crosshead velocity
4 %ateachend.Also,therearelocalsmallinstabilitiesofcross
in order to maintain a near constant strain rate. The testing
section over the gauge length. These contribute to an error in
machine crosshead velocity may be increased in steps. The
the calculated values of ε and σ. In the absence of currently
instantaneous strain rate may vary up to 1 % from nominal
available extensometers that could operate in the elevated-
strain rate.
temperature environment of an SPF test, ε and σ are to be
5.5 The tensile testing machine shall be provided with
inferred from crosshead extension and force.
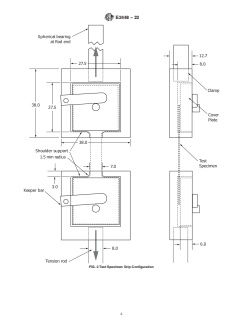
clamps that hold the test specimen at and under the shoulders
4.4 The derived term m is widely used to describe the SPF
adjacent to the gauge section. The test specimen shall not be
properties of a material. It should be used with caution, as it is
compressed by the clamps, as this will induce superplastic flow
dependent on strain, strain rate and temperature. Many refer-
out of the clamp area during the test. Clamp design should
ences in the literature do not identify the strain condition at
follow that shown in Fig. 2.
which the readings were taken, or allow multiple strains to be
used in the determination of m.
4.5 Many superplastic alloys exhibit strain hardening.
Ghosh, A. K., and Hamilton, C. H., “Influences of Material Parameters and
However, the conventional strain hardening exponent n as
Microstructure on Superplastic Forming,” Met Trans A, Vol 13A, May 1982, pp.
defined in Test Method E646 is not valid for superplastic 733-742.
E2448 − 22
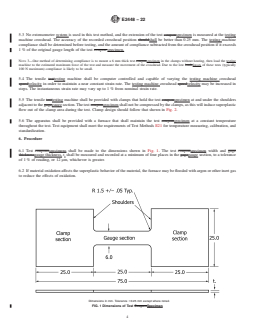
Dimensions in mm. Tolerance 60.25 mm except where noted.
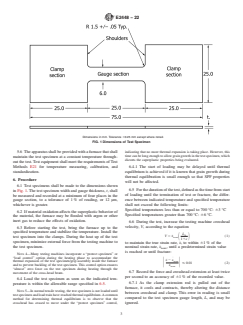
FIG. 1 Dimensions of Test Specimen
indicating that no more thermal expansion is taking place. However, this
5.6 The apparatus shall be provided with a furnace that shall
time can be long enough to allow grain growth in the test specimen, which
maintain the test specimen at a constant temperature through-
distorts the superplastic properties being evaluated.
out the test.Test equipment shall meet the requirements ofTest
Methods E21 for temperature measuring, calibration, and
6.4.1 The start of loading may be delayed until thermal
standardization.
equilibrium is achieved if it is known that grain growth during
thermal equilibration is small enough so that SPF properties
6. Procedure
will not be affected.
6.1 Test specimens shall be made to the dimensions shown
6.5 Forthedurationofthetest,definedasthetimefromstart
in Fig. 1. The test specimen width and gauge thickness, t, shall
of loading until the termination of test or fracture, the differ-
be measured and recorded at a minimum of four places in the
ence between indicated temperature and specified temperature
gauge section, to a tolerance of 1 % of reading, or 12 µm,
shall not exceed the following limits:
whichever is greater.
Specified temperatures less than or equal to 700 °C: 63°C
6.2 If material oxidation affects the superplastic behavior of
Specified temperatures greater than 700 °C: 66 °C.
the material, the furnace may be flooded with argon or other
inert gas to reduce the effects of oxidation.
6.6 During the test, increase the testing machine crosshead
velocity, V, according to the equation
6.3 Before starting the test, bring the furnace u
...
This document is not an ASTM standard and is intended only to provide the user of an ASTM standard an indication of what changes have been made to the previous version. Because
it may not be technically possible to adequately depict all changes accurately, ASTM recommends that users consult prior editions as appropriate. In all cases only the current version
of the standard as published by ASTM is to be considered the official document.
Designation: E2448 − 18 E2448 − 22
Standard Test Method for
Determining the Superplastic Properties of Metallic Sheet
Materials
This standard is issued under the fixed designation E2448; the number immediately following the designation indicates the year of
original adoption or, in the case of revision, the year of last revision. A number in parentheses indicates the year of last reapproval. A
superscript epsilon (´) indicates an editorial change since the last revision or reapproval.
1. Scope
1.1 This test method describes the procedure for determining the superplastic forming properties (SPF) of a metallic sheet
material. It includes tests both for the basic SPF properties and also for derived SPF properties. The test for basic properties
encompasses effects due to strain hardening or softening.
1.2 This test method covers sheet materials with thicknesses of at least 0.5 mm but not greater than 6 mm. It characterizes the
material under a uni-axial tensile stress condition.
NOTE 1—Most industrial applications of superplastic forming involve a multi-axial stress condition in a sheet; however it is more convenient to
characterize a material under a uni-axial tensile stress condition. Tests should be performed in different orientations to the rolling direction of the sheet
to ascertain initial anisotropy.
-5 -1
1.3 This method has been used successfully between strain rates of 10 mm ⁄mm ⁄s to 10 mm ⁄mm per ⁄s second.
1.4 This method has been used successfully on Aluminum and Titanium alloys. The use of the method with other metals should
be verified.
1.5 The values stated in SI units are to be regarded as standard. No other units of measurement are included in this standard.
1.6 This standard does not purport to address all of the safety concerns, if any, associated with its use. It is the responsibility
of the user of this standard to establish appropriate safety, health, and environmental practices and determine the applicability of
regulatory limitations prior to use.
1.7 This international standard was developed in accordance with internationally recognized principles on standardization
established in the Decision on Principles for the Development of International Standards, Guides and Recommendations issued
by the World Trade Organization Technical Barriers to Trade (TBT) Committee.
2. Referenced Documents
2.1 ASTM Standards:
E4 Practices for Force Calibration and Verification of Testing Machines
E6 Terminology Relating to Methods of Mechanical Testing
This test method is under the jurisdiction of ASTM Committee E28 on Mechanical Testing and is the direct responsibility of Subcommittee E28.02 on Ductility and
Formability.
Current edition approved June 1, 2018June 15, 2022. Published September 2018January 2023. Originally approved in 2005. Last previous edition approved in 20112018
ɛ1
as E2448–11–18. . DOI: 10.1520/E2448-18.10.1520/E2448-22.
For referenced ASTM standards, visit the ASTM website, www.astm.org, or contact ASTM Customer Service at service@astm.org. For Annual Book of ASTM Standards
volume information, refer to the standard’s Document Summary page on the ASTM website.
Copyright © ASTM International, 100 Barr Harbor Drive, PO Box C700, West Conshohocken, PA 19428-2959. United States
E2448 − 22
E21 Test Methods for Elevated Temperature Tension Tests of Metallic Materials
E177 Practice for Use of the Terms Precision and Bias in ASTM Test Methods
E646 Test Method for Tensile Strain-Hardening Exponents (n -Values) of Metallic Sheet Materials
E691 Practice for Conducting an Interlaboratory Study to Determine the Precision of a Test Method
3. Terminology
3.1 Definitions:Terms common to mechanical testing. Definitions such as true stress (σ), true strain (ε), normal engineering
stress (S), and engineering strain (e) are defined in Terminology E6. Thus,
ε5 ln L/L
~ !
σ5 S 11e
~ !
3.1.1 indicated temperature, engineering strain, e, n—the temperature indicated by aa dimensionless value that is the change in
length (ΔL temperature measuring device using good pyrometric practice. ) per unit length of original linear dimension (L ) along
the loading axis of the specimen; that is, e = (ΔL) ⁄L .
-2
3.1.2 nominal temperature, engineering stress, S [FL ],n—the intended test temperature.normal stress, expressed in units of
applied force, F, per unit of original cross-sectional area, A ; that is, S = F⁄A .
0 0
3.1.3 true strain, ε, n—the natural logarithm of the ratio of instantaneous gauge length, L, to the original gauge length, L ; that
is, ε = ln (L ⁄L ) or ε = ln (1+e).
-2
3.1.4 true stress, σ [FL ],n—the instantaneous normal stress, calculated on the basis of the instantaneous cross-sectional area, A;
that is, σ = F/A; if no necking has occurred, σ = S(1+e).
3.1.5 Refer to Terminology E6 for the definitions of the terms extensometer system, indicated temperature, necking, specified
temperature, strain hardening, and stress-strain diagram.
3.2 Definitions of Terms Specific to This Standard:
3.2.1 gauge length, L, [L],n—the instantaneous distance between the shoulders of the test couponspecimen during the test
3.2.2 testing machine crosshead velocity, V, [L/T],n—the velocity of the traveling member of the testing machine to which one of
the test specimen clamps is attached.
V
3.2.3 strain rate, ε˙, [1/T],n—the time rate of change of the true strain in the test specimen, measured as:
L 11e
~ !
where:
L = original gauge length
V = machine crosshead velocity
3.2.3.1 Discussion—
This is an operational definition of strain rate.
3.2.4 strain rate sensitivity, m, n—(ln Δσ)/ (ln Δε˙)ԑ˙.
3.2.4.1 Discussion—
ln σ ⁄ σ
~ !
2 1
In practical terms, m5 under stated test conditions, see 7.2.1.
ln ε˙ ⁄ ε˙
~ !
2 1
3.3 Symbols Specific To This Standard: V = machine crosshead velocity, the velocity of the traveling member of the test machine
to which one of the coupon clamps is attached
ε = strain rate, measured as: V/ L 11e
˙ @ ~ !#
NOTE 2—This is an operational definition of strain rate.
m = strain rate sensitivity, defined as (ln Δ σ)/ (ln Δ ε˙). In practical terms, m = log (σ /σ )/log (ε˙ /ε˙ ) under stated test conditions,
2 1 2 1
see 7.2.1.
E2448 − 22
4. Significance and Use
4.1 The determination of the superplastic properties of a metallic sheet material is important for the observation, development and
comparison of superplastic materials. It is also necessary to predict the correct forming parameters during an SPF process. SPF
tensile testing has peculiar characteristics compared to conventional mechanical testing, which distort the true values of stress,
strain, strain hardening, and strain rate at the very large elongations encountered in an SPF pull test, consequently conventional
mechanical test methods cannot be used. This test method addresses those characteristics by optimizing the shape of the test
couponspecimen and specifying a new test procedure.
4.2 The evaluation of a superplastic material can be divided into two parts. Firstly, the basic superplastic-forming (SPF) properties
of the material are measured using the four parameters of stress, temperature, strain, and strain rate. These are obtained using
conversions from the raw data of a tensile test. Secondly, derived properties useful to define an SPF material are obtained from
the basic properties using specific equations.
4.3 The test couponspecimen undergoes an essentially uniform and constant necknecking along its length, and S and e are assumed
in this standard to be valid. However at the junction to the clamp sections of the test couponspecimen the cross section reduces
from the original value to the final value, over a length of approximately 4 % at each end. Also, there are local small instabilities
of cross section over the gauge length. These contribute to an error in the calculated values of ε and σ. In the absence of currently
available extensometers that could operate in the high temperature elevated-temperature environment of an SPF test, ε and σ are
to be inferred from crosshead extension and force.
4.4 The derived term m is widely used to describe the SPF properties of a material. It should be used with caution, as it is
dependent on strain, strain rate and temperature. Many references in the literature do not identify the strain condition at which the
readings were taken, or allow multiple strains to be used in the determination of m.
4.5 Many superplastic alloys exhibit strain hardening. However, the conventional strain hardening exponent n as defined in Test
Method E646 is not valid for superplastic materials as strain hardening in the latter is usually a coefficient of strain, rather than
an exponent. The mechanism of strain hardening in superplastic flow is essentially due to grain growth, and although the
stress/strain relationship is often linear, it is not universal for all superplastic materials. Consequently, there is no simple definition
of a strain hardening coefficient and this standard does not define one. Consideration of strain hardening in superplastic
deformation is discussed in Ghosh and Hamilton’s, “Influences of Material Parameters and Microstructure on Superplastic
Forming.”
4.6 It is assumed no local necking takes place and the cross section of the test couponspecimen is constant over the entire gauge
length. For some materials, cavitation inside the material increases the volume of the gauge section as the test progresses, and the
true cross-sectional area has to be compensated for any strain. For other materials, the coupon can develop a ribbed or other local
texture, and in this case, the minimum cross section has to be measured. During the test there is an increasingly non uniform cross
section at each end of the test coupon where the gauge section transitions to the original width at the clamp section. This effect
is small and can usually be ignored.
NOTE 2—For some materials, cavitation inside the material increases the volume of the gauge section as the test progresses and changes the true
cross-sectional area. For other materials, the test specimen develops a ribbed or other local texture, and changes the minimum cross section.
4.7 It is assumed that the increasingly non uniform cross section that develops at each end of the test specimen where the gauge
section transitions to the original width at the clamp section is small and can be ignored.
5. Apparatus
5.1 The accuracy force-measuring system of the testing machine shall be within the permissible variation specified in conform to
the requirements of Practices E4.
5.2 The apparatus shall be calibrated according to appropriate standards or manufacturer instructions.
Ghosh, A. K., and Hamilton, C. H., “Influences of Material Parameters and Microstructure on Superplastic Forming,” Met Trans A, Vol 13A, May 1982, pp. 733-742.
E2448 − 22
5.3 No extensometer system is used in this test method, and the extension of the test couponspecimen is measured at the testing
machine crosshead. The accuracy of the recorded crosshead position shouldshall be better than 0.25 mm. The testing machine
compliance shall be determined before testing, and the amount of compliance subtracted from the crosshead position if it exceeds
1 % of the original gauge length of the test coupon.specimen.
NOTE 3—One method of determining compliance is to mount a 6 mm thick test couponspecimen in the clamps without heating, then load the testing
machine to the estimated maximum force of the test and measure the movement of the crosshead. Due to the low loadsforces of these tests (typically
100 N maximum) compliance is likely to be small.
5.4 The tensile testtesting machine shall be computer controlled and capable of varying the testing machine crosshead
speedvelocity in order to maintain a near constant strain rate. The testing machine crosshead speedvelocity may be increased in
steps. The instantaneous strain rate may vary up to 1 % from nominal strain rate.
5.5 The tensile testtesting machine shall be provided with clamps that hold the test couponspecimen at and under the shoulders
adjacent to the gagegauge section. The test couponspecimen shall not be compressed by the clamps, as this will induce superplastic
flow out of the clamp area during the test. Clamp design should follow that shown in Fig. 2.
5.6 The apparatus shall be provided with a furnace that shall maintain the test couponspecimen at a constant temperature
throughout the test. Test equipment shall meet the requirements of Test Methods E21 for temperature measuring, calibration, and
standardization.
6. Procedure
6.1 Test couponsspecimens shall be made to the dimensions shown in Fig. 1. The test couponspecimen width and gage
thicknessgauge thickness, t, shall be measured and recorded at a minimum of four places in the gagegauge section, to a tolerance
of 1 % of reading, or 12 μm, whichever is greater.
6.2 If material oxidation affects the superplastic behavior of the material, the furnace may be flooded with argon or other inert gas
to reduce the effects of oxidation.
Dimensions in mm. Tolerance 60.25 mm except where noted.
FIG. 1 Dimensions of Test CouponSpecimen
E2448 − 22
FIG. 2 Test CouponSpecimen Grip Configuration
E2448 − 22
6.3 Before starting the test, bring the furnace up to the nominalspecified temperature and stabilize the temperature. LoadInstall the
test couponspecimen into the clamps. During the heat up of the test coupon, important to specimen, minimize external stressforce
from the testing machine to the test coupon.specimen.
NOTE 4—Many testtesting machines incorporate a “protect specimen” or “load control” option during the heating phase to accommodate the thermal
expansion of the test coupon/gripspecimen/grip assembly inside the furnace and to prevent buckling of the test coupon.specimen. This control option
ensures “almost” zero loadingforce on the test specimen during heating through the movement of the cross-head beam.
6.4 The test should not commence until the test coupon has reached thermal equilibrium. This will be reached when the cross-head
beam ceases to move under the “protect specimen” control, indicating that no more thermal expansion is taking place. However
this time can be long enough to allow grain growth in the test coupon, which distorts the superplastic properties being evalu
...
Questions, Comments and Discussion
Ask us and Technical Secretary will try to provide an answer. You can facilitate discussion about the standard in here.
Loading comments...