ASTM D3474-23
(Practice)Standard Practice for Calibration and Use of Torque Meters Used in Packaging Applications
Standard Practice for Calibration and Use of Torque Meters Used in Packaging Applications
SIGNIFICANCE AND USE
5.1 This practice can be used to check devices used to measure the application and removal torques of continuous or intermittent thread and lug closures.
5.2 This practice can be used to determine the amount of torque to either apply or remove a closure.
SCOPE
1.1 This practice covers the calibration and use of torque meters of the type normally used in packaging applications.
1.2 This standard does not purport to address all of the safety concerns, if any, associated with its use. It is the responsibility of the user of this standard to establish appropriate safety, health, and environmental practices and determine the applicability of regulatory limitations prior to use.
1.3 This international standard was developed in accordance with internationally recognized principles on standardization established in the Decision on Principles for the Development of International Standards, Guides and Recommendations issued by the World Trade Organization Technical Barriers to Trade (TBT) Committee.
General Information
- Status
- Published
- Publication Date
- 31-Oct-2023
- Technical Committee
- F02 - Primary Barrier Packaging
- Drafting Committee
- F02.25 - Rigid Container Closure Systems
Relations
- Effective Date
- 01-Nov-2023
- Effective Date
- 01-Nov-2023
- Effective Date
- 01-Nov-2023
Overview
ASTM D3474-23: Standard Practice for Calibration and Use of Torque Meters Used in Packaging Applications is a critical ASTM International standard for ensuring the accuracy and reliability of torque measurements during the application and removal of closures, such as threaded caps or lug closures, on packaging containers. This practice details procedures for calibrating torque meters - both spring-loaded and automatic types - and provides guidance for their effective use in quality assurance and testing environments within the packaging industry.
Meeting the requirements of ASTM D3474-23 demonstrates a commitment to product quality and compliance with international standardization principles, facilitating reliable packaging performance for various consumer goods, pharmaceuticals, and industrial products.
Key Topics
- Scope of Application: Applies to the calibration and use of torque meters commonly used in measuring application (tightening) and removal (loosening) torques for container closures in packaging.
- Calibration Procedures: Covers step-by-step calibration using dead weights, adapters, and connecting means to achieve accurate reference torque values.
- Use of Torque Meters: Provides guidance on how to properly position containers and closures in the torque tester, and how to apply or remove closures to record application, removal, or stripping torque.
- Reporting Requirements: Details the necessary information for reporting torque measurements, including specimen identification, test dates, and statistical summaries.
- Precision and Bias: Addresses the factors influencing measurement uncertainty, including instrument calibration, operator skill, and lab environment.
- Safety and Compliance: Reminds users to establish appropriate safety, health, and environmental practices when using torque meters as the standard itself does not address all potential safety considerations.
Applications
The ASTM D3474-23 standard is primarily employed by manufacturers, quality assurance professionals, and laboratories in the packaging sector to:
- Validate the correct tightness of container closures, ensuring product freshness, safety, and tamper evidence.
- Support routine calibration and maintenance programs for torque meters, minimizing measurement variation and enhancing reliability.
- Conduct quality control testing for caps, lids, and other closures to comply with regulatory and industry requirements.
- Reduce risks of product leakage, contamination, or customer complaints by ensuring closures are neither over-tightened nor under-tightened.
- Gather reproducible torque measurement data to troubleshoot closure problems and support packaging line adjustments.
Industries that benefit from this standard include food and beverage, pharmaceuticals, cosmetics, and chemical packaging, where closure torque is critical to package integrity.
Related Standards
- ASTM D3198 (Withdrawn 2016): Previously established test methods for application and removal torque of threaded or lug-style closures. Definitions and concepts regarding application and removal torque are referenced in ASTM D3474-23.
- ISO Standards: ASTM D3474-23 aligns with principles set by the World Trade Organization Technical Barriers to Trade (TBT) Committee for internationally recognized standardization.
- Other ASTM Packaging Standards: Coordinated with committees focused on rigid container closure systems and primary barrier packaging to ensure comprehensive quality management.
Conclusion
Implementing ASTM D3474-23 ensures high-quality packaging by providing a consistent approach to the calibration and use of torque meters. Adhering to this standard supports regulatory compliance, enhances product safety, and improves consumer confidence through reliable packaging closure performance. For more information and official documentation, consult the ASTM website or related technical resources.
Buy Documents
ASTM D3474-23 - Standard Practice for Calibration and Use of Torque Meters Used in Packaging Applications
REDLINE ASTM D3474-23 - Standard Practice for Calibration and Use of Torque Meters Used in Packaging Applications
Get Certified
Connect with accredited certification bodies for this standard

BRCGS (Brand Reputation Compliance Global Standards)
Global food safety and quality standards owner.
Sponsored listings
Frequently Asked Questions
ASTM D3474-23 is a standard published by ASTM International. Its full title is "Standard Practice for Calibration and Use of Torque Meters Used in Packaging Applications". This standard covers: SIGNIFICANCE AND USE 5.1 This practice can be used to check devices used to measure the application and removal torques of continuous or intermittent thread and lug closures. 5.2 This practice can be used to determine the amount of torque to either apply or remove a closure. SCOPE 1.1 This practice covers the calibration and use of torque meters of the type normally used in packaging applications. 1.2 This standard does not purport to address all of the safety concerns, if any, associated with its use. It is the responsibility of the user of this standard to establish appropriate safety, health, and environmental practices and determine the applicability of regulatory limitations prior to use. 1.3 This international standard was developed in accordance with internationally recognized principles on standardization established in the Decision on Principles for the Development of International Standards, Guides and Recommendations issued by the World Trade Organization Technical Barriers to Trade (TBT) Committee.
SIGNIFICANCE AND USE 5.1 This practice can be used to check devices used to measure the application and removal torques of continuous or intermittent thread and lug closures. 5.2 This practice can be used to determine the amount of torque to either apply or remove a closure. SCOPE 1.1 This practice covers the calibration and use of torque meters of the type normally used in packaging applications. 1.2 This standard does not purport to address all of the safety concerns, if any, associated with its use. It is the responsibility of the user of this standard to establish appropriate safety, health, and environmental practices and determine the applicability of regulatory limitations prior to use. 1.3 This international standard was developed in accordance with internationally recognized principles on standardization established in the Decision on Principles for the Development of International Standards, Guides and Recommendations issued by the World Trade Organization Technical Barriers to Trade (TBT) Committee.
ASTM D3474-23 is classified under the following ICS (International Classification for Standards) categories: 55.200 - Packaging machinery. The ICS classification helps identify the subject area and facilitates finding related standards.
ASTM D3474-23 has the following relationships with other standards: It is inter standard links to ASTM D3474-90(2018), ASTM D7860-14(2022), ASTM D2063/D2063M-10(2018). Understanding these relationships helps ensure you are using the most current and applicable version of the standard.
ASTM D3474-23 is available in PDF format for immediate download after purchase. The document can be added to your cart and obtained through the secure checkout process. Digital delivery ensures instant access to the complete standard document.
Standards Content (Sample)
This international standard was developed in accordance with internationally recognized principles on standardization established in the Decision on Principles for the
Development of International Standards, Guides and Recommendations issued by the World Trade Organization Technical Barriers to Trade (TBT) Committee.
Designation: D3474 − 23
Standard Practice for
Calibration and Use of Torque Meters Used in Packaging
Applications
This standard is issued under the fixed designation D3474; the number immediately following the designation indicates the year of
original adoption or, in the case of revision, the year of last revision. A number in parentheses indicates the year of last reapproval. A
superscript epsilon (´) indicates an editorial change since the last revision or reapproval.
1. Scope 4.2 Use—Torque values to apply or remove closures are
obtained by mounting containers on the platform and either
1.1 This practice covers the calibration and use of torque
applying or removing the closures. In some applications, the
meters of the type normally used in packaging applications.
closure is mounted on the platform and the container is rotated.
1.2 This standard does not purport to address all of the
safety concerns, if any, associated with its use. It is the
5. Significance and Use
responsibility of the user of this standard to establish appro-
5.1 This practice can be used to check devices used to
priate safety, health, and environmental practices and deter-
measure the application and removal torques of continuous or
mine the applicability of regulatory limitations prior to use.
intermittent thread and lug closures.
1.3 This international standard was developed in accor-
dance with internationally recognized principles on standard-
5.2 This practice can be used to determine the amount of
ization established in the Decision on Principles for the
torque to either apply or remove a closure.
Development of International Standards, Guides and Recom-
mendations issued by the World Trade Organization Technical
6. Apparatus
Barriers to Trade (TBT) Committee.
6.1 Adapter—A circular plate that can be mounted concen-
trically on the platform of the tester. If the platform itself is
2. Referenced Documents
2 suitable, an adapter is not necessary. The adapter should be of
2.1 ASTM Standards:
such diameter that its radius multiplied by appropriate weights
D3198 Test Method for Application and Removal Torque of
1 1
3 will give torque values equal to ⁄4, ⁄2 , and full-scale meter
Threaded or Lug-Style Closures (Withdrawn 2016)
readings. (Typical devices for packaging applications have
3. Terminology
ranges from: 0 to 10, 0 to 25, 0 to 50, and 0 to 100 lbf-in. (0
to 1.13, 0 to 2.8, 0 to 5.7, and 0 to 11.3 N/m, respectively).
3.1 Definitions—For definitions of application torque and
removal torque, see Test Method D3198.
6.2 Connecting Means—A very flexible, thin filament, such
3.1.1 stripping torque—a force or system of forces acting in as a wire or fishing line that transmits the force of hanging
a tightening direction that causes overrunning of the threads or
weights to the circumference of the adapter.
rotation of a threaded or lug style closure system with respect
6.3 Pulley, low friction, used to change the direction of the
to its supporting member.
connecting means from horizontal to vertical.
4. Summary of Practice
6.4 Appropriate Dead Weights, for example: 2, 4, and 7-lb
(0.9, 1.8, and 3.2-kg) for a torque meter with a 7 in. (178 mm)
4.1 Calibration—Reference torque values are obtained by
diameter plate or platform and a range of 0 to 25 in.lb (0 to 2.8
means of vertically suspended dead weights acting at specific
N-m).
distances from the axis of the mounting platform of the tester.
7. Conditioning
This practice is under the jurisdiction of ASTM Committee F02 on Primary
Barrier Packaging and is the direct responsibility of Subcommittee F02.25 on Rigid
7.1 Prior to calibration, the torque meter and weights shall
Container Closure Systems.
be allowed to come to ambient room conditions.
Current edition approved Nov. 1, 2023. Published November 2023. Originally
approved in 1976. Last previous edition approved in 2018 as D3474 – 90 (2018).
DOI: 10.1520/D3474-23.
8. Calibration Procedures (see Fig. 1)
For referenced ASTM standards, visit the ASTM website, www.astm.org, or
contact ASTM Customer Service at service@astm.org. For Annual Book of ASTM
8.1 Spring-Loaded Type Testers:
Standards volume information, refer to the standard‘s Document Summary page on
8.1.1 Verify that the meter needle moves freely throughout
the ASTM website.
its entire range and rests on zero when not loaded. Adjust if
The last approved version of this historical standard is referenced on
www.astm.org. necessary.
Copyright © ASTM International, 100 Barr Harbor Drive, PO Box C700, West Conshohocken, PA 19428-2959. United States
D3474 − 23
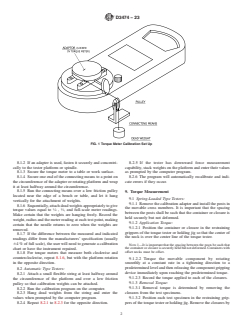
FIG. 1 Torque Meter Calibration Set Up
8.1.2 If an adapter is used, fasten it securely and concentri- 8.2.5 If the tester has downward force measurement
cally to the tester platform or spindle. capability, stack weights on the platform and enter their values
8.1.3 Secure the torque meter to a table or work surface. as prompted by the computer program.
8.1.4 Secure one end of the connecting means to a point on 8.2.6 The program will automatically recalibrate and indi-
the circumference of the adapter or rotating platform and wrap
cate errors if they occur.
it at least halfway around the circumference.
8.1.5 Run the connecting means over a low friction pulley
9. Torque Measurement
located near the edge of a bench or table, and let it hang
9.1 Spring-Loaded Type Testers:
vertically for the attachment of weights.
9.1.1 Remove the calibration adapter and install the posts in
8.1.6 Sequentially, attach dead weights appropriately to give
the movable cross members. It is important that the spacing
1 1
torque values equal to ⁄4 , ⁄2, and full-scale meter readings.
between the posts shall be such that the container or closure is
Make certain that the weights are hanging freely. Record the
held securely but not deformed.
weight, radius and the meter reading at each test point, making
9.1.2 Application Torque:
certain that the needle returns
...
This document is not an ASTM standard and is intended only to provide the user of an ASTM standard an indication of what changes have been made to the previous version. Because
it may not be technically possible to adequately depict all changes accurately, ASTM recommends that users consult prior editions as appropriate. In all cases only the current version
of the standard as published by ASTM is to be considered the official document.
Designation: D3474 − 90 (Reapproved 2018) D3474 − 23
Standard Practice for
Calibration and Use of Torque Meters Used in Packaging
Applications
This standard is issued under the fixed designation D3474; the number immediately following the designation indicates the year of
original adoption or, in the case of revision, the year of last revision. A number in parentheses indicates the year of last reapproval. A
superscript epsilon (´) indicates an editorial change since the last revision or reapproval.
1. Scope
1.1 This practice covers the calibration and use of torque meters of the type normally used in packaging applications.
1.2 This standard does not purport to address all of the safety concerns, if any, associated with its use. It is the responsibility
of the user of this standard to establish appropriate safety, health, and environmental practices and determine the applicability of
regulatory limitations prior to use.
1.3 This international standard was developed in accordance with internationally recognized principles on standardization
established in the Decision on Principles for the Development of International Standards, Guides and Recommendations issued
by the World Trade Organization Technical Barriers to Trade (TBT) Committee.
2. Referenced Documents
2.1 ASTM Standards:
D3198 Test Method for Application and Removal Torque of Threaded or Lug-Style Closures (Withdrawn 2016)
3. Terminology
3.1 Definitions—For definitions of application torque and removal torque, see Test Method D3198.
3.1.1 stripping torque—a force or system of forces acting in a tightening direction that causes overrunning of the threads or
rotation of an overshell a threaded or lug style closure system with respect to its supporting member.
4. Summary of Practice
4.1 Calibration—Reference torque values are obtained by means of vertically suspended dead weights acting at specific distances
from the axis of the mounting platform of the tester.
4.2 Use—Torque values to apply or remove closures are obtained by mounting containers on the platform and either applying or
removing the closures. In some applications, the closure is mounted on the platform and the container is rotated.
This practice is under the jurisdiction of ASTM Committee F02 on Primary Barrier Packaging and is the direct responsibility of Subcommittee F02.25 on Rigid Container
Closure Systems.
Current edition approved April 15, 2018Nov. 1, 2023. Published June 2018November 2023. Originally approved in 1976. Last previous edition approved in 20122018
as D3474 – 90 (2018).(2012). DOI: 10.1520/D3474-90R18.10.1520/D3474-23.
For referenced ASTM standards, visit the ASTM website, www.astm.org, or contact ASTM Customer Service at service@astm.org. For Annual Book of ASTM Standards
volume information, refer to the standard‘s Document Summary page on the ASTM website.
The last approved version of this historical standard is referenced on www.astm.org.
Copyright © ASTM International, 100 Barr Harbor Drive, PO Box C700, West Conshohocken, PA 19428-2959. United States
D3474 − 23
5. Significance and Use
5.1 This practice can be used to check devices used to measure the application and removal torques of continuous or intermittent
thread and lug closures.
5.2 This practice can be used to determine the amount of torque to either apply or remove a closure.
6. Apparatus
6.1 Adapter—A circular plate that can be mounted concentrically on the platform of the tester. If the platform itself is suitable,
an adapter is not necessary. The adapter should be of such diameter that its radius multiplied by appropriate weights will give
1 1
torque values equal to ⁄4, ⁄2 , and full-scale meter readings. (Typical devices for packaging applications have ranges from: 0 to
10, 0 to 25, 0 to 50, and 0 to 100 lbf-in. (0 to 1.13, 0 to 2.8, 0 to 5.7, and 0 to 11.3 N/m, respectively).
6.2 Connecting Means—A very flexible, thin filament, such as a wire or fishing line that transmits the force of hanging weights
to the circumference of the adapter.
6.3 Pulley, low friction, used to change the direction of the connecting means from horizontal to vertical.
6.4 Appropriate Dead Weights, for example: 2, 4, and 7-lb (0.9, 1.8, and 3.2-kg) for a torque meter with a 7 in. (178 mm) diameter
plate or platform and a range of 0 to 25 in-lbsin.lb (0 to 2.8 N-m).
7. Conditioning
7.1 Prior to calibration, the torque meter and weights shall be allowed to come to ambient room conditions.
8. Calibration Procedures (see Fig. 1)
8.1 Spring-Loaded Type Testers:
FIG. 1 Torque Meter Calibration Set Up
D3474 − 23
8.1.1 Verify that the meter needle moves freely throughout its entire range and rests on zero when not loaded. Adjust if necessary.
8.1.2 If an adapter is used, fasten it securely and concentrically to the tester platform or spindle.
8.1.3 Secure the torque meter to a table or work surface.
8.1.4 Secure one end of the connecting means to a point on the circumference of the adapter or rotating platform and wrap it at
least halfway around the circumference.
8.1.5 Run the connecting means over a low friction pulley located near the edge of a bench or table, and let it hang vertically for
the attachment of weights.
1 1
8.1.6 Sequentially, attach dead weights appropriately to give torque values equal to ⁄4 , ⁄2, and full-scale meter readings. Make
certain that the weights are hanging freely. Record the weight, radius and the meter reading at each test point, making certain that
the needle returns to zero when the weights are removed.
8.1.7 If the difference between the measured and indicated readings differ from the manufacturers’ specification (usually 64 %
of full scale), the user will need to generate a calibration chart or have the instrument repaired.
8.1.8 For torque meters that measure both clockwise and counterclockwise, repeat 8.1.6, but with the platform rotation in the
opposite direction.
8.2 Automatic Type Testers:
8.2.1 Attach a small flexible string
...


Questions, Comments and Discussion
Ask us and Technical Secretary will try to provide an answer. You can facilitate discussion about the standard in here.
Loading comments...