ASTM D1623-17(2023)
(Test Method)Standard Test Method for Tensile and Tensile Adhesion Properties of Rigid Cellular Plastics
Standard Test Method for Tensile and Tensile Adhesion Properties of Rigid Cellular Plastics
ABSTRACT
This test method establishes standard procedure for determining the tensile and tensile adhesion properties of rigid cellular plastics in the form of test specimens of standard shape under defined conditions of temperature, humidity, and testing machine speed. Tensile properties shall be measured using any of three types of specimens: Type A shall be the preferred specimen in those cases where enough sample material exists to form the necessary specimen; Type B shall be the preferred specimen when only smaller specimens are available, as in sandwich panels, etc.; Type C shall be the preferred specimen for the determination of tensile adhesive properties of a cellular plastic to a substrate as in a sandwich panel or the bonding strength of a cellular plastic to a single substrate. This test method requires the use of the following apparatuses: a constant-rate-of-crosshead-movement type testing machine; self-aligning type grips for holding test specimens; an extension indicator; and a lathe specimen cutter.
SCOPE
1.1 This test method covers the determination of the tensile and tensile adhesion properties of rigid cellular materials in the form of test specimens of standard shape under defined conditions of temperature, humidity, and testing machine speed.
1.2 Tensile properties shall be measured using any of three types of specimens:
1.2.1 Type A shall be the preferred specimen in those cases where enough sample material exists to form the necessary specimen.
1.2.2 Type B shall be the preferred specimen when only smaller specimens are available, as in sandwich panels, etc.
1.2.3 Type C shall be the preferred specimen for the determination of tensile adhesive properties of a cellular plastic to a substrate as in a sandwich panel (top and bottom substrate) or the bonding strength of a cellular plastic to a single substrate.
1.3 The values stated in SI units are to be regarded as standard. The values given in parentheses are mathematical conversions to inch-pound units that are provided for information only and are not considered standard.
Note 1: There is no known ISO equivalent to this test method.
1.4 This international standard was developed in accordance with internationally recognized principles on standardization established in the Decision on Principles for the Development of International Standards, Guides and Recommendations issued by the World Trade Organization Technical Barriers to Trade (TBT) Committee.
General Information
- Status
- Published
- Publication Date
- 30-Apr-2023
- Technical Committee
- D20 - Plastics
- Drafting Committee
- D20.22 - Cellular Materials - Plastics and Elastomers
Relations
- Effective Date
- 01-Feb-2024
- Effective Date
- 01-Nov-2023
- Effective Date
- 01-Jan-2020
- Effective Date
- 01-Aug-2019
- Effective Date
- 15-Apr-2019
- Effective Date
- 01-Feb-2019
- Effective Date
- 01-Dec-2018
- Effective Date
- 01-Nov-2018
- Effective Date
- 15-Aug-2017
- Effective Date
- 01-May-2013
- Effective Date
- 15-Nov-2012
- Effective Date
- 01-Nov-2011
- Effective Date
- 15-May-2011
- Effective Date
- 15-May-2010
- Effective Date
- 01-Oct-2008
Overview
ASTM D1623-17(2023) is the internationally recognized standard test method for evaluating the tensile and tensile adhesion properties of rigid cellular plastics. Developed by ASTM International, this standard outlines a comprehensive procedure for determining mechanical properties through testing specimens of standardized shapes under controlled conditions. These properties are critical for understanding the performance of rigid foams and cellular plastics in construction, insulation, transportation, and packaging industries.
This method applies to rigid cellular materials tested at defined conditions of temperature, humidity, and machine speed, ensuring repeatability and comparability of results across laboratories and production batches. Three different specimen types (Type A, Type B, and Type C) are specified, supporting varied sample sizes and testing needs.
Key Topics
- Tensile Properties Measurement: The standard provides procedures for testing the tensile strength and elongation of rigid cellular plastics using three specimen types:
- Type A: Preferred when sufficient sample material is available.
- Type B: Used for smaller samples, such as those from sandwich panels.
- Type C: Designed for evaluating tensile adhesion properties and bonding strength between a cellular plastic and a substrate.
- Controlled Testing Environment: Test conditions such as temperature and humidity are defined to ensure that results are consistent and comparable.
- Standardized Equipment: The use of a constant-rate-of-crosshead-movement testing machine, self-aligning grips, precise extension indicators, and specialized cutters is required to minimize variability and error.
- Comprehensive Reporting: The standard emphasizes documenting all relevant test parameters, including specimen type, conditioning, atmospheric conditions, rate of testing, results, and the measurement method used for extension.
- Precision and Reproducibility: Information on interlaboratory studies and statistical calculation of repeatability and reproducibility is provided, supporting quality assurance in testing laboratories.
Applications
ASTM D1623-17(2023) is widely used in quality control, research, and development to assess the mechanical performance of rigid cellular plastics. Key areas of application include:
- Construction: Critical for evaluating the mechanical integrity and bond strength of foam insulation panels and structural sandwich panels.
- Insulation Performance: Determining tensile strength ensures that rigid foam materials will maintain performance under load in building and industrial applications.
- Composite Materials: Used to assess the adhesive strength between cellular plastics and various substrates, ensuring durable bonding in multilayered products.
- Product Certification: Essential for demonstrating compliance with building codes, product standards, and customer requirements.
- Material Comparison and Selection: Enables manufacturers and designers to compare rigid foam products based on standardized tensile properties, aiding in the selection of suitable materials for specific applications.
Related Standards
- ASTM D638: Test Method for Tensile Properties of Plastics - covers similar evaluations for non-cellular plastics.
- ASTM D883: Terminology Relating to Plastics - provides definitions applicable to this and other plastics standards.
- ASTM E691: Practice for Conducting an Interlaboratory Study to Determine the Precision of a Test Method - referenced for establishing precision and reproducibility metrics.
Note: There is currently no ISO equivalent for ASTM D1623-17(2023).
By following the procedures outlined in ASTM D1623-17(2023), laboratories and manufacturers can ensure accurate, reliable measurement of the tensile and adhesion properties of rigid cellular plastics, supporting product quality, safety, and performance across a wide range of industries.
Buy Documents
ASTM D1623-17(2023) - Standard Test Method for Tensile and Tensile Adhesion Properties of Rigid Cellular Plastics
Get Certified
Connect with accredited certification bodies for this standard

Smithers Quality Assessments
US management systems and product certification.

DIN CERTCO
DIN Group product certification.
Sponsored listings
Frequently Asked Questions
ASTM D1623-17(2023) is a standard published by ASTM International. Its full title is "Standard Test Method for Tensile and Tensile Adhesion Properties of Rigid Cellular Plastics". This standard covers: ABSTRACT This test method establishes standard procedure for determining the tensile and tensile adhesion properties of rigid cellular plastics in the form of test specimens of standard shape under defined conditions of temperature, humidity, and testing machine speed. Tensile properties shall be measured using any of three types of specimens: Type A shall be the preferred specimen in those cases where enough sample material exists to form the necessary specimen; Type B shall be the preferred specimen when only smaller specimens are available, as in sandwich panels, etc.; Type C shall be the preferred specimen for the determination of tensile adhesive properties of a cellular plastic to a substrate as in a sandwich panel or the bonding strength of a cellular plastic to a single substrate. This test method requires the use of the following apparatuses: a constant-rate-of-crosshead-movement type testing machine; self-aligning type grips for holding test specimens; an extension indicator; and a lathe specimen cutter. SCOPE 1.1 This test method covers the determination of the tensile and tensile adhesion properties of rigid cellular materials in the form of test specimens of standard shape under defined conditions of temperature, humidity, and testing machine speed. 1.2 Tensile properties shall be measured using any of three types of specimens: 1.2.1 Type A shall be the preferred specimen in those cases where enough sample material exists to form the necessary specimen. 1.2.2 Type B shall be the preferred specimen when only smaller specimens are available, as in sandwich panels, etc. 1.2.3 Type C shall be the preferred specimen for the determination of tensile adhesive properties of a cellular plastic to a substrate as in a sandwich panel (top and bottom substrate) or the bonding strength of a cellular plastic to a single substrate. 1.3 The values stated in SI units are to be regarded as standard. The values given in parentheses are mathematical conversions to inch-pound units that are provided for information only and are not considered standard. Note 1: There is no known ISO equivalent to this test method. 1.4 This international standard was developed in accordance with internationally recognized principles on standardization established in the Decision on Principles for the Development of International Standards, Guides and Recommendations issued by the World Trade Organization Technical Barriers to Trade (TBT) Committee.
ABSTRACT This test method establishes standard procedure for determining the tensile and tensile adhesion properties of rigid cellular plastics in the form of test specimens of standard shape under defined conditions of temperature, humidity, and testing machine speed. Tensile properties shall be measured using any of three types of specimens: Type A shall be the preferred specimen in those cases where enough sample material exists to form the necessary specimen; Type B shall be the preferred specimen when only smaller specimens are available, as in sandwich panels, etc.; Type C shall be the preferred specimen for the determination of tensile adhesive properties of a cellular plastic to a substrate as in a sandwich panel or the bonding strength of a cellular plastic to a single substrate. This test method requires the use of the following apparatuses: a constant-rate-of-crosshead-movement type testing machine; self-aligning type grips for holding test specimens; an extension indicator; and a lathe specimen cutter. SCOPE 1.1 This test method covers the determination of the tensile and tensile adhesion properties of rigid cellular materials in the form of test specimens of standard shape under defined conditions of temperature, humidity, and testing machine speed. 1.2 Tensile properties shall be measured using any of three types of specimens: 1.2.1 Type A shall be the preferred specimen in those cases where enough sample material exists to form the necessary specimen. 1.2.2 Type B shall be the preferred specimen when only smaller specimens are available, as in sandwich panels, etc. 1.2.3 Type C shall be the preferred specimen for the determination of tensile adhesive properties of a cellular plastic to a substrate as in a sandwich panel (top and bottom substrate) or the bonding strength of a cellular plastic to a single substrate. 1.3 The values stated in SI units are to be regarded as standard. The values given in parentheses are mathematical conversions to inch-pound units that are provided for information only and are not considered standard. Note 1: There is no known ISO equivalent to this test method. 1.4 This international standard was developed in accordance with internationally recognized principles on standardization established in the Decision on Principles for the Development of International Standards, Guides and Recommendations issued by the World Trade Organization Technical Barriers to Trade (TBT) Committee.
ASTM D1623-17(2023) is classified under the following ICS (International Classification for Standards) categories: 83.100 - Cellular materials. The ICS classification helps identify the subject area and facilitates finding related standards.
ASTM D1623-17(2023) has the following relationships with other standards: It is inter standard links to ASTM D883-24, ASTM D883-23, ASTM D883-20, ASTM D883-19c, ASTM D883-19a, ASTM D883-19, ASTM D883-18a, ASTM D883-18, ASTM D883-17, ASTM E691-13, ASTM D883-12e1, ASTM E691-11, ASTM D883-11, ASTM D638-10, ASTM E691-08. Understanding these relationships helps ensure you are using the most current and applicable version of the standard.
ASTM D1623-17(2023) is available in PDF format for immediate download after purchase. The document can be added to your cart and obtained through the secure checkout process. Digital delivery ensures instant access to the complete standard document.
Standards Content (Sample)
This international standard was developed in accordance with internationally recognized principles on standardization established in the Decision on Principles for the
Development of International Standards, Guides and Recommendations issued by the World Trade Organization Technical Barriers to Trade (TBT) Committee.
Designation: D1623 − 17 (Reapproved 2023)
Standard Test Method for
Tensile and Tensile Adhesion Properties of Rigid Cellular
Plastics
This standard is issued under the fixed designation D1623; the number immediately following the designation indicates the year of
original adoption or, in the case of revision, the year of last revision. A number in parentheses indicates the year of last reapproval. A
superscript epsilon (´) indicates an editorial change since the last revision or reapproval.
This standard has been approved for use by agencies of the U.S. Department of Defense.
1. Scope 2. Referenced Documents
2.1 ASTM Standards:
1.1 This test method covers the determination of the tensile
D638 Test Method for Tensile Properties of Plastics
and tensile adhesion properties of rigid cellular materials in the
D883 Terminology Relating to Plastics
form of test specimens of standard shape under defined
E691 Practice for Conducting an Interlaboratory Study to
conditions of temperature, humidity, and testing machine
Determine the Precision of a Test Method
speed.
1.2 Tensile properties shall be measured using any of three
3. Terminology
types of specimens:
3.1 Definitions of terms applying to this test method appear
1.2.1 Type A shall be the preferred specimen in those cases
in Test Method D638, Annex A2.
where enough sample material exists to form the necessary
specimen.
4. Apparatus
1.2.2 Type B shall be the preferred specimen when only
4.1 Testing Machine—A testing machine that is capable of
smaller specimens are available, as in sandwich panels, etc.
applying a constant rate of crosshead movement, comprising
1.2.3 Type C shall be the preferred specimen for the deter-
essentially the following:
mination of tensile adhesive properties of a cellular plastic to a
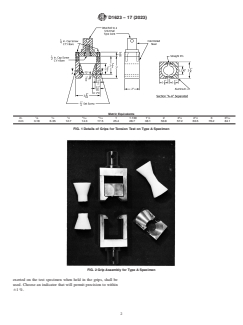
4.1.1 Grips—Grips for holding the test specimen shall be
substrate as in a sandwich panel (top and bottom substrate) or
the self-aligning type; that is, they must be attached to the fixed
the bonding strength of a cellular plastic to a single substrate.
and movable members of the testing machine in such a way
1.3 The values stated in SI units are to be regarded as that they will move freely into alignment as soon as any load
standard. The values given in parentheses are mathematical is applied, so that the long axis of the test specimen will
conversions to inch-pound units that are provided for informa- coincide with the direction of the applied pull through the
tion only and are not considered standard. center line of the grip assembly. Universal-type joints imme-
diately above and below the specimen grips are recommended.
NOTE 1—There is no known ISO equivalent to this test method.
The test specimen shall be held in such a way that slippage
1.4 This international standard was developed in accor-
relative to the grips is prevented, insofar as possible. For Type
dance with internationally recognized principles on standard-
A specimens, use a grip assembly like the one shown in Fig. 1
ization established in the Decision on Principles for the
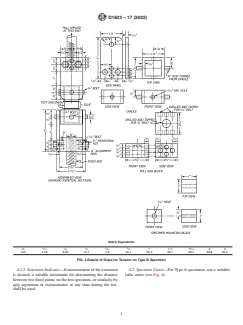
and Fig. 2. For Type B specimens, one suitable grip assembly
Development of International Standards, Guides and Recom-
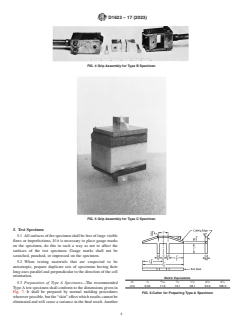
is shown in Fig. 3 and Fig. 4. For Type C specimen, a suitable
mendations issued by the World Trade Organization Technical
grip assembly is shown in Fig. 5.
Barriers to Trade (TBT) Committee.
4.1.2 Load Indicator—A load cell or suitable load-
indicating mechanism, capable of showing the total tensile load
This test method is under the jurisdiction of ASTM Committee D20 on Plastics
and is the direct responsibility of Subcommittee D20.22 on Cellular Materials -
Plastics and Elastomers. For referenced ASTM standards, visit the ASTM website, www.astm.org, or
Current edition approved May 1, 2023. Published May 2023. Originally contact ASTM Customer Service at service@astm.org. For Annual Book of ASTM
approved in 1959. Last previous edition approved in 2017 as D1623 – 17. DOI: Standards volume information, refer to the standard’s Document Summary page on
10.1520/D1623-17R23. the ASTM website.
Copyright © ASTM International, 100 Barr Harbor Drive, PO Box C700, West Conshohocken, PA 19428-2959. United States
D1623 − 17 (2023)
Metric Equivalents
1 1 1 9 11 1 1 1 5
in. ⁄8 ⁄4 ⁄2 ⁄16 ⁄16 1 1.130 1 ⁄2 2 2 ⁄4 2 ⁄2 3 3 ⁄16
mm 3.18 6.35 12.7 14.3 17.5 25.4 28.7 38.1 50.8 57.2 63.5 76.2 84.1
FIG. 1 Details of Grips for Tension Test on Type A Specimen
FIG. 2 Grip Assembly for Type A Specimen
exerted on the test specimen when held in the grips, shall be
used. Choose an indicator that will permit precision to within
61 %.
D1623 − 17 (2023)
Metric Equivalents
3 1 1 5 3 1 9
in. ⁄16 ⁄4 ⁄2 ⁄16 ⁄4 1 1 ⁄2 1 ⁄16 2 3
mm 4.76 6.35 12.7 7.9 19.1 25.4 38.1 39.7 50.8 76.2
FIG. 3 Details of Grips for Tension on Type B Specimen
4.1.3 Extension Indicator—If measurement of the extension 4.2 Specimen Cutter—For Type A specimens, use a suitable
is desired, a suitable instrument for determining the distance lathe cutter (see Fig. 6).
between two fixed points on the test specimen, or similarly by
grip separation or extensometer, at any time during the test,
shall be used.
D1623 − 17 (2023)
FIG. 4 Grip Assembly for Type B Specimen
FIG. 5 Grip Assembly for Type C Specimen
5. Test Specimen
5.1 All surfaces of the specimen shall be free of large visible
flaws or imperfections. If it is necessary to place gauge marks
on the specimen, do this in such a way as not to affect the
surfaces of the test specimen. Gauge marks shall not be
scratched, punched, or impressed on the specimen.
5.2 When testing materials that are suspected to be
anisotropic, prepare duplicate sets of specimens having their
long axes parallel and perpendicular to the direction of the cell
orientation.
Metric Equivalents
1 15 3 1 1 1
in. ⁄4 ⁄32 ⁄4 1 ⁄2 2 ⁄8 4 ⁄4
5.3 Preparation of Type A Specimens—The recommended
mm 6.35 11.9 19.1 38.1 54.0 108.0
Type A test specimen shall conform to the dimensions given in
Fig. 7. It shall be prepared by normal molding procedures
FIG. 6 Cutter for Preparing Type A Specimen
wherever possible, but the “skin” effect which results cannot be
eliminated and will cause a variance in the final result. Another
D1623 − 17 (2023)
vibrations or heat buildup, which could weaken the bond
between the cellular plastic and the substrate.
5.5.3 When adhesion test involves only one surface, the
other side shall be trimmed to provide a smooth, parallel
bonding surface.
5.5.4 Bond the specimen mounting (or grip assembly)
blocks to the top and bottom of the test specimen by a suitable
method that does not affect the material being tested.
6. Conditioning
Metric Equivalents
15 5 1
in. 1.129 ⁄32 1 ⁄8 4 ⁄4
6.1 Conditioning—Condition the test specimens at 23 6
mm 28.7 11.9 41.3 108.0
2°C (73.4 6 3.6°F) and 50 6 10 % relative humidity for not
FIG. 7 Dimensions of Type A Specimen less than 24 h prior to testing.
6.2 Test Conditions—Conduct tests in the standard labora-
tory atmosphere of 23 6 2°C (73.4 6 3.6°F) and 50 6 10 %
method of preparation of the specimen, which would eliminate
relative humidity, unless otherwise specified.
the “skin effect” variable, is to machine the desired geometry
on a small lathe, using a cutter like the one shown in Fig. 6.
7. Number of Test Specimens
Insert a 50 by 50 by 150-mm (2 by 2 by 6-in.) block of the
7.1 A minimum of three specimens shall be tested. Speci-
material to be tested into the four-jaw chuck, which had been
mens that break at some obvious flaw shall be discarded and
previously centered. Prepare the other end of the block to
retests made, unless such flaws constitute a variable that is to
receive the 60° tapered end of the tailstock center. Set the lathe
be studied.
at its highest speed. The appropriate rate of entry of the cutter
blade will depend on the density of the foam. Advance the
8. Speed of Testing
cutter until it reaches a stop, at which time the diameter of the
8.1 The standard speed of testing shall be such that rupture
specimen test section shall be 28.7 mm (1.130 in.), giving a
occurs in 3 to 6 min. A suggested rate of crosshead movement
2 2
645 mm (1 in. ) cross sectional area. Using a band saw, cut off
is 1.3 mm (0.05 in.)/min for each 25.4 mm (1 in.) of test section
the excess sample end (up to the taper). The lathe assembly and
gauge length.
completed specimen are shown in Fig. 6 and Fig. 7. The
9. Procedure
recommended gauge length shall be 25.4 mm (1 in.) with a
radius of curvature of 11.9 mm ( ⁄32 in.) at each end joining it
9.1 Meas
...


Questions, Comments and Discussion
Ask us and Technical Secretary will try to provide an answer. You can facilitate discussion about the standard in here.
Loading comments...