ASTM D1155-10(2020)
(Test Method)Standard Test Method for Roundness of Glass Spheres
Standard Test Method for Roundness of Glass Spheres
SIGNIFICANCE AND USE
4.1 The roundness of glass spheres is one measurable aspect relating to their performance as a retroreflective media. The function of this test method is to measure the percent of true spheres as related to compliance with applicable specifications.
Note 1: This method has been used in other industrial areas outside the intended scope of this test method.
SCOPE
1.1 This test method2 covers the determination of the percent of true spheres in glass spheres used for retroreflective marking purposes and industrial uses.
1.2 This test method includes two procedures as follows:
1.2.1 Procedure A, in which the selected specimen is split into two size ranges or groups prior to separation into true spheres and irregular particles, and
1.2.2 Procedure B, in which the selected specimen is split into five size ranges or groups prior to separation.
1.2.3 In determining compliance with specification requirements, either Procedure A or Procedure B may be used. Where tests indicate failure to meet the specified percent of true spheres and irregular particles, the referee test shall be made in accordance with Procedure B.
1.3 The values stated in SI units are to be regarded as the standard. The values given in parentheses are for information only.
1.4 This standard does not purport to address all of the safety concerns, if any, associated with its use. It is the responsibility of the user of this standard to establish appropriate safety, health, and environmental practices and determine the applicability of regulatory limitations prior to use.
1.5 This international standard was developed in accordance with internationally recognized principles on standardization established in the Decision on Principles for the Development of International Standards, Guides and Recommendations issued by the World Trade Organization Technical Barriers to Trade (TBT) Committee.
General Information
- Status
- Published
- Publication Date
- 31-May-2020
- Technical Committee
- D01 - Paint and Related Coatings, Materials, and Applications
- Drafting Committee
- D01.44 - Traffic Coatings
Relations
- Effective Date
- 01-Jun-2020
- Effective Date
- 01-May-2014
- Effective Date
- 01-Oct-2013
- Effective Date
- 01-May-2013
- Effective Date
- 01-May-2013
- Effective Date
- 01-Nov-2011
- Effective Date
- 01-Oct-2010
- Effective Date
- 01-May-2009
- Effective Date
- 01-Oct-2008
- Effective Date
- 01-Oct-2008
- Refers
ASTM E177-06b - Standard Practice for Use of the Terms Precision and Bias in ASTM Test Methods - Effective Date
- 15-Nov-2006
- Refers
ASTM E177-06a - Standard Practice for Use of the Terms Precision and Bias in ASTM Test Methods - Effective Date
- 01-Nov-2006
- Effective Date
- 01-Nov-2005
- Refers
ASTM E177-04e1 - Standard Practice for Use of the Terms Precision and Bias in ASTM Test Methods - Effective Date
- 01-Nov-2004
- Effective Date
- 01-Nov-2004
Overview
ASTM D1155-10(2020): Standard Test Method for Roundness of Glass Spheres is a globally recognized method published by ASTM International. This standard provides procedures to determine the percent of true, round spheres in samples of glass beads. Primarily used to evaluate materials for retroreflective applications, such as road marking media, this test method ensures product quality and compliance with industry specifications. The standard outlines two procedures for separating true spheres from irregular particles based on size, delivering reliable results vital for both industrial and safety applications.
Key Topics
- Test Purpose: Measures the roundness of glass spheres, a critical property affecting their retroreflective and functional performance.
- Test Procedures:
- Procedure A: Divides specimens into two size groups before testing.
- Procedure B: Uses five size groups for more detailed analysis and is required for referee testing in cases of non-compliance.
- Apparatus: Utilizes a vibrating glass panel at a variable slope to mechanically segregate true spheres from irregular particles.
- Sample Selection: Involves random selection and mechanical splitting to ensure representative sampling.
- Performance Reporting: Results are expressed as the weight percent of true spheres in the sample, with clear documentation of the method used.
- Precision and Reproducibility: The standard defines statistical limits for repeatability and reproducibility, ensuring reliability across different labs and operators.
- Compliance: Either Procedure A or B may be used for compliance testing; Procedure B is required if results do not meet specification requirements.
Applications
This standard is widely applied in quality control and compliance testing in the following areas:
- Retroreflective Road Markings: Ensuring the roundness of glass beads used in paints and coatings for traffic lines, enhancing nighttime visibility.
- Industrial Processing: Reliable evaluation of glass beads for blasting, peening, or filler materials where roundness impacts performance or flow properties.
- Safety Materials Manufacturing: Specification compliance for products requiring high retroreflectivity, such as signage and safety clothing.
- General Industrial Use: The test is referenced in various industries where glass spheres are integral, even beyond its originally intended application.
Organizations benefit from using ASTM D1155 by:
- Validating the quality and consistency of glass spheres.
- Meeting regulatory and contract requirements for material supply.
- Supporting research and development for performance-optimized materials.
- Facilitating fair dispute resolution between suppliers and purchasers through standardized measurement.
Related Standards
Users of ASTM D1155-10(2020) may also consult these relevant standards to ensure comprehensive material characterization:
- ASTM E11: Specification for woven wire test sieve cloth and sieves, used in sample preparation for size grouping.
- ASTM E177: Practice for use of the terms precision and bias in ASTM test methods, supporting interpretation of results.
- ASTM E691: Practice for conducting interlaboratory studies to determine the precision of a test method.
- ASTM MNL32: Manual on test sieving methods.
- Other Retroreflectivity Standards: For comprehensive retroreflective performance, refer to relevant standards specific to road marking materials and safety applications.
Keywords: ASTM D1155, glass spheres, roundness, retroreflective media, test method, quality control, road marking beads, industrial glass beads, standard compliance.
Buy Documents
ASTM D1155-10(2020) - Standard Test Method for Roundness of Glass Spheres
Frequently Asked Questions
ASTM D1155-10(2020) is a standard published by ASTM International. Its full title is "Standard Test Method for Roundness of Glass Spheres". This standard covers: SIGNIFICANCE AND USE 4.1 The roundness of glass spheres is one measurable aspect relating to their performance as a retroreflective media. The function of this test method is to measure the percent of true spheres as related to compliance with applicable specifications. Note 1: This method has been used in other industrial areas outside the intended scope of this test method. SCOPE 1.1 This test method2 covers the determination of the percent of true spheres in glass spheres used for retroreflective marking purposes and industrial uses. 1.2 This test method includes two procedures as follows: 1.2.1 Procedure A, in which the selected specimen is split into two size ranges or groups prior to separation into true spheres and irregular particles, and 1.2.2 Procedure B, in which the selected specimen is split into five size ranges or groups prior to separation. 1.2.3 In determining compliance with specification requirements, either Procedure A or Procedure B may be used. Where tests indicate failure to meet the specified percent of true spheres and irregular particles, the referee test shall be made in accordance with Procedure B. 1.3 The values stated in SI units are to be regarded as the standard. The values given in parentheses are for information only. 1.4 This standard does not purport to address all of the safety concerns, if any, associated with its use. It is the responsibility of the user of this standard to establish appropriate safety, health, and environmental practices and determine the applicability of regulatory limitations prior to use. 1.5 This international standard was developed in accordance with internationally recognized principles on standardization established in the Decision on Principles for the Development of International Standards, Guides and Recommendations issued by the World Trade Organization Technical Barriers to Trade (TBT) Committee.
SIGNIFICANCE AND USE 4.1 The roundness of glass spheres is one measurable aspect relating to their performance as a retroreflective media. The function of this test method is to measure the percent of true spheres as related to compliance with applicable specifications. Note 1: This method has been used in other industrial areas outside the intended scope of this test method. SCOPE 1.1 This test method2 covers the determination of the percent of true spheres in glass spheres used for retroreflective marking purposes and industrial uses. 1.2 This test method includes two procedures as follows: 1.2.1 Procedure A, in which the selected specimen is split into two size ranges or groups prior to separation into true spheres and irregular particles, and 1.2.2 Procedure B, in which the selected specimen is split into five size ranges or groups prior to separation. 1.2.3 In determining compliance with specification requirements, either Procedure A or Procedure B may be used. Where tests indicate failure to meet the specified percent of true spheres and irregular particles, the referee test shall be made in accordance with Procedure B. 1.3 The values stated in SI units are to be regarded as the standard. The values given in parentheses are for information only. 1.4 This standard does not purport to address all of the safety concerns, if any, associated with its use. It is the responsibility of the user of this standard to establish appropriate safety, health, and environmental practices and determine the applicability of regulatory limitations prior to use. 1.5 This international standard was developed in accordance with internationally recognized principles on standardization established in the Decision on Principles for the Development of International Standards, Guides and Recommendations issued by the World Trade Organization Technical Barriers to Trade (TBT) Committee.
ASTM D1155-10(2020) is classified under the following ICS (International Classification for Standards) categories: 81.040.30 - Glass products. The ICS classification helps identify the subject area and facilitates finding related standards.
ASTM D1155-10(2020) has the following relationships with other standards: It is inter standard links to ASTM D1155-10(2015), ASTM E177-14, ASTM E11-13, ASTM E691-13, ASTM E177-13, ASTM E691-11, ASTM E177-10, ASTM E11-09e1, ASTM E177-08, ASTM E691-08, ASTM E177-06b, ASTM E177-06a, ASTM E691-05, ASTM E177-04e1, ASTM E177-06. Understanding these relationships helps ensure you are using the most current and applicable version of the standard.
ASTM D1155-10(2020) is available in PDF format for immediate download after purchase. The document can be added to your cart and obtained through the secure checkout process. Digital delivery ensures instant access to the complete standard document.
Standards Content (Sample)
This international standard was developed in accordance with internationally recognized principles on standardization established in the Decision on Principles for the
Development of International Standards, Guides and Recommendations issued by the World Trade Organization Technical Barriers to Trade (TBT) Committee.
Designation: D1155 − 10 (Reapproved 2020)
Standard Test Method for
Roundness of Glass Spheres
This standard is issued under the fixed designation D1155; the number immediately following the designation indicates the year of
original adoption or, in the case of revision, the year of last revision. A number in parentheses indicates the year of last reapproval. A
superscript epsilon (´) indicates an editorial change since the last revision or reapproval.
1. Scope 2. Referenced Documents
2.1 ASTM Standards:
1.1 This test method covers the determination of the
percent of true spheres in glass spheres used for retroreflective E11 Specification for Woven Wire Test Sieve Cloth and Test
Sieves
marking purposes and industrial uses.
E177 Practice for Use of the Terms Precision and Bias in
1.2 This test method includes two procedures as follows:
ASTM Test Methods
1.2.1 Procedure A, in which the selected specimen is split
E691 Practice for Conducting an Interlaboratory Study to
into two size ranges or groups prior to separation into true
Determine the Precision of a Test Method
spheres and irregular particles, and
2.2 Other Document:
1.2.2 Procedure B, in which the selected specimen is split
ASTM MNL32 Manual on Test Sieving Methods
into five size ranges or groups prior to separation.
1.2.3 In determining compliance with specification 3. Summary of Test Method
requirements, either ProcedureAor Procedure B may be used.
3.1 The glass particles are mechanically separated into true
Where tests indicate failure to meet the specified percent of
spheres and irregular particles by controlled vibration on a
true spheres and irregular particles, the referee test shall be
glass plate fixed at a predetermined slope.
made in accordance with Procedure B.
4. Significance and Use
1.3 The values stated in SI units are to be regarded as the
4.1 The roundness of glass spheres is one measurable aspect
standard. The values given in parentheses are for information
relating to their performance as a retroreflective media. The
only.
function of this test method is to measure the percent of true
1.4 This standard does not purport to address all of the
spheres as related to compliance with applicable specifications.
safety concerns, if any, associated with its use. It is the
NOTE 1—This method has been used in other industrial areas outside
responsibility of the user of this standard to establish appro-
the intended scope of this test method.
priate safety, health, and environmental practices and deter-
mine the applicability of regulatory limitations prior to use.
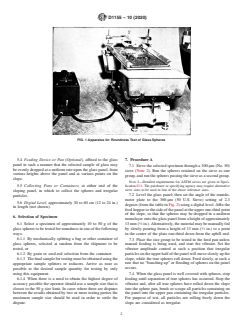
5. Apparatus (Fig. 1)
1.5 This international standard was developed in accor-
5.1 Electrical Feeder-Vibrator, upon which is mounted a
dance with internationally recognized principles on standard-
smoothglasspanel,152.4mm(6in.)wideand381mm(15in.)
ization established in the Decision on Principles for the
long.
Development of International Standards, Guides and Recom-
mendations issued by the World Trade Organization Technical 5.2 Hinged Base, supporting the vibrator and panel in such
a manner that the angle of slope of the glass panel with the
Barriers to Trade (TBT) Committee.
horizontal may be varied and fixed in any predetermined
position.
5.3 Vibrator—Meansofvaryingtheamplitudeorstrengthof
This test method is under the jurisdiction of ASTM Committee D01 on Paint
and Related Coatings, Materials, andApplications and is the direct responsibility of
the vibrations transmitted to the glass panel, at a fixed
Subcommittee D01.44 on Traffic Coatings.
frequency of 60 impulses per second.
Current edition approved June 1, 2020. Published June 2020. Originally
approved in 1951. Last previous edition approved in 2015 as D1155 – 10 (2015).
DOI: 10.1520/D1155-10R20. For referenced ASTM standards, visit the ASTM website, www.astm.org, or
Forinformationonthedevelopmentofthistestmethod,referencemaybemade contact ASTM Customer Service at service@astm.org. For Annual Book of ASTM
to the paper by Keeley, A. E., “Roundness Testing of Glass Spheres,” ASTM Standards volume information, refer to the standard’s Document Summary page on
Bulletin, No. 174, May 1951, p. 72. the ASTM website.
Copyright © ASTM International, 100 Barr Harbor Drive, PO Box C700, West Conshohocken, PA 19428-2959. United States
D1155 − 10 (2020)
FIG. 1 Apparatus for Roundness Test of Glass Spheres
5.4 Feeding Device or Pan (Optional), affixed to the glass 7. Procedure A
panel in such a manner that the selected sample of glass may
7.1 Sieve the selected specimen through a 300-µm (No. 50)
be evenly dropped at a uniform rate upon the glass panel, from
sieve (Note 2). Run the spheres retained on the sieve as one
various heights above the panel and at various points on the
group, and run the spheres passing the sieve as a second group.
slope.
NOTE 2—Detailed requirements for ASTM sieves are given in Speci-
fication E11. The purchaser or specifying agency may require alternative
5.5 Collecting Pans or Containers, at either end of the
sieve sizes to be used in lieu of the above reference sizes.
sloping panel, in which to collect the spheres and irregular
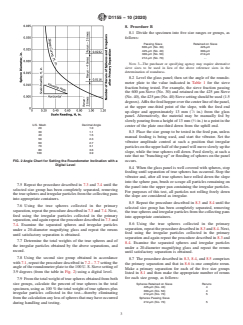
7.2 Level the glass panel; then set the angle of the roundo-
particles.
meter plate to the 300-µm (50 U.S. Sieve) setting of 2.3
5.6 Digital Level, approximately 30 to 60 cm (12 to 24 in.)
degrees (from the table in Fig. 2) using a digital level.Affix the
in length (not shown).
feed hopper to the side of the panel at the upper one-third point
of the slope, so that the spheres may be dropped in a uniform
6. Selection of Specimen
monolayer onto the glass panel from a height of approximately
6.1 Select a specimen of approximately 10 to 50 g of the 13mm( ⁄2in.).Alternatively,thematerialmaybemanuallyfed
glass spheres to be tested for roundness in one of the following by slowly pouring from a height of 13 mm ( ⁄2 in.) to a point
ways: in the center of the plate one-third down from the uphill end.
6.1.1 By mechanically splitting a bag or other container of
7.3 Place the size group to be tested in the feed pan unless
glass spheres, selected at random from the shipment to be
manual feeding is being used, and start the vibrator. Set the
tested, or
vibrator amplitude control at such a position that irregular
particles on the upper half of the panel will move slowly up the
6.1.2 By grain or seed-rod selection from the container.
slope, while the true spheres roll down. Feed slowly, at such a
6.1.3 Thefinalsamplefortestingmustbeobtainedusingthe
rate that no “bunching up” or flooding of spheres on the panel
appropriate sample splitters or reducers. Arrive as near as
occurs.
possible to the desired sample quantity for testing by only
using this equipment.
7.4 When the glass panel is well covered with spheres, stop
6.1.4 When there is a need to obtain the highest degree of feeding until separation of true spheres has occurred. Stop the
accuracy possible the operator should use a sample size that is vibrator and, after all true spheres have rolled down the slope
closest to the 50 g size limit. In cases where there are disputes into the sphere pan, brush or scrape all particles remaining on
between the results obtained by two or more testing parties the the panel into the upper pan containing the irregular particles.
maximum sample size should be used in order to settle the For purpose of test, all particles not rolling freely down the
dispute. slope are considered as irregular.
D1155 − 10 (2020)
8. Procedure B
8.1 Divide the specimen into five size ranges or groups, as
follows:
Passing Sieve Retained on Sieve
600-µm (No. 30) 425-µm
425-µm (No. 40) 300-µm
300-µm (No. 50) 212-µm
212-µm (No. 70) .
NOTE 3—The purchaser or specifying agency may require alternative
sieve sizes to be used in lieu of the above reference sizes in the
determination of roundness.
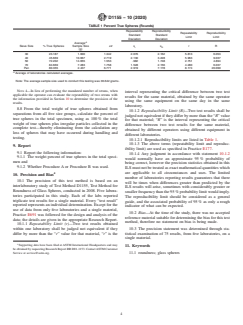
8.2 Level the glass panel; then set the angle of the roundo-
meter plate to the value indicated in Table 1 for the sieve
fraction being tested. For example, the sieve fraction passing
the 600 µm Sieve (No. 30) and retained on the 425 µm Sieve
(No.40),the425µm(No.40)Sievesettingshouldbeused(1.5
degrees).Affixthefeedhopperoverthecenterlineofthepanel,
at the upper one-third point of the slope, with the feed end
up-slope and approximately 13 mm ( ⁄2 in.) from the glass
panel. Alternatively, the material may be manually fed by
slowly pouring from a height of 13 mm ( ⁄2 in.) to a point in the
U.S. Mesh Decimal Angle
center of the plate one-third down from the uphill end.
20 1.0
30 1.1
8.3 Place the size group to be tested i
...


Questions, Comments and Discussion
Ask us and Technical Secretary will try to provide an answer. You can facilitate discussion about the standard in here.
Loading comments...