ASTM F2754/F2754M-09
(Test Method)Standard Test Method for Measurement of Camber, Cast, Helix and Direction of Helix of Coiled Wire
Standard Test Method for Measurement of Camber, Cast, Helix and Direction of Helix of Coiled Wire
SIGNIFICANCE AND USE
The process of coiling wire causes the wire to take on a curvature from the process of being mechanically deformed into a coiled geometry. The curvature in the wire is permanent unless the wire is straightened. It will affect how the coiled wire will react when it is subjected to additional wire forming operations. In addition, residual stresses induced from the coiling operation can cause elastic recoil or spring back in subsequent wire forming operations unless the material is straightened and stress relieved prior to forming. These residual stresses can create wide variations in the dimensions of components and or parts that have been built using the coiled wire (cast).
The direction that the wire has been coiled affects how the wire will be taken off of the coil for subsequent wire forming operations (helix direction).
Lift or spacing between adjacent coils also affects how the wire will be taken off of the coil and can also affect the dimensions of components and or parts that have been built using the coiled wire due to residual stresses (helix).
SCOPE
1.1 This test method covers the various standard methods that are used for measuring camber, cast, helix, and helix direction. The wire may be coiled with or without a spool.
1.2 This test method applies to round wire that has a diameter between 0.0127 to 4.78 mm (0.0005 to 0.188 in.). It also applies to flat or shaped wire.
1.3 This test method does not apply to superelastic nitinol wire. It does apply to the as-drawn condition of nitinol wire.
1.4 This test method does not apply to the measurement of the straightness of straightened to length wire and tubing.
1.5 The values stated in either SI units or inch-pound units are to be regarded separately as standard. The values stated in each system may not be exact equivalents; therefore, each system shall be used independently of the other. Combining values from the two systems may result in non-conformance with the standard.
1.6 This standard does not purport to address all of the safety concerns, if any, associated with its use. It is the responsibility of the user of this standard to establish appropriate safety and health practices and determine the applicability of regulatory limitations prior to use.
General Information
Relations
Standards Content (Sample)
NOTICE: This standard has either been superseded and replaced by a new version or withdrawn.
Contact ASTM International (www.astm.org) for the latest information
Designation:F2754/F2754M −09
StandardTest Method for
Measurement of Camber, Cast, Helix and Direction of Helix
of Coiled Wire
This standard is issued under the fixed designation F2754/F2754M; the number immediately following the designation indicates the year
of original adoption or, in the case of revision, the year of last revision. A number in parentheses indicates the year of last reapproval.
A superscript epsilon (´) indicates an editorial change since the last revision or reapproval.
1. Scope 2.2.2.1 helix (free end lift)—the maximum lift of the free
end of the wire when laid on a flat surface, Fig. 1(b).
1.1 This test method covers the various standard methods
2.2.2.2 helix (hanging helix)—the maximum distance be-
that are used for measuring camber, cast, helix, and helix
tween two adjacent coils of wire, Fig. 1(c).Ahanging helix can
direction. The wire may be coiled with or without a spool.
also be measured by suspending the coils.
1.2 This test method applies to round wire that has a
2.2.3 helix direction—can be left— or right-handed depend-
diameter between 0.0127 to 4.78 mm (0.0005 to 0.188 in.). It
ing upon how the wire was coiled, Fig. 1(d)
also applies to flat or shaped wire.
2.2.3.1 left-handed helix—the wire is coiled in a counter-
1.3 This test method does not apply to superelastic nitinol
clockwise direction, Fig. 2(a).
wire. It does apply to the as-drawn condition of nitinol wire.
2.2.3.2 right-handed helix—the wire is coiled in a clockwise
1.4 This test method does not apply to the measurement of
direction, Fig. 2(b).
the straightness of straightened to length wire and tubing.
2.2.4 camber—the deflection in the width direction of a flat
1.5 The values stated in either SI units or inch-pound units
or shaped wire, Fig. 1(e).
are to be regarded separately as standard. The values stated in
3. Summary of Test Method
each system may not be exact equivalents; therefore, each
system shall be used independently of the other. Combining
3.1 The maximum diameter of at least one complete cir-
values from the two systems may result in non-conformance
cumference is measured using a linear scale while it is resting
with the standard.
completely flat on a flat surface such as a table, workbench, or
floor (cast measurement). The maximum lift of the free end of
1.6 This standard does not purport to address all of the
the wire when laid on a flat surface is the free end lift helix and
safety concerns, if any, associated with its use. It is the
is measured using a linear scale. A hanging helix can be
responsibility of the user of this standard to establish appro-
measuredusingalinearscalewhilethewireisbeingsuspended
priate safety and health practices and determine the applica-
(hanging helix free end lift). Camber is the offset in the width
bility of regulatory limitations prior to use.
dimension of a flat or shaped wire and can also be measured
using a linear scale while the wire is resting on a flat surface.
2. Terminology
Alternatively, a coordinate measurement machine or optical
2.1 Fig. 1(a) through Fig. 1(e) illustrate the physical mean-
comparator may be used. Helix direction is the direction which
ing of cast, helix, direction of helix, and camber.
the wire has been coiled.
2.2 Definitions:
4. Significance and Use
2.2.1 cast—the maximum diameter of coiled wire when one
4.1 The process of coiling wire causes the wire to take on a
complete circumference rests completely on a flat surface such
curvature from the process of being mechanically deformed
as a table, workbench, or floor. Fig. 1(a).
into a coiled geometry. The curvature in the wire is permanent
2.2.2 helix—there are two common methods for measuring
unless the wire is straightened. It will affect how the coiled
helix—free end lift and hanging helix. These definitions are
wire will react when it is subjected to additional wire forming
defined by Fig. 1(b) and Fig. 1(c), respectively.
operations. In addition, residual stresses induced from the
coiling operation can cause elastic recoil or spring back in
subsequent wire forming operations unless the material is
This test method is under the jurisdiction ofASTM Committee F04 on Medical
straightened and stress relieved prior to forming. These re-
and Surgical Materials and Devices and is the direct responsibility of Subcommittee
sidual stresses can create wide variations in the dimensions of
F04.15 on Material Test Methods.
components and or parts that have been built using the coiled
Current edition approved Feb. 1, 2009. Published February 2009. DOI: 10.1520/
F2754_F2754M-09. wire (cast).
Copyright © ASTM International, 100 Barr Harbor Drive, PO Box C700, West Conshohocken, PA 19428-2959. United States
F2754/F2754M−09
NOTE 1—(a) Definition of cast. (b) Definition of helix as measured by lift method. (c) Definition of helix as measured by hanging method. (d) Definition
of helix direction. (e) Definition of camber.
FIG. 1Standard Definitions for Cast, Helix, and Camber of Spooled Wire
NOTE 1—(a) Definition of left-handed helix direction. (b) Definition of right-handed helix direction.
FIG. 2Standard Definition for Direction of Helix
4.2 The direction that the wire has been coiled affects how 5.3 Special equipment is not required for measurement of
the wire will be taken off of the coil for subsequent wire camber, helix, or the direction of helix.
forming operations (helix direction).
6. Test Specimen
4.3 Lift or spacing between adjacent coils also affects how
the wire will be taken off of the coil and can also affect the
6.1 Test Specimen for Measuring Cast:
dimensions of components and or parts that have been built
6.1.1 It is preferred to fixture the spool or coil in a suitable
using the coiled wire due to residual stresses (helix).
manner so it does not move as the wire is removed. It is
important to keep a firm tension on the wire to prevent tangling
5. Apparatus
which could alter the measurement.
5.1 Alinear scale is required for measurement of the cast of
6.1.2 Scrap the first 1.5 to3m(5to10ft)of wire in order
coiled wire. An alternate approach is to use a profilometer or
to eliminate any possible end effects and wire damage from
coordinate measurement machine.
being tied off. Ensure that the wire is easily coming off of the
spool or coil without any crossing over of the wire.
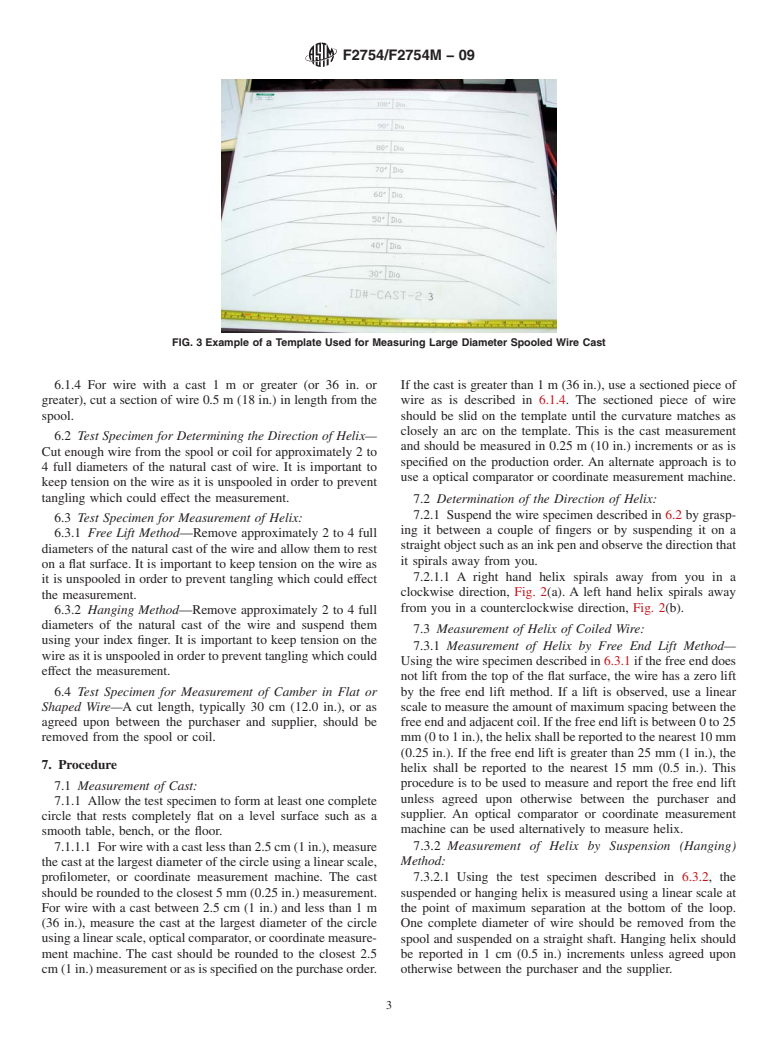
5.2 A template is useful for measuring the cast of coiled
wire that is greater than 0.6 m (24 in), Fig. 3. An alternative 6.1.3 Allow the uncoiled wire to naturally form at least one
approach is to use a coordinate measurement machine or complete circle that rests completely flat on a level surface
optical comparato such as a smooth table, bench, or the floor.
...


Questions, Comments and Discussion
Ask us and Technical Secretary will try to provide an answer. You can facilitate discussion about the standard in here.