ASTM D2718-24
(Test Method)Standard Test Methods for Structural Panels in Planar Shear (Rolling Shear)
Standard Test Methods for Structural Panels in Planar Shear (Rolling Shear)
SIGNIFICANCE AND USE
3.1 Planar shear (rolling shear) characteristics of structural panels determined by these test methods are essential for the rigorous design of various glued wood-panel structural components, such as box beams, folded plate roofs, and stressed skin panels. Planar shear also may govern the design at low span-depth ratios encountered in floors subjected to high concentrated loads, concrete forms at high pouring pressures, and bulk storage structures.
3.2 The modulus of rigidity determined from Test Method A is a composite of the entire specimen acting as a unit. For plywood panels for which the ratio between the shear moduli of the plies with grain oriented parallel and perpendicular to the shear forces is known, the rolling shear modulus of the perpendicular plies can be calculated.
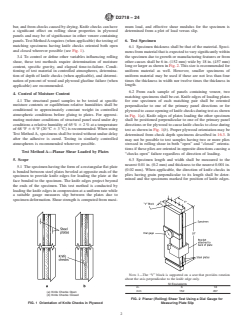
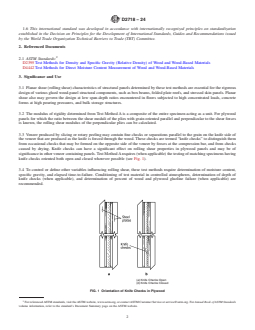
3.3 Veneer produced by slicing or rotary peeling may contain fine checks or separations parallel to the grain on the knife side of the veneer that are produced as the knife is forced through the wood. These checks are termed “knife checks” to distinguish them from occasional checks that may be formed on the opposite side of the veneer by forces at the compression bar, and from checks caused by drying. Knife checks can have a significant effect on rolling shear properties in plywood panels and may be of significance in other veneer containing panels. Test Method A requires (when applicable) the testing of matching specimens having knife checks oriented both open and closed wherever possible (see Fig. 1).
3.4 To control or define other variables influencing rolling shear, these test methods require determination of moisture content, specific gravity, and elapsed time-to-failure. Conditioning of test material in controlled atmospheres, determination of depth of knife checks (when applicable), and determination of percent of wood and plywood glueline failure (when applicable) are recommended.
SCOPE
1.1 These test methods determine the shear properties of structural panels associated with shear distortion of the planes parallel to the edge planes of the panels. Both shear strength and modulus of rigidity may be determined. Primarily, the tests measure the planar shear (rolling shear) strength developed in the plane of the panel.
1.2 Structural panels in use include, but are not limited to, structural plywood, oriented strand board (OSB), and composites of veneer and of wood-based layers.
1.3 Two test methods are included:
1.3.1 Test Method A—Planar shear loaded by plates.
1.3.2 Test Method B—Planar shear induced by five-point bending.
1.3.3 The choice of method will be dictated by the purpose of the test and equipment available.
1.3.4 Test Method A, Planar Shear Loaded by Plates—This test method uses a rectangular panel section adhered between steel plates with protruding knife edges to create load at the panel faces. This test method has been used to develop shear properties of plywood and oriented strand board for the purpose of confirming design values. This test method does not produce pure shear, but the specimen length is prescribed so that the secondary stresses have a minimum effect. The method determines shear strength and modulus of rigidity.
1.3.5 Test Method B, Planar Shear Induced by Five-Point Bending—Planar shear stress is induced on the panel while loaded in bending using two continuous spans. This test method determines planar shear strength consistent with panel applications under transverse loading. This test method is able to determine shear strength at any moisture condition.
1.4 The values stated in inch-pound units are to be regarded as standard. When there are values given in parentheses, these are mathematical conversions to SI units that are provided for information only and are not considered standard.
1.5 This standard does not purport to address all of the safety concerns, if any, associated with its use. It is the responsibility of the user of this stan...
General Information
- Status
- Published
- Publication Date
- 14-Feb-2024
- Technical Committee
- D07 - Wood
- Drafting Committee
- D07.03 - Panel Products
Relations
- Effective Date
- 15-Feb-2024
- Referred By
ASTM D5456-21e1 - Standard Specification for Evaluation of Structural Composite Lumber Products - Effective Date
- 15-Feb-2024
- Effective Date
- 15-Feb-2024
- Referred By
ASTM D3044-16(2023) - Standard Test Method for Shear Modulus of Wood-Based Structural Panels - Effective Date
- 15-Feb-2024
- Effective Date
- 15-Feb-2024
Overview
ASTM D2718-24 provides standard test methods for determining the planar shear (rolling shear) properties of structural panels. These methods are critical for evaluating the mechanical performance of materials commonly used in engineering and construction, such as structural plywood, oriented strand board (OSB), and wood-based composite panels. Precise assessment of planar shear strength and modulus of rigidity ensures the structural integrity of components where shear distortion is a key factor, including box beams, folded plate roofs, stressed skin panels, floors, and specialized forms.
Key Topics
- Planar Shear and Rolling Shear: The standard focuses on measuring the shear properties that occur parallel to the plane of the panel, providing crucial metrics for design and performance validation.
- Tests Covered:
- Test Method A: Utilizes steel plates with knife edges adhered to specimen faces to apply load, measuring both shear strength and modulus of rigidity.
- Test Method B: Involves five-point bending to induce planar shear stress, simulating conditions found in practical panel applications and accommodating various moisture conditions.
- Material Scope: Applies to a wide range of structural panels, including plywood, OSB, and composite wood products. It considers manufacturing features such as veneer knife checks, which can significantly impact rolling shear characteristics.
- Influencing Variables: The methods account for factors like moisture content, specific gravity, knife check depth, and failure characteristics to ensure reliable, repeatable results.
- Data Reporting: Requires comprehensive documentation of specimen characteristics, including thickness, moisture content, specific gravity, shear strength, modulus of rigidity, and failure modes.
Applications
The ASTM D2718-24 test methods are essential tools in the design and quality assurance of wood-based structural systems. Key applications include:
- Structural Design Verification: Ensuring panels meet rigorous strength and rigidity criteria for use in critical structures such as box beams, flooring systems subjected to concentrated loads, concrete formworks, and bulk storage units.
- Material Development & Quality Control: Used by manufacturers and engineers to confirm the suitability and uniformity of plywood, OSB, and composite panels for structural applications.
- Research and Product Comparison: Facilitates comparative analysis between different materials, adhesive systems, and manufacturing methods.
- Assessment of Manufacturing Defects: Evaluates the impact of knife checks and other production-induced characteristics on rolling shear strength, informing both product specification and process improvements.
- Moisture Condition Analysis: Both test methods allow assessment under varying moisture environments, relevant for panels used in diverse climates and exposure conditions.
Related Standards
For comprehensive assessment and compliance, the following standards are commonly referenced alongside ASTM D2718-24:
- ASTM D2395 - Test Methods for Density and Specific Gravity (Relative Density) of Wood and Wood-Based Materials
- ASTM D4442 - Test Methods for Direct Moisture Content Measurement of Wood and Wood-Based Materials
- Other Related Structural Panel Standards: Reference additional ASTM standards relevant to specific panel types, testing methods, or adhesive performance.
Practical Value
Complying with ASTM D2718-24 ensures that structural panels are tested to internationally recognized benchmarks for shear properties, supporting safe and efficient engineering applications. The standard methods foster confidence in material selection, structural reliability, and regulatory acceptance for construction and manufacturing professionals working with wood-based engineered materials. By establishing uniform testing and reporting practices, ASTM D2718-24 enables consistent quality and performance assessment across the wood panel industry.
Keywords: ASTM D2718-24, planar shear, rolling shear, structural panels, plywood shear strength, OSB, composite panels, modulus of rigidity, wood-based materials, mechanical testing.
Buy Documents
ASTM D2718-24 - Standard Test Methods for Structural Panels in Planar Shear (Rolling Shear)
REDLINE ASTM D2718-24 - Standard Test Methods for Structural Panels in Planar Shear (Rolling Shear)
Get Certified
Connect with accredited certification bodies for this standard

Gozdarski inštitut Slovenije
Slovenian Forestry Institute. Forest management certification support, timber testing.
Sponsored listings
Frequently Asked Questions
ASTM D2718-24 is a standard published by ASTM International. Its full title is "Standard Test Methods for Structural Panels in Planar Shear (Rolling Shear)". This standard covers: SIGNIFICANCE AND USE 3.1 Planar shear (rolling shear) characteristics of structural panels determined by these test methods are essential for the rigorous design of various glued wood-panel structural components, such as box beams, folded plate roofs, and stressed skin panels. Planar shear also may govern the design at low span-depth ratios encountered in floors subjected to high concentrated loads, concrete forms at high pouring pressures, and bulk storage structures. 3.2 The modulus of rigidity determined from Test Method A is a composite of the entire specimen acting as a unit. For plywood panels for which the ratio between the shear moduli of the plies with grain oriented parallel and perpendicular to the shear forces is known, the rolling shear modulus of the perpendicular plies can be calculated. 3.3 Veneer produced by slicing or rotary peeling may contain fine checks or separations parallel to the grain on the knife side of the veneer that are produced as the knife is forced through the wood. These checks are termed “knife checks” to distinguish them from occasional checks that may be formed on the opposite side of the veneer by forces at the compression bar, and from checks caused by drying. Knife checks can have a significant effect on rolling shear properties in plywood panels and may be of significance in other veneer containing panels. Test Method A requires (when applicable) the testing of matching specimens having knife checks oriented both open and closed wherever possible (see Fig. 1). 3.4 To control or define other variables influencing rolling shear, these test methods require determination of moisture content, specific gravity, and elapsed time-to-failure. Conditioning of test material in controlled atmospheres, determination of depth of knife checks (when applicable), and determination of percent of wood and plywood glueline failure (when applicable) are recommended. SCOPE 1.1 These test methods determine the shear properties of structural panels associated with shear distortion of the planes parallel to the edge planes of the panels. Both shear strength and modulus of rigidity may be determined. Primarily, the tests measure the planar shear (rolling shear) strength developed in the plane of the panel. 1.2 Structural panels in use include, but are not limited to, structural plywood, oriented strand board (OSB), and composites of veneer and of wood-based layers. 1.3 Two test methods are included: 1.3.1 Test Method A—Planar shear loaded by plates. 1.3.2 Test Method B—Planar shear induced by five-point bending. 1.3.3 The choice of method will be dictated by the purpose of the test and equipment available. 1.3.4 Test Method A, Planar Shear Loaded by Plates—This test method uses a rectangular panel section adhered between steel plates with protruding knife edges to create load at the panel faces. This test method has been used to develop shear properties of plywood and oriented strand board for the purpose of confirming design values. This test method does not produce pure shear, but the specimen length is prescribed so that the secondary stresses have a minimum effect. The method determines shear strength and modulus of rigidity. 1.3.5 Test Method B, Planar Shear Induced by Five-Point Bending—Planar shear stress is induced on the panel while loaded in bending using two continuous spans. This test method determines planar shear strength consistent with panel applications under transverse loading. This test method is able to determine shear strength at any moisture condition. 1.4 The values stated in inch-pound units are to be regarded as standard. When there are values given in parentheses, these are mathematical conversions to SI units that are provided for information only and are not considered standard. 1.5 This standard does not purport to address all of the safety concerns, if any, associated with its use. It is the responsibility of the user of this stan...
SIGNIFICANCE AND USE 3.1 Planar shear (rolling shear) characteristics of structural panels determined by these test methods are essential for the rigorous design of various glued wood-panel structural components, such as box beams, folded plate roofs, and stressed skin panels. Planar shear also may govern the design at low span-depth ratios encountered in floors subjected to high concentrated loads, concrete forms at high pouring pressures, and bulk storage structures. 3.2 The modulus of rigidity determined from Test Method A is a composite of the entire specimen acting as a unit. For plywood panels for which the ratio between the shear moduli of the plies with grain oriented parallel and perpendicular to the shear forces is known, the rolling shear modulus of the perpendicular plies can be calculated. 3.3 Veneer produced by slicing or rotary peeling may contain fine checks or separations parallel to the grain on the knife side of the veneer that are produced as the knife is forced through the wood. These checks are termed “knife checks” to distinguish them from occasional checks that may be formed on the opposite side of the veneer by forces at the compression bar, and from checks caused by drying. Knife checks can have a significant effect on rolling shear properties in plywood panels and may be of significance in other veneer containing panels. Test Method A requires (when applicable) the testing of matching specimens having knife checks oriented both open and closed wherever possible (see Fig. 1). 3.4 To control or define other variables influencing rolling shear, these test methods require determination of moisture content, specific gravity, and elapsed time-to-failure. Conditioning of test material in controlled atmospheres, determination of depth of knife checks (when applicable), and determination of percent of wood and plywood glueline failure (when applicable) are recommended. SCOPE 1.1 These test methods determine the shear properties of structural panels associated with shear distortion of the planes parallel to the edge planes of the panels. Both shear strength and modulus of rigidity may be determined. Primarily, the tests measure the planar shear (rolling shear) strength developed in the plane of the panel. 1.2 Structural panels in use include, but are not limited to, structural plywood, oriented strand board (OSB), and composites of veneer and of wood-based layers. 1.3 Two test methods are included: 1.3.1 Test Method A—Planar shear loaded by plates. 1.3.2 Test Method B—Planar shear induced by five-point bending. 1.3.3 The choice of method will be dictated by the purpose of the test and equipment available. 1.3.4 Test Method A, Planar Shear Loaded by Plates—This test method uses a rectangular panel section adhered between steel plates with protruding knife edges to create load at the panel faces. This test method has been used to develop shear properties of plywood and oriented strand board for the purpose of confirming design values. This test method does not produce pure shear, but the specimen length is prescribed so that the secondary stresses have a minimum effect. The method determines shear strength and modulus of rigidity. 1.3.5 Test Method B, Planar Shear Induced by Five-Point Bending—Planar shear stress is induced on the panel while loaded in bending using two continuous spans. This test method determines planar shear strength consistent with panel applications under transverse loading. This test method is able to determine shear strength at any moisture condition. 1.4 The values stated in inch-pound units are to be regarded as standard. When there are values given in parentheses, these are mathematical conversions to SI units that are provided for information only and are not considered standard. 1.5 This standard does not purport to address all of the safety concerns, if any, associated with its use. It is the responsibility of the user of this stan...
ASTM D2718-24 is classified under the following ICS (International Classification for Standards) categories: 79.060.10 - Plywood. The ICS classification helps identify the subject area and facilitates finding related standards.
ASTM D2718-24 has the following relationships with other standards: It is inter standard links to ASTM D2718-18, ASTM D5456-21e1, ASTM D5457-23, ASTM D3044-16(2023), ASTM D7033-22. Understanding these relationships helps ensure you are using the most current and applicable version of the standard.
ASTM D2718-24 is available in PDF format for immediate download after purchase. The document can be added to your cart and obtained through the secure checkout process. Digital delivery ensures instant access to the complete standard document.
Standards Content (Sample)
This international standard was developed in accordance with internationally recognized principles on standardization established in the Decision on Principles for the
Development of International Standards, Guides and Recommendations issued by the World Trade Organization Technical Barriers to Trade (TBT) Committee.
Designation: D2718 − 24
Standard Test Methods for
Structural Panels in Planar Shear (Rolling Shear)
This standard is issued under the fixed designation D2718; the number immediately following the designation indicates the year of
original adoption or, in the case of revision, the year of last revision. A number in parentheses indicates the year of last reapproval. A
superscript epsilon (´) indicates an editorial change since the last revision or reapproval.
1. Scope responsibility of the user of this standard to establish appro-
priate safety, health, and environmental practices and deter-
1.1 These test methods determine the shear properties of
mine the applicability of regulatory limitations prior to use.
structural panels associated with shear distortion of the planes
1.6 This international standard was developed in accor-
parallel to the edge planes of the panels. Both shear strength
dance with internationally recognized principles on standard-
and modulus of rigidity may be determined. Primarily, the tests
ization established in the Decision on Principles for the
measure the planar shear (rolling shear) strength developed in
Development of International Standards, Guides and Recom-
the plane of the panel.
mendations issued by the World Trade Organization Technical
1.2 Structural panels in use include, but are not limited to,
Barriers to Trade (TBT) Committee.
structural plywood, oriented strand board (OSB), and compos-
ites of veneer and of wood-based layers.
2. Referenced Documents
1.3 Two test methods are included:
2.1 ASTM Standards:
1.3.1 Test Method A—Planar shear loaded by plates.
D2395 Test Methods for Density and Specific Gravity (Rela-
1.3.2 Test Method B—Planar shear induced by five-point
tive Density) of Wood and Wood-Based Materials
bending.
D4442 Test Methods for Direct Moisture Content Measure-
1.3.3 The choice of method will be dictated by the purpose
ment of Wood and Wood-Based Materials
of the test and equipment available.
1.3.4 Test Method A, Planar Shear Loaded by Plates—This 3. Significance and Use
test method uses a rectangular panel section adhered between
3.1 Planar shear (rolling shear) characteristics of structural
steel plates with protruding knife edges to create load at the
panels determined by these test methods are essential for the
panel faces. This test method has been used to develop shear
rigorous design of various glued wood-panel structural
properties of plywood and oriented strand board for the
components, such as box beams, folded plate roofs, and
purpose of confirming design values. This test method does not
stressed skin panels. Planar shear also may govern the design
produce pure shear, but the specimen length is prescribed so
at low span-depth ratios encountered in floors subjected to high
that the secondary stresses have a minimum effect. The method
concentrated loads, concrete forms at high pouring pressures,
determines shear strength and modulus of rigidity.
and bulk storage structures.
1.3.5 Test Method B, Planar Shear Induced by Five-Point
3.2 The modulus of rigidity determined from Test Method A
Bending—Planar shear stress is induced on the panel while
is a composite of the entire specimen acting as a unit. For
loaded in bending using two continuous spans. This test
plywood panels for which the ratio between the shear moduli
method determines planar shear strength consistent with panel
of the plies with grain oriented parallel and perpendicular to the
applications under transverse loading. This test method is able
shear forces is known, the rolling shear modulus of the
to determine shear strength at any moisture condition.
perpendicular plies can be calculated.
1.4 The values stated in inch-pound units are to be regarded
3.3 Veneer produced by slicing or rotary peeling may
as standard. When there are values given in parentheses, these
contain fine checks or separations parallel to the grain on the
are mathematical conversions to SI units that are provided for
knife side of the veneer that are produced as the knife is forced
information only and are not considered standard.
through the wood. These checks are termed “knife checks” to
1.5 This standard does not purport to address all of the
distinguish them from occasional checks that may be formed
safety concerns, if any, associated with its use. It is the
on the opposite side of the veneer by forces at the compression
These test methods are under the jurisdiction of ASTM Committee D07 on
Wood and is the direct responsibility of Subcommittee D07.03 on Panel Products. For referenced ASTM standards, visit the ASTM website, www.astm.org, or
Current edition approved Feb. 15, 2024. Published February 2024. Originally contact ASTM Customer Service at service@astm.org. For Annual Book of ASTM
approved in 1969. Last previous edition approved in 2018 as D2718 – 18. DOI: Standards volume information, refer to the standard’s Document Summary page on
10.1520/D2718-24. the ASTM website.
Copyright © ASTM International, 100 Barr Harbor Drive, PO Box C700, West Conshohocken, PA 19428-2959. United States
D2718 − 24
bar, and from checks caused by drying. Knife checks can have mum load, and effective shear modulus for the specimen is
a significant effect on rolling shear properties in plywood determined from a plot of load versus slip.
panels and may be of significance in other veneer containing
6. Test Specimen
panels. Test Method A requires (when applicable) the testing of
matching specimens having knife checks oriented both open
6.1 Specimen thickness shall be that of the material. Speci-
and closed wherever possible (see Fig. 1).
mens from material that is expected to vary significantly within
3.4 To control or define other variables influencing rolling the specimen due to growth or manufacturing features or from
other causes shall be 6 in. (152 mm) wide by 18 in. (457 mm)
shear, these test methods require determination of moisture
content, specific gravity, and elapsed time-to-failure. Condi- long or larger as shown in Fig. 2. This size is recommended for
uniform material as well. However, smaller specimens of
tioning of test material in controlled atmospheres, determina-
uniform material may be used if these are not less than four
tion of depth of knife checks (when applicable), and determi-
times the thickness in width nor twelve times the thickness in
nation of percent of wood and plywood glueline failure (when
length.
applicable) are recommended.
6.2 From each sample of panels containing veneer, two
4. Control of Moisture Content
matching specimens shall be cut. Knife edges of loading plates
4.1 The structural panel samples to be tested at specific
for one specimen of each matching pair shall be oriented
moisture contents or equilibrium relative humidities shall be
perpendicular to one of the primary panel directions or for
conditioned to approximately constant weight in controlled
plywood to cause opening of knife checks during test as shown
atmospheric conditions before gluing to plates. For approxi-
in Fig. 1(a). Knife edges of plates loading the other specimen
mating moisture conditions of structural panel used under dry
shall be positioned perpendicular to one of the primary panel
conditions a relative humidity of 65 % 6 2 % at a temperature
directions or for plywood to cause knife checks to close during
of 68 °F 6 6 °F (20 °C 6 3 °C) is recommended. When using
test as shown in Fig. 1(b). Proper plywood orientation may be
Test Method A, specimens shall be tested without undue delay
determined from check depth specimens described in 16.3. It
after the adhesive is cured. Testing in similarly controlled
may not be possible to test samples having two or more plies
atmospheres is recommended wherever possible.
stressed in rolling shear in both “open” and “closed” orienta-
tions if these plies are oriented in opposite directions causing a
Test Method A—Planar Shear Loaded by Plates
“checks open” failure regardless of direction of loading.
5. Scope 6.3 Specimen length and width shall be measured to the
nearest 0.01 in. (0.2 mm) and thickness to the nearest 0.001 in.
5.1 The specimen having the form of a rectangular flat plate
(0.02 mm). When applicable, the direction of knife checks in
is bonded between steel plates beveled at opposite ends of the
plies having grain perpendicular to its length shall be deter-
specimen to provide knife edges for loading the plate at the
mined and the specimens marked for position of knife edges.
face bonded to the specimen. The knife edges project beyond
the ends of the specimen. This test method is conducted by
loading the knife edges in compression at a uniform rate while
a suitable gauge measures slip between the plates due to
specimen deformation. Shear strength is computed from maxi-
NOTE 1—The “V” block is supported on a seat that provides rotation
about the axis perpendicular to the knife edge only.
SI Equivalents
in. 6 18
mm 152 457
(a) Knife Checks Open
(b) Knife Checks Closed
FIG. 2 Planar (Rolling) Shear Test Using a Dial Gauge for
FIG. 1 Orientation of Knife Checks in Plywood Measuring Plate Slip
D2718 − 24
At the time specimens are cut matching samples for determi- 12 min elapsed time from the beginning of loading. Should
nation of moisture content and specific gravity in accordance elapsed time to failure fall greatly outside this range, machine
with 16.1 and 16.2 shall be obtained. When measurement of
speed should be modified to obtain times within this range.
knife checks is included as discussed in 16.3, a sample for this
7.3 Both epoxy and polyvinyl adhesives have been found
measurement also may be cut at this time.
satisfactory for bonding steel plates to specimens. Minimum
7. Loading required surface preparation of steel plates consists of removal
of residual adhesive. This can be accomplished most easily by
7.1 Figs. 1 and 2 illustrate the specimen and suitable loading
mild heating of the plate and any portion of the specimen
plates and blocks for loading the knife edges of the plates. The
remaining from the previous test in an oven which weakens the
specimen shall be loaded by steel plates bonded to both faces
bond to the steel sufficiently to permit peeling the remaining
of the specimen with an adhesive sufficiently rigid to preclude
wood and adhesive from the plate. The residual adhesive may
contribution of adhesive creep to measured deformation. Width
be scraped off with a sharp-edged tool. Further degreasing and
of plates shall be that of the specimen. One end of each plate
cleaning has frequently been found necessary in addition to the
shall be provided with a knife edge projecting ⁄4 in. (6 mm)
above to ensure adequate bond strength. Curing the adhesive at
beyond the end of the specimen at one end and flush with the
a slightly elevated temperature has also been helpful.
surface glued to the specimen. The other end of the plate shall
be square and flush with the end of the specimen. Knife edges
8. Measurement of Deformation
of the two plates shall be at opposite ends of the specimen and
shall be oriented to load the specimen in the desired direction
8.1 Slip between the steel plates during load application
in relation to the knife checks. Planar shear properties of
shall be measured to at least the nearest 0.0001 in. (0.002 mm)
structural panels should be determined in both directions.
at no less than twelve and preferably more equally spaced
Plates for specimens 18 in. (457 mm) long shall be 1 in.
increments of load to proportional limit from which a load-
(25.4 mm) thick. The thickness of plates for shorter specimens
deformation curve shall be plotted. Slip can be measured with
may be reduced proportionately. Loading of at least one
a dial gauge as illustrated in Figs. 2 and 3 or with appropriate
V-block shall provide for uniform load distribution along the
automatic measuring and recording equipment. Gauge geom-
knife edge by loading through a pivot having its axis perpen-
etry and position on the specimen shall be such as to minimize
dicular to the knife edge and centered along it. Pivots permit-
any effects of unsymmetrical loading or deformation.
ting rotation about an axis parallel to the knife edge or
spherical seats free to pivot in this manner shall not be used as
9. Calculation
they create unstable loading which may cause violent ejection
of the specimen from the machine and hazard to operating
9.1 Shear stress shall be calculated as follows:
personnel. The V-blocks shall be vertically positioned in the
f 5 P⁄~L · W! (2)
v
machine, one above the other, causing the forces applied to the
specimen to act paralle
...
This document is not an ASTM standard and is intended only to provide the user of an ASTM standard an indication of what changes have been made to the previous version. Because
it may not be technically possible to adequately depict all changes accurately, ASTM recommends that users consult prior editions as appropriate. In all cases only the current version
of the standard as published by ASTM is to be considered the official document.
Designation: D2718 − 18 D2718 − 24
Standard Test Methods for
Structural Panels in Planar Shear (Rolling Shear)
This standard is issued under the fixed designation D2718; the number immediately following the designation indicates the year of
original adoption or, in the case of revision, the year of last revision. A number in parentheses indicates the year of last reapproval. A
superscript epsilon (´) indicates an editorial change since the last revision or reapproval.
1. Scope
1.1 These test methods determine the shear properties of structural panels associated with shear distortion of the planes parallel
to the edge planes of the panels. Both shear strength and modulus of rigidity may be determined. Primarily, the tests measure the
planar shear (rolling shear) strength developed in the plane of the panel.
1.2 Structural panels in use include, but are not limited to, structural plywood, oriented strand board (OSB), and composites of
veneer and of wood-based layers.
1.3 Two test methods are included:
1.3.1 Test Method A—Planar shear loaded by plates.
1.3.2 Test Method B—Planar shear induced by five-point bending.
1.3.3 The choice of method will be dictated by the purpose of the test and equipment available.
1.3.4 Test Method A, Planar Shear Loaded by Plates—This test method uses a rectangular panel section adhered between steel
plates with protruding knife edges to create load at the panel faces. This test method has been used to develop shear properties
of plywood and oriented strand board for the purpose of confirming design values. This test method does not produce pure shear,
but the specimen length is prescribed so that the secondary stresses have a minimum effect. The method determines shear strength
and modulus of rigidity.
1.3.5 Test Method B, Planar Shear Induced by Five-Point Bending—Planar shear stress is induced on the panel while loaded in
bending using two continuous spans. This test method determines planar shear strength consistent with panel applications under
transverse loading. This test method is able to determine shear strength at any moisture condition.
1.4 The values stated in inch-pound units are to be regarded as standard. When there are values given in parentheses, these are
mathematical conversions to SI units that are provided for information only and are not considered standard.
1.5 This standard does not purport to address all of the safety concerns, if any, associated with its use. It is the responsibility
of the user of this standard to establish appropriate safety, health, and environmental practices and determine the applicability of
regulatory limitations prior to use.
This test method isThese test methods are under the jurisdiction of ASTM Committee D07 on Wood and is the direct responsibility of Subcommittee D07.03 on Panel
Products.
Current edition approved Nov. 1, 2018Feb. 15, 2024. Published November 2018February 2024. Originally approved in 1969. Last previous edition approved in 20112018
ɛ1
as D2718 – 00 (2011)D2718 – 18. . DOI: 10.1520/D2718-18.10.1520/D2718-24.
Copyright © ASTM International, 100 Barr Harbor Drive, PO Box C700, West Conshohocken, PA 19428-2959. United States
D2718 − 24
1.6 This international standard was developed in accordance with internationally recognized principles on standardization
established in the Decision on Principles for the Development of International Standards, Guides and Recommendations issued
by the World Trade Organization Technical Barriers to Trade (TBT) Committee.
2. Referenced Documents
2.1 ASTM Standards:
D2395 Test Methods for Density and Specific Gravity (Relative Density) of Wood and Wood-Based Materials
D4442 Test Methods for Direct Moisture Content Measurement of Wood and Wood-Based Materials
3. Significance and Use
3.1 Planar shear (rolling shear) characteristics of structural panels determined by these test methods are essential for the rigorous
design of various glued wood-panel structural components, such as box beams, folded plate roofs, and stressed skin panels. Planar
shear also may govern the design at low span-depth ratios encountered in floors subjected to high concentrated loads, concrete
forms at high pouring pressures, and bulk storage structures.
3.2 The modulus of rigidity determined from Test Method A is a composite of the entire specimen acting as a unit. For plywood
panels for which the ratio between the shear moduli of the plies with grain oriented parallel and perpendicular to the shear forces
is known, the rolling shear modulus of the perpendicular plies can be calculated.
3.3 Veneer produced by slicing or rotary peeling may contain fine checks or separations parallel to the grain on the knife side of
the veneer that are produced as the knife is forced through the wood. These checks are termed “knife checks” to distinguish them
from occasional checks that may be formed on the opposite side of the veneer by forces at the compression bar, and from checks
caused by drying. Knife checks can have a significant effect on rolling shear properties in plywood panels and may be of
significance in other veneer containing panels. Test Method A requires (when applicable) the testing of matching specimens having
knife checks oriented both open and closed wherever possible (see Fig. 1).
3.4 To control or define other variables influencing rolling shear, these test methods require determination of moisture content,
specific gravity, and elapsed time-to-failure. Conditioning of test material in controlled atmospheres, determination of depth of
knife checks (when applicable), and determination of percent of wood and plywood glueline failure (when applicable) are
recommended.
(a) Knife Checks Open
(b) Knife Checks Closed
FIG. 1 Orientation of Knife Checks in Plywood
For referenced ASTM standards, visit the ASTM website, www.astm.org, or contact ASTM Customer Service at service@astm.org. For Annual Book of ASTM Standards
volume information, refer to the standard’s Document Summary page on the ASTM website.
D2718 − 24
4. Control of Moisture Content
4.1 The structural panel samples to be tested at specific moisture contents or equilibrium relative humidities shall be conditioned
to approximately constant weight in controlled atmospheric conditions before gluing to plates. For approximating moisture
conditions of structural panel used under dry conditions a relative humidity of 6565 % 6 2 % at a temperature of 68 6 6°F (20
6 3°C)68 °F 6 6 °F (20 °C 6 3 °C) is recommended. When using Test Method A, specimens shall be tested without undue delay
after the adhesive is cured. Testing in similarly controlled atmospheres is recommended wherever possible.
Test Method A—Planar Shear Loaded by Plates
5. Scope
5.1 The specimen having the form of a rectangular flat plate is bonded between steel plates beveled at opposite ends of the
specimen to provide knife edges for loading the plate at the face bonded to the specimen. The knife edges project beyond the ends
of the specimen. This test method is conducted by loading the knife edges in compression at a uniform rate while a suitable gage
measures slip between the plates due to specimen deformation. Shear strength is computed from maximum load, and effective
shear modulus for the specimen is determined from a plot of load versus slip.
5.2 This international standard was developed in accordance with internationally recognized principles on standardization
established in the Decision on Principles for the Development of International Standards, Guides and Recommendations issued
by the World Trade Organization Technical Barriers to Trade (TBT) Committee.
5. Scope
5.1 The specimen having the form of a rectangular flat plate is bonded between steel plates beveled at opposite ends of the
specimen to provide knife edges for loading the plate at the face bonded to the specimen. The knife edges project beyond the ends
of the specimen. This test method is conducted by loading the knife edges in compression at a uniform rate while a suitable gauge
measures slip between the plates due to specimen deformation. Shear strength is computed from maximum load, and effective
shear modulus for the specimen is determined from a plot of load versus slip.
6. Test Specimen
6.1 Specimen thickness shall be that of the material. Specimens from material that is expected to vary significantly within the
specimen due to growth or manufacturing features or from other causes shall be 6 in. (15 cm)(152 mm) wide by 18 in. (45 cm)(457
mm) long or larger as shown in Fig. 2. This size is recommended for uniform material as well. However, smaller specimens of
uniform material may be used if these are not less than four times the thickness in width nor twelve times the thickness in length.
6.2 From each sample of panels containing veneer, two matching specimens shall be cut. Knife edges of loading plates for one
specimen of each matching pair shall be oriented perpendicular to one of the primary panel directions or for plywood to cause
opening of knife checks during test as shown in Fig. 1(a). Knife edges of plates loading the other specimen shall be positioned
perpendicular to one of the primary panel directions or for plywood to cause knife checks to close during test as shown in Fig.
1(b). Proper plywood orientation may be determined from check depth specimens described in 16.3. It may not be possible to test
samples having two or more plies stressed in rolling shear in both “open” and “closed” orientations if these plies are oriented in
opposite directions causing a “checks open” failure regardless of direction of loading.
6.3 Specimen length and width shall be measured to the nearest 0.01 in. (0.25(0.2 mm) and thickness to the nearest 0.001 in.
(0.025(0.02 mm). When applicable, the direction of knife checks in plies having grain perpendicular to its length shall be
determined and the specimens marked for position of knife edges. At the time specimens are cut matching samples for
determination of moisture content and specific gravity in accordance with 16.1 and 16.2 shall be obtained. When measurement of
knife checks is included as discussed in 16.3, a sample for this measurement also may be cut at this time.
7. Loading
7.1 Figs. 1 and 2 illustrate the specimen and suitable loading plates and blocks for loading the knife edges of the plates. The
specimen shall be loaded by steel plates bonded to both faces of the specimen with an adhesive sufficiently rigid to preclude
contribution of adhesive creep to measured deformation. Width of plates shall be that of the specimen. One end of each plate shall
D2718 − 24
NOTE 1—The “V” block is supported on a seat that provides rotation about the axis perpendicular to the knife edge only.
Metric Equivalents
SI Equivalents
in. 6 18
mm 15 45
mm 152 457
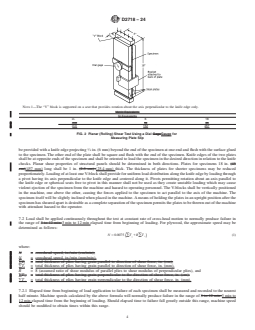
FIG. 2 Planar (Rolling) Shear Test Using a Dial GageGauge for
Measuring Plate Slip
be provided with a knife edge projecting ⁄4 in. (6 mm) beyond the end of the specimen at one end and flush with the surface glued
to the specimen. The other end of the plate shall be square and flush with the end of the specimen. Knife edges of the two plates
shall be at opposite ends of the specimen and shall be oriented to load the specimen in the desired direction in relation to the knife
checks. Planar shear properties of structural panels should be determined in both directions. Plates for specimens 18 in. (45
cm)(457 mm) long shall be 1 in. (2.5 cm) (25.4 mm) thick. The thickness of plates for shorter specimens may be reduced
proportionately. Loading of at least one V-block shall provide for uniform load distribution along the knife edge by loading through
a pivot having its axis perpendicular to the knife edge and centered along it. Pivots permitting rotation about an axis parallel to
the knife edge or spherical seats free to pivot in this manner shall not be used as they create unstable loading which may cause
violent ejection of the specimen from the machine and hazard to operating personnel. The V-blocks shall be vertically positioned
in the machine, one above the other, causing the forces applied to the specimen to act parallel to the axis of the machine. The
specimen itself will be slightly inclined when placed in the machine. A means of holding the plates in an upright position after the
specimen has sheared apart is desirable as a complete separation of the specimen permits the plates to be thrown out of the machine
with attendant hazard to the operator.
7.2 Load shall be applied continuously throughout the test at constant rate of cross-head motion to normally produce failure in
the range of 3 to 12 min 3 min to 12 min elapsed time from beginning of loading. For plywood, the approximate speed may be
determined as follows:
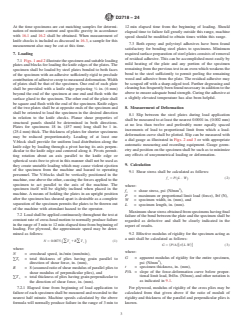
N 5 0.0075 T 1R T (1)
~ !
'
( (
?
where:
N = crosshead speed, in./min (cm/min),
N = crosshead speed, in./min (mm/min),
∑T = total thickness of plies having grain parallel to direction of shear force, in. (cm),
|
∑T = total thickness of plies having grain parallel to direction of shear force, in. (mm),
|
R = 8 (assumed ratio of shear modulus of parallel plies to shear modulus of perpendicular plies), and
∑T = total thickness of plies having grain perpendicular to the direction of shear force, in. (cm).
'
∑T = total thickness of plies having grain perpendicular to the direction of shear force, in. (mm).
'
7.2.1 Elapsed time from beginning of load application to failure of each specimen shall be measured and recorded to the nearest
half minute. Machine speeds calculated by the above formula will normally produce failure in the range of 3 to 12 min 3 min to
12 min elapsed time from the beginning of loading. Should elapsed time to failure fall greatly outside this range, machine speed
should be modified to obtain times within this range.
D2718 − 24
7.3 Both epoxy and polyvinyl adhesives have been found satisfactory for bonding steel plates to specimens. Minimum required
surface preparation of steel plates consi
...
Questions, Comments and Discussion
Ask us and Technical Secretary will try to provide an answer. You can facilitate discussion about the standard in here.
Loading comments...