ASTM D7378-16(2024)
(Practice)Standard Practice for Measurement of Thickness of Applied Coating Powders to Predict Cured Thickness
Standard Practice for Measurement of Thickness of Applied Coating Powders to Predict Cured Thickness
SIGNIFICANCE AND USE
5.1 Many physical and appearance properties of the finished coating are affected by the film thickness. Film thickness can affect the color, gloss, surface profile, adhesion, flexibility, impact resistance and hardness of the coating. The fit of pieces assembled after coating can be affected when film thickness is not within tolerance. Therefore coatings must be applied within certain minimum and maximum film thickness specifications to optimize their intended use.
5.2 All procedures involve taking measurements of applied coating powders in the pre-cured, pre-gelled state to help insure correct cured film thickness. This enables the application system to be set up and fine-tuned prior to the curing process. In turn, this will reduce the amount of scrap and over-spray. Accurate predictions help avoid stripping and re-coating which can cause problems with adhesion and coating integrity.
5.3 Measurements of cured powder coating thickness can be made using different methods depending upon the substrate. Non-destructive measurements over metal substrates can be made with magnetic and eddy current coating thickness gauges (see Practice D7091). Non-destructive measurements over non-metal substrates can be made with ultrasonic coating thickness gauges (see Test Method D6132). Destructive measurements over rigid substrates can be made with cross-sectioning instruments (see Practices D4138).
SCOPE
1.1 This practice describes the thickness measurement of dry coating powders applied to a variety of rigid substrates. Use of some of these procedures may require repair of the coating powder. This practice covers the use of portable instruments. It is intended to supplement the manufacturers’ instructions for their operation of the gauges and is not intended to replace them. It includes definitions of key terms, reference documents, the significance and use of the practice, and the advantages and limitations of the instruments.
1.2 Three procedures are provided for measuring dry coating powder thickness:
1.2.1 Procedure A—Using rigid metal notched (comb) gauges.
1.2.2 Procedure B—Using magnetic or eddy current coating thickness gauges.
1.2.3 Procedure C—Using non-contact ultrasonic powder thickness instruments.
1.3 Coating powders generally diminish in thickness during the curing process. Some of these procedures therefore require a reduction factor be established to predict cured film thickness of powder coatings.
1.4 Procedure A and Procedure B
measure the thickness (height or depth) of the applied coating powders in the pre-cured, pre-gelled state. By comparing results to the measured cured powder thickness in the same location, a reduction factor can be determined and applied to future thickness measurements of the same coating powder.
1.5 Procedure C
results in a predicted thickness value of the cured state based on a calibration for typical coating powders. If the powder in question is not typical then an adjustment can be made to align gauge readings with the actual cured values as determined by other measurement methods.
1.6 The values stated in SI units are to be regarded as the standard. The values given in parentheses are for information only.
1.7 This standard does not purport to address all of the safety concerns, if any, associated with its use. It is the responsibility of the user of this standard to establish appropriate safety, health, and environmental practices and determine the applicability of regulatory limitations prior to use.
1.8 This international standard was developed in accordance with internationally recognized principles on standardization established in the Decision on Principles for the Development of International Standards, Guides and Recommendations issued by the World Trade Organization Technical Barriers to Trade (TBT) Committee.
General Information
- Status
- Published
- Publication Date
- 31-Jan-2024
- Technical Committee
- D01 - Paint and Related Coatings, Materials, and Applications
- Drafting Committee
- D01.51 - Powder Coatings
Relations
- Effective Date
- 01-Feb-2024
Overview
ASTM D7378-16(2024), “Standard Practice for Measurement of Thickness of Applied Coating Powders to Predict Cured Thickness,” establishes recognized methods for measuring the thickness of dry powder coatings on rigid substrates before curing. Ensuring proper powder coating thickness is critical, as it impacts the final appearance and performance characteristics such as color, gloss, adhesion, and durability of the finished film. This ASTM standard supports optimization, quality control, and regulatory compliance in powder coating processes by enabling accurate prediction of cured film thickness from pre-cured measurements.
Key Topics
- Film Thickness Impact: Ensuring coatings are applied within specified minimum and maximum thickness tolerances is essential for achieving desired physical and visual properties and maintaining the fit of assembled parts.
- Pre-Cured Measurement: The standard details procedures to measure the dry, pre-cured powder thickness, critical for setting up application systems and reducing waste.
- Instrumentation: Procedures utilize portable instruments, including:
- Metal notched (comb) gauges
- Magnetic or eddy current coating thickness gauges with powder probes
- Non-contact ultrasonic powder thickness instruments
- Reduction Factors: As coating powders diminish in thickness during curing, the standard describes how to calculate and apply reduction factors, enabling the accurate prediction of final cured thickness.
- Verification and Calibration: Emphasis on regular verification of instrument accuracy and appropriate adjustment or calibration, in line with manufacturer and standard requirements.
Applications
ASTM D7378 is widely applicable across industries where powder coating quality and consistency are paramount. Examples include:
- Automotive Manufacturing: Ensures powder-coated components meet specified performance and aesthetic criteria before assembly.
- Industrial Equipment: Maintains corrosion resistance and finish durability through precise film thickness control.
- Architectural Metalwork: Assures color uniformity, gloss retention, and surface integrity in aluminum and steel structures.
- Consumer Goods: Reduces rework, over-spray, and scrap by enabling early correction of coating application errors.
By following ASTM D7378, facilities can optimize their powder coating process, improve yield, maintain product quality, and reduce costs related to defective coatings or unnecessary material usage.
Related Standards
ASTM D7378 references and complements several other key ASTM standards:
- ASTM D7091: Practice for Nondestructive Measurement of Dry Film Thickness of Nonmagnetic Coatings Applied to Ferrous Metals and Nonmagnetic, Nonconductive Coatings Applied to Non-Ferrous Metals
- ASTM D4138: Practices for Measurement of Dry Film Thickness of Protective Coating Systems by Destructive, Cross-Sectioning Means
- ASTM D6132: Test Method for Nondestructive Measurement of Dry Film Thickness of Applied Organic Coatings Using an Ultrasonic Coating Thickness Gage
These standards provide guidance for measuring cured and uncured coating thicknesses on a variety of substrates and through various methods, supporting comprehensive quality assurance in coating processes.
Keywords: ASTM D7378, powder coating thickness, dry coating powders, cured film thickness, coating thickness measurement, quality control, reduction factor, coating powder, non-destructive testing, thickness gauges, powder probe, ultrasonic measurement.
Buy Documents
ASTM D7378-16(2024) - Standard Practice for Measurement of Thickness of Applied Coating Powders to Predict Cured Thickness
Get Certified
Connect with accredited certification bodies for this standard

BSMI (Bureau of Standards, Metrology and Inspection)
Taiwan's standards and inspection authority.
Sponsored listings
Frequently Asked Questions
ASTM D7378-16(2024) is a standard published by ASTM International. Its full title is "Standard Practice for Measurement of Thickness of Applied Coating Powders to Predict Cured Thickness". This standard covers: SIGNIFICANCE AND USE 5.1 Many physical and appearance properties of the finished coating are affected by the film thickness. Film thickness can affect the color, gloss, surface profile, adhesion, flexibility, impact resistance and hardness of the coating. The fit of pieces assembled after coating can be affected when film thickness is not within tolerance. Therefore coatings must be applied within certain minimum and maximum film thickness specifications to optimize their intended use. 5.2 All procedures involve taking measurements of applied coating powders in the pre-cured, pre-gelled state to help insure correct cured film thickness. This enables the application system to be set up and fine-tuned prior to the curing process. In turn, this will reduce the amount of scrap and over-spray. Accurate predictions help avoid stripping and re-coating which can cause problems with adhesion and coating integrity. 5.3 Measurements of cured powder coating thickness can be made using different methods depending upon the substrate. Non-destructive measurements over metal substrates can be made with magnetic and eddy current coating thickness gauges (see Practice D7091). Non-destructive measurements over non-metal substrates can be made with ultrasonic coating thickness gauges (see Test Method D6132). Destructive measurements over rigid substrates can be made with cross-sectioning instruments (see Practices D4138). SCOPE 1.1 This practice describes the thickness measurement of dry coating powders applied to a variety of rigid substrates. Use of some of these procedures may require repair of the coating powder. This practice covers the use of portable instruments. It is intended to supplement the manufacturers’ instructions for their operation of the gauges and is not intended to replace them. It includes definitions of key terms, reference documents, the significance and use of the practice, and the advantages and limitations of the instruments. 1.2 Three procedures are provided for measuring dry coating powder thickness: 1.2.1 Procedure A—Using rigid metal notched (comb) gauges. 1.2.2 Procedure B—Using magnetic or eddy current coating thickness gauges. 1.2.3 Procedure C—Using non-contact ultrasonic powder thickness instruments. 1.3 Coating powders generally diminish in thickness during the curing process. Some of these procedures therefore require a reduction factor be established to predict cured film thickness of powder coatings. 1.4 Procedure A and Procedure B measure the thickness (height or depth) of the applied coating powders in the pre-cured, pre-gelled state. By comparing results to the measured cured powder thickness in the same location, a reduction factor can be determined and applied to future thickness measurements of the same coating powder. 1.5 Procedure C results in a predicted thickness value of the cured state based on a calibration for typical coating powders. If the powder in question is not typical then an adjustment can be made to align gauge readings with the actual cured values as determined by other measurement methods. 1.6 The values stated in SI units are to be regarded as the standard. The values given in parentheses are for information only. 1.7 This standard does not purport to address all of the safety concerns, if any, associated with its use. It is the responsibility of the user of this standard to establish appropriate safety, health, and environmental practices and determine the applicability of regulatory limitations prior to use. 1.8 This international standard was developed in accordance with internationally recognized principles on standardization established in the Decision on Principles for the Development of International Standards, Guides and Recommendations issued by the World Trade Organization Technical Barriers to Trade (TBT) Committee.
SIGNIFICANCE AND USE 5.1 Many physical and appearance properties of the finished coating are affected by the film thickness. Film thickness can affect the color, gloss, surface profile, adhesion, flexibility, impact resistance and hardness of the coating. The fit of pieces assembled after coating can be affected when film thickness is not within tolerance. Therefore coatings must be applied within certain minimum and maximum film thickness specifications to optimize their intended use. 5.2 All procedures involve taking measurements of applied coating powders in the pre-cured, pre-gelled state to help insure correct cured film thickness. This enables the application system to be set up and fine-tuned prior to the curing process. In turn, this will reduce the amount of scrap and over-spray. Accurate predictions help avoid stripping and re-coating which can cause problems with adhesion and coating integrity. 5.3 Measurements of cured powder coating thickness can be made using different methods depending upon the substrate. Non-destructive measurements over metal substrates can be made with magnetic and eddy current coating thickness gauges (see Practice D7091). Non-destructive measurements over non-metal substrates can be made with ultrasonic coating thickness gauges (see Test Method D6132). Destructive measurements over rigid substrates can be made with cross-sectioning instruments (see Practices D4138). SCOPE 1.1 This practice describes the thickness measurement of dry coating powders applied to a variety of rigid substrates. Use of some of these procedures may require repair of the coating powder. This practice covers the use of portable instruments. It is intended to supplement the manufacturers’ instructions for their operation of the gauges and is not intended to replace them. It includes definitions of key terms, reference documents, the significance and use of the practice, and the advantages and limitations of the instruments. 1.2 Three procedures are provided for measuring dry coating powder thickness: 1.2.1 Procedure A—Using rigid metal notched (comb) gauges. 1.2.2 Procedure B—Using magnetic or eddy current coating thickness gauges. 1.2.3 Procedure C—Using non-contact ultrasonic powder thickness instruments. 1.3 Coating powders generally diminish in thickness during the curing process. Some of these procedures therefore require a reduction factor be established to predict cured film thickness of powder coatings. 1.4 Procedure A and Procedure B measure the thickness (height or depth) of the applied coating powders in the pre-cured, pre-gelled state. By comparing results to the measured cured powder thickness in the same location, a reduction factor can be determined and applied to future thickness measurements of the same coating powder. 1.5 Procedure C results in a predicted thickness value of the cured state based on a calibration for typical coating powders. If the powder in question is not typical then an adjustment can be made to align gauge readings with the actual cured values as determined by other measurement methods. 1.6 The values stated in SI units are to be regarded as the standard. The values given in parentheses are for information only. 1.7 This standard does not purport to address all of the safety concerns, if any, associated with its use. It is the responsibility of the user of this standard to establish appropriate safety, health, and environmental practices and determine the applicability of regulatory limitations prior to use. 1.8 This international standard was developed in accordance with internationally recognized principles on standardization established in the Decision on Principles for the Development of International Standards, Guides and Recommendations issued by the World Trade Organization Technical Barriers to Trade (TBT) Committee.
ASTM D7378-16(2024) is classified under the following ICS (International Classification for Standards) categories: 17.040.20 - Properties of surfaces. The ICS classification helps identify the subject area and facilitates finding related standards.
ASTM D7378-16(2024) has the following relationships with other standards: It is inter standard links to ASTM D7378-16. Understanding these relationships helps ensure you are using the most current and applicable version of the standard.
ASTM D7378-16(2024) is available in PDF format for immediate download after purchase. The document can be added to your cart and obtained through the secure checkout process. Digital delivery ensures instant access to the complete standard document.
Standards Content (Sample)
This international standard was developed in accordance with internationally recognized principles on standardization established in the Decision on Principles for the
Development of International Standards, Guides and Recommendations issued by the World Trade Organization Technical Barriers to Trade (TBT) Committee.
Designation: D7378 − 16 (Reapproved 2024)
Standard Practice for
Measurement of Thickness of Applied Coating Powders to
Predict Cured Thickness
This standard is issued under the fixed designation D7378; the number immediately following the designation indicates the year of
original adoption or, in the case of revision, the year of last revision. A number in parentheses indicates the year of last reapproval. A
superscript epsilon (´) indicates an editorial change since the last revision or reapproval.
1. Scope 1.6 The values stated in SI units are to be regarded as the
standard. The values given in parentheses are for information
1.1 This practice describes the thickness measurement of
only.
dry coating powders applied to a variety of rigid substrates.
1.7 This standard does not purport to address all of the
Use of some of these procedures may require repair of the
safety concerns, if any, associated with its use. It is the
coating powder. This practice covers the use of portable
responsibility of the user of this standard to establish appro-
instruments. It is intended to supplement the manufacturers’
priate safety, health, and environmental practices and deter-
instructions for their operation of the gauges and is not
mine the applicability of regulatory limitations prior to use.
intended to replace them. It includes definitions of key terms,
1.8 This international standard was developed in accor-
reference documents, the significance and use of the practice,
dance with internationally recognized principles on standard-
and the advantages and limitations of the instruments.
ization established in the Decision on Principles for the
1.2 Three procedures are provided for measuring dry coat-
Development of International Standards, Guides and Recom-
ing powder thickness:
mendations issued by the World Trade Organization Technical
1.2.1 Procedure A—Using rigid metal notched (comb)
Barriers to Trade (TBT) Committee.
gauges.
1.2.2 Procedure B—Using magnetic or eddy current coating
2. Referenced Documents
thickness gauges.
2.1 ASTM Standards:
1.2.3 Procedure C—Using non-contact ultrasonic powder
D4138 Practices for Measurement of Dry Film Thickness of
thickness instruments.
Protective Coating Systems by Destructive, Cross-
Sectioning Means
1.3 Coating powders generally diminish in thickness during
D6132 Test Method for Nondestructive Measurement of Dry
the curing process. Some of these procedures therefore require
Film Thickness of Applied Organic Coatings Using an
a reduction factor be established to predict cured film thickness
Ultrasonic Coating Thickness Gage
of powder coatings.
D7091 Practice for Nondestructive Measurement of Dry
1.4 Procedure A and Procedure B measure the thickness
Film Thickness of Nonmagnetic Coatings Applied to
(height or depth) of the applied coating powders in the
Ferrous Metals and Nonmagnetic, Nonconductive Coat-
pre-cured, pre-gelled state. By comparing results to the mea-
ings Applied to Non-Ferrous Metals
sured cured powder thickness in the same location, a reduction
factor can be determined and applied to future thickness
3. Terminology
measurements of the same coating powder.
3.1 Definitions of Terms Specific to This Standard:
1.5 Procedure C results in a predicted thickness value of the
3.1.1 accuracy, n—the measure of the magnitude of error
cured state based on a calibration for typical coating powders.
between the result of a measurement and the true thickness of
If the powder in question is not typical then an adjustment can
the item being measured.
be made to align gauge readings with the actual cured values as
3.1.2 adjustment, n—the physical act of aligning a gauge’s
determined by other measurement methods.
thickness readings to match those of a known thickness sample
(reduction of bias) in order to improve the accuracy of the
This practice is under the jurisdiction of ASTM Committee D01 on Paint and
Related Coatings, Materials, and Applications and is the direct responsibility of
Subcommittee D01.51 on Powder Coatings. For referenced ASTM standards, visit the ASTM website, www.astm.org, or
Current edition approved Feb. 1, 2024. Published February 2024. Originally contact ASTM Customer Service at service@astm.org. For Annual Book of ASTM
approved in 2007. Last previous edition approved in 2016 as D7378 – 16. DOI: Standards volume information, refer to the standard’s Document Summary page on
10.1520/D7378-16R24. the ASTM website.
Copyright © ASTM International, 100 Barr Harbor Drive, PO Box C700, West Conshohocken, PA 19428-2959. United States
D7378 − 16 (2024)
gauge on a specific surface, within a specific portion of its 4.3 Procedure B—Uses a conventional magnetic or eddy
measurement range or to specific operating conditions. current coating thickness gauge with a specially designed
powder probe to measure the thickness of the coating powder.
3.1.2.1 Discussion—An adjustment will affect the outcome
of subsequent readings. Micro pins, which are integrated into the probe, penetrate the
coating powder down to the substrate. The probe is manually
3.1.3 coating powders, n—finely divided particles of resin,
pressed down to the surface of the powder to effect a thickness
either thermoplastic or thermosetting, generally incorporating
measurement. This procedure is applicable to flat, metal
pigments, fillers, and additives and remaining finely divided
substrates only. Marks may be made in the powder that may
during storage under suitable conditions, which, after fusing
not be covered when the powder flows in the cure process.
and possibly curing, give a continuous film.
4.4 Procedure C—Uses a non-contact ultrasonic powder
3.1.4 calibration, n—the high-level, controlled and docu-
thickness instrument to take a measurement of the applied
mented process of obtaining measurements on traceable cali-
coating powder to calculate and display a predicted cured
bration standards over the full operating range of the gauge,
thickness. Measurements can be made on any rigid surface.
then making the necessary gauge adjustments (as required) to
correct any out-of-tolerance conditions.
4.5 The thickness of dry coating powder diminishes during
3.1.4.1 Discussion—Calibration of coating thickness gauges the curing process. To predict the cured powder coating
is performed in a controlled environment using a documented thickness, a correlation must be made between pre-cured and
process by the equipment manufacturer, their authorized agent, post-cured thicknesses.
or by an accredited calibration laboratory. The outcome of the 4.5.1 Procedure A and Procedure B result in a thickness
calibration process is to restore/realign the gauge to meet/ measurement of the uncured coating powder only. A reduction
exceed the manufacturer’s stated accuracy and may result in factor must then be used to predict the cured powder thickness
the creation of a calibration certificate recording the results of for each particular coating powder. This reduction factor is
the process at the time of testing. obtained by measuring the cured powder thickness at the same
location where the uncured powder thickness measurement
3.1.5 powder coatings, n—coatings which are protective or
was taken. For best accuracy, measurements before and after
decorative, or both, formed by the application of a coating
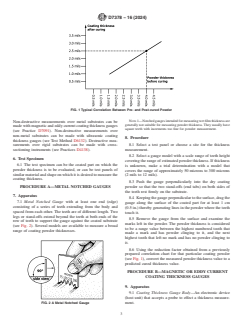
curing should be taken for different thicknesses. A sample plot
powder to a substrate and fused in a continuous film by the
of measurement results is shown in Fig. 1. From this plot a
application of heat or radiant energy.
reduction factor can be determined and applied to all future dry
3.1.6 dry film thickness, n—the thickness of a cured coating
coating powder thickness measurements to predict cured thick-
(or coating layers) as measured from the surface of the
ness. As coating powder properties may alter over time, this
substrate.
value should be confirmed annually or when there is a change
3.1.7 micrometer (micron), n—one one-thousandth of a in powder suppliers.
millimeter (0.001 mm); 25.4 microns = 1 mil. 4.5.2 Procedure C does not provide a dry powder thickness
measurement. The user can make an adjustment to the instru-
3.1.8 mil, n—an imperial unit of measure; one one-
ment by measuring the cured powder thickness at the same
thousandth of an inch (0.001 in.); 1 mil = 25.4 microns.
location where the uncured powder thickness measurement
3.1.9 substrate, n—the base material, type of surface or
was taken and align the gauge readings with the cured coating
component that is being coated.
readings.
3.
...


Questions, Comments and Discussion
Ask us and Technical Secretary will try to provide an answer. You can facilitate discussion about the standard in here.
Loading comments...