ASTM E2786-10(2019)
(Test Method)Standard Test Methods for Measuring Expansion of Intumescent Materials Used in Firestop and Joint Systems
Standard Test Methods for Measuring Expansion of Intumescent Materials Used in Firestop and Joint Systems
SIGNIFICANCE AND USE
5.1 These test methods are intended to measure the material’s expansion after heating.
5.2 The test methods also provide a means to determine the expansion factor.
SCOPE
1.1 These test methods determine, by measurement, the expansion of intumescent materials used in firestop and joint systems under specified conditions.
1.2 The values stated in inch-pound units are to be regarded as standard. The values given in parentheses are mathematical conversions to SI units that are provided for information only and are not considered standard.
1.3 The text of these test methods references notes and footnotes which provide explanatory material. These notes and footnotes (excluding those in tables and figures) shall not be considered as requirements of the fire test response standard.
1.4 This standard does not purport to address all of the safety concerns, if any, associated with its use. It is the responsibility of the user of this standard to establish appropriate safety, health, and environmental practices and determine the applicability of regulatory limitations prior to use.
1.5 This international standard was developed in accordance with internationally recognized principles on standardization established in the Decision on Principles for the Development of International Standards, Guides and Recommendations issued by the World Trade Organization Technical Barriers to Trade (TBT) Committee.
General Information
- Status
- Published
- Publication Date
- 30-Sep-2019
- Technical Committee
- E06 - Performance of Buildings
- Drafting Committee
- E06.21 - Serviceability
Relations
- Effective Date
- 01-Oct-2019
- Effective Date
- 01-Jan-2024
- Effective Date
- 15-Dec-2018
- Effective Date
- 01-Mar-2018
- Effective Date
- 01-Aug-2015
- Effective Date
- 01-Aug-2015
- Effective Date
- 01-Mar-2015
- Effective Date
- 01-Feb-2015
- Effective Date
- 01-Nov-2014
- Effective Date
- 01-Oct-2014
- Effective Date
- 15-Aug-2014
- Effective Date
- 01-Aug-2014
- Effective Date
- 01-Jul-2014
- Effective Date
- 01-Apr-2013
- Effective Date
- 15-Dec-2012
Overview
ASTM E2786-10(2019), Standard Test Methods for Measuring Expansion of Intumescent Materials Used in Firestop and Joint Systems, provides critical methodologies for assessing the expansion characteristics of intumescent materials under heat exposure. These test methods are designed to measure both the physical expansion and the expansion factor of materials integral to firestop and joint system performance in buildings. Recognized by international standardization bodies, this ASTM standard promotes consistency, safety, and reliability in fire protection applications.
Key features of this standard include:
- Procedures for quantifying expansion after heating.
- Guidance on calculating the expansion factor for use in product evaluation and quality assurance.
- Applicability to a broad range of intumescent materials, including solids and granular forms.
Key Topics
- Expansion Measurement: Test methods detail how to measure the dimensional or volumetric change of intumescent materials when exposed to heat, reflecting real-world fire conditions.
- Expansion Factor Calculation: The standard provides definitions and equations for expansion factor-the ratio of material height or volume before and after heating-to assess material performance.
- Test Method Options: Two methods are specified:
- Test Method A (Specimen Holder Method): Suitable for most material types, this method measures height change within a device under controlled heat.
- Test Method B (Water Displacement Method): Employs Archimedes' Principle for volumetric expansion, used for materials unsuitable for the pressurized holder method.
- Specimen Preparation: Details requirements for sample selection, conditioning, and preparation, ensuring accurate and repeatable results.
- Reporting Requirements: Outlines mandatory information for test reports, supporting traceability and compliance.
- Applicability and Limitations: Notes on safety, health, and environmental considerations, and the importance of method selection for accurate comparison.
Applications
ASTM E2786-10(2019) is invaluable for stakeholders across fire protection and construction industries due to its practical applications:
- Product Development and Quality Control: Manufacturers of intumescent firestopping, joint systems, and related fire protection materials use these test methods to verify product performance and consistency, ensuring compliance with safety standards.
- Building Safety and Compliance: Building engineers, architects, and code officials rely on results from these methods to demonstrate the effectiveness of firestop and joint systems in containing fire, heat, and smoke.
- Regulatory Testing and Certification: Testing laboratories apply these standardized procedures for third-party certification programs, providing traceable and comparable performance data.
- Research and Comparative Analysis: Academic and industry researchers use the expansion data generated to develop improved fire protection products and evaluate material innovation.
Related Standards
For comprehensive fire protection system evaluation and terminology, refer to these related ASTM standards:
- ASTM E176 - Terminology of Fire Standards: Defines key fire science terms applied within E2786 and related documents.
- ASTM E631 - Terminology of Building Constructions: Supplies additional building and construction terms relevant to the testing and application of firestopping systems.
- International Standards and Guides: ASTM E2786-10(2019) aligns with globally recognized standardization principles, such as those outlined in the WTO's TBT Committee guidance.
Keywords: intumescent materials, firestop systems, expansion factor, ASTM E2786, joint systems, fire protection testing, building safety standards, material expansion measurement.
Buy Documents
ASTM E2786-10(2019) - Standard Test Methods for Measuring Expansion of Intumescent Materials Used in Firestop and Joint Systems
Get Certified
Connect with accredited certification bodies for this standard

CIS Institut d.o.o.
Personal Protective Equipment (PPE) certification body. Notified Body NB-2890 for EU Regulation 2016/425 PPE.

Kiwa BDA Testing
Building and construction product certification.

Kmetijski inštitut Slovenije
Agricultural Institute of Slovenia. Soil testing, plant health, agricultural product analysis.
Sponsored listings
Frequently Asked Questions
ASTM E2786-10(2019) is a standard published by ASTM International. Its full title is "Standard Test Methods for Measuring Expansion of Intumescent Materials Used in Firestop and Joint Systems". This standard covers: SIGNIFICANCE AND USE 5.1 These test methods are intended to measure the material’s expansion after heating. 5.2 The test methods also provide a means to determine the expansion factor. SCOPE 1.1 These test methods determine, by measurement, the expansion of intumescent materials used in firestop and joint systems under specified conditions. 1.2 The values stated in inch-pound units are to be regarded as standard. The values given in parentheses are mathematical conversions to SI units that are provided for information only and are not considered standard. 1.3 The text of these test methods references notes and footnotes which provide explanatory material. These notes and footnotes (excluding those in tables and figures) shall not be considered as requirements of the fire test response standard. 1.4 This standard does not purport to address all of the safety concerns, if any, associated with its use. It is the responsibility of the user of this standard to establish appropriate safety, health, and environmental practices and determine the applicability of regulatory limitations prior to use. 1.5 This international standard was developed in accordance with internationally recognized principles on standardization established in the Decision on Principles for the Development of International Standards, Guides and Recommendations issued by the World Trade Organization Technical Barriers to Trade (TBT) Committee.
SIGNIFICANCE AND USE 5.1 These test methods are intended to measure the material’s expansion after heating. 5.2 The test methods also provide a means to determine the expansion factor. SCOPE 1.1 These test methods determine, by measurement, the expansion of intumescent materials used in firestop and joint systems under specified conditions. 1.2 The values stated in inch-pound units are to be regarded as standard. The values given in parentheses are mathematical conversions to SI units that are provided for information only and are not considered standard. 1.3 The text of these test methods references notes and footnotes which provide explanatory material. These notes and footnotes (excluding those in tables and figures) shall not be considered as requirements of the fire test response standard. 1.4 This standard does not purport to address all of the safety concerns, if any, associated with its use. It is the responsibility of the user of this standard to establish appropriate safety, health, and environmental practices and determine the applicability of regulatory limitations prior to use. 1.5 This international standard was developed in accordance with internationally recognized principles on standardization established in the Decision on Principles for the Development of International Standards, Guides and Recommendations issued by the World Trade Organization Technical Barriers to Trade (TBT) Committee.
ASTM E2786-10(2019) is classified under the following ICS (International Classification for Standards) categories: 13.220.20 - Fire protection. The ICS classification helps identify the subject area and facilitates finding related standards.
ASTM E2786-10(2019) has the following relationships with other standards: It is inter standard links to ASTM E2786-10(2015), ASTM E176-24, ASTM E176-18a, ASTM E176-18, ASTM E176-15ae1, ASTM E176-15a, ASTM E631-15, ASTM E176-15, ASTM E631-14, ASTM E176-14c, ASTM E176-14b, ASTM E176-14a, ASTM E176-14, ASTM E176-13, ASTM E176-12b. Understanding these relationships helps ensure you are using the most current and applicable version of the standard.
ASTM E2786-10(2019) is available in PDF format for immediate download after purchase. The document can be added to your cart and obtained through the secure checkout process. Digital delivery ensures instant access to the complete standard document.
Standards Content (Sample)
This international standard was developed in accordance with internationally recognized principles on standardization established in the Decision on Principles for the
Development of International Standards, Guides and Recommendations issued by the World Trade Organization Technical Barriers to Trade (TBT) Committee.
Designation: E2786 − 10 (Reapproved 2019)
Standard Test Methods for
Measuring Expansion of Intumescent Materials Used in
Firestop and Joint Systems
This standard is issued under the fixed designation E2786; the number immediately following the designation indicates the year of
original adoption or, in the case of revision, the year of last revision. A number in parentheses indicates the year of last reapproval. A
superscript epsilon (´) indicates an editorial change since the last revision or reapproval.
1. Scope 3.1.1 For definitions of general terms used in these test
methods related to building construction, refer to Terminology
1.1 These test methods determine, by measurement, the
E631.
expansion of intumescent materials used in firestop and joint
3.1.2 For definitions of general terms used in these test
systems under specified conditions.
methods related to fire standards, refer to Terminology E176.
1.2 The values stated in inch-pound units are to be regarded
3.2 Definitions of Terms Specific to This Standard:
as standard. The values given in parentheses are mathematical
3.2.1 expansion, n—an increase in the dimensions as the
conversions to SI units that are provided for information only
result of heating.
and are not considered standard.
3.2.2 expansion factor, n—the ratio of the material height
1.3 The text of these test methods references notes and
before and after heating, under test conditions that allow
footnotes which provide explanatory material. These notes and
expansion only in the vertical direction.
footnotes (excluding those in tables and figures) shall not be
considered as requirements of the fire test response standard.
3.2.3 intumescent, adj—characterized by swelling when ex-
posed to high surface temperatures or flames.
1.4 This standard does not purport to address all of the
safety concerns, if any, associated with its use. It is the
4. Summary of Test Method
responsibility of the user of this standard to establish appro-
priate safety, health, and environmental practices and deter-
4.1 These test methods place a material of a specified
mine the applicability of regulatory limitations prior to use.
thickness or volume into a specific device that is capable of
1.5 This international standard was developed in accor-
heating the material.
dance with internationally recognized principles on standard-
4.2 After the material is heated, its dimensional or volumet-
ization established in the Decision on Principles for the
ric change is measured.
Development of International Standards, Guides and Recom-
mendations issued by the World Trade Organization Technical
4.3 Two test methods are provided, one using a test speci-
Barriers to Trade (TBT) Committee.
men holder (Test Method A) and the other using a water
displacement method (Test Method B).
2. Referenced Documents
4.4 Test MethodAmay be used for measuring expansion of
2.1 ASTM Standards:
any material.
E176 Terminology of Fire Standards
E631 Terminology of Building Constructions
4.5 Test Method B may be used for measuring expansion of
any material, except for those materials that are granular, that
3. Terminology
are susceptible to absorbing paraffin in conditioned pre-
3.1 Definitions—Definitions in the following standards will
expandedstateorpost-expandedstate,orthataresusceptibleto
prevail for terms not defined in these test methods.
damage or deformation in a post-expanded state.
4.6 The test method used must be reported, as use of
These test methods are under the jurisdiction of ASTM Committee E06 on
different test methods will result in different expansion factors.
Performance of Buildings and is the direct responsibility of Subcommittee E06.21
on Serviceability.
5. Significance and Use
Current edition approved Oct. 1, 2019. Published October 2019. Originally
approved in 2010. Last previous edition approved in 2015 as E2786–10 (2015).
5.1 These test methods are intended to measure the materi-
DOI: 10.1520/E2786–10R19.
al’s expansion after heating.
For referenced ASTM standards, visit the ASTM website, www.astm.org, or
contact ASTM Customer Service at service@astm.org. For Annual Book of ASTM
5.2 The test methods also provide a means to determine the
Standards volume information, refer to the standard’s Document Summary page on
the ASTM website. expansion factor.
Copyright © ASTM International, 100 Barr Harbor Drive, PO Box C700, West Conshohocken, PA 19428-2959. United States
E2786 − 10 (2019)
6. Apparatus 6.3.2 Steel rule die, 1 in. (25 mm) diameter,
6.3.3 Glass beaker, 400 mL smooth wall type,
6.1 Heating Device—An enclosed furnace or oven or simi-
6.3.4 Weight with hook attached,
lar equipment capable of maintaining the temperature specified
6.3.5 Aluminum tins,
herein and large enough to contain the test specimen holder.
6.3.6 Electric hot plate for heating wax,
6.2 Test Method A—Test Specimen Holder Method:
6.3.7 Paraffın wax with Melting Point of 132.8 °F –
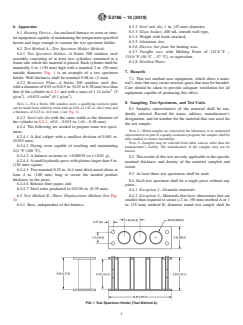
6.2.1 Test Specimen Holder—A Series 300 stainless steel
134.6 °F (56 °C – 57 °C), or equivalent.
assembly consisting of at least two cylinders contained in a
6.3.8 Distilled Water.
frame into which the material is placed. Each cylinder shall be
nominally 5 in. (130 mm) high with a nominal 2 in. (50 mm)
7. Hazards
outside diameter. Fig. 1 is an example of a test specimen
holder. Wall thickness shall be nominal 0.08 in. (2 mm).
7.1 This test method uses equipment, which alters a mate-
6.2.2 Restrictor Plate—A Series 300 stainless steel disc
rial’s state that may create noxious gases that may be harmful.
with a diameter of 0.01 to 0.015 in. (0.25 to 0.38 mm) less than
Care should be taken to provide adequate ventilation for all
that of the cylinder in 6.2.1 and with a mass of 1.14 oz/in (5
equipment capable of producing this effect.
2 2 2
g/cm ), 60.023 oz/in (0.1 g/cm ).
8. Sampling, Test Specimens, and Test Units
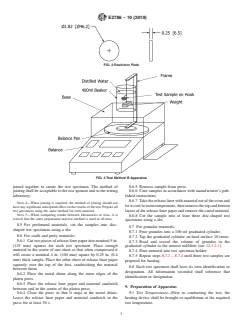
NOTE 1—For a Series 300 stainless steel, a qualifying restrictor plate
can be made from solid bar stock with an O.D. of 1.82 in. (46.2 mm) and
8.1 Samples representative of the material shall be ran-
a thickness of 0.25 in. (6.5 mm ) (see Fig. 2).
domly selected. Record the name, address, manufacturer’s
6.2.3 Steel rule die with the same width as the diameter of
designation, and lot number for the material that was used for
the cylinder in 6.2.1, +0.0 – 0.015 in. (+0 – 0.38 mm).
the test sample.
6.2.4 The following are needed to prepare some test speci-
NOTE 2—When samples are selected by the laboratory or its authorized
mens:
representative as part of a quality assurance program, the samples shall be
6.2.4.1 A dial caliper with a smallest division of 0.001 in.
duly marked to ensure traceability.
(0.025 mm),
NOTE 3—Samples may be selected from other sources other than the
6.2.4.2 Drying oven capable of reaching and maintaining
manufacturer’s facility. The manufacturer of the samples may not be
212 °F (100 °C), known.
6.2.4.3 A balance accurate to 60.00035 oz (60.01 g),
8.2 The results of this test are only applicable to the specific
6.2.4.4 Asmall hydraulic press with platens larger than 5 in.
nominal thickness and density of the material sampled and
(130 mm) square,
tested.
6.2.4.5 Two nominal 0.25 in. (6.4 mm) thick metal shims at
8.3 At least three test specimens shall be used.
least 4 in. (100 mm) long to create the needed product
thickness in the press,
8.4 Each test specimen shall be a single piece without any
6.2.4.6 Release liner paper, and
joints.
6.2.4.7 Steel ruler graduated to 0.0156 in. (0.39 mm).
8.4.1 Exception 1—Granular materials.
6.3 Test Method B—Water Displacement Method (See Fig. 8.4.2 Exception 2—Materials that have dimensions that are
3): smaller than required to create a 2 in. (50 mm) method A or 1
6.3.1 Base, independent of the balance, in. (25 mm) method B, diameter round test sample shall be
FIG. 1 Test Specimen Holder (Test Method A)
E2786 − 10 (2019)
FIG. 2 Restrictor Plate
FIG. 3 Test Method B Apparatus
joined together to create the test specimen. The method of 8.6.5 Remove sample from press.
joining shall be acceptable to the test sponsor and to the testing 8.6.6 Cure samples in accordance with manufacturer’s pub-
laboratory. lished instructions.
8.6.7 Takethereleaselinerwithmaterialoutoftheovenand
NOTE 4—When joining is required, the method of joining should not
letitcooltoroomtemperature,thenremovethetopandbottom
have any significant anticipated effect on the results of the test. Prepare all
test specimens using the same method for each material. layers of the release liner paper and remove the cured material.
NOTE 5—When comparing results between laboratories or tests, it is
8.6.8 Cut the sample into at least three disc-shaped test
critical that the same preparation and test method is used in all tests.
specimens using a die.
8.5 For preformed materials, cut the samples into disc-
8.7 For granular materials:
shaped test specimens using a die.
8.7.1 Pour granules into a 100 ml graduated cylinder.
8.6 For caulk and putty materials:
8.7.2 Tap the graduated cylinder on hard surface 10 times.
8.6.1 Cuttwopiecesofreleaselinerpaperintonominal5in.
8.7.3 Read and record the volume of granules in the
(125 mm) squares for each test specimen. Place enough
graduated cylinder to the nearest millilitre (see 12.1.2.1).
material in the center of one sheet so that when compressed it
8.7.4 Pour material into test specimen holder.
will create a nominal 4 in. (100 mm) square by 0.25 in. (6.4
8.7.5 Repeat steps 8.7.1 – 8.7.4 until three test samples are
mm) thick sample. Place the other sheet of release liner paper
prepared for heating.
squarely over the top of the first, sandwiching the material
8.8 Each test specimen shall have its own identification or
between them.
designation. All information recorded shall reference that
8.6.2 Place the metal shims along the outer edges of the
identification or designation.
platen press.
8.6.3 Place the release liner paper and material sandwich
9. Preparation of Apparatus
between and in the center of the platen press.
8.6.4 Close the press so that it stops at the metal shims. 9.1 Test Temperatures—Prior to conducting the test, the
Leave the release liner paper and material sandwich in the heating device shall be brought to equilibrium at the required
press for at least 30 s. test temperature.
E2786 − 10 (2019)
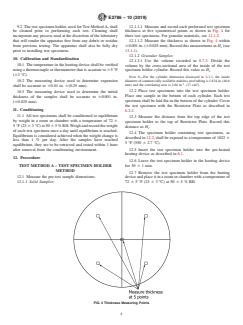
9.2 The test specimen holder, used for Test MethodA, shall 12.1.1.1 Measure and record each preformed test specimen
be cleaned prior to performing each test. Cleaning shall thickness at five symmetrical points as shown in Fig. 4 for
incorporate any process used at the discretion of the laboratory three test specimens. For granular materials, see 12.1.2.
that will render the apparatus free from any debris or residue 12.1.1.2 Measure the thickness as shown in Fig. 4 within
from previous testing. The apparatus shall also be fully dry
60.001 in. (60.025 mm). Record this measurement as H (see
s
prior to installing test specimens. 13.1.1).
12.1.2 Granular Samples:
10. Calibration and Standardization
12.1.2.1 Use the volume recorded in 8.7.3. Divide the
10.1 The temperature in the heating device shall be verified
volume by the cross-sectional area of the inside of the test
using a thermocouple or thermometer that is accurate to 65°F
specimen holder cylinder. Record this value as H .
s
(63 °C).
NOTE 6—For the cylinder dimension discussed in 6.2.1, the inside
10.2 The measuring device used to determine expansion
diameter of commercially available stainless steel tubing is 1.834 in. (46.6
2 2
mm) and the correlating area is 2.64 in. (17 cm ).
shall be accurate to 60.01 in. 6(0.25 mm).
12.2 Place test specimens into the test specimen holder.
10.3 The measuring device used to determine the initial
Place one sample in the bottom of e
...


Questions, Comments and Discussion
Ask us and Technical Secretary will try to provide an answer. You can facilitate discussion about the standard in here.
Loading comments...