ASTM D4562-01(2019)
(Test Method)Standard Test Method for Shear Strength of Adhesives Using Pin-and-Collar Specimen
Standard Test Method for Shear Strength of Adhesives Using Pin-and-Collar Specimen
SIGNIFICANCE AND USE
5.1 This test method provides reasonably accurate information with regard to the ability of an adhesive to withstand shearing forces. It may also be used to determine degree of cure and the effect of environment on shear strength.
SCOPE
1.1 This test method covers the determination of the shear strength of curing liquid adhesives used for retaining cylindrical assemblies or for locking and sealing threaded fasteners.
1.2 The values stated in inch-pound units are to be regarded as standard. The values given in parentheses are mathematical conversions to SI units that are provided for information only and are not considered standard.
1.3 This standard does not purport to address all of the safety concerns, if any, associated with its use. It is the responsibility of the user of this standard to establish appropriate safety, health, and environmental practices and determine the applicability of regulatory limitations prior to use.
1.4 This international standard was developed in accordance with internationally recognized principles on standardization established in the Decision on Principles for the Development of International Standards, Guides and Recommendations issued by the World Trade Organization Technical Barriers to Trade (TBT) Committee.
General Information
- Status
- Published
- Publication Date
- 31-May-2019
- Technical Committee
- D14 - Adhesives
- Drafting Committee
- D14.60 - Adhesive Material Classification System
Relations
- Effective Date
- 01-Jun-2019
- Effective Date
- 01-Mar-2024
- Effective Date
- 01-Nov-2018
- Effective Date
- 01-May-2016
- Effective Date
- 01-May-2014
- Effective Date
- 15-Aug-2013
- Effective Date
- 01-May-2013
- Effective Date
- 01-May-2013
- Effective Date
- 01-Jul-2012
- Effective Date
- 01-May-2012
- Effective Date
- 01-Dec-2011
- Effective Date
- 01-Nov-2011
- Effective Date
- 01-Jan-2011
- Effective Date
- 01-Oct-2010
- Effective Date
- 01-Oct-2008
Overview
ASTM D4562-01(2019) is the international standard that establishes the test method for determining the shear strength of adhesives using a pin-and-collar specimen. Developed by ASTM International, this test method is specifically applicable to curing liquid adhesives designed for retaining cylindrical assemblies or for locking and sealing threaded fasteners. By providing a standardized approach to measuring adhesive performance under shear loading, ASTM D4562 helps ensure reliability and consistency in product quality across a wide range of manufacturing and engineering applications.
This standard is recognized by agencies such as the U.S. Department of Defense and developed according to the principles set forth by the World Trade Organization Technical Barriers to Trade (TBT) Committee.
Key Topics
- Shear Strength Determination: The primary focus of ASTM D4562 is to measure the ability of an adhesive to withstand shearing forces when used in pin-and-collar assemblies.
- Specimen Preparation: Details the required cleaning, assembly, and curing procedures to produce consistent test specimens.
- Testing Procedures: Specifies the use of a universal test machine to apply force and record the load required to shear the adhesive joint.
- Environmental Conditioning: Guides the testing of adhesive joints after exposure to various environmental factors to evaluate shear strength under real-world conditions.
- Repeatability and Reproducibility: Provides precision data from interlaboratory studies to support reliability of test results.
- Reporting Requirements: Outlines the information that must be included in test reports to ensure clarity and traceability.
Applications
The procedures defined in ASTM D4562-01(2019) are widely used across several industries to:
- Evaluate Adhesive Performance: Manufacturers use this test to assess the shear strength of adhesives intended for critical applications, such as locking threaded fasteners or retaining cylindrical components.
- Quality Control and Product Development: The standard is instrumental in quality assurance processes, ensuring adhesives meet performance specifications and helping in comparative analysis during R&D phases.
- Environmental Testing: By determining shear strength after environmental exposure, companies can validate the durability and suitability of adhesives for demanding service conditions.
- Regulatory Compliance: Adhering to ASTM D4562 standards demonstrates due diligence in safety and reliability, which is often mandated in aerospace, automotive, military, and industrial sectors.
Related Standards
- ASTM D907: Terminology of Adhesives – Provides definitions of terms used throughout ASTM D4562.
- ASTM D2651: Guide for Preparation of Metal Surfaces for Adhesive Bonding – Guidance on proper cleaning of test materials.
- ASTM E177: Practice for Use of the Terms Precision and Bias in ASTM Test Methods – Used for interpreting repeatability and reproducibility results.
- ASTM E691: Practice for Conducting an Interlaboratory Study to Determine the Precision of a Test Method – Reference for interlaboratory studies on adhesive shear strength.
- ASTM A108: Specification for Steel Bar, Carbon and Alloy, Cold-Finished – Reference material for pin-and-collar specimen construction.
Other referenced specifications include standards for various metals (aluminum, brass, steel alloys) and finishing practices relevant to the preparation of pin-and-collar specimens.
Keywords: ASTM D4562, adhesive shear strength, pin-and-collar test, adhesives standard, locking fasteners, cylindrical assemblies, mechanical testing, adhesive performance
Adopting ASTM D4562-01(2019) ensures a robust, repeatable, and internationally recognized approach to evaluating the shear strength of adhesives in demanding mechanical assemblies.
Buy Documents
ASTM D4562-01(2019) - Standard Test Method for Shear Strength of Adhesives Using Pin-and-Collar Specimen
Get Certified
Connect with accredited certification bodies for this standard

DIN CERTCO
DIN Group product certification.

Smithers Quality Assessments
US management systems and product certification.
Sponsored listings
Frequently Asked Questions
ASTM D4562-01(2019) is a standard published by ASTM International. Its full title is "Standard Test Method for Shear Strength of Adhesives Using Pin-and-Collar Specimen". This standard covers: SIGNIFICANCE AND USE 5.1 This test method provides reasonably accurate information with regard to the ability of an adhesive to withstand shearing forces. It may also be used to determine degree of cure and the effect of environment on shear strength. SCOPE 1.1 This test method covers the determination of the shear strength of curing liquid adhesives used for retaining cylindrical assemblies or for locking and sealing threaded fasteners. 1.2 The values stated in inch-pound units are to be regarded as standard. The values given in parentheses are mathematical conversions to SI units that are provided for information only and are not considered standard. 1.3 This standard does not purport to address all of the safety concerns, if any, associated with its use. It is the responsibility of the user of this standard to establish appropriate safety, health, and environmental practices and determine the applicability of regulatory limitations prior to use. 1.4 This international standard was developed in accordance with internationally recognized principles on standardization established in the Decision on Principles for the Development of International Standards, Guides and Recommendations issued by the World Trade Organization Technical Barriers to Trade (TBT) Committee.
SIGNIFICANCE AND USE 5.1 This test method provides reasonably accurate information with regard to the ability of an adhesive to withstand shearing forces. It may also be used to determine degree of cure and the effect of environment on shear strength. SCOPE 1.1 This test method covers the determination of the shear strength of curing liquid adhesives used for retaining cylindrical assemblies or for locking and sealing threaded fasteners. 1.2 The values stated in inch-pound units are to be regarded as standard. The values given in parentheses are mathematical conversions to SI units that are provided for information only and are not considered standard. 1.3 This standard does not purport to address all of the safety concerns, if any, associated with its use. It is the responsibility of the user of this standard to establish appropriate safety, health, and environmental practices and determine the applicability of regulatory limitations prior to use. 1.4 This international standard was developed in accordance with internationally recognized principles on standardization established in the Decision on Principles for the Development of International Standards, Guides and Recommendations issued by the World Trade Organization Technical Barriers to Trade (TBT) Committee.
ASTM D4562-01(2019) is classified under the following ICS (International Classification for Standards) categories: 83.180 - Adhesives. The ICS classification helps identify the subject area and facilitates finding related standards.
ASTM D4562-01(2019) has the following relationships with other standards: It is inter standard links to ASTM D4562-01(2013), ASTM A108-24, ASTM A108-18, ASTM D2651-01(2016), ASTM E177-14, ASTM A108-13, ASTM E691-13, ASTM E177-13, ASTM D907-12a, ASTM D907-12, ASTM D907-11a, ASTM E691-11, ASTM D907-11, ASTM E177-10, ASTM E177-08. Understanding these relationships helps ensure you are using the most current and applicable version of the standard.
ASTM D4562-01(2019) is available in PDF format for immediate download after purchase. The document can be added to your cart and obtained through the secure checkout process. Digital delivery ensures instant access to the complete standard document.
Standards Content (Sample)
This international standard was developed in accordance with internationally recognized principles on standardization established in the Decision on Principles for the
Development of International Standards, Guides and Recommendations issued by the World Trade Organization Technical Barriers to Trade (TBT) Committee.
Designation: D4562 − 01 (Reapproved 2019)
Standard Test Method for
Shear Strength of Adhesives Using Pin-and-Collar
Specimen
This standard is issued under the fixed designation D4562; the number immediately following the designation indicates the year of
original adoption or, in the case of revision, the year of last revision. A number in parentheses indicates the year of last reapproval. A
superscript epsilon (´) indicates an editorial change since the last revision or reapproval.
This standard has been approved for use by agencies of the U.S. Department of Defense.
1. Scope 3. Terminology
1.1 This test method covers the determination of the shear 3.1 Definitions—Many of the terms in this standard are
strength of curing liquid adhesives used for retaining cylindri- defined in Terminology D907.
cal assemblies or for locking and sealing threaded fasteners.
4. Summary of Test Method
1.2 The values stated in inch-pound units are to be regarded
4.1 This test method consists of bonding a metal pin inside
as standard. The values given in parentheses are mathematical
a metal collar and determining the force required to shear the
conversions to SI units that are provided for information only
adhesive joint.
and are not considered standard.
1.3 This standard does not purport to address all of the 5. Significance and Use
safety concerns, if any, associated with its use. It is the
5.1 This test method provides reasonably accurate informa-
responsibility of the user of this standard to establish appro-
tion with regard to the ability of an adhesive to withstand
priate safety, health, and environmental practices and deter-
shearing forces. It may also be used to determine degree of
mine the applicability of regulatory limitations prior to use.
cure and the effect of environment on shear strength.
1.4 This international standard was developed in accor-
dance with internationally recognized principles on standard- 6. Apparatus
ization established in the Decision on Principles for the
6.1 Universal Test Machine, or equivalent, for applying
Development of International Standards, Guides and Recom-
force to the specimen. Details of the test specimen (pin-and-
mendations issued by the World Trade Organization Technical
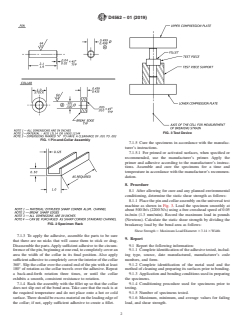
collar) are given in Fig. 1.
Barriers to Trade (TBT) Committee.
6.2 Specimen Curing Rack, as shown in Fig. 2, or equiva-
lent.
2. Referenced Documents
2.1 ASTM Standards:
7. Preparation of Test Specimens
A108 Specification for Steel Bar, Carbon and Alloy, Cold-
7.1 Assemble five specimens for each test as described in
Finished
the following paragraphs:
D907 Terminology of Adhesives
7.1.1 Eachspecimeniscomprisedofapin0.498to0.499in.
D2651 GuideforPreparationofMetalSurfacesforAdhesive
(12.65 to 12.675 mm) in diameter and a slip collar 0.500 to
Bonding
0.501 in. (12.7 to 12.725 mm) inside diameter by 0.435 to
E177 Practice for Use of the Terms Precision and Bias in
0.439 in. (11.05 to 11.15 mm) wide, both components finished
ASTM Test Methods
to 32 to 64 µin (0.8 to 1.6 µm) with 0.001 to 0.003 in. (0.025
E691 Practice for Conducting an Interlaboratory Study to
to 0.075 mm) diametrical clearance between the pin and collar
Determine the Precision of a Test Method
(see Fig. 1). The pin and collar, by agreement, may be made of
any material (see Appendix X1), but the most common
This test method is under the jurisdiction of ASTM Committee D14 on
material is steel, as specified in Specification A108.
Adhesives and is the direct responsibility of Subcommittee D14.60 on Adhesive
7.1.2 Degrease all pins and collars (refer to Guide D2651),
Material Classification System.
store in an atmosphere of low humidity (20 % relative
Current edition approved June 1, 2019. Published June 2019. Originally
humidity), and keep them clean. Use degreased specimens
approved in 1986. Last previous edition approved in 2013 as D4562 – 01 (2013).
DOI: 10.1520/D4562-01R19.
within four days or discard. (Oxidation affects the test results
For referenced ASTM standards, visit the ASTM website, www.astm.org, or
after this time. Prior to vapor degreasing, it is permissible to
contact ASTM Customer Service at service@astm.org. For Annual Book of ASTM
soak or wash hard-greased or waxed parts in solvent.) Do not
Standards volume information, refer to the standard’s Document Summary page on
the ASTM website. prime or activate unless specified for the material to be tested.
Copyright © ASTM International, 100 Barr Harbor Drive, PO Box C700, West Conshohocken, PA 19428-2959. United States
D4562 − 01 (2019)
FIG. 3 Test Device
FIG. 1 Pin-and-Collar Assembly
7.1.5 Cure the specimens in accordance with the manufac-
turer’s instructions.
7.1.5.1 For primed or activated surfaces, when specified or
recommended, use the manufacturer’s primer. Apply the
primer and adhesive according to the manufacturer’s instruc-
tions. Assemble and cure the specimens for a time and
temperature in accordance with the manufacturer’s recommen-
dation.
8. Procedure
8.1 After allowing for cure and any planned environmental
conditioning, determine the static shear strength as follows:
8.1.1 Place the pin and collar assembly on the universal test
machine as shown in Fig. 3. Load the specimen smoothly at
about 500 lb/s (2200 N/s) using a free crosshead speed of 0.05
in./min (1.3 mm/min). Record the maximum load in pounds
(Newtons). Calculate the static shear strength by dividing the
FIG. 2 Specimen Rack
breakaway load by the bond area as follows:
Shear Strength 5 Maximum Load/Diameter 33.14 3Width
7.1.3 To apply the adhesive, assemble the parts to be sure
9. Report
that there are no nicks that will cause them to stick or drag.
Disassemble the parts.Apply sufficient adhesive to the c
...


Questions, Comments and Discussion
Ask us and Technical Secretary will try to provide an answer. You can facilitate discussion about the standard in here.
Loading comments...