ASTM G55-07(2019)
(Test Method)Standard Test Method for Evaluating Pipeline Coating Patch Materials
Standard Test Method for Evaluating Pipeline Coating Patch Materials
SIGNIFICANCE AND USE
3.1 Holidays in pipeline coatings may be repaired by circumferential wrapping with a suitable pipe wrap tape. However, this technique is not always practicable and patching may be required. The effectiveness of a patch material depends upon its adhesion to the original pipeline coating to effect sealing.
3.2 The results of this accelerated test have been found to yield comparative data useful for the selection of patching materials. The user is cautioned against the use of this method for absolute material properties characterization.
3.3 This procedure provides an accelerated method by exposing the patch to a severe radius of curvature on small-diameter pipe. The specimen is also exposed to a stress voltage in the presence of a highly conductive electrolyte.
SCOPE
1.1 This test method provides an accelerated means of determining the relative sealing abilities of pipeline patching materials that are used to seal holidays in pipeline coatings on steel pipe. This test method is intended for utilization of specimens of pipeline coatings on small-diameter pipe, for representing coatings used for buried or submerged service, and where the purpose of the coating is to provide an electrical barrier between the steel pipe and its environment.
1.2 This test method is not intended for evaluating patch materials that are overlapped upon themselves.
1.3 The values stated in SI units are to be regarded as the standard. The values given in parentheses are for information only.
1.4 This standard does not purport to address all of the safety concerns, if any, associated with its use. It is the responsibility of the user of this standard to establish appropriate safety, health, and environmental practices and determine the applicability of regulatory limitations prior to use.
1.5 This international standard was developed in accordance with internationally recognized principles on standardization established in the Decision on Principles for the Development of International Standards, Guides and Recommendations issued by the World Trade Organization Technical Barriers to Trade (TBT) Committee.
General Information
- Status
- Published
- Publication Date
- 30-Sep-2019
- Technical Committee
- D01 - Paint and Related Coatings, Materials, and Applications
- Drafting Committee
- D01.48 - Durability of Pipeline Coating and Linings
Relations
- Effective Date
- 01-Oct-2019
Overview
ASTM G55-07(2019), Standard Test Method for Evaluating Pipeline Coating Patch Materials, specifies an accelerated laboratory method for determining the relative sealing abilities of patching materials used to repair “holidays” (defects or breaks) in pipeline coatings. Developed by ASTM International, this standard is especially relevant for evaluating pipeline coatings applied to steel pipes intended for buried or submerged service, where the primary purpose is to provide an effective electrical barrier between the steel and the external environment.
Reliable pipeline coating repairs are crucial for the integrity and long-term performance of transmission pipelines. Proper patch material selection ensures that leaks, corrosion, and environmental failures are minimized. ASTM G55-07(2019) delivers practical comparative data to aid in the selection and evaluation of these repair materials.
Key Topics
- Pipeline Holiday Repair: The standard addresses the evaluation of patch materials for repairing localized defects (holidays) in protective pipeline coatings, focusing on adhesion and sealing efficacy.
- Accelerated Test Conditions: Test specimens of coated steel pipes (small-diameter) are exposed to challenging conditions, including a severe radius of curvature and an electrically conductive, alkaline environment, to simulate field stresses and provide accelerated data on patch performance.
- Comparative Data: The method yields comparative-not absolute-performance data for different pipe coating patch materials, helping users select suitable repair products.
- Scope Limitations: The standard is not intended for patch materials overlapped on themselves or for providing absolute values of material properties; its results are best used for comparison and selection purposes.
Applications
ASTM G55-07(2019) offers value in a range of pipeline industry scenarios, including:
- Pipeline Maintenance and Repair: Enabling pipeline operators, contractors, and coating manufacturers to effectively screen and compare patching materials used for field repairs of coating defects.
- Quality Assurance Programs: Supporting systematic quality testing of patch products to ensure compliance with industry requirements and to minimize the risk of pipeline corrosion due to inadequate repairs.
- Research & Development: Assisting manufacturers in R&D activities seeking to develop improved pipeline coating patch materials that perform well under accelerated aging and electrochemical stress.
- Asset Integrity Management: Contributing to better asset management practices by providing a standardized method to evaluate product performance for buried or submerged pipelines.
Related Standards
Organizations utilizing ASTM G55-07(2019) for pipeline coating testing and maintenance may also reference related standards, such as:
- ASTM D5162 - Standard Practice for Discontinuity (Holiday) Testing of Nonconductive Protective Coating on Metallic Substrates: Addresses field testing for coating holidays.
- ASTM G8 - Standard Test Methods for Cathodic Disbonding of Pipeline Coatings: Focuses on the ability of pipeline coatings to resist disbondment under cathodic protection.
- NACE SP0109 - Standard Practice for Holiday Detection of Fusion-Bonded Epoxy External Coatings: Provides guidance on field detection of holidays specific to fusion-bonded epoxy coatings.
- ISO 21809 Series - Petroleum and natural gas industries - External coatings for buried or submerged pipelines: Specifies international requirements and test methods for pipeline coatings.
Keywords: pipeline coating, patch materials, holiday repair, sealing ability, steel pipe, accelerated testing, protective coatings, buried pipeline, submerged pipeline, ASTM standards, comparative testing, asset integrity.
Buy Documents
ASTM G55-07(2019) - Standard Test Method for Evaluating Pipeline Coating Patch Materials
Get Certified
Connect with accredited certification bodies for this standard

Institut za varilstvo d.o.o. (Welding Institute)
Slovenia's leading welding institute since 1952. ISO 3834, EN 1090, pressure equipment certification, NDT personnel, welder qualification. Only IIW Au
Sponsored listings
Frequently Asked Questions
ASTM G55-07(2019) is a standard published by ASTM International. Its full title is "Standard Test Method for Evaluating Pipeline Coating Patch Materials". This standard covers: SIGNIFICANCE AND USE 3.1 Holidays in pipeline coatings may be repaired by circumferential wrapping with a suitable pipe wrap tape. However, this technique is not always practicable and patching may be required. The effectiveness of a patch material depends upon its adhesion to the original pipeline coating to effect sealing. 3.2 The results of this accelerated test have been found to yield comparative data useful for the selection of patching materials. The user is cautioned against the use of this method for absolute material properties characterization. 3.3 This procedure provides an accelerated method by exposing the patch to a severe radius of curvature on small-diameter pipe. The specimen is also exposed to a stress voltage in the presence of a highly conductive electrolyte. SCOPE 1.1 This test method provides an accelerated means of determining the relative sealing abilities of pipeline patching materials that are used to seal holidays in pipeline coatings on steel pipe. This test method is intended for utilization of specimens of pipeline coatings on small-diameter pipe, for representing coatings used for buried or submerged service, and where the purpose of the coating is to provide an electrical barrier between the steel pipe and its environment. 1.2 This test method is not intended for evaluating patch materials that are overlapped upon themselves. 1.3 The values stated in SI units are to be regarded as the standard. The values given in parentheses are for information only. 1.4 This standard does not purport to address all of the safety concerns, if any, associated with its use. It is the responsibility of the user of this standard to establish appropriate safety, health, and environmental practices and determine the applicability of regulatory limitations prior to use. 1.5 This international standard was developed in accordance with internationally recognized principles on standardization established in the Decision on Principles for the Development of International Standards, Guides and Recommendations issued by the World Trade Organization Technical Barriers to Trade (TBT) Committee.
SIGNIFICANCE AND USE 3.1 Holidays in pipeline coatings may be repaired by circumferential wrapping with a suitable pipe wrap tape. However, this technique is not always practicable and patching may be required. The effectiveness of a patch material depends upon its adhesion to the original pipeline coating to effect sealing. 3.2 The results of this accelerated test have been found to yield comparative data useful for the selection of patching materials. The user is cautioned against the use of this method for absolute material properties characterization. 3.3 This procedure provides an accelerated method by exposing the patch to a severe radius of curvature on small-diameter pipe. The specimen is also exposed to a stress voltage in the presence of a highly conductive electrolyte. SCOPE 1.1 This test method provides an accelerated means of determining the relative sealing abilities of pipeline patching materials that are used to seal holidays in pipeline coatings on steel pipe. This test method is intended for utilization of specimens of pipeline coatings on small-diameter pipe, for representing coatings used for buried or submerged service, and where the purpose of the coating is to provide an electrical barrier between the steel pipe and its environment. 1.2 This test method is not intended for evaluating patch materials that are overlapped upon themselves. 1.3 The values stated in SI units are to be regarded as the standard. The values given in parentheses are for information only. 1.4 This standard does not purport to address all of the safety concerns, if any, associated with its use. It is the responsibility of the user of this standard to establish appropriate safety, health, and environmental practices and determine the applicability of regulatory limitations prior to use. 1.5 This international standard was developed in accordance with internationally recognized principles on standardization established in the Decision on Principles for the Development of International Standards, Guides and Recommendations issued by the World Trade Organization Technical Barriers to Trade (TBT) Committee.
ASTM G55-07(2019) is classified under the following ICS (International Classification for Standards) categories: 23.040.99 - Other pipeline components. The ICS classification helps identify the subject area and facilitates finding related standards.
ASTM G55-07(2019) has the following relationships with other standards: It is inter standard links to ASTM G55-07(2013). Understanding these relationships helps ensure you are using the most current and applicable version of the standard.
ASTM G55-07(2019) is available in PDF format for immediate download after purchase. The document can be added to your cart and obtained through the secure checkout process. Digital delivery ensures instant access to the complete standard document.
Standards Content (Sample)
This international standard was developed in accordance with internationally recognized principles on standardization established in the Decision on Principles for the
Development of International Standards, Guides and Recommendations issued by the World Trade Organization Technical Barriers to Trade (TBT) Committee.
Designation: G55 − 07 (Reapproved 2019)
Standard Test Method for
Evaluating Pipeline Coating Patch Materials
ThisstandardisissuedunderthefixeddesignationG55;thenumberimmediatelyfollowingthedesignationindicatestheyearoforiginal
adoptionor,inthecaseofrevision,theyearoflastrevision.Anumberinparenthesesindicatestheyearoflastreapproval.Asuperscript
epsilon (´) indicates an editorial change since the last revision or reapproval.
1. Scope 3. Significance and Use
1.1 This test method provides an accelerated means of 3.1 Holidays in pipeline coatings may be repaired by
circumferential wrapping with a suitable pipe wrap tape.
determining the relative sealing abilities of pipeline patching
materials that are used to seal holidays in pipeline coatings on However,thistechniqueisnotalwayspracticableandpatching
mayberequired.Theeffectivenessofapatchmaterialdepends
steel pipe. This test method is intended for utilization of
specimens of pipeline coatings on small-diameter pipe, for upon its adhesion to the original pipeline coating to effect
representing coatings used for buried or submerged service, sealing.
and where the purpose of the coating is to provide an electrical
3.2 The results of this accelerated test have been found to
barrier between the steel pipe and its environment.
yield comparative data useful for the selection of patching
1.2 This test method is not intended for evaluating patch materials. The user is cautioned against the use of this method
for absolute material properties characterization.
materials that are overlapped upon themselves.
3.3 This procedure provides an accelerated method by
1.3 The values stated in SI units are to be regarded as the
exposing the patch to a severe radius of curvature on small-
standard. The values given in parentheses are for information
diameterpipe.Thespecimenisalsoexposedtoastressvoltage
only.
in the presence of a highly conductive electrolyte.
1.4 This standard does not purport to address all of the
safety concerns, if any, associated with its use. It is the
4. Apparatus
responsibility of the user of this standard to establish appro-
priate safety, health, and environmental practices and deter-
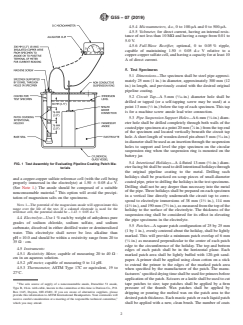
4.1 Test Vessel—A cylindrical glass battery jar (or
mine the applicability of regulatory limitations prior to use. equivalent), approximately 300 mm (12 in.) in diameter and
1.5 This international standard was developed in accor- 300mminheight.Onemagnesiumanodeshallbecontainedin
each battery jar, with a maximum of eight pipe specimens, and
dance with internationally recognized principles on standard-
ization established in the Decision on Principles for the witheachspecimenmeasuringabout25mm(1in.)indiameter
by approximately 300 mm in length of coated pipe. (See 4.3
Development of International Standards, Guides and Recom-
mendations issued by the World Trade Organization Technical and Fig. 1 and Fig. 2.)
Barriers to Trade (TBT) Committee.
4.2 Suspension—The suspension ring for supporting the
pipe specimens shall be an electrically nonconductive circular
2. Summary of Test Method
disk, measuring approximately 300 mm (12 in.) in diameter
and approximately 5 mm ( ⁄16 in.) in thickness. (See 6.4.) Drill
2.1 Patched pipeline coating specimens are suspended in an
a 15-mm ( ⁄2-in.) diameter hole through the center of the ring
aqueous, alkaline, low-resistivity electrolyte. The specimens
for external extension of the anode lead wire. Drill eight
areindividuallyconnectedtoamagnesiumanodeorrectifierat
apointexternaltotheelectrolyte.Thecoated,patchedpipeline suspension holes, about 45 mm (1 ⁄4 in.) in diameter, through
thesuspensionringforthepipespecimens;theseholesshallbe
specimens are sealed at the base and at all other areas except
centered 110 mm (4 ⁄2 in.) from the center of the suspension
the patch boundaries, such that the only paths for current flow
ring and evenly spaced around the ring at 45° increments as
areattheboundariesofthepatches.Currentflowineachpatch
measured from the center of the suspension ring.
area is averaged from monthly readings taken for one year.
4.3 Potential—A high-purity magnesium anode shall be
used, weighing approximately 2.3 kg (5 lb), and having an
open-circuit potential of approximately 1.7 d-c V relative to a
This test method is under the jurisdiction of ASTM Committee D01 on Paint
and Related Coatings, Materials, andApplications and is the direct responsibility of
copper-copper sulfate electrode, and complete with a factory-
Subcommittee D01.48 on Durability of Pipeline Coating and Linings.
sealed lead wire. The magnesium anode may be replaced by a
Current edition approved Oct. 1, 2019. Published October 2019. Originally
controlledd-cvoltagefromarectifier,andthenmaintainingthe
approved in 1977. Last previous edition approved in 2013 as G55– 07(2013). DOI:
10.1520/G0055-07R19. potential between the specimen having the least current flow
Copyright © ASTM International, 100 Barr Harbor Drive, PO Box C700, West Conshohocken, PA 19428-2959. United States
G55 − 07 (2019)
4.5.4 Microammeters, d-c, 0 to 100-µA and 0 to 500-µA.
4.5.5 Voltmeter, for direct current, having an internal resis-
tance of not less than 10 MΩ and having a range from 0.01 to
5.0 V.
4.5.6 Full-Wave Rectifier, optional, 0 to 0.05% ripple,
capable of maintaining 1.50 6 0.05 d-c V relative to a
copper-coppersulfatecell,andhavingacapacityforatleast10
A of direct current.
5. Test Specimens
5.1 Dimensions—The specimen shall be steel pipe approxi-
mately 25 mm (1 in.) in diameter, approximately 300 mm (12
in.) in length, and previously coated with the desired original
pipeline coating.
5.2 Circuit Tap—A 5-mm ( ⁄16-in.) diameter hole shall be
drilled or tapped (or a self-tapping screw may be used) at a
point 13 mm ( ⁄2 in.) below the top of each specimen. This tap
is for a machine screw anode lead wire connection.
5.3 Pipe Suspension Support Holes—A6-mm( ⁄4-in.)diam-
eter hole shall be drilled completely through both walls of the
coatedpipespecimenatapoint20mm( ⁄4in.)fromthetopend
of the specimen and located vertically beneath the circuit tap
hole.Ashort length of wooden dowel pin about 5 mm ( ⁄16 in.)
indiametershallbeusedasaninsertionthroughthesuspension
holes to support and level the pipe specimen on the circular
suspension ring when the suspension ring is mounted on the
battery jar.
5.4 Intentional Holidays—A 4-fluted 13-mm ( ⁄2-in.) diam-
FIG. 1 Test Assembly for Evaluating Pipeline Coating Patch Ma-
terials eterfacingbitshallbeusedtodrillintentionalholidaysthrough
the original pipeline coating to the metal. Drilling such
holidays shall be practiced on scrap pieces of small-diameter
and a copper-copper sulfate reference cell (with the cell being
coatedpipe,priortodrillingtheholidaysinthetestspecimens.
properly immersed in the electrolyte) at 1.50 6 0.05 d-c V.
Drilling shall not be any deeper than necessary into the metal
(See Note 1.) The anode should be composed of a suitable
2 ofthepipe.Threeholidaysshallbepreparedoneachspecimen
nonconsumable material. This option will avoid the precipi-
in a vertical line directly underneath the circuit tap to corre-
tation of magnesium salts on the specimens.
spond to electrolyte immersions of 38 mm (1 ⁄2 in.), 114 mm
NOTE 1—The potential of the magnesium anode will approximate this 1 1
(4 ⁄2in.),and190mm(7 ⁄2in.),asmeasuredfromthetopofthe
range over the life of the test. If a calomel electrode is used for the
holiday to the surface of the electrolyte. The thickness of the
reference cell, the potential should be−1.43 6 0.05 d-c V.
suspension ring shall be considered for its effect in elevating
4.4 Electrolyte—Use 1% each by weight of anhydrous pure
the pipe specimens in the electrolyte.
grades of sodium chloride, sodium sulfate, and sodium
5.5 Patches—Asquare patch configuration of 25 by 25 mm
carbonate, dissolved in either distilled water or demineralized
(1 by 1 in.), evenly centered about the holiday, shall be lightly
water. This electrolyte shall never be less alkaline than
marked. This will provide a minimum patch overlap of 6 mm
pH=10.0 and should be within a resistivity range from 20 to
( ⁄4 in.) as measured perpendicular to the center of each patch
35Ω · cm.
edge to the circumference of the holiday. The top and bottom
4.5 Instruments:
edges of each patch shall be in the horizontal plane. Each
4.5.1 Resistivity Meter, capable of measuring 20 to 40Ω ·
marked patch area shall be lightly buffed with 120-grit sand-
cm in an aqueous solution.
paper. A primer shall be
...


Questions, Comments and Discussion
Ask us and Technical Secretary will try to provide an answer. You can facilitate discussion about the standard in here.
Loading comments...