ASTM E2580-24
(Practice)Standard Practice for Ultrasonic Testing of Flat Panel Composites and Sandwich Core Materials Used in Aerospace Applications
Standard Practice for Ultrasonic Testing of Flat Panel Composites and Sandwich Core Materials Used in Aerospace Applications
SIGNIFICANCE AND USE
5.1 This practice is intended primarily for the testing of flat panel composites and sandwich core panels to an acceptance criteria most typically specified in a purchase order or other contractual document.
5.2 Basis of Application—There are areas in this practice that require agreement between the cognizant engineering organization and the supplier, or specific direction from the cognizant engineering organization.
SCOPE
1.1 This practice covers two procedures for ultrasonic testing (UT) of flat panel (parallel surfaces) composites and flat sandwich core panels. Typical as-fabricated lay-ups include uniaxial, cross ply, and angle ply laminates, as well as honeycomb sandwich core materials. These procedures can be used throughout the life cycle of the materials: product and process design optimization, on line process control, after manufacture inspection, and in-service inspection. Contact methods, such as angle-beam techniques using shear waves, are not discussed.
1.2 Ultrasonic testing is a common subsurface method for detection of laminar discontinuities. Two techniques can be considered based on panel surface accessibility; pulse echo for one sided and through transmission (bubblers/squirters) for two sided. As used in this practice, both require the use of a pulsed straight-beam ultrasonic longitudinal wave followed by observing indications of either the reflected (pulse-echo) or received (through transmission) wave. The general types of anomalies detected by both techniques include foreign materials, delamination, disbond/un-bond, fiber de-bonding, inclusions, porosity, and voids.
1.3 This practice provides two ultrasonic test procedures. These test procedures can be applied to small area manual scanning and large area automated scanning. Each has its own merits and requirements for inspection and shall be selected as agreed upon in a contractual document.
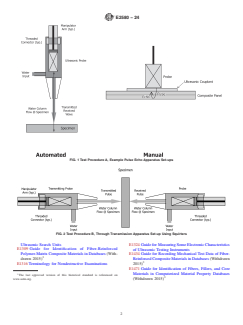
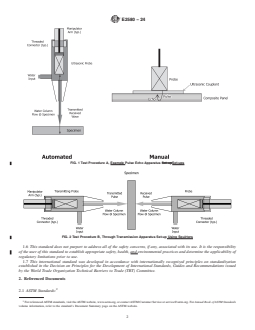
1.3.1 Test Procedure A, Pulse Echo (Non-contacting and Contacting), is at a minimum a single transducer transmitting and receiving a longitudinal wave in the range of 0.5 MHz to 20 MHz (see Fig. 1). This procedure requires access to only one side of the specimen. This procedure can be conducted by automated or manual means. Automated and manual test results may be imaged or recorded.
FIG. 1 Test Procedure A, Example Pulse Echo Apparatus Set-ups
1.3.2 Test Procedure B, Through Transmission, is a combination of two transducers. One transmits a longitudinal wave and the other receives the longitudinal wave in the range of 0.5 MHz to 20 MHz (see Fig. 2 for an example set-up using squirters). This procedure requires access to both sides of the specimen. This procedure is automated and the examination results are recorded.
FIG. 2 Test Procedure B, Through Transmission Apparatus Set-up Using Squirters
1.4 This practice does not specify accept-reject criteria.
1.5 Units—The values stated in SI units are to be regarded as standard. No other units of measurement are included in this standard.
1.6 This standard does not purport to address all of the safety concerns, if any, associated with its use. It is the responsibility of the user of this standard to establish appropriate safety, health, and environmental practices and determine the applicability of regulatory limitations prior to use.
1.7 This international standard was developed in accordance with internationally recognized principles on standardization established in the Decision on Principles for the Development of International Standards, Guides and Recommendations issued by the World Trade Organization Technical Barriers to Trade (TBT) Committee.
General Information
- Status
- Published
- Publication Date
- 31-Jan-2024
- Technical Committee
- E07 - Nondestructive Testing
- Drafting Committee
- E07.06 - Ultrasonic Method
Relations
- Effective Date
- 01-Feb-2024
- Effective Date
- 01-Feb-2024
- Effective Date
- 01-Feb-2024
- Effective Date
- 01-Feb-2024
- Effective Date
- 01-Feb-2024
Overview
ASTM E2580-24 is the internationally recognized standard practice for ultrasonic testing (UT) of flat panel composites and sandwich core materials used in aerospace applications. Developed by ASTM International, this practice is crucial for detecting subsurface defects and ensuring the quality and structural integrity of advanced composite materials in safety-critical industries.
The standard outlines procedures for evaluating composite panels, such as uniaxial, cross ply, and angle ply laminates, as well as honeycomb sandwich structures. The UT techniques addressed herein are applicable throughout the entire material lifecycle, including process optimization, manufacturing inspection, in-service monitoring, and quality assurance. Both manual and automated scanning methods are supported, with selection and detailed requirements typically defined by a contractual agreement.
Key Topics
- Scope of Application: Focused on flat panel (parallel surface) composite laminates and sandwich core panels, primarily for aerospace but relevant to any high-performance industry using similar structures.
- Testing Methods:
- Procedure A: Pulse Echo Ultrasonic Testing
- Uses a single transducer to both emit and receive longitudinal waves.
- Requires access to only one side of the panel.
- Suitable for manual or automated inspection, with results optionally recorded or imaged.
- Procedure B: Through Transmission Ultrasonic Testing
- Utilizes two transducers on opposite sides for signal transmission and reception.
- Requires access to both sides of the specimen.
- Typically performed by automated systems with complete data recording.
- Procedure A: Pulse Echo Ultrasonic Testing
- Detection Capabilities: Identifies common defects such as delaminations, disbonds, fiber de-bonding, inclusions, porosity, foreign materials, and voids.
- Contractual Guidance: The standard does not set specific accept/reject criteria; all acceptance levels, reference standards, and reporting requirements are determined by the customer and supplier contract.
- Equipment Requirements: Specifies uniform, repeatable operation for test instruments, precise manipulation and scanning apparatus, and appropriate selection and calibration of transducers and couplants.
Applications
ASTM E2580-24 is widely used in:
- Aerospace Manufacturing: Ensuring structural quality of aircraft components, such as wings, fuselage panels, and control surfaces made from advanced composites or sandwich constructions.
- Quality Control in Production Lines: Real-time process control and inspection to detect manufacturing defects in composite materials and maintain high production standards.
- Maintenance and In-Service Inspection: Assists in the ongoing non-destructive evaluation (NDE) of aircraft and space vehicles, supporting timely detection of service-induced damage such as delamination or core unbonds.
- Research & Development: Enables optimization of new composite layups and sandwich panel designs by providing reliable, quantifiable data on material integrity throughout development cycles.
Benefits of applying ASTM E2580-24 include:
- Improved detection of embedded flaws and anomalies
- Reduced risk of catastrophic failure in mission-critical components
- Consistent and standardized testing protocols across the aerospace industry
Related Standards
ASTM E2580-24 directly references and aligns with several influential standards in the realm of nondestructive testing and composite materials:
- ASTM E317: Practice for Evaluating Performance Characteristics of Ultrasonic Pulse-Echo Testing Instruments and Systems
- ASTM E543: Specification for Agencies Performing Nondestructive Testing
- ASTM E1065/E1065M: Practice for Evaluating Characteristics of Ultrasonic Search Units
- ASTM D3878: Terminology for Composite Materials
- SAE ARP 5605: Solid Composite Laminate NDI Reference Standards
- SAE ARP 5606: Composite Honeycomb NDI Reference Standards
This standard was developed following internationally accepted standardization principles established by the World Trade Organization Technical Barriers to Trade (TBT) Committee, ensuring broad applicability and global acceptance.
Keywords: Ultrasonic testing, flat panel composites, sandwich core materials, aerospace composites, nondestructive testing, NDE, advanced composites, honeycomb core, ASTM E2580-24, quality control, aerospace inspection
Buy Documents
ASTM E2580-24 - Standard Practice for Ultrasonic Testing of Flat Panel Composites and Sandwich Core Materials Used in Aerospace Applications
REDLINE ASTM E2580-24 - Standard Practice for Ultrasonic Testing of Flat Panel Composites and Sandwich Core Materials Used in Aerospace Applications
Get Certified
Connect with accredited certification bodies for this standard

DEKRA North America
DEKRA certification services in North America.

Eagle Registrations Inc.
American certification body for aerospace and defense.

Element Materials Technology
Materials testing and product certification.
Sponsored listings
Frequently Asked Questions
ASTM E2580-24 is a standard published by ASTM International. Its full title is "Standard Practice for Ultrasonic Testing of Flat Panel Composites and Sandwich Core Materials Used in Aerospace Applications". This standard covers: SIGNIFICANCE AND USE 5.1 This practice is intended primarily for the testing of flat panel composites and sandwich core panels to an acceptance criteria most typically specified in a purchase order or other contractual document. 5.2 Basis of Application—There are areas in this practice that require agreement between the cognizant engineering organization and the supplier, or specific direction from the cognizant engineering organization. SCOPE 1.1 This practice covers two procedures for ultrasonic testing (UT) of flat panel (parallel surfaces) composites and flat sandwich core panels. Typical as-fabricated lay-ups include uniaxial, cross ply, and angle ply laminates, as well as honeycomb sandwich core materials. These procedures can be used throughout the life cycle of the materials: product and process design optimization, on line process control, after manufacture inspection, and in-service inspection. Contact methods, such as angle-beam techniques using shear waves, are not discussed. 1.2 Ultrasonic testing is a common subsurface method for detection of laminar discontinuities. Two techniques can be considered based on panel surface accessibility; pulse echo for one sided and through transmission (bubblers/squirters) for two sided. As used in this practice, both require the use of a pulsed straight-beam ultrasonic longitudinal wave followed by observing indications of either the reflected (pulse-echo) or received (through transmission) wave. The general types of anomalies detected by both techniques include foreign materials, delamination, disbond/un-bond, fiber de-bonding, inclusions, porosity, and voids. 1.3 This practice provides two ultrasonic test procedures. These test procedures can be applied to small area manual scanning and large area automated scanning. Each has its own merits and requirements for inspection and shall be selected as agreed upon in a contractual document. 1.3.1 Test Procedure A, Pulse Echo (Non-contacting and Contacting), is at a minimum a single transducer transmitting and receiving a longitudinal wave in the range of 0.5 MHz to 20 MHz (see Fig. 1). This procedure requires access to only one side of the specimen. This procedure can be conducted by automated or manual means. Automated and manual test results may be imaged or recorded. FIG. 1 Test Procedure A, Example Pulse Echo Apparatus Set-ups 1.3.2 Test Procedure B, Through Transmission, is a combination of two transducers. One transmits a longitudinal wave and the other receives the longitudinal wave in the range of 0.5 MHz to 20 MHz (see Fig. 2 for an example set-up using squirters). This procedure requires access to both sides of the specimen. This procedure is automated and the examination results are recorded. FIG. 2 Test Procedure B, Through Transmission Apparatus Set-up Using Squirters 1.4 This practice does not specify accept-reject criteria. 1.5 Units—The values stated in SI units are to be regarded as standard. No other units of measurement are included in this standard. 1.6 This standard does not purport to address all of the safety concerns, if any, associated with its use. It is the responsibility of the user of this standard to establish appropriate safety, health, and environmental practices and determine the applicability of regulatory limitations prior to use. 1.7 This international standard was developed in accordance with internationally recognized principles on standardization established in the Decision on Principles for the Development of International Standards, Guides and Recommendations issued by the World Trade Organization Technical Barriers to Trade (TBT) Committee.
SIGNIFICANCE AND USE 5.1 This practice is intended primarily for the testing of flat panel composites and sandwich core panels to an acceptance criteria most typically specified in a purchase order or other contractual document. 5.2 Basis of Application—There are areas in this practice that require agreement between the cognizant engineering organization and the supplier, or specific direction from the cognizant engineering organization. SCOPE 1.1 This practice covers two procedures for ultrasonic testing (UT) of flat panel (parallel surfaces) composites and flat sandwich core panels. Typical as-fabricated lay-ups include uniaxial, cross ply, and angle ply laminates, as well as honeycomb sandwich core materials. These procedures can be used throughout the life cycle of the materials: product and process design optimization, on line process control, after manufacture inspection, and in-service inspection. Contact methods, such as angle-beam techniques using shear waves, are not discussed. 1.2 Ultrasonic testing is a common subsurface method for detection of laminar discontinuities. Two techniques can be considered based on panel surface accessibility; pulse echo for one sided and through transmission (bubblers/squirters) for two sided. As used in this practice, both require the use of a pulsed straight-beam ultrasonic longitudinal wave followed by observing indications of either the reflected (pulse-echo) or received (through transmission) wave. The general types of anomalies detected by both techniques include foreign materials, delamination, disbond/un-bond, fiber de-bonding, inclusions, porosity, and voids. 1.3 This practice provides two ultrasonic test procedures. These test procedures can be applied to small area manual scanning and large area automated scanning. Each has its own merits and requirements for inspection and shall be selected as agreed upon in a contractual document. 1.3.1 Test Procedure A, Pulse Echo (Non-contacting and Contacting), is at a minimum a single transducer transmitting and receiving a longitudinal wave in the range of 0.5 MHz to 20 MHz (see Fig. 1). This procedure requires access to only one side of the specimen. This procedure can be conducted by automated or manual means. Automated and manual test results may be imaged or recorded. FIG. 1 Test Procedure A, Example Pulse Echo Apparatus Set-ups 1.3.2 Test Procedure B, Through Transmission, is a combination of two transducers. One transmits a longitudinal wave and the other receives the longitudinal wave in the range of 0.5 MHz to 20 MHz (see Fig. 2 for an example set-up using squirters). This procedure requires access to both sides of the specimen. This procedure is automated and the examination results are recorded. FIG. 2 Test Procedure B, Through Transmission Apparatus Set-up Using Squirters 1.4 This practice does not specify accept-reject criteria. 1.5 Units—The values stated in SI units are to be regarded as standard. No other units of measurement are included in this standard. 1.6 This standard does not purport to address all of the safety concerns, if any, associated with its use. It is the responsibility of the user of this standard to establish appropriate safety, health, and environmental practices and determine the applicability of regulatory limitations prior to use. 1.7 This international standard was developed in accordance with internationally recognized principles on standardization established in the Decision on Principles for the Development of International Standards, Guides and Recommendations issued by the World Trade Organization Technical Barriers to Trade (TBT) Committee.
ASTM E2580-24 is classified under the following ICS (International Classification for Standards) categories: 49.035 - Components for aerospace construction. The ICS classification helps identify the subject area and facilitates finding related standards.
ASTM E2580-24 has the following relationships with other standards: It is inter standard links to ASTM E2580-17, ASTM E3370-23, ASTM E2533-21, ASTM E2981-21, ASTM E543-21. Understanding these relationships helps ensure you are using the most current and applicable version of the standard.
ASTM E2580-24 is available in PDF format for immediate download after purchase. The document can be added to your cart and obtained through the secure checkout process. Digital delivery ensures instant access to the complete standard document.
Standards Content (Sample)
This international standard was developed in accordance with internationally recognized principles on standardization established in the Decision on Principles for the
Development of International Standards, Guides and Recommendations issued by the World Trade Organization Technical Barriers to Trade (TBT) Committee.
Designation: E2580 − 24
Standard Practice for
Ultrasonic Testing of Flat Panel Composites and Sandwich
Core Materials Used in Aerospace Applications
This standard is issued under the fixed designation E2580; the number immediately following the designation indicates the year of
original adoption or, in the case of revision, the year of last revision. A number in parentheses indicates the year of last reapproval. A
superscript epsilon (´) indicates an editorial change since the last revision or reapproval.
This standard has been approved for use by agencies of the U.S. Department of Defense.
1. Scope* 1.3.2 Test Procedure B, Through Transmission, is a combi-
nation of two transducers. One transmits a longitudinal wave
1.1 This practice covers two procedures for ultrasonic
and the other receives the longitudinal wave in the range of
testing (UT) of flat panel (parallel surfaces) composites and flat
0.5 MHz to 20 MHz (see Fig. 2 for an example set-up using
sandwich core panels. Typical as-fabricated lay-ups include
squirters). This procedure requires access to both sides of the
uniaxial, cross ply, and angle ply laminates, as well as
specimen. This procedure is automated and the examination
honeycomb sandwich core materials. These procedures can be
results are recorded.
used throughout the life cycle of the materials: product and
process design optimization, on line process control, after 1.4 This practice does not specify accept-reject criteria.
manufacture inspection, and in-service inspection. Contact
1.5 Units—The values stated in SI units are to be regarded
methods, such as angle-beam techniques using shear waves,
as standard. No other units of measurement are included in this
are not discussed.
standard.
1.2 Ultrasonic testing is a common subsurface method for
1.6 This standard does not purport to address all of the
detection of laminar discontinuities. Two techniques can be
safety concerns, if any, associated with its use. It is the
considered based on panel surface accessibility; pulse echo for
responsibility of the user of this standard to establish appro-
one sided and through transmission (bubblers/squirters) for two
priate safety, health, and environmental practices and deter-
sided. As used in this practice, both require the use of a pulsed
mine the applicability of regulatory limitations prior to use.
straight-beam ultrasonic longitudinal wave followed by ob-
1.7 This international standard was developed in accor-
serving indications of either the reflected (pulse-echo) or
dance with internationally recognized principles on standard-
received (through transmission) wave. The general types of
ization established in the Decision on Principles for the
anomalies detected by both techniques include foreign
Development of International Standards, Guides and Recom-
materials, delamination, disbond/un-bond, fiber de-bonding,
mendations issued by the World Trade Organization Technical
inclusions, porosity, and voids.
Barriers to Trade (TBT) Committee.
1.3 This practice provides two ultrasonic test procedures.
2. Referenced Documents
These test procedures can be applied to small area manual
scanning and large area automated scanning. Each has its own
2.1 ASTM Standards:
merits and requirements for inspection and shall be selected as
D3878 Terminology for Composite Materials
agreed upon in a contractual document.
D5687/D5687M Guide for Preparation of Flat Composite
1.3.1 Test Procedure A, Pulse Echo (Non-contacting and
Panels with Processing Guidelines for Specimen Prepara-
Contacting), is at a minimum a single transducer transmitting
tion
and receiving a longitudinal wave in the range of 0.5 MHz to
E317 Practice for Evaluating Performance Characteristics of
20 MHz (see Fig. 1). This procedure requires access to only
Ultrasonic Pulse-Echo Testing Instruments and Systems
one side of the specimen. This procedure can be conducted by
without the Use of Electronic Measurement Instruments
automated or manual means. Automated and manual test
E543 Specification for Agencies Performing Nondestructive
results may be imaged or recorded.
Testing
E1065/E1065M Practice for Evaluating Characteristics of
This practice is under the jurisdiction of ASTM Committee E07 on Nonde-
structive Testing and is the direct responsibility of Subcommittee E07.06 on
Ultrasonic Method. For referenced ASTM standards, visit the ASTM website, www.astm.org, or
Current edition approved Feb. 1, 2024. Published March 2024. Originally contact ASTM Customer Service at service@astm.org. For Annual Book of ASTM
approved in 2007. Last previous edition approved in 2017 as E2580 – 17. DOI: Standards volume information, refer to the standard’s Document Summary page on
10.1520/E2580-24. the ASTM website.
*A Summary of Changes section appears at the end of this standard
Copyright © ASTM International, 100 Barr Harbor Drive, PO Box C700, West Conshohocken, PA 19428-2959. United States
E2580 − 24
FIG. 1 Test Procedure A, Example Pulse Echo Apparatus Set-ups
FIG. 2 Test Procedure B, Through Transmission Apparatus Set-up Using Squirters
Ultrasonic Search Units E1324 Guide for Measuring Some Electronic Characteristics
E1309 Guide for Identification of Fiber-Reinforced of Ultrasonic Testing Instruments
Polymer-Matrix Composite Materials in Databases (With-
E1434 Guide for Recording Mechanical Test Data of Fiber-
drawn 2015) Reinforced Composite Materials in Databases (Withdrawn
E1316 Terminology for Nondestructive Examinations
2015)
E1471 Guide for Identification of Fibers, Fillers, and Core
3 Materials in Computerized Material Property Databases
The last approved version of this historical standard is referenced on
www.astm.org. (Withdrawn 2015)
E2580 − 24
2.2 SAE Standards: 6.7 Reporting Criteria/Acceptance Criteria—Reporting cri-
ARP 5605 Solid Composite Laminate NDI Reference Stan- teria for the examination results shall be in accordance with
dards 14.1 unless otherwise specified. Since acceptance criteria (for
ARP 5606 Composite Honeycomb NDI Reference Stan- example, for reference radiographs) are not specified in this
dards standard, they shall be specified in the contractual agreement.
6.8 Reexamination of Repaired/Reworked Items—
3. Terminology
Reexamination of repaired/reworked items is not addressed in
3.1 Definitions—Terminology in accordance with Termi-
this standard and if required shall be specified in the contrac-
nologies E1316 and D3878 shall be used where applicable.
tual agreement.
4. Summary of Practice
7. Equipment and Materials
4.1 This practice describes two procedures for detecting
7.1 Equipment
anomalies in flat panel composite and flat sandwich core panels
7.1.1 Operation—Test equipment shall be capable of pro-
using ultrasonic longitudinal waves coupled by either contact
viding uniform, repeatable, and controlled operation.
(Procedure A) or bubbler/squirter (Procedure B). Equipment,
7.1.2 Electronic Equipment—The electronic equipment
reference blocks, examination and evaluation procedures, and
should be capable of producing and processing electronic
documentation are described in detail.
signals at frequencies in the range of search unit frequencies
being used.
5. Significance and Use
7.1.3 Search Unit(s)—The search unit(s) selected should be
5.1 This practice is intended primarily for the testing of flat compatible with the electronic equipment being used and with
panel composites and sandwich core panels to an acceptance
the material to be inspected. The search unit should match the
criteria most typically specified in a purchase order or other intended squirter(s) or contact. Only longitudinal, straight-
contractual document.
beam search units, with flat or focused acoustic lenses, should
be used.
5.2 Basis of Application—There are areas in this practice
7.1.4 Alarm—The alarm or threshold level should be adjust-
that require agreement between the cognizant engineering
able to allow triggering at any commonly required level of
organization and the supplier, or specific direction from the
indication amplitude. Alarms are not required on systems that
cognizant engineering organization.
record amplitude recordings.
7.1.5 Alarm Gate Synchronization—In the pulse echo mode,
6. Basis of Application
ensure that the alarm gate tracks the inspection area. The gate
6.1 The following items are subject to contractual agree-
should lock on the first interface pulse from the test piece rather
ment between the parties using or referencing this standard.
than on the initial pulse from the system. In the through
6.2 Personnel Qualification—If specified in the contractual
transmission mode, the alarm gate should be wide enough to
agreement, personnel performing examinations to this standard
cover any negative or positive movement (left to right) in the
shall be qualified in accordance with a nationally or interna-
horizontal plane.
tionally recognized NDT personnel qualification practice or
7.1.6 Manipulating Equipment should be provided to ad-
standard and certified by the employer or certifying agency, as
equately support the search tube(s) and allow angular adjust-
applicable. The practice or standard used, and its applicable
ment in two mutually perpendicular planes. The search unit
revision, shall be identified in the contractual agreement
manipulator shall be capable of providing the adjustments
between the using parties.
necessary to properly position the search unit during testing.
The scanning and indexing apparatus should have sufficient
6.3 Qualification of Nondestructive Agencies—If specified
structural rigidity to provide support for the manipulator and
in the contractual agreement, NDT agencies shall be qualified
should allow smooth, accurate positioning of the search unit.
and evaluated as described in Specification E543. The appli-
The scanning apparatus should be sufficiently rigid to keep
cable edition of Specification E543 shall be specified in the
search unit backlash to within tolerances as specified in the
contractual agreement.
contractual agreement.
6.4 Surface Preparation—The pre-examination surface
7.1.7 Tank or Gantry System—The tank or gantry system
preparation criteria shall be in accordance with 8.4, unless
should permit accurate positioning of the search unit, reference
otherwise specified.
standards, and part or material to be examined.
6.5 Timing of Examination—The timing of examination
7.1.8 Squirter—The squirter equipment shall be capable of
shall be in accordance with 8.2 and 8.3, unless otherwise
supplying a laminar flow of coupling fluid from the transducer
specified.
to the part being tested at all angles used.
7.1.9 Scan-Record—The recording shall not exhibit back-
6.6 Extent of Examination—The extent of examination shall
lash or hysteresis that would hinder detection or evaluation of
be in accordance with 8.5 unless otherwise specified.
discontinuities.
7.1.10 Composite Reference Blocks—For the applicable
testing system, the responses from reference block(s) and part
Available from Society of Automotive Engineers (SAE), 400 Commonwealth
Dr., Warrendale, PA 15096-0001, http://www.sae.org. shall be similar to the extent that standardization of the testing
E2580 − 24
system can be accomplished and demonstrated to provide a criteria. The diameter of the search unit shall be appropriate to
known and acceptable detection level in the part. Reference the detection requirements of the inspection.
blocks contain either structural anomalies or foreign inclu-
8.2 In-service testing may be conducted using manual
sions. Structural anomalies are those that are known to be
contact techniques, these tests are for the determination of
possible during the life cycle of the material. Debonding during
suspected areas of damage. Testing shall be conducted using a
manufacturing or delamination during in-service may be rep-
reference standard. This reference standard shall be of the same
resented by the block. Foreign inclusions most commonly
configuration as the test specimen, acoustically similar, and
encountered during manufacturing are used in the reference
contain simulated or actual discontinuities or as agreed upon
blocks.
contractually.
7.1.11 Transfer Cutouts—When non-contact through-
8.3 In-process testing of flat panel composites shall be for
transmission is used transfer cutouts may be used in lieu of
the detection of foreign materials, delaminations, voids, and
reference blocks when agreed upon contractually. The size of
porosity. In-process testing of honeycomb structures shall be
the transfer cutouts shall be agreed contractually. The transfer
for the detection of non-bonds between the face sheets and
cutouts must provide sufficient attenuation to simulate voids or
core. In-service testing of flat panel composites shall be for the
unbonds in the part. Transfer cutouts shall be attached to the
detection of damage such as delaminations. In-service testing
part and be placed to cover changes in part configuration and
of honeycomb structure shall be for unbond between the face
alignment.
sheet and core.
7.2 Materials:
8.4 Material Condition—Perform ultrasonic testing of parts
7.2.1 Flat Panel Specimens—Processing guidelines that fa-
or materials that possess a clean and smooth surface.
cilitate fabrication of flat panel composite specimens made
from unidirectional tape or using orthogonal weave patterns are 8.5 Coverage—In all examinations, perform scanning to
found in Guide D5687/D5687M. For specimen preparation
locate discontinuities that are oriented parallel with the entry
using other processing techniques, for example, pultrusion, surface. The scanning speed and index increment and step size
filament winding, and resin transfer molding, processing guide-
shall be such that the target simulated anomaly registers three
lines are not available and shall be agreed upon by the using times at a contractually agreed upon threshold.
parties.
8.6 Ultrasonic Frequency—For a particular test select the
7.2.2 Sandwich Core Specimens—Processing guidelines for
frequency based on the material being inspected and of the
fabrication of sandwich construction specimens are diverse and
anticipated type of discontinuities.
shall be agreed upon by the using parties.
8.7 Evaluation—Evaluate each discontinuity to determine
7.2.3 Transfer Cutouts—Transfer cutouts shall be made of
its type, size, location, and conformance to the applicable
two layers of lead foil tape cut to size.
accept/reject criteria. Specific discontinuity evaluation proce-
7.2.4 Couplants—Air, immersion, or contact couplants shall
dures shall be agreed upon contractually.
provide intimate coupling between search unit and part, be
compatible with the part, and be easily removed from the part
8.8 Technique Record—For each part inspected, a technique
using an applicable cleaning process.
record shall be completed for each discontinuity detection scan
and indication evaluation set-up used and approved by the
8. General Requirements
Level III. The technique record shall identify the part, the
8.1 In-process testing of flat panel composite or honeycomb area/zone/bond-line of the part being inspected, the inspector,
structure shall be conducted using automated equipment ca- the inspection procedure, and the equipment used. The record
pable of electronically recording the test output. Evaluation of shall include cross-sectional sketches as necessary to show part
indications may be conducted using manual contact. There coverage. The technique record shall note instrument control
shall be a direct correlation of the electronic recording and the
settings such that the test can be repeated.
tested specimen. Transducer frequency shall be determined by
the material’s apparent attenuation and the required acceptance
TEST PROCEDURES
9. Procedure A
9.1 Test Procedure A (Pulse-Echo): 9.1.2 Select the reference block based on the objective of
9.1.1 Select the ultrasonic transducer based on the specific the test. Step wedge blocks may be useful for ply count and
requirements of the material, discontinuity size, resolution, and de-bond or delamination. Flat bottom holes may
...
This document is not an ASTM standard and is intended only to provide the user of an ASTM standard an indication of what changes have been made to the previous version. Because
it may not be technically possible to adequately depict all changes accurately, ASTM recommends that users consult prior editions as appropriate. In all cases only the current version
of the standard as published by ASTM is to be considered the official document.
Designation: E2580 − 17 E2580 − 24
Standard Practice for
Ultrasonic Testing of Flat Panel Composites and Sandwich
Core Materials Used in Aerospace Applications
This standard is issued under the fixed designation E2580; the number immediately following the designation indicates the year of
original adoption or, in the case of revision, the year of last revision. A number in parentheses indicates the year of last reapproval. A
superscript epsilon (´) indicates an editorial change since the last revision or reapproval.
This standard has been approved for use by agencies of the U.S. Department of Defense.
1. Scope*
1.1 This practice establishescovers two procedures for ultrasonic testing (UT) of flat panel (parallel surfaces) composites and flat
sandwich core panels (parallel surfaces). panels. Typical as-fabricated lay-ups include uniaxial, cross ply, and angle ply
laminates;laminates, as well as honeycomb sandwich core materials. These procedures can be used throughout the life cycle of the
materials;materials: product and process design optimization, on line process control, after manufacture inspection, and in service
in-service inspection. Contact methods, such as angle-beam techniques using shear waves, or surface-beam techniques using Lamb
waves, are not discussed.
1.2 Ultrasonic testing is a common subsurface method for detection of laminar oriented discontinuities. Two techniques can be
considered based on panel surface accessibility; pulse echo for one sided and through transmission (bubblers/squirters) for two
sided. As used in this practice, both require the use of a pulsed straight-beam ultrasonic longitudinal wave followed by observing
indications of either the reflected (pulse-echo) or received (through transmission) wave. The general types of anomalies detected
by both techniques include foreign materials, delamination, disbond/un-bond, fiber de-bonding, inclusions, porosity, and voids.
1.3 This practice provides two ultrasonic test procedures. These test procedures can be applied to small area manual scanning and
large area automated scanning. Each has its own merits and requirements for inspection and shall be selected as agreed upon in
a contractual document.
1.3.1 Test Procedure A, Pulse Echo (non-contacting and contacting),(Non-contacting and Contacting), is at a minimum a single
transducer transmitting and receiving a longitudinal wave in the range of 0.5 to 20 MHz 0.5 MHz to 20 MHz (see Fig. 1). This
procedure requires access to only one side of the specimen. This procedure can be conducted by automated or manual means.
Automated and manual test results may be imaged or recorded.
1.3.2 Test Procedure B, Through Transmission, is a combination of two transducers. One transmits a longitudinal wave and the
other receives the longitudinal wave in the range of 0.5 MHz 0.5 MHz to 20 MHz (see Fig. 2). for an example set-up using
squirters). This procedure requires access to both sides of the specimen. This procedure is automated and the examination results
are recorded.
1.4 This practice does not specify accept-reject criteria.
1.5 Units—The values stated in SI units are to be regarded as standard. No other units of measurement are included in this
standard.
This practice is under the jurisdiction of ASTM Committee E07 on Nondestructive Testing and is the direct responsibility of Subcommittee E07.06 on Ultrasonic Method.
Current edition approved Nov. 1, 2017Feb. 1, 2024. Published December 2017March 2024. Originally approved in 2007. Last previous edition approved in 20122017 as
E2580 - 12.E2580 – 17. DOI: 10.1520/E2580-17.10.1520/E2580-24.
*A Summary of Changes section appears at the end of this standard
Copyright © ASTM International, 100 Barr Harbor Drive, PO Box C700, West Conshohocken, PA 19428-2959. United States
E2580 − 24
FIG. 1 Test Procedure A, Example Pulse Echo Apparatus Set-upSet-ups
FIG. 2 Test Procedure B, Through Transmission Apparatus Set-up Using Squirters
1.6 This standard does not purport to address all of the safety concerns, if any, associated with its use. It is the responsibility
of the user of this standard to establish appropriate safety, health, and environmental practices and determine the applicability of
regulatory limitations prior to use.
1.7 This international standard was developed in accordance with internationally recognized principles on standardization
established in the Decision on Principles for the Development of International Standards, Guides and Recommendations issued
by the World Trade Organization Technical Barriers to Trade (TBT) Committee.
2. Referenced Documents
2.1 ASTM Standards:
For referenced ASTM standards, visit the ASTM website, www.astm.org, or contact ASTM Customer Service at service@astm.org. For Annual Book of ASTM Standards
volume information, refer to the standard’s Document Summary page on the ASTM website.
E2580 − 24
C274 Terminology of Structural Sandwich Constructions (Withdrawn 2016)
D3878 Terminology for Composite Materials
D5687/D5687M Guide for Preparation of Flat Composite Panels with Processing Guidelines for Specimen Preparation
E317 Practice for Evaluating Performance Characteristics of Ultrasonic Pulse-Echo Testing Instruments and Systems without the
Use of Electronic Measurement Instruments
E543 Specification for Agencies Performing Nondestructive Testing
E1065/E1065M Practice for Evaluating Characteristics of Ultrasonic Search Units
E1309 Guide for Identification of Fiber-Reinforced Polymer-Matrix Composite Materials in Databases (Withdrawn 2015)
E1316 Terminology for Nondestructive Examinations
E1324 Guide for Measuring Some Electronic Characteristics of Ultrasonic Testing Instruments
E1434 Guide for Recording Mechanical Test Data of Fiber-Reinforced Composite Materials in Databases (Withdrawn 2015)
E1471 Guide for Identification of Fibers, Fillers, and Core Materials in Computerized Material Property Databases (Withdrawn
2015)
2.2 SAE Standards:
ARP 5605 Solid Composite Laminate NDI Reference Standards, Issued 2001-09Standards
ARP 5606 Composite Honeycomb NDI Reference Standards, Issued 2001-09Standards
2.3 AIA Standard:
NAS-410 NAS Certification & Qualification of Nondestructive Test Personnel
2.4 ASNT Standards:
SNT-TC-1A Recommended Practice for Personnel Qualification and Certification in Nondestructive Testing
ANSI/ASNT CP-189 Standard for Qualification and Certification or Nondestructive Testing Personnel
2.5 ISO Standard:
ISO 9712 NDT–Qualification and Certification of NDT Personnel in the Applicable Product Sector “Aerospace”
3. Terminology
3.1 Definitions—Terminology in accordance with Terminologies C274, E1316, and D3878 shall be used where applicable.
3.2 Definitions of Terms Specific to This Standard:
3.2.1 flat panel composite, n—any fiber reinforced composite lay-up consisting of laminate (plies) with one or more orientations
with respect to some reference direction that are consolidated by press or autoclave to yield a two-dimensionally flat article of finite
thickness.
3.2.2 sandwich core material, n—a structural panel made up of two relatively thin outer skins of composite laminate or other
material, such as metal or wood, separated by and bonded to a relatively thick lightweight inner core such as honeycomb, open
and close cell foam, wave formed material, bonded composite tubes, or naturally occurring material such as balsa wood.
4. Summary of Practice
4.1 This practice describes two procedures for detecting anomalies in flat panel composite and flat sandwich core panels using
ultrasonic longitudinal waves coupled by either contact (Procedure A) or bubbler/squirter (Procedure B). Equipment, reference
blocks, examination and evaluation procedures, and documentation are described in detail.
5. Significance and Use
5.1 This practice is intended primarily for the testing of flat panel composites and sandwich core panels to an acceptance criteria
most typically specified in a purchase order or other contractual document.
5.2 Basis of Application—There are areas in this practice that require agreement between the cognizant engineering organization
and the supplier, or specific direction from the cognizant engineering organization.
6. Basis of Application
6.1 The following items are subject to contractual agreement between the parties using or referencing this standard.
The last approved version of this historical standard is referenced on www.astm.org.
Available from Society of Automotive Engineers (SAE), 400 Commonwealth Dr., Warrendale, PA 15096-0001, http://www.sae.org.
E2580 − 24
6.2 Personnel Qualification—If specified in the Contractualcontractual agreement, personnel performing examinations to this
standard shall be qualified in accordance with a nationally or internationally recognized NDT personnel qualification practice or
standard such as ANSI/ASNT-CP-189, SNT-TC-1A, NAS-410, or similar document and certified by the employer or certifying
agency, as applicable. The practice or standard used, and its applicable revision, shall be identified in the contractual agreement
between the using parties.
6.3 Qualification of Nondestructive Agencies—If specified in the contractual agreement, NDT agencies shall be qualified and
evaluated as described in Specification E543. The applicable edition of Specification E543 shall be specified in the contractual
agreement.
6.4 Surface Preparation—The pre-examination surface preparation criteria shall be in accordance with 8.48.4,, unless otherwise
specified.
6.5 Timing of Examination—The timing of examination shall be in accordance with 8.28.2 and 8.38.3,, unless otherwise specified.
6.6 Extent of Examination—The extent of examination shall be in accordance with 8.58.5 unless otherwise specified.
6.7 Reporting Criteria/Acceptance Criteria—Reporting criteria for the examination results shall be in accordance with 14.114.1
unless otherwise specified. Since acceptance criteria (for example, for reference radiographs) are not specified in this standard, they
shall be specified in the contractual agreement.
6.8 Reexamination of Repaired/Reworked Items—Reexamination of repaired/reworked items is not addressed in this standard and
if required shall be specified in the contractual agreement.
7. Equipment and Materials
7.1 Equipment
7.1.1 Operation—Test equipment shall be capable of providing uniform, repeatable, and controlled operation.
7.1.2 Electronic Equipment—The electronic equipment should be capable of producing and processing electronic signals at
frequencies in the range of search unit frequencies being used.
7.1.3 Search Unit(s)—The search unit(s) selected should be compatible with the electronic equipment being used and with the
material to be inspected. The search unit should match the intended squirter(s) or contact. Only longitudinal, straight-beam
(longitudinal) search units, with flat or focused acoustic lenses, should be used.
7.1.4 Alarm—The alarm or threshold level should be adjustable to allow triggering at any commonly required level of indication
amplitude. Alarms are not required on systems that record amplitude recordings.
7.1.5 Alarm Gate Synchronization—In the pulse echo mode, ensure that the alarm gate tracks the inspection area. The gate should
lock on the first interface pulse from the test piece rather than on the initial pulse from the system. In the through transmission
mode, the alarm gate should be wide enough to cover any negative or positive movement (left to right) in the horizontal plane.
7.1.6 Manipulating Equipment should be provided to adequately support the search tube(s) and allow angular adjustment in two
mutually perpendicular planes. The search unit manipulator shall be capable of providing the adjustments necessary to properly
position the search unit during testing. The scanning and indexing apparatus should have sufficient structural rigidity to provide
support for the manipulator and should allow smooth, accurate positioning of the search unit. The scanning apparatus should be
sufficiently rigid to keep search unit backlash to within tolerances as specified in the contractual agreement.
7.1.7 Tank or Gantry System—The tank or gantry system should permit accurate positioning of the search unit, reference
standards, and part or material to be examined.
7.1.8 Squirter—The squirter equipment shall be capable of supplying a laminar flow of coupling fluid from the transducer to the
part being tested at all angles used.
E2580 − 24
7.1.9 Scan-Record—The recording shall not exhibit backlash or hysteresis that would hinder detection or evaluation of
discontinuities.
7.1.10 Composite Reference Blocks—For the applicable testing system, the responses from reference blockblock(s) and part shall
be similar to the extent that standardization of the testing system can be accomplished and demonstrated to provide a known and
acceptable detection level in the part. Reference blocks contain either structural anomalies or foreign inclusions. Structural
anomalies are those that are known to be possible during the life cycle of the material. Debonding during manufacturing or
delamination during in-service may be represented by the block. Foreign inclusions most commonly encountered during
manufacturing are used in the reference blocks.
7.1.11 Transfer Cutouts—When non-contact through-transmission is used transfer cutouts may be used in lieu of reference blocks
when agreed upon contractually. The size of the transfer cutouts shall be agreed contractually. The transfer cutouts must provide
sufficient attenuation to simulate voids or unbonds in the part. Transfer cutouts shall be attached to the part and be placed to cover
changes in part configuration and alignment.
7.2 Materials:
7.2.1 Flat Panel Specimens—Processing guidelines that facilitate fabrication of flat panel composite specimens made from
unidirectional tape or using orthogonal weave patterns are found in Guide D5687/D5687M. For specimen preparation using other
processing techniques, for example, pultrusion, filament winding, and resin transfer molding, processing guidelines are not
available and shall be agreed upon by the using parties.
7.2.2 Sandwich Core Specimens—Processing guidelines for fabrication of sandwich construction specimens are diverse and shall
be agreed upon by the using parties.
7.2.3 Transfer Cutouts—Transfer cutouts shall be made of two layers of lead foil tape cut to size.
7.2.4 Couplants—Immersion and Air, immersion, or contact couplants shall provide intimate coupling between search unit and
part; shall part, be compatible with the part;part, and shall be easily removed from the part using an applicable cleaning process.
8. General Requirements
8.1 In-process testing of flat panel composite or honeycomb structure shall be conducted using automated equipment capable of
electronically recording the test output or manual contact during indication evaluation. output. Evaluation of indications may be
conducted using manual contact. There shall be a direct correlation of the electronic recording and the tested specimen. Transducer
frequency shall be determined by the material’s apparent attenuation and the required acceptance criteria. Scan increment shall be
set to provide three ultrasonic signal violations from the standard at the specified threshold level.The diameter of the search unit
shall be appropriate to the detection requirements of the inspection.
8.2 In-service testing shallmay be conducted using manual contact techniques, these tests are for the determination of suspected
areas of damage. Testing shall be conducted using a reference standard. This reference standard shall be of the same configuration
as the test specimen or as agreed upon contractually. This reference standard shall be acoustically similarspecimen, acoustically
similar, and contain simulated or actual discontinuities.discontinuities or as agreed upon contractually.
8.3 In-process testing of flat panel composites shall be for the detection of foreign materials, delaminations, voids, and porosity.
In-process testing of honeycomb structures shall be for the detection of non-bonds between the face sheets and core. In-service
testing of flat panel composites shall be for the detection of damage such as delaminations. In-service testing of honeycomb
structure shall be for unbond between the face sheet and core.
8.4 Material Condition—Perform ultrasonic testing of parts or materials that possess a clean and smooth surface.
8.5 Coverage—In all examinations, perform scanning to locate discontinuities that are oriented parallel with the entry surface. The
scanning speed and index increment and step size shall be such that the target simulated anomaly registers three times at a
contractually agreed upon threshold.
E2580 − 24
8.6 Ultrasonic Frequency—For a particular test select the frequency based on the material being inspected and of the anticipated
type of discontinuities.
8.7 Evaluation—Evaluate each discontinuity to determine its type, size, location, and conformance to the applicable accept/reject
criteria. Specific discontinuity evaluation procedures shall be agreed upon contractually.
8.8 Technique Record—For each part inspected, a technique record shall be completed for each discontinuity detection scan and
indication evaluation set-up used. used and approved by the Level III. The technique record shall identify the part, the area or zone,
or bond-line area/zone/bond-line of the part being inspected, the inspector, the inspection procedure, and the equipment used. The
record shall include cross-sectional sketches as necessary to show part coverage. The technique record shall note instrument control
settings such that the test can be repeated.
TEST PROCEDURES
9. Procedure A
9.1 Test procedure A (Pulse-Echo) is a single transducer transmitting and receiving a longitudinal wave in the range of 0.5 MHz
to 20 MHz (see Fig. 1). This procedure can be automated or manual. The test results may be recorde
...
Questions, Comments and Discussion
Ask us and Technical Secretary will try to provide an answer. You can facilitate discussion about the standard in here.
Loading comments...