ASTM B523/B523M-18(2023)
(Specification)Standard Specification for Seamless and Welded Zirconium and Zirconium Alloy Tubes
Standard Specification for Seamless and Welded Zirconium and Zirconium Alloy Tubes
ABSTRACT
This specification covers the three grades of zirconium and zirconium alloy seamless and welded tubes. The tubes are furnished in three grades as Grade R60702 which is an unalloyed zirconium, Grade R60704 which is zirconium-tin alloy, and Grade R60705 which is zirconium-niobium alloy. Seamless tube shall be made by any seamless method. Welded tube shall be made from sheet or strip by an automatic arc-welding process or other method of welding. Filler metal shall not be used. The material shall conform to the required chemical compostion for zirconium, hafnium, iron, chromium, tin, hydrogen, nitrogen, carbon, niobium, and oxygen. The materials shall conform to the required tensile properties such as tensile strength, yield strength, and elongation.
SCOPE
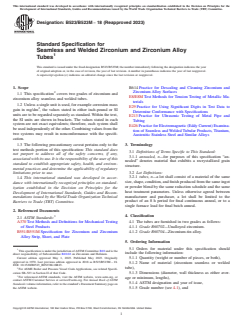
1.1 This specification2 covers two grades of zirconium and zirconium alloy seamless and welded tubes.
1.2 Unless a single unit is used, for example corrosion mass gain in mg/dm2, the values stated in either inch-pound or SI units are to be regarded separately as standard. Within the text, the SI units are shown in brackets. The values stated in each system are not exact equivalents; therefore, each system shall be used independently of the other. Combining values from the two systems may result in nonconformance with the specification.
1.3 The following precautionary caveat pertains only to the test methods portion of this specification: This standard does not purport to address all of the safety concerns, if any, associated with its use. It is the responsibility of the user of this standard to establish appropriate safety, health, and environmental practices and determine the applicability of regulatory limitations prior to use.
1.4 This international standard was developed in accordance with internationally recognized principles on standardization established in the Decision on Principles for the Development of International Standards, Guides and Recommendations issued by the World Trade Organization Technical Barriers to Trade (TBT) Committee.
General Information
- Status
- Published
- Publication Date
- 30-Apr-2023
- Technical Committee
- B10 - Reactive and Refractory Metals and Alloys
- Drafting Committee
- B10.02 - Zirconium and Hafnium
Relations
- Effective Date
- 01-Mar-2024
- Effective Date
- 01-Jan-2024
- Effective Date
- 01-Jul-2019
- Refers
ASTM A370-17a - Standard Test Methods and Definitions for Mechanical Testing of Steel Products - Effective Date
- 15-Nov-2017
- Effective Date
- 01-Jan-2017
- Effective Date
- 15-Jul-2016
- Effective Date
- 01-Nov-2015
- Effective Date
- 01-Feb-2015
- Effective Date
- 15-May-2014
- Effective Date
- 15-Nov-2013
- Effective Date
- 01-Jun-2013
- Refers
ASTM A370-12a - Standard Test Methods and Definitions for Mechanical Testing of Steel Products - Effective Date
- 15-Oct-2012
- Effective Date
- 01-Aug-2012
- Effective Date
- 15-May-2012
- Effective Date
- 15-Mar-2012
Overview
ASTM B523/B523M-18(2023): Standard Specification for Seamless and Welded Zirconium and Zirconium Alloy Tubes provides detailed requirements for the manufacture, chemical composition, mechanical properties, and testing of seamless and welded tubes made from zirconium and zirconium alloys. Developed by ASTM International, this standard ensures quality and consistency for tubes used in highly demanding industries. The specification applies to two primary grades:
- Grade R60702: Unalloyed zirconium
- Grade R60704: Zirconium-tin alloy
Both seamless and welded tubes are included, with specific requirements for material condition, testing, and acceptance criteria. The standard covers products made in both inch-pound and SI units.
Key Topics
- Material Grades: Defines Grade R60702 (unalloyed zirconium) and Grade R60704 (zirconium-tin alloy) for tube manufacturing.
- Manufacturing Methods:
- Seamless tubes must be produced by appropriate seamless methods.
- Welded tubes are manufactured from zirconium sheet or strip using automatic arc-welding or equivalent processes without the use of filler metal.
- Chemical Composition: Specifies limits for zirconium, hafnium, iron, chromium, tin, hydrogen, nitrogen, carbon, oxygen, and niobium.
- Mechanical Properties: Requires each tube to meet prescribed minimum values for tensile strength, yield strength, and elongation.
- Dimensional Tolerances: Establishes permissible variations in outside diameter, wall thickness, length, and straightness to ensure tubes fit demanding applications.
- Verification and Testing:
- Includes tension testing, eddy current testing, ultrasonic testing, hydrostatic or pneumatic testing, and product chemical analysis.
- Stipulates the need for tests such as flare and reverse flattening to assure weld integrity and ductility.
- Workmanship and Quality: Finished tubes must be clean, free from burrs, and without injurious surface or internal defects.
- Product Marking and Packaging: Outlines identification requirements and safe packaging for transport.
Applications
Zirconium and zirconium alloy tubes are valued for their outstanding corrosion resistance and mechanical strength, particularly in environments where other materials quickly degrade. Key application areas include:
- Nuclear Power Generation: Used in fuel cladding, heat exchangers, and reactor component tubing due to low neutron absorption and superior corrosion resistance.
- Chemical Processing: Suitable for use in process equipment exposed to aggressive chemicals, acids, and alkalis.
- Pharmaceutical and Medical Industries: Employed in high-purity systems where material contamination must be minimized.
- Aerospace and Defense: Utilized for components requiring reliability in extreme conditions.
The ASTM B523/B523M standard ensures that zirconium and zirconium alloy tubes meet strict criteria for safety, durability, and performance in these critical applications.
Related Standards
The following ASTM standards are referenced within ASTM B523/B523M-18(2023) and provide complementary specifications and test methods:
- ASTM B551/B551M - Specification for Zirconium and Zirconium Alloy Strip, Sheet, and Plate (used as feedstock for welded tubes)
- ASTM E8/E8M - Test Methods for Tension Testing of Metallic Materials (tensile testing requirements)
- ASTM E213 - Practice for Ultrasonic Testing of Metal Pipe and Tubing
- ASTM E426 - Practice for Electromagnetic (Eddy Current) Examination of Seamless and Welded Tubular Products
- ASTM B614 - Practice for Descaling and Cleaning Zirconium and Zirconium Alloy Surfaces
- ASTM E29 - Practice for Using Significant Digits in Test Data
These related standards support thorough quality control, ensuring that zirconium tubes meet both material and performance requirements as outlined in ASTM B523/B523M for reliable service in advanced technological applications.
Buy Documents
ASTM B523/B523M-18(2023) - Standard Specification for Seamless and Welded Zirconium and Zirconium Alloy Tubes
Get Certified
Connect with accredited certification bodies for this standard

Institut za varilstvo d.o.o. (Welding Institute)
Slovenia's leading welding institute since 1952. ISO 3834, EN 1090, pressure equipment certification, NDT personnel, welder qualification. Only IIW Au
Sponsored listings
Frequently Asked Questions
ASTM B523/B523M-18(2023) is a technical specification published by ASTM International. Its full title is "Standard Specification for Seamless and Welded Zirconium and Zirconium Alloy Tubes". This standard covers: ABSTRACT This specification covers the three grades of zirconium and zirconium alloy seamless and welded tubes. The tubes are furnished in three grades as Grade R60702 which is an unalloyed zirconium, Grade R60704 which is zirconium-tin alloy, and Grade R60705 which is zirconium-niobium alloy. Seamless tube shall be made by any seamless method. Welded tube shall be made from sheet or strip by an automatic arc-welding process or other method of welding. Filler metal shall not be used. The material shall conform to the required chemical compostion for zirconium, hafnium, iron, chromium, tin, hydrogen, nitrogen, carbon, niobium, and oxygen. The materials shall conform to the required tensile properties such as tensile strength, yield strength, and elongation. SCOPE 1.1 This specification2 covers two grades of zirconium and zirconium alloy seamless and welded tubes. 1.2 Unless a single unit is used, for example corrosion mass gain in mg/dm2, the values stated in either inch-pound or SI units are to be regarded separately as standard. Within the text, the SI units are shown in brackets. The values stated in each system are not exact equivalents; therefore, each system shall be used independently of the other. Combining values from the two systems may result in nonconformance with the specification. 1.3 The following precautionary caveat pertains only to the test methods portion of this specification: This standard does not purport to address all of the safety concerns, if any, associated with its use. It is the responsibility of the user of this standard to establish appropriate safety, health, and environmental practices and determine the applicability of regulatory limitations prior to use. 1.4 This international standard was developed in accordance with internationally recognized principles on standardization established in the Decision on Principles for the Development of International Standards, Guides and Recommendations issued by the World Trade Organization Technical Barriers to Trade (TBT) Committee.
ABSTRACT This specification covers the three grades of zirconium and zirconium alloy seamless and welded tubes. The tubes are furnished in three grades as Grade R60702 which is an unalloyed zirconium, Grade R60704 which is zirconium-tin alloy, and Grade R60705 which is zirconium-niobium alloy. Seamless tube shall be made by any seamless method. Welded tube shall be made from sheet or strip by an automatic arc-welding process or other method of welding. Filler metal shall not be used. The material shall conform to the required chemical compostion for zirconium, hafnium, iron, chromium, tin, hydrogen, nitrogen, carbon, niobium, and oxygen. The materials shall conform to the required tensile properties such as tensile strength, yield strength, and elongation. SCOPE 1.1 This specification2 covers two grades of zirconium and zirconium alloy seamless and welded tubes. 1.2 Unless a single unit is used, for example corrosion mass gain in mg/dm2, the values stated in either inch-pound or SI units are to be regarded separately as standard. Within the text, the SI units are shown in brackets. The values stated in each system are not exact equivalents; therefore, each system shall be used independently of the other. Combining values from the two systems may result in nonconformance with the specification. 1.3 The following precautionary caveat pertains only to the test methods portion of this specification: This standard does not purport to address all of the safety concerns, if any, associated with its use. It is the responsibility of the user of this standard to establish appropriate safety, health, and environmental practices and determine the applicability of regulatory limitations prior to use. 1.4 This international standard was developed in accordance with internationally recognized principles on standardization established in the Decision on Principles for the Development of International Standards, Guides and Recommendations issued by the World Trade Organization Technical Barriers to Trade (TBT) Committee.
ASTM B523/B523M-18(2023) is classified under the following ICS (International Classification for Standards) categories: 23.040.15 - Non-ferrous metal pipes. The ICS classification helps identify the subject area and facilitates finding related standards.
ASTM B523/B523M-18(2023) has the following relationships with other standards: It is inter standard links to ASTM A370-24, ASTM E8/E8M-24, ASTM A370-19, ASTM A370-17a, ASTM A370-17, ASTM E8/E8M-16, ASTM A370-15, ASTM E8/E8M-15, ASTM A370-14, ASTM A370-13, ASTM E8/E8M-13, ASTM A370-12a, ASTM E426-12, ASTM B551/B551M-12, ASTM A370-12. Understanding these relationships helps ensure you are using the most current and applicable version of the standard.
ASTM B523/B523M-18(2023) is available in PDF format for immediate download after purchase. The document can be added to your cart and obtained through the secure checkout process. Digital delivery ensures instant access to the complete standard document.
Standards Content (Sample)
This international standard was developed in accordance with internationally recognized principles on standardization established in the Decision on Principles for the
Development of International Standards, Guides and Recommendations issued by the World Trade Organization Technical Barriers to Trade (TBT) Committee.
Designation: B523/B523M − 18 (Reapproved 2023)
Standard Specification for
Seamless and Welded Zirconium and Zirconium Alloy
Tubes
This standard is issued under the fixed designation B523/B523M; the number immediately following the designation indicates the year
of original adoption or, in the case of revision, the year of last revision. A number in parentheses indicates the year of last reapproval.
A superscript epsilon (´) indicates an editorial change since the last revision or reapproval.
1. Scope B614 Practice for Descaling and Cleaning Zirconium and
2 Zirconium Alloy Surfaces
1.1 This specification covers two grades of zirconium and
E8/E8M Test Methods for Tension Testing of Metallic Ma-
zirconium alloy seamless and welded tubes.
terials
1.2 Unless a single unit is used, for example corrosion mass
E29 Practice for Using Significant Digits in Test Data to
gain in mg/dm , the values stated in either inch-pound or SI
Determine Conformance with Specifications
units are to be regarded separately as standard. Within the text,
E213 Practice for Ultrasonic Testing of Metal Pipe and
the SI units are shown in brackets. The values stated in each
Tubing
system are not exact equivalents; therefore, each system shall
E426 Practice for Electromagnetic (Eddy Current) Examina-
be used independently of the other. Combining values from the
tion of Seamless and Welded Tubular Products, Titanium,
two systems may result in nonconformance with the specifi-
Austenitic Stainless Steel and Similar Alloys
cation.
1.3 The following precautionary caveat pertains only to the
3. Terminology
test methods portion of this specification: This standard does
3.1 Definitions of Terms Specific to This Standard:
not purport to address all of the safety concerns, if any,
3.1.1 annealed, n—for purposes of this specification “an-
associated with its use. It is the responsibility of the user of this
nealed” denotes material that exhibits a recrystallized grain
standard to establish appropriate safety, health, and environ-
structure.
mental practices and determine the applicability of regulatory
3.2 Lot Definitions:
limitations prior to use.
3.2.1 tubes, n—a lot shall consist of a material of the same
1.4 This international standard was developed in accor-
size, shape, condition, and finish produced from the same ingot
dance with internationally recognized principles on standard-
or powder blend by the same reduction schedule and the same
ization established in the Decision on Principles for the
heat treatment parameters. Unless otherwise agreed between
Development of International Standards, Guides and Recom-
manufacturer and purchaser, a lot shall be limited to the
mendations issued by the World Trade Organization Technical
product of an 8 h period for final continuous anneal, or to a
Barriers to Trade (TBT) Committee.
single furnace load for final batch anneal.
2. Referenced Documents
3 4. Classification
2.1 ASTM Standards:
A370 Test Methods and Definitions for Mechanical Testing
4.1 The tubes are furnished in two grades as follows:
of Steel Products
4.1.1 Grade R60702—Unalloyed zirconium.
B551/B551M Specification for Zirconium and Zirconium
4.1.2 Grade R60704—Zirconium-tin alloy.
Alloy Strip, Sheet, and Plate
5. Ordering Information
5.1 Orders for material under this specification should
This specification is under the jurisdiction of ASTM Committee B10 and is the
include the following information:
direct responsibility of Subcommittee B10.02 on Zirconium and Hafnium.
Current edition approved May 1, 2023. Published May 2023. Originally
5.1.1 Quantity (weight or number of pieces, or both),
approved in 1970. Last previous edition approved in 2018 as B523/B523M – 18.
5.1.2 Name of material (zirconium seamless or welded
DOI: 10.1520/B0523_B0523M-18R23.
2 tube),
For ASME Boiler and Pressure Vessel Code Applications, see related Specifi-
cation SB–523 in Section II of that Code.
5.1.3 Dimensions (diameter, wall thickness as either aver-
For referenced ASTM standards, visit the ASTM website, www.astm.org, or
age or minimum, lengths),
contact ASTM Customer Service at service@astm.org. For Annual Book of ASTM
5.1.4 ASTM designation and year of issue,
Standards volume information, refer to the standard’s Document Summary page on
the ASTM website. 5.1.5 Grade number (see 4.1), and
Copyright © ASTM International, 100 Barr Harbor Drive, PO Box C700, West Conshohocken, PA 19428-2959. United States
B523/B523M − 18 (2023)
TABLE 2 Permissible Variation in Product Analysis Between
5.1.6 Additions to the specification, if required. See 6.3.1,
Different Laboratories
7.3, 10.1, 12.7.3, 14.1, and 15.1 for additional optional
Permissible Variation in Product
requirements for the purchase order.
Element
Analysis, %
NOTE 1—A typical ordering description is as follows: 1000 pieces of
Hydrogen 0.002
seamless zirconium tubes, 2 in. [50 mm] in outside diameter by 0.06 in.
Nitrogen 0.01
Carbon 0.01
[15 mm] in average wall thickness by 10 ft [3 m] in length, vacuum
Hafnium 0.1
annealed, ASTM B523/B523M - 01, Grade R60702.
Iron + chromium 0.025
Tin 0.05
6. Materials and Manufacture
Niobium 0.05
Oxygen 0.02
6.1 Seamless tube shall be made by any seamless method
that will yield a product meeting the requirements of this
specification.
TABLE 3 Tensile Requirements
6.2 Welded tube shall be made from sheet or strip meeting
UNS Grade Designation
B551/B551M by an auto-
the requirements of Specification
R60702 R60704
matic arc-welding process or other method of welding that will
Tensile strength, 55 [380] 60 [415]
yield a product meeting the requirements of this specification. min, ksi [MPa]
Yield strength, min, 30 [205] 35 [240]
Filler metal shall not be used. Welded tubing shall be supplied
ksi [MPa]
as follows:
Elongation in 2 in. 16 14
or 50 mm, min, %
6.2.1 As welded, or
6.2.2 As welded and further reduced.
6.3 The tube shall be furnished annealed.
6.3.1 Purchaser shall specify one of the following:
(a) annealed in air
9. Permissible Variation in Dimensions
(b) annealed in vacuum
9.1 Diameter—At any point (cross section) along the length
7. Chemical Composition
of the tube, the variation in outside diameter shall not exceed
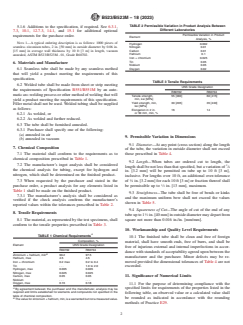
7.1 The material shall conform to the requirements as to those prescribed in Table 4.
chemical composition prescribed in Table 1.
9.2 Length—When tubes are ordered cut to length, the
7.2 The manufacturer’s ingot analysis shall be considered 1
length shall be not less than that specified, but a variation of ⁄8
the chemical analysis for tubing, except for hydrogen and
in. [3.2 mm] will be permitted on tube up to 10 ft [3 m],
nitrogen, which shall be determined on the finished product.
inclusive. For lengths over 10 ft, an additional over-tolerance
7.3 When requested by the purchaser and stated in the of ⁄8 in. [3.2 mm] for each 10 ft [3 m] or fraction thereof shall
purchase order, a product analysis for any elements listed in be permissible up to ⁄2 in. [13 mm], maximum.
Table 1 shall be made on the finished product.
9.3 Straightness—The tube shall be free of bends or kinks
7.3.1 The manufacturer’s analysis shall be considered as
and the maximum uniform bow shall not exceed the values
verified if the check analysis confirms the manufacturer’s
shown in Table 5.
reported values within the tolerances prescribed in Table 2.
9.4 Squareness of Cut—The angle of cut of the end of any
8. Tensile Requirements
tube up to 1 ⁄2 in. [40 mm] in outside diameter may depart from
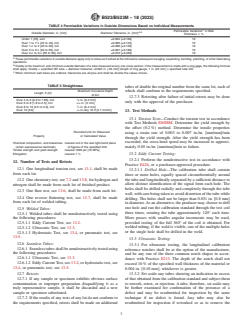
8.1 The material, as represented by the test specimens, shall square not more than 0.016 in./in. [mm/mm].
conform to the tensile properties prescribed in Table 3.
10. Workmanship and Quality Level Requirements
A
TABLE 1 Chemical Requirements
10.1 The finished tube shall be clean and free of foreign
Composition, %
material, shall have smooth ends, free of burrs, and shall be
Element UNS Grade Designation
free of injurious external and internal imperfections in accor-
R60702 R60704
dance with standards of acceptability agreed upon between the
B
Zirconium + hafnium, min 99.2 97.5
manufacturer and the purchaser. Minor defects may be re-
Hafnium, max 4.5 4.5
moved provided the dimensional tolerances of Table 4 are not
Iron + chromium 0.2 max 0.2 to 0.4
Tin . . . 1.0 to 2.0
exceeded.
Hydrogen, max 0.005 0.005
Nitrogen, max 0.025 0.025
Carbon, max 0.05 0.05 11. Significance of Numerical Limits
Niobium . . . . . .
Oxygen, max 0.16 0.18
11.1 For the purpose of determining compliance with the
A
specified limits for requirements of the properties listed in the
By agreement between the purchaser and the manufacturer, analysis may be
required and limits established for elements and compounds not specified in the
following table, an observed value or a calculated value shall
table of chemical composition.
be rounded as indicated in accordance with the rounding
B
The value for zirconium + hafnium, min, is a warranted but not a measured value.
methods of Practice E29.
B523/B523M − 18 (2023)
TABLE 4 Permissible Variations in Outside Dimensions Based on Individual Measurements
C
Permissible Variations in Wall
A,B
Outside Diameter, in. [mm] Diameter Tolerance, in. [mm]
Thickness, t, %
Under 1 [25], excl ±0.004 [±0.100] 10
Over 1 to 1 ⁄2 [25 to 40], incl ±0.005 [±0.125] 10
Over 1 ⁄2 to 2 [40 to 50], incl ±0.006 [±0.150] 10
Over 2 to 2 ⁄2 [50 to 65], incl ±0.007 [±0.180] 10
1 1
Over 2 ⁄2 to 3 ⁄2 [65 to 90], incl ±0.010 [±0.250] 10
A
These permissible variations in outside diameter apply only to tubes as finished at the mill before subsequent swaging, expanding, bending, polishing, or other fabricating
operations.
B
Ovality is the maximum and minimum outside diameter of a tube measured at any one cross section. If the measurement is made with a ring gage, the following formula
shall apply: Ovality = specified OD tube + diameter tolerance +0.002 in. [.05 mm] (length of ring gauge, 1 in. [25 mm] × specified tube OD.
C
When minimum wall tubes are ordered, tolerances are all plus and shall be double the values shown.
TABLE 5 Straightness
tubes of double the original number from the same lot, each of
Maximum Curvature Depth which shall conform to the requirements specified.
Length, ft [m]
of Arc
12.7.3 Retesting after failure of initial retests may be done
Over 3 to 6 [0.9 to 1.85], incl ⁄8 in. [3.2 mm]
only with the approval of the purchaser.
Over 6 to 8 [1.8 to 2.5], incl ⁄16 in. [5 mm]
Over 8 to 10 [2.5 to 3.0], incl ⁄4 in. [6.4 mm]
Over 10 [3.0] ⁄4 in./any 10 ft [2.1 mm/m]
13.
...


Questions, Comments and Discussion
Ask us and Technical Secretary will try to provide an answer. You can facilitate discussion about the standard in here.
Loading comments...