ASTM D1214-10(2020)
(Test Method)Standard Test Method for Sieve Analysis of Glass Spheres
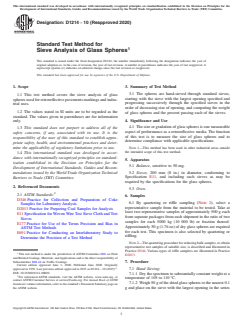
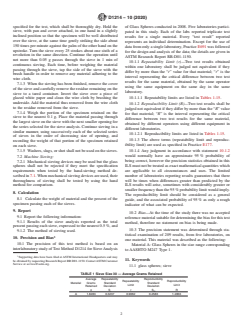
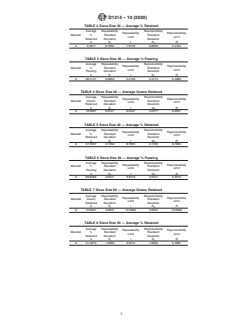
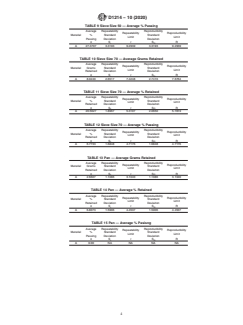
Standard Test Method for Sieve Analysis of Glass Spheres
SIGNIFICANCE AND USE
4.1 The size or gradation of glass spheres is one measurable aspect of performance as a retroreflective media. The function of this test is to measure the size of glass spheres and to determine compliance with applicable specifications.
Note 1: This method has been used in other industrial areas outside the intended scope of this test method.
SCOPE
1.1 This test method covers the sieve analysis of glass spheres used for retroreflective pavements markings and industrial uses.
1.2 The values stated in SI units are to be regarded as the standard. The values given in parentheses are for information only.
1.3 This standard does not purport to address all of the safety concerns, if any, associated with its use. It is the responsibility of the user of this standard to establish appropriate safety, health, and environmental practices and determine the applicability of regulatory limitations prior to use.
1.4 This international standard was developed in accordance with internationally recognized principles on standardization established in the Decision on Principles for the Development of International Standards, Guides and Recommendations issued by the World Trade Organization Technical Barriers to Trade (TBT) Committee.
General Information
- Status
- Published
- Publication Date
- 31-May-2020
- Technical Committee
- D01 - Paint and Related Coatings, Materials, and Applications
- Drafting Committee
- D01.44 - Traffic Coatings
Relations
- Effective Date
- 01-Jun-2020
- Effective Date
- 01-May-2014
- Effective Date
- 01-Oct-2013
- Effective Date
- 01-May-2013
- Effective Date
- 01-May-2013
- Effective Date
- 01-Nov-2011
- Effective Date
- 01-Oct-2010
- Effective Date
- 01-May-2010
- Effective Date
- 01-May-2009
- Effective Date
- 01-Oct-2008
- Effective Date
- 01-Oct-2008
- Effective Date
- 01-Jun-2007
- Refers
ASTM E177-06b - Standard Practice for Use of the Terms Precision and Bias in ASTM Test Methods - Effective Date
- 15-Nov-2006
- Refers
ASTM E177-06a - Standard Practice for Use of the Terms Precision and Bias in ASTM Test Methods - Effective Date
- 01-Nov-2006
- Effective Date
- 01-Nov-2005
Overview
ASTM D1214-10(2020) - Standard Test Method for Sieve Analysis of Glass Spheres is an internationally recognized test method developed by ASTM International. This standard provides procedures for determining the size distribution, or gradation, of glass spheres by sieve analysis. Glass spheres are widely used as retroreflective media in pavement markings and have various industrial applications. Measuring the particle size distribution of glass spheres is important for ensuring compliance with applicable product specifications and achieving optimal performance in their end use.
The standard describes both hand and machine sieving methods, as well as guidelines for sample preparation, measurement, reporting results, and evaluating precision and reproducibility. It is developed in line with World Trade Organization (WTO) guidelines for international standards, ensuring broad applicability and acceptance.
Key Topics
- Scope: The method covers the sieve analysis of glass spheres utilized for retroreflective pavement markings and general industrial uses.
- Procedure: Specifies drying, sample weighing, step-by-step hand sieving, and detailed reporting of mass retained and percentage passing for each sieve.
- Precision and Reproducibility: Includes guidance for interlaboratory consistency, measuring repeatability and reproducibility limits.
- Compliance: Enables users to determine whether glass spheres meet the specified gradation requirements.
- Safety: The standard notes that users must ensure appropriate safety and regulatory practices.
- International Alignment: Conforms to internationally recognized standardization principles, enhancing global compatibility and acceptance.
Applications
ASTM D1214-10(2020) is essential for:
- Quality Assurance: Ensures that glass spheres used in road markings and other industrial sectors have consistent and controlled size distributions, directly impacting performance and durability.
- Compliance Testing: Laboratories and manufacturers use this standard to verify that glass sphere materials comply with project or regulatory requirements.
- Retroreflective Pavement Markings: Accurate gradation of beads is critical for maximizing night-time visibility and road safety, making this standard vital for agencies and contractors in transportation infrastructure.
- Industrial Uses: Beyond pavement markings, glass spheres are used in manufacturing, blasting, and other processes where particle size can affect product behavior or process efficiency.
- Specification Development: Provides a benchmark for writing specifications and purchase requirements for glass beads in various applications.
Related Standards
- ASTM E11 - Standard Specification for Woven Wire Test Sieve Cloth and Test Sieves: Specifies the type of sieves to be used in the analysis.
- ASTM D346 - Practice for Collection and Preparation of Coke Samples for Laboratory Analysis: Referenced for sampling procedures.
- ASTM D2013 - Practice for Preparing Coal Samples for Analysis: Provides additional sampling guidance.
- ASTM E177 - Practice for Use of the Terms Precision and Bias in ASTM Test Methods: Applied for precision and bias assessments.
- ASTM E691 - Practice for Conducting an Interlaboratory Study to Determine the Precision of a Test Method: Basis for analyzing interlaboratory test results.
- AASHTO M247 - Specification referenced for classifying types of pavement marking beads.
Practical Value
Adhering to ASTM D1214-10(2020) for sieve analysis of glass spheres supports manufacturers, testing labs, and end-users in achieving:
- Reliable and repeatable results
- Regulatory and specification compliance
- Higher quality and performance in end-use applications
- Alignment with US Department of Defense and global procurement requirements
- Improved safety and functionality in retroreflective road marking systems
This standard is a cornerstone for quality control in the production and assessment of glass spheres, having wide-reaching benefits across transportation, infrastructure, and industrial applications.
Keywords: ASTM D1214, sieve analysis, glass spheres, retroreflective media, test method, pavement markings, particle size, gradation, standards compliance, quality assurance.
Buy Documents
ASTM D1214-10(2020) - Standard Test Method for Sieve Analysis of Glass Spheres
Get Certified
Connect with accredited certification bodies for this standard

IMP NDT d.o.o.
Non-destructive testing services. Radiography, ultrasonic, magnetic particle, penetrant, visual inspection.

Inštitut za kovinske materiale in tehnologije
Institute of Metals and Technology. Materials testing, metallurgical analysis, NDT.

Q Techna d.o.o.
NDT and quality assurance specialist. 30+ years experience. NDT personnel certification per ISO 9712, nuclear and thermal power plant inspections, QA/
Sponsored listings
Frequently Asked Questions
ASTM D1214-10(2020) is a standard published by ASTM International. Its full title is "Standard Test Method for Sieve Analysis of Glass Spheres". This standard covers: SIGNIFICANCE AND USE 4.1 The size or gradation of glass spheres is one measurable aspect of performance as a retroreflective media. The function of this test is to measure the size of glass spheres and to determine compliance with applicable specifications. Note 1: This method has been used in other industrial areas outside the intended scope of this test method. SCOPE 1.1 This test method covers the sieve analysis of glass spheres used for retroreflective pavements markings and industrial uses. 1.2 The values stated in SI units are to be regarded as the standard. The values given in parentheses are for information only. 1.3 This standard does not purport to address all of the safety concerns, if any, associated with its use. It is the responsibility of the user of this standard to establish appropriate safety, health, and environmental practices and determine the applicability of regulatory limitations prior to use. 1.4 This international standard was developed in accordance with internationally recognized principles on standardization established in the Decision on Principles for the Development of International Standards, Guides and Recommendations issued by the World Trade Organization Technical Barriers to Trade (TBT) Committee.
SIGNIFICANCE AND USE 4.1 The size or gradation of glass spheres is one measurable aspect of performance as a retroreflective media. The function of this test is to measure the size of glass spheres and to determine compliance with applicable specifications. Note 1: This method has been used in other industrial areas outside the intended scope of this test method. SCOPE 1.1 This test method covers the sieve analysis of glass spheres used for retroreflective pavements markings and industrial uses. 1.2 The values stated in SI units are to be regarded as the standard. The values given in parentheses are for information only. 1.3 This standard does not purport to address all of the safety concerns, if any, associated with its use. It is the responsibility of the user of this standard to establish appropriate safety, health, and environmental practices and determine the applicability of regulatory limitations prior to use. 1.4 This international standard was developed in accordance with internationally recognized principles on standardization established in the Decision on Principles for the Development of International Standards, Guides and Recommendations issued by the World Trade Organization Technical Barriers to Trade (TBT) Committee.
ASTM D1214-10(2020) is classified under the following ICS (International Classification for Standards) categories: 19.120 - Particle size analysis. Sieving. The ICS classification helps identify the subject area and facilitates finding related standards.
ASTM D1214-10(2020) has the following relationships with other standards: It is inter standard links to ASTM D1214-10(2015)e1, ASTM E177-14, ASTM E11-13, ASTM E177-13, ASTM E691-13, ASTM E691-11, ASTM E177-10, ASTM D346-04(2010), ASTM E11-09e1, ASTM E691-08, ASTM E177-08, ASTM D2013-07, ASTM E177-06b, ASTM E177-06a, ASTM E691-05. Understanding these relationships helps ensure you are using the most current and applicable version of the standard.
ASTM D1214-10(2020) is available in PDF format for immediate download after purchase. The document can be added to your cart and obtained through the secure checkout process. Digital delivery ensures instant access to the complete standard document.
Standards Content (Sample)
This international standard was developed in accordance with internationally recognized principles on standardization established in the Decision on Principles for the
Development of International Standards, Guides and Recommendations issued by the World Trade Organization Technical Barriers to Trade (TBT) Committee.
Designation: D1214 − 10 (Reapproved 2020)
Standard Test Method for
Sieve Analysis of Glass Spheres
This standard is issued under the fixed designation D1214; the number immediately following the designation indicates the year of
original adoption or, in the case of revision, the year of last revision. A number in parentheses indicates the year of last reapproval. A
superscript epsilon (´) indicates an editorial change since the last revision or reapproval.
This standard has been approved for use by agencies of the U.S. Department of Defense.
1. Scope 3. Summary of Test Method
3.1 The spheres are hand-sieved through standard sieves,
1.1 This test method covers the sieve analysis of glass
starting with the sieve with the largest opening specified and
spheresusedforretroreflectivepavementsmarkingsandindus-
progressing successively through the specified sieves in the
trial uses.
order of decreasing size of opening, and computing the weight
1.2 The values stated in SI units are to be regarded as the
of glass spheres and the percent passing each of the sieves.
standard. The values given in parentheses are for information
4. Significance and Use
only.
4.1 The size or gradation of glass spheres is one measurable
1.3 This standard does not purport to address all of the
aspect of performance as a retroreflective media. The function
safety concerns, if any, associated with its use. It is the
of this test is to measure the size of glass spheres and to
responsibility of the user of this standard to establish appro-
determine compliance with applicable specifications.
priate safety, health, and environmental practices and deter-
mine the applicability of regulatory limitations prior to use.
NOTE 1—This method has been used in other industrial areas outside
the intended scope of this test method.
1.4 This international standard was developed in accor-
dance with internationally recognized principles on standard-
5. Apparatus
ization established in the Decision on Principles for the
5.1 Balance, sensitive to 50 mg.
Development of International Standards, Guides and Recom-
5.2 Sieves, 200 mm (8 in.) in diameter, conforming to
mendations issued by the World Trade Organization Technical
Barriers to Trade (TBT) Committee. Specification E11, and including such sieves as may be
required by the specifications for the glass spheres.
2. Referenced Documents
5.3 Oven.
2.1 ASTM Standards:
6. Samples
D346 Practice for Collection and Preparation of Coke
6.1 By quartering or riffle sampling (Note 2), select a
Samples for Laboratory Analysis
representative sample from the material to be tested. Take at
D2013 Practice for Preparing Coal Samples for Analysis
least two representative samples of approximately 500 g each
E11 Specification for Woven Wire Test Sieve Cloth and Test
from separate packages from each shipment in the ratio of two
Sieves
samples for each 5000 kg (10 000 lb) or fraction thereof.
E177 Practice for Use of the Terms Precision and Bias in
Approximately 50 g (1.76 oz) of dry glass spheres are required
ASTM Test Methods
for each test. This specimen is also selected by quartering or
E691 Practice for Conducting an Interlaboratory Study to
riffling.
Determine the Precision of a Test Method
NOTE 2—The quartering procedure for reducing bulk samples, to obtain
representative test samples of suitable size, is described and illustrated in
Practice D346. Various types of riffle samplers are illustrated in Practice
This test method is under the jurisdiction of ASTM Committee D01 on Paint
D2013.
and Related Coatings, Materials, andApplications and is the direct responsibility of
Subcommittee D01.44 on Traffic Coatings.
7. Procedure
Current edition approved June 1, 2020. Published June 2020. Originally
ɛ1
7.1 Hand Sieving:
approved in 1952. Last previous edition approved in 2015 as D1214 – 10 (2015) .
DOI: 10.1520/D1214-10R20.
7.1.1 Dry the specimen to substantially constant weight at a
For referenced ASTM standards, visit the ASTM website, www.astm.org, or
temperature of 105 to 110 °C.
contact ASTM Customer Service at service@astm.org. For Annual Book of ASTM
7.1.2 Weigh50gofthedriedglassspherestothenearest0.1
Standards volume information, refer to the standard’s Document Summary page on
the ASTM website. g and place on the sieve with the largest opening in the series
Copyright ©ASTM International, 100 Barr Harbor Drive, PO Box C700, West Conshohocken, PA19428-2959. United States
D1214 − 10 (2020)
specified for the test, which shall be thoroughly dry. Hold the of Glass Spheres conducted in 2008. Five laboratories partici-
sieve, with pan and cover attached, in one hand in a slightly pated in this study. Each of the labs reported triplicate test
inclined position so that the specimen will be well distributed
results for a single material. Every “test result” reported
over the sieve, at the same time gently striking the side about
represents an individual determination. Except for the use of
150 times per minute against the palm of the other hand on the
data from only a single laboratory, Practice E691 was followed
upstroke. Turn the sieve every 25 strokes about one sixth of a
for the design and analysis of the data; the details are given in
revolution in the same direction. Continue the operation until
ASTM Research Report RR:D01-1150.
not more than 0.05 g passes through the sieve in 1 min of
10.1.1 Repeatability Limit (r)—Two test results obtained
continuous sieving. Each time, before weighing the material
within one laboratory shall be judged not equivalent if they
passing through the sieve, tap the side of the sieve with the
differ by more than the “r” value for that material; “r”isthe
brush handle in order to remove any material adhering to the
interval representing the critical difference between two test
wire cloth.
results for the same material, obtained by the same operator
7.1.3 When the sieving has been finished, remove the cover
using the same equipment on the same day in the same
of the sieve and carefully remove the residue remaining on the
laboratory.
sieve to a tared container. Invert the sieve over a piece of
glazed white paper and clean the wire cloth by brushing the 10.1.1.1 Repeatability limits are listed in Tables 1-15.
underside. Add the material thus removed from the wire cloth
10.1.2 Reproducibility Limit (R)—Two test results shall be
to the residue removed from the sieve.
judged not equivalent if they differ by more than the “R” value
7.1.4 Weigh the portion of the specimen retained on the
for that material; “R” is the interval representing the critical
sieve to the nearest 0.1 g. Place the material passing through
difference between two test results for the same material,
the largest sieve on the sieve with the next smaller opening for
obtained by different operators using different equipment in
the series selected for the sieve analysis. Continue sieving in a
different laboratories.
similar manner, using successively each of the selected series
10.1.2.1 Reproducibility limits are listed in Tables 1-15.
of sieves in the order of decreasing size of opening, and
10.1.3 The above terms (repeatability limit and reproduc-
recording the weight of that po
...


Questions, Comments and Discussion
Ask us and Technical Secretary will try to provide an answer. You can facilitate discussion about the standard in here.
Loading comments...