ASTM E803-20
(Test Method)Standard Test Method for Determining the L/D Ratio of Neutron Radiography Beams
Standard Test Method for Determining the <emph type="ital">L/D </emph>Ratio of Neutron Radiography Beams
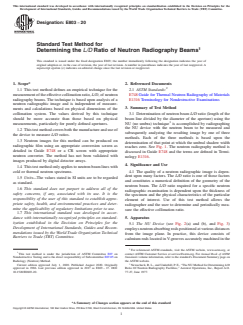
SIGNIFICANCE AND USE
4.1 The quality of a neutron radiographic image is dependent upon many factors. The L/D ratio is one of those factors and constitutes a numerical definition of the geometry of the neutron beam. The L/D ratio required for a specific neutron radiographic examination is dependent upon the thickness of the specimen and the physical characteristics of the particular element of interest. Use of this test method allows the radiographer and the user to determine and periodically measure the effective collimation ratio.
SCOPE
1.1 This test method defines an empirical technique for the measurement of the effective collimation ratio, L/D, of neutron radiography beams. The technique is based upon analysis of a neutron radiographic image and is independent of measurements and calculations based on physical dimensions of the collimation system. The values derived by this technique should be more accurate than those based on physical measurements, particularly for poorly defined apertures.
1.2 This test method covers both the manufacture and use of the device to measure L/D ratios.
1.3 Neutron images for this method can be produced on radiographic film using an appropriate conversion screen as detailed in Guide E748 or a CR screen with appropriate neutron converter. The method has not been validated with images produced by digital detector arrays.
1.4 This test method only applies to neutron beam lines with cold or thermal neutron spectrums.
1.5 Units—The values stated in SI units are to be regarded as standard.
1.6 This standard does not purport to address all of the safety concerns, if any, associated with its use. It is the responsibility of the user of this standard to establish appropriate safety, health, and environmental practices and determine the applicability of regulatory limitations prior to use.
1.7 This international standard was developed in accordance with internationally recognized principles on standardization established in the Decision on Principles for the Development of International Standards, Guides and Recommendations issued by the World Trade Organization Technical Barriers to Trade (TBT) Committee.
General Information
- Status
- Published
- Publication Date
- 30-Jun-2020
- Technical Committee
- E07 - Nondestructive Testing
- Drafting Committee
- E07.05 - Radiology (Neutron) Method
Relations
- Effective Date
- 01-Jul-2020
- Effective Date
- 01-Feb-2024
- Effective Date
- 01-Dec-2019
- Effective Date
- 01-May-2019
- Effective Date
- 01-Mar-2019
- Effective Date
- 01-Jan-2018
- Effective Date
- 15-Jun-2017
- Effective Date
- 01-Feb-2017
- Effective Date
- 01-Aug-2016
- Effective Date
- 15-Feb-2016
- Effective Date
- 01-Feb-2016
- Effective Date
- 01-Dec-2015
- Effective Date
- 01-Sep-2015
- Effective Date
- 01-Jun-2014
- Effective Date
- 01-Jun-2014
Overview
The ASTM E803-20 Standard Test Method for Determining the L/D Ratio of Neutron Radiography Beams specifies an empirical method for accurately measuring the effective collimation ratio (L/D) of neutron radiography beams. The L/D ratio, which is the ratio of the beam path length (L) to the diameter of the aperture (D), is a critical parameter affecting the quality, sharpness, and usability of neutron radiographic images. Unlike traditional measurement approaches that rely on geometric calculations or physical measurements, ASTM E803-20 establishes a technique based on analysis of the neutron radiographic image itself, resulting in higher accuracy, especially for systems with poorly defined geometries.
This standard applies exclusively to neutron beam lines with cold or thermal neutron spectrums and covers both the fabrication and use of L/D measuring devices. It guides users in generating and analyzing neutron radiographs to determine the L/D ratio, enabling ongoing control and verification of beam quality.
Key Topics
- Empirical Measurement Technique: Introduces the practice of using radiographic images rather than physical system dimensions to determine the L/D ratio, ensuring reliable results even where system geometry is uncertain.
- NU Device Utilization: Describes the device (commonly featuring cadmium rods on a supporting channel) employed to produce radiographic images for analysis.
- Applicable Imaging Methods:
- Radiographic film with a conversion screen (as described in ASTM Guide E748)
- Computed radiography (CR) using an appropriate neutron converter
- Excludes digital detector arrays, as they have not been validated by this method
- Image and Data Analysis Methods: Outlines three approaches to determine the L/D ratio from the recorded neutron radiography image:
- Visual analysis
- Line plot analysis
- Alternative line plot (microdensitometric) analysis
- Reporting Requirements: Specifies recording image capture and digitization methods, calculation approach, aperture shape, and L/D values in all directions for non-circular apertures.
- Applicability and Limitations: Clarifies that results provide more accurate collimation ratio estimates than geometrical calculations, especially for complex or indeterminate aperture shapes.
- Safety and Compliance: Reminds users to establish appropriate safety, health, and environmental practices.
Applications
ASTM E803-20 is vital in a variety of fields that rely on neutron radiography and neutron imaging:
- Quality Assurance in Industrial Radiography: Ensures neutron beam collimation meets required standards for image sharpness and reliability, directly impacting defect detection in critical components.
- Periodic Facility Validation: Enables ongoing assessment of neutron beam lines, facilitating maintenance and adjustments by providing empirical L/D ratio verification.
- Research and Development: Offers precise L/D measurement for experimental setups, supporting innovation in imaging techniques and non-destructive testing methods.
- Regulatory Compliance and Reporting: Assists organizations in meeting documentation requirements, especially in the manufacturing, aerospace, energy, and defense sectors.
- Aperture Shape Characterization: Supports accurate L/D evaluation in circular, non-circular, and custom aperture designs.
Related Standards
ASTM E748 – Guide for Thermal Neutron Radiography of Materials
Provides complementary guidance on producing thermal neutron radiographic images, including materials, techniques, and quality assurance practices.ASTM E1316 – Terminology for Nondestructive Examinations
Offers standardized terminology essential for clear communication and documentation in nondestructive testing and neutron radiography.
By following ASTM E803-20, professionals in neutron imaging ensure accurate, reproducible, and transparent measurement of neutron collimation ratios, forming the foundation for high-quality neutron radiography and imaging system optimization. For the most current and official documentation, refer to the ASTM website.
Buy Documents
ASTM E803-20 - Standard Test Method for Determining the <emph type="ital">L/D </emph>Ratio of Neutron Radiography Beams
REDLINE ASTM E803-20 - Standard Test Method for Determining the <emph type="ital">L/D </emph>Ratio of Neutron Radiography Beams
Get Certified
Connect with accredited certification bodies for this standard

IMP NDT d.o.o.
Non-destructive testing services. Radiography, ultrasonic, magnetic particle, penetrant, visual inspection.

Inštitut za kovinske materiale in tehnologije
Institute of Metals and Technology. Materials testing, metallurgical analysis, NDT.

Q Techna d.o.o.
NDT and quality assurance specialist. 30+ years experience. NDT personnel certification per ISO 9712, nuclear and thermal power plant inspections, QA/
Sponsored listings
Frequently Asked Questions
ASTM E803-20 is a standard published by ASTM International. Its full title is "Standard Test Method for Determining the <emph type="ital">L/D </emph>Ratio of Neutron Radiography Beams". This standard covers: SIGNIFICANCE AND USE 4.1 The quality of a neutron radiographic image is dependent upon many factors. The L/D ratio is one of those factors and constitutes a numerical definition of the geometry of the neutron beam. The L/D ratio required for a specific neutron radiographic examination is dependent upon the thickness of the specimen and the physical characteristics of the particular element of interest. Use of this test method allows the radiographer and the user to determine and periodically measure the effective collimation ratio. SCOPE 1.1 This test method defines an empirical technique for the measurement of the effective collimation ratio, L/D, of neutron radiography beams. The technique is based upon analysis of a neutron radiographic image and is independent of measurements and calculations based on physical dimensions of the collimation system. The values derived by this technique should be more accurate than those based on physical measurements, particularly for poorly defined apertures. 1.2 This test method covers both the manufacture and use of the device to measure L/D ratios. 1.3 Neutron images for this method can be produced on radiographic film using an appropriate conversion screen as detailed in Guide E748 or a CR screen with appropriate neutron converter. The method has not been validated with images produced by digital detector arrays. 1.4 This test method only applies to neutron beam lines with cold or thermal neutron spectrums. 1.5 Units—The values stated in SI units are to be regarded as standard. 1.6 This standard does not purport to address all of the safety concerns, if any, associated with its use. It is the responsibility of the user of this standard to establish appropriate safety, health, and environmental practices and determine the applicability of regulatory limitations prior to use. 1.7 This international standard was developed in accordance with internationally recognized principles on standardization established in the Decision on Principles for the Development of International Standards, Guides and Recommendations issued by the World Trade Organization Technical Barriers to Trade (TBT) Committee.
SIGNIFICANCE AND USE 4.1 The quality of a neutron radiographic image is dependent upon many factors. The L/D ratio is one of those factors and constitutes a numerical definition of the geometry of the neutron beam. The L/D ratio required for a specific neutron radiographic examination is dependent upon the thickness of the specimen and the physical characteristics of the particular element of interest. Use of this test method allows the radiographer and the user to determine and periodically measure the effective collimation ratio. SCOPE 1.1 This test method defines an empirical technique for the measurement of the effective collimation ratio, L/D, of neutron radiography beams. The technique is based upon analysis of a neutron radiographic image and is independent of measurements and calculations based on physical dimensions of the collimation system. The values derived by this technique should be more accurate than those based on physical measurements, particularly for poorly defined apertures. 1.2 This test method covers both the manufacture and use of the device to measure L/D ratios. 1.3 Neutron images for this method can be produced on radiographic film using an appropriate conversion screen as detailed in Guide E748 or a CR screen with appropriate neutron converter. The method has not been validated with images produced by digital detector arrays. 1.4 This test method only applies to neutron beam lines with cold or thermal neutron spectrums. 1.5 Units—The values stated in SI units are to be regarded as standard. 1.6 This standard does not purport to address all of the safety concerns, if any, associated with its use. It is the responsibility of the user of this standard to establish appropriate safety, health, and environmental practices and determine the applicability of regulatory limitations prior to use. 1.7 This international standard was developed in accordance with internationally recognized principles on standardization established in the Decision on Principles for the Development of International Standards, Guides and Recommendations issued by the World Trade Organization Technical Barriers to Trade (TBT) Committee.
ASTM E803-20 is classified under the following ICS (International Classification for Standards) categories: 19.100 - Non-destructive testing. The ICS classification helps identify the subject area and facilitates finding related standards.
ASTM E803-20 has the following relationships with other standards: It is inter standard links to ASTM E803-17, ASTM E1316-24, ASTM E1316-19b, ASTM E748-19, ASTM E1316-19, ASTM E1316-18, ASTM E1316-17a, ASTM E1316-17, ASTM E1316-16a, ASTM E748-16, ASTM E1316-16, ASTM E1316-15a, ASTM E1316-15, ASTM E1316-14, ASTM E1316-14e1. Understanding these relationships helps ensure you are using the most current and applicable version of the standard.
ASTM E803-20 is available in PDF format for immediate download after purchase. The document can be added to your cart and obtained through the secure checkout process. Digital delivery ensures instant access to the complete standard document.
Standards Content (Sample)
This international standard was developed in accordance with internationally recognized principles on standardization established in the Decision on Principles for the
Development of International Standards, Guides and Recommendations issued by the World Trade Organization Technical Barriers to Trade (TBT) Committee.
Designation:E803 −20
Standard Test Method for
Determining the L/DRatio of Neutron Radiography Beams
This standard is issued under the fixed designation E803; the number immediately following the designation indicates the year of
original adoption or, in the case of revision, the year of last revision. A number in parentheses indicates the year of last reapproval. A
superscript epsilon (´) indicates an editorial change since the last revision or reapproval.
1. Scope* 2. Referenced Documents
2.1 ASTM Standards:
1.1 This test method defines an empirical technique for the
measurement of the effective collimation ratio, L/D, of neutron E748 Guide for Thermal Neutron Radiography of Materials
E1316 Terminology for Nondestructive Examinations
radiography beams. The technique is based upon analysis of a
neutron radiographic image and is independent of measure-
3. Summary of Test Method
ments and calculations based on physical dimensions of the
collimation system. The values derived by this technique 3.1 Determination of neutron beam L/D ratio (length of the
should be more accurate than those based on physical beam line divided by the diameter of the aperture) using the
measurements, particularly for poorly defined apertures. NU (no umbra) technique is accomplished by radiographing
the NU device with the neutron beam to be measured and
1.2 Thistestmethodcoversboththemanufactureanduseof
subsequently analyzing the resulting image by one of three
the device to measure L/D ratios.
methods. Each of the three methods is based upon the
1.3 Neutron images for this method can be produced on
determination of that point at which the umbral shadow width
radiographic film using an appropriate conversion screen as
reaches zero. See Fig. 1. The neutron radiography method is
detailed in Guide E748 or a CR screen with appropriate
discussed in Guide E748 and the terms are defined in Termi-
neutron converter. The method has not been validated with
nology E1316.
images produced by digital detector arrays.
4. Significance and Use
1.4 Thistestmethodonlyappliestoneutronbeamlineswith
cold or thermal neutron spectrums. 4.1 The quality of a neutron radiographic image is depen-
dent upon many factors. The L/D ratio is one of those factors
1.5 Units—The values stated in SI units are to be regarded
and constitutes a numerical definition of the geometry of the
as standard.
neutron beam. The L/D ratio required for a specific neutron
1.6 This standard does not purport to address all of the
radiographic examination is dependent upon the thickness of
safety concerns, if any, associated with its use. It is the
the specimen and the physical characteristics of the particular
responsibility of the user of this standard to establish appro-
element of interest. Use of this test method allows the
priate safety, health, and environmental practices and deter-
radiographer and the user to determine and periodically mea-
mine the applicability of regulatory limitations prior to use.
sure the effective collimation ratio.
1.7 This international standard was developed in accor-
5. Apparatus
dance with internationally recognized principles on standard-
ization established in the Decision on Principles for the
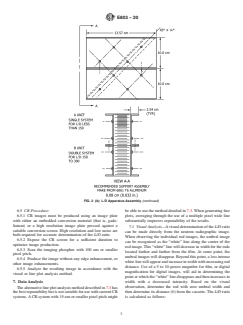
5.1 The NU Device (see Fig. 2(a) and (b), and Fig. 3)
Development of International Standards, Guides and Recom-
employsneutronabsorbingrodspositionedatvariousdistances
mendations issued by the World Trade Organization Technical
from the image plane. In practice, this device consists of
Barriers to Trade (TBT) Committee.
cadmium rods located inV-grooves accurately machined in the
For referenced ASTM standards, visit the ASTM website, www.astm.org, or
This test method is under the jurisdiction of ASTM Committee E07 on contact ASTM Customer Service at service@astm.org. For Annual Book of ASTM
Nondestructive Testing and is the direct responsibility of Subcommittee E07.05 on Standards volume information, refer to the standard’s Document Summary page on
Radiology (Neutron) Method. the ASTM website.
Current edition approved July 1, 2020. Published August 2020. Originally Newacheck, R. L., and Underhill, P. E., “The NU Method for Determining L/D
approved in 1986. Last previous edition approved in 2017 as E803 – 17. DOI: Ratio Of Neutron Radiography Facilities,” Aerotest Operations, Inc., Report A.O.
10.1520/E0803-20. 77-27, June 1977.
*A Summary of Changes section appears at the end of this standard
Copyright © ASTM International, 100 Barr Harbor Drive, PO Box C700, West Conshohocken, PA 19428-2959. United States
E803−20
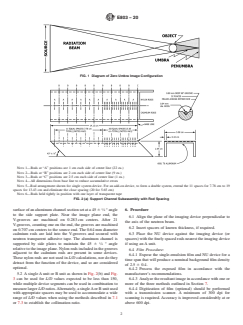
FIG. 1 Diagram of Zero Umbra Image Configuration
NOTE 1—Rods at “A” positions are 1 cm each side of center line (22 ea.)
NOTE 2—Rods at “B” positions are 2 cm each side of center line (9 ea.)
NOTE 3—Rods at “C” positions are 2.5 cm each side of center line (1 ea.)
NOTE 4—All dimensions from base line to reduce accumulative errors
NOTE 5—Rod arrangement shown for single system device. For an add-on device, to form a double system, extend the 11 spaces for 7.78 cm to 19
spaces for 13.43 cm and eliminate the close spacing (20 for 5.65 cm)
NOTE 6—Rods held tightly in position with one layer of transparent tape
FIG. 2(a) Support Channel Subassembly with Rod Spacing
surfaceofanaluminumchannelsectionsetata45 6 ⁄4°angle 6. Procedure
to the side support plate. Near the image plane end, the
6.1 Align the plane of the imaging device perpendicular to
V-grooves are machined on 0.283 cm centers. After 21
the axis of the neutron beam.
V-grooves, counting one on the end, the grooves are machined
6.2 Insert spacers of known thickness, if required.
on 0.707 cm centers to the source end. The 0.64 mm diameter
cadmium rods are laid into the V-grooves and secured with
6.3 Place the NU device against the imaging device (or
neutron transparent adhesive tape. The aluminum channel is spacers) with the finely spaced rods nearest the imaging device
supported by side plates to maintain the 45 6 ⁄4 ° angle
if using an A unit.
relative to the image plane. Nylon rods included in the grooves
6.4 Film Procedure:
adjacent to the cadmium rods are present in some devices.
6.4.1 Expose the single-emulsion film and NU device for a
These nylon rods are not used in L/D calculations, nor do they
time span that will produce a nominal background film density
detract from the function of the device, and so are considered
of 2.5 6 0.4.
optional.
6.4.2 Process the exposed film in accordance with the
5.2 AsingleAunit or B unit as shown in Fig. 2(b) and Fig. manufacturer’s recommendations.
3 can be used for L/D values expected to be less than 150, 6.4.3 Analyze the resultant image in accordance with one or
while multiple device segments can be used in combination to more of the three methods outlined in Section 7.
measurelarger L/Dratios.Alternately,asingleAorBunitused 6.4.4 Digitization of film (optional) should be performed
with appropriate spacers may be used to accommodate a wide with a transmission scanner. A minimum of 300 dpi for
range of L/D values when using the methods described in 7.1 scanning is required. Accuracy is improved considerably at or
or 7.3 to establish the collimation ratio. above 600 dpi.
E803−20
FIG. 2 (b) L⁄D Apparatus Assembly (continued)
6.5 CR Procedure: be able to use the method detailed in 7.3.When generating line
6.5.1 CR images must be produced using an image plate
plots, averaging through the use of a multiple pixel wide line
with either an embedded conversion material (that is, gado-
substantially improves repeatability of the results.
linium) or a high resolution image plate pressed against a
7.1 Visual Analysis—Avisual determination of the L/D ratio
suitable conversion screen. High resolution and low noise are
can be made directly from the neutron radiographic image.
both required for accurate determination of the L/D ratio.
When observing the individual rod images, the umbral image
6.5.2 Expose the CR screen for a sufficient duration to
can be recognized as the “white” line along the center of the
optimize image production.
rod image.This “white” line will decrease in width for the rods
6.5.3 Scan the imaging phosphor with 100 um or smaller
located farther and farther from the film. At some point, the
pixel pitch.
umbral images will disappear. Beyond this point, a less intense
6.5.4 Produce the image without any edge enhancement, or
whitelinewillappearandincreaseinwidthwithincreasingrod
other image enhancements.
distance. Use ofa5to 10-power magnifier for film, or digital
6.5.5 Analyze the resulting image in accordance with the
magnification for digital images, will aid in determining the
visual or line plot analysis method.
pointatwhichthe“white”linedisappearsandthenincreasesin
7. Data Analysis
width with a decreased intensity. Based on the visual
observation, determine the rod with zero umbral width and
Thealternativelineplotanalysismethoddescribedin7.3has
thebestrepeatabilitybutisnotsuitableforusewithcurrentCR then determine its distance (b) from the cassette. The L/D ratio
systems.ACR system with 15 um or smaller pixel pitch might is calculated as follows:
E803−20
L/D 5 b/rod diameter line with lines drawn through the two sides of the wave form.
~ !
The unit of measurement and scan/magnification settings must
7.2 Line Plot Analysis—The second data analysis method is
be consistent through measurement of all individual wave
based on a microdensitometric, line plot from a digitized film,
forms.
or a line plot from a digital CR image. The line plot is taken
7.3.2 At least two wave forms must be plotted, one near the
acrossthecadmiumrodimagesbeginningwiththe“0”position
film plane and one near the point where the umbra disappears.
rod nearest the film.Atypical line plot is shown in Fig. 4. The
Increasing the number of wave forms plotted improves accu-
value
...
This document is not an ASTM standard and is intended only to provide the user of an ASTM standard an indication of what changes have been made to the previous version. Because
it may not be technically possible to adequately depict all changes accurately, ASTM recommends that users consult prior editions as appropriate. In all cases only the current version
of the standard as published by ASTM is to be considered the official document.
Designation: E803 − 17 E803 − 20
Standard Test Method for
Determining the L/D Ratio of Neutron Radiography Beams
This standard is issued under the fixed designation E803; the number immediately following the designation indicates the year of
original adoption or, in the case of revision, the year of last revision. A number in parentheses indicates the year of last reapproval. A
superscript epsilon (´) indicates an editorial change since the last revision or reapproval.
1. Scope*
1.1 This test method defines an empirical technique for the measurement of the effective collimation ratio, L/D, of neutron
radiography beams. The technique is based upon analysis of a neutron radiographic image and is independent of measurements
and calculations based on physical dimensions of the collimation system. The values derived by this technique should be more
accurate than those based on physical measurements, particularly for poorly defined apertures.
1.2 This test method covers both the manufacture and use of the device to measure L/D ratios.
1.3 Neutron images for this method can be produced on radiographic film using an appropriate conversion screen as detailed in
Guide E748 or a CR screen with appropriate neutron converter. The method has not been validated with images produced by digital
detector arrays.
1.4 This test method only applies to neutron beam lines with cold or thermal neutron spectrums.
1.5 Units—The values stated in SI units are to be regarded as standard.
1.6 This standard does not purport to address all of the safety concerns, if any, associated with its use. It is the responsibility
of the user of this standard to establish appropriate safety, health, and environmental practices and determine the applicability of
regulatory limitations prior to use.
1.7 This international standard was developed in accordance with internationally recognized principles on standardization
established in the Decision on Principles for the Development of International Standards, Guides and Recommendations issued
by the World Trade Organization Technical Barriers to Trade (TBT) Committee.
2. Referenced Documents
2.1 ASTM Standards:
E748 Guide for Thermal Neutron Radiography of Materials
E1316 Terminology for Nondestructive Examinations
3. Summary of Test Method
3.1 Determination of neutron beam L/D ratio (length of the beam line divided by the diameter of the aperture) using the NU (no
This test method is under the jurisdiction of ASTM Committee E07 on Nondestructive Testing and is the direct responsibility of Subcommittee E07.05 on Radiology
(Neutron) Method.
Current edition approved Nov. 1, 2017July 1, 2020. Published November 2017August 2020. Originally approved in 1986. Last previous edition approved in 20132017
as E803 – 91E803 – 17.(2013). DOI: 10.1520/E0803-17.10.1520/E0803-20.
For referenced ASTM standards, visit the ASTM website, www.astm.org, or contact ASTM Customer Service at service@astm.org. For Annual Book of ASTM Standards
volume information, refer to the standard’s Document Summary page on the ASTM website.
*A Summary of Changes section appears at the end of this standard
Copyright © ASTM International, 100 Barr Harbor Drive, PO Box C700, West Conshohocken, PA 19428-2959. United States
E803 − 20
umbra) technique is accomplished by radiographing the NU device with the neutron beam to be measured and subsequently
analyzing the resulting image by one of three methods. Each of the three methods is based upon the determination of that point
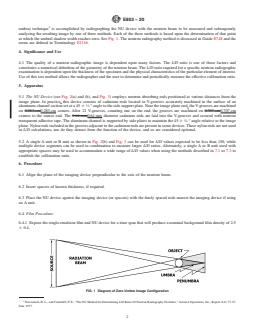
at which the umbral shadow width reaches zero. See Fig. 1. The neutron radiography method is discussed in Guide E748 and the
terms are defined in Terminology E1316.
4. Significance and Use
4.1 The quality of a neutron radiographic image is dependent upon many factors. The L/D ratio is one of those factors and
constitutes a numerical definition of the geometry of the neutron beam. The L/D ratio required for a specific neutron radiographic
examination is dependent upon the thickness of the specimen and the physical characteristics of the particular element of interest.
Use of this test method allows the radiographer and the user to determine and periodically measure the effective collimation ratio.
5. Apparatus
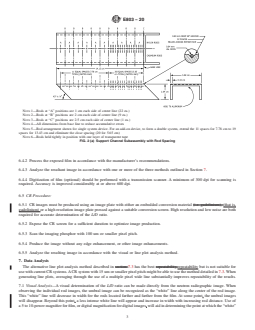
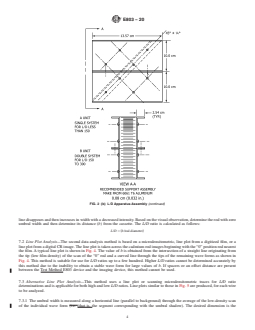
5.1 The NU Device (see Fig. 2(a) and (b), and Fig. 3) employs neutron absorbing rods positioned at various distances from the
image plane. In practice, this device consists of cadmium rods located in V-grooves accurately machined in the surface of an
aluminum channel section set at a 45 6 ⁄4 ° angle to the side support plate. Near the image plane end, the V-grooves are machined
on 0.283-cm0.283 cm centers. After 21 V-grooves, counting one on the end, the grooves are machined on 0.707-cm0.707 cm
centers to the source end. The 0.64-mm0.64 mm diameter cadmium rods are laid into the V-grooves and secured with neutron
transparent adhesive tape. The aluminum channel is supported by side plates to maintain the 45 6 ⁄4 ° angle relative to the image
plane. Nylon rods included in the grooves adjacent to the cadmium rods are present in some devices. These nylon rods are not used
in L/D calculations, nor do they detract from the function of the device, and so are considered optional.
5.2 A single A unit or B unit as shown in Fig. 2(b) and Fig. 3 can be used for L/D values expected to be less than 150, while
multiple device segments can be used in combination to measure larger L/D ratios. Alternately, a single A or B unit used with
appropriate spacers may be used to accommodate a wide range of L/D values when using the methods described in 7.1 or 7.3 to
establish the collimation ratio.
6. Procedure
6.1 Align the plane of the imaging device perpendicular to the axis of the neutron beam.
6.2 Insert spacers of known thickness, if required.
6.3 Place the NU device against the imaging device (or spacers) with the finely spaced rods nearest the imaging device if using
an A unit.
6.4 Film Procedure:
6.4.1 Expose the single-emulsion film and NU device for a time span that will produce a nominal background film density of 2.5
6 0.4.
FIG. 1 Diagram of Zero Umbra Image Configuration
Newacheck, R. L., and Underhill, P. E., “The NU Method for Determining L/D Ratio Of Neutron Radiography Facilities,” Aerotest Operations, Inc., Report A.O. 77-27,
June 1977.
E803 − 20
NOTE 1—Rods at “A” positions are 1 cm each side of center line (22 ea.)
NOTE 2—Rods at “B” positions are 2 cm each side of center line (9 ea.)
NOTE 3—Rods at “C” positions are 2.5 cm each side of center line (1 ea.)
NOTE 4—All dimensions from base line to reduce accumulative errors
NOTE 5—Rod arrangement shown for single system device. For an add-on device, to form a double system, extend the 11 spaces for 7.78 cm to 19
spaces for 13.43 cm and eliminate the close spacing (20 for 5.65 cm)
NOTE 6—Rods held tightly in position with one layer of transparent tape
FIG. 2 (a) Support Channel Subassembly with Rod Spacing
6.4.2 Process the exposed film in accordance with the manufacturer’s recommendations.
6.4.3 Analyze the resultant image in accordance with one or more of the three methods outlined in Section 7.
6.4.4 Digitization of film (optional) should be performed with a transmission scanner. A minimum of 300 dpi for scanning is
required. Accuracy is improved considerably at or above 600 dpi.
6.5 CR Procedure:
6.5.1 CR images must be produced using an image plate with either an embedded conversion material (i.e. gadolinium), (that is,
gadolinium) or a high resolution image plate pressed against a suitable conversion screen. High resolution and low noise are both
required for accurate determination of the L/D ratio.
6.5.2 Expose the CR screen for a sufficient duration to optimize image production.
6.5.3 Scan the imaging phosphor with 100 um or smaller pixel pitch.
6.5.4 Produce the image without any edge enhancement, or other image enhancements.
6.5.5 Analyze the resulting image in accordance with the visual or line plot analysis method.
7. Data Analysis
The alternative line plot analysis method described in section 7.3 has the best repeatability,repeatability but is not suitable for
use with current CR systems. A CR system with 15 um or smaller pixel pitch might be able to use the method detailed in 7.3. When
generating line plots, averaging through the use of a multiple pixel wide line substantially improves repeatability of the results.
7.1 Visual Analysis—A visual determination of the L/D ratio can be made directly from the neutron radiographic image. When
observing the individual rod images, the umbral image can be recognized as the “white” line along the center of the rod image.
This “white” line will decrease in width for the rods located farther and farther from the film. At some point, the umbral images
will disappear. Beyond this point, a less intense white line will appear and increase in width with increasing rod distance. Use of
a 5 to 10-power magnifier for film, or digital magnification for digital images, will aid in determining the point at which the “white”
E803 − 20
FIG. 2 (b) L ⁄D Apparatus Assembly (continued)
line disappears and then increases in width with a decreased intensity. Based on the visual observation, determine the rod with zero
umbral width and then determine its distance (b) from the cassette. The L/D ratio is calculated as follows:
L/D 5 ~b/rod diameter!
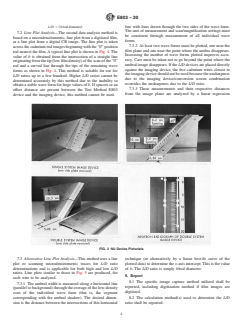
7.2 Line Plot Analysis—The second data analysis method is based on a microdensitometric, line plot from a digitized film, or a
line plot from a digital CR image. The line plot is taken across the cadmium rod images beginning with the “0” position rod nearest
the film. A typical line plot is shown in Fig. 4. The value of b is obtained from the intersection of a straight line originating from
the tip (low film density) of the scan of the “0” rod and a curved line through the tips of the remaining wave forms as shown in
Fig. 4. This method is suitable for use for L/D ratios up to a few hundred. Higher L/D ratios cannot be determined accurately by
this method due to the inability to obtain a stable wave form
...
Questions, Comments and Discussion
Ask us and Technical Secretary will try to provide an answer. You can facilitate discussion about the standard in here.
Loading comments...