ASTM F746-04(2021)
(Test Method)Standard Test Method for Pitting or Crevice Corrosion of Metallic Surgical Implant Materials
Standard Test Method for Pitting or Crevice Corrosion of Metallic Surgical Implant Materials
SIGNIFICANCE AND USE
4.1 This test method is designed solely for determining comparative laboratory indices of performance. The results may be used for ranking alloys in order of increasing resistance to pitting and crevice corrosion under the specific conditions of this method. It should be noted that the method is intentionally designed to reach conditions that are sufficiently severe to cause breakdown of at least one alloy (Type 316 L stainless steel) currently considered acceptable for surgical implant use, and that those alloys which suffer pitting or crevice corrosion during the more severe portions of the test do not necessarily suffer localized corrosion when placed within the human body as a surgical implant.
SCOPE
1.1 This test method covers the determination of resistance to either pitting or crevice corrosion of metals and alloys from which surgical implants will be produced. It is a modified version of an established test2 and is used as a screening test to rank surgical implant alloys in order of their resistance to localized corrosion.
1.2 This test method applies only to passive metals and alloys. Nonpassive alloys (other than noble alloys) are susceptible to general corrosion and are not normally suitable for implant use.
1.3 This test method is intended for use as a laboratory screening test for metals and alloys which undergo pitting or crevice corrosion, or both.
1.4 The values stated in either SI units or inch-pound units are to be regarded separately as standard. The values stated in each system may not be exact equivalents; therefore, each system shall be used independently of the other. Combining values from the two systems may result in nonconformance with the standard.
1.5 This standard does not purport to address all of the safety concerns, if any, associated with its use. It is the responsibility of the user of this standard to establish appropriate safety, health, and environmental practices and determine the applicability of regulatory limitations prior to use.
1.6 This international standard was developed in accordance with internationally recognized principles on standardization established in the Decision on Principles for the Development of International Standards, Guides and Recommendations issued by the World Trade Organization Technical Barriers to Trade (TBT) Committee.
General Information
- Status
- Published
- Publication Date
- 31-Jul-2021
- Technical Committee
- F04 - Medical and Surgical Materials and Devices
- Drafting Committee
- F04.15 - Material Test Methods
Relations
- Effective Date
- 01-May-2019
- Effective Date
- 15-Jan-2019
- Effective Date
- 01-Jan-2019
- Effective Date
- 01-Dec-2017
- Effective Date
- 15-Nov-2017
- Effective Date
- 01-Jan-2017
- Effective Date
- 01-Mar-2015
- Effective Date
- 15-Dec-2014
- Effective Date
- 01-Nov-2014
- Effective Date
- 01-Dec-2013
- Effective Date
- 01-Feb-2013
- Effective Date
- 01-Feb-2013
- Effective Date
- 01-Feb-2013
- Refers
ASTM F86-12a - Standard Practice for Surface Preparation and Marking of Metallic Surgical Implants - Effective Date
- 01-Dec-2012
- Effective Date
- 15-Nov-2012
Overview
ASTM F746-04(2021), titled Standard Test Method for Pitting or Crevice Corrosion of Metallic Surgical Implant Materials, provides a systematic laboratory procedure for evaluating the resistance of metals and alloys to pitting and crevice corrosion. Developed by ASTM International, this standard is specifically intended for metallic materials used in surgical implants. The method focuses on comparative screening under intentionally severe test conditions to rank alloys by their resistance to localized corrosion, such as pitting and crevice attacks.
This laboratory test method plays a critical role in the selection and qualification of materials for medical implants, ensuring that they have robust resistance to localized corrosion in environments that can simulate particularly aggressive bodily conditions.
Key Topics
Scope and Purpose
- Applies to passive metals and alloys intended for surgical implant applications.
- Designed to differentiate and rank alloys based on their susceptibility to pitting and crevice corrosion.
- Not suitable for nonpassive alloys, which are prone to general corrosion and are usually not used for implants.
Test Method Highlights
- Specimens are exposed to a phosphate buffered saline (PBS) electrolyte at body temperature.
- Corrosion is stimulated electrochemically by potentiostatic polarization.
- The critical potential at which repassivation occurs is used as an indicator of corrosion resistance.
- The test is intentionally aggressive - some currently accepted alloys (e.g., Type 316L stainless steel) may fail under these laboratory conditions, whereas they may still perform acceptably in the body.
Reporting and Safety
- Results include detailed specimen data, corrosion potentials, critical potentials, and observations of corrosion types.
- Users are responsible for adhering to appropriate safety, health, and regulatory practices.
Applications
Material Screening
- Used by manufacturers, researchers, and quality assurance teams to screen and rank surgical implant alloys for localized corrosion resistance before clinical use.
- Supports material selection during the development of new medical devices, such as orthopedic, dental, and cardiovascular implants.
Quality Control in Production
- Assists in verifying the consistency and corrosion performance of implant-grade metals and alloys throughout manufacturing processes.
Research and Development
- Enables comparative assessment of novel alloys and surface treatments designed to improve implant longevity and safety.
Regulatory Submissions
- Provides supporting data for regulatory bodies regarding the performance of materials under extreme conditions as part of product qualification.
Related Standards
- ASTM F86 - Practice for Surface Preparation and Marking of Metallic Surgical Implants.
- ASTM F2129 - Test Method for Conducting Cyclic Potentiodynamic Polarization Measurements to Determine the Corrosion Susceptibility of Small Implant Devices.
- ASTM G3 & G5 - Practices and methods related to electrochemical measurements in corrosion testing.
- ASTM D1193 - Specification for Reagent Water, relevant for test preparation.
Practical Value
By following ASTM F746-04(2021), organizations can ensure that only metals and alloys with proven resistance to pitting and crevice corrosion are considered for surgical implant applications. This minimizes the risk of implant failure caused by localized corrosion, directly supporting patient safety and regulatory compliance.
Relevant Keywords: ASTM F746, pitting corrosion, crevice corrosion, surgical implant materials, corrosion resistance, medical device testing, passive alloys, laboratory corrosion test, implant alloy screening
Buy Documents
ASTM F746-04(2021) - Standard Test Method for Pitting or Crevice Corrosion of Metallic Surgical Implant Materials
Get Certified
Connect with accredited certification bodies for this standard

BSI Group
BSI (British Standards Institution) is the business standards company that helps organizations make excellence a habit.

TÜV Rheinland
TÜV Rheinland is a leading international provider of technical services.

TÜV SÜD
TÜV SÜD is a trusted partner of choice for safety, security and sustainability solutions.
Sponsored listings
Frequently Asked Questions
ASTM F746-04(2021) is a standard published by ASTM International. Its full title is "Standard Test Method for Pitting or Crevice Corrosion of Metallic Surgical Implant Materials". This standard covers: SIGNIFICANCE AND USE 4.1 This test method is designed solely for determining comparative laboratory indices of performance. The results may be used for ranking alloys in order of increasing resistance to pitting and crevice corrosion under the specific conditions of this method. It should be noted that the method is intentionally designed to reach conditions that are sufficiently severe to cause breakdown of at least one alloy (Type 316 L stainless steel) currently considered acceptable for surgical implant use, and that those alloys which suffer pitting or crevice corrosion during the more severe portions of the test do not necessarily suffer localized corrosion when placed within the human body as a surgical implant. SCOPE 1.1 This test method covers the determination of resistance to either pitting or crevice corrosion of metals and alloys from which surgical implants will be produced. It is a modified version of an established test2 and is used as a screening test to rank surgical implant alloys in order of their resistance to localized corrosion. 1.2 This test method applies only to passive metals and alloys. Nonpassive alloys (other than noble alloys) are susceptible to general corrosion and are not normally suitable for implant use. 1.3 This test method is intended for use as a laboratory screening test for metals and alloys which undergo pitting or crevice corrosion, or both. 1.4 The values stated in either SI units or inch-pound units are to be regarded separately as standard. The values stated in each system may not be exact equivalents; therefore, each system shall be used independently of the other. Combining values from the two systems may result in nonconformance with the standard. 1.5 This standard does not purport to address all of the safety concerns, if any, associated with its use. It is the responsibility of the user of this standard to establish appropriate safety, health, and environmental practices and determine the applicability of regulatory limitations prior to use. 1.6 This international standard was developed in accordance with internationally recognized principles on standardization established in the Decision on Principles for the Development of International Standards, Guides and Recommendations issued by the World Trade Organization Technical Barriers to Trade (TBT) Committee.
SIGNIFICANCE AND USE 4.1 This test method is designed solely for determining comparative laboratory indices of performance. The results may be used for ranking alloys in order of increasing resistance to pitting and crevice corrosion under the specific conditions of this method. It should be noted that the method is intentionally designed to reach conditions that are sufficiently severe to cause breakdown of at least one alloy (Type 316 L stainless steel) currently considered acceptable for surgical implant use, and that those alloys which suffer pitting or crevice corrosion during the more severe portions of the test do not necessarily suffer localized corrosion when placed within the human body as a surgical implant. SCOPE 1.1 This test method covers the determination of resistance to either pitting or crevice corrosion of metals and alloys from which surgical implants will be produced. It is a modified version of an established test2 and is used as a screening test to rank surgical implant alloys in order of their resistance to localized corrosion. 1.2 This test method applies only to passive metals and alloys. Nonpassive alloys (other than noble alloys) are susceptible to general corrosion and are not normally suitable for implant use. 1.3 This test method is intended for use as a laboratory screening test for metals and alloys which undergo pitting or crevice corrosion, or both. 1.4 The values stated in either SI units or inch-pound units are to be regarded separately as standard. The values stated in each system may not be exact equivalents; therefore, each system shall be used independently of the other. Combining values from the two systems may result in nonconformance with the standard. 1.5 This standard does not purport to address all of the safety concerns, if any, associated with its use. It is the responsibility of the user of this standard to establish appropriate safety, health, and environmental practices and determine the applicability of regulatory limitations prior to use. 1.6 This international standard was developed in accordance with internationally recognized principles on standardization established in the Decision on Principles for the Development of International Standards, Guides and Recommendations issued by the World Trade Organization Technical Barriers to Trade (TBT) Committee.
ASTM F746-04(2021) is classified under the following ICS (International Classification for Standards) categories: 11.040.40 - Implants for surgery, prosthetics and orthotics. The ICS classification helps identify the subject area and facilitates finding related standards.
ASTM F746-04(2021) has the following relationships with other standards: It is inter standard links to ASTM G3-14(2019), ASTM F2129-19a, ASTM F2129-19, ASTM F2129-17b, ASTM F2129-17a, ASTM F2129-17, ASTM F2129-15, ASTM G3-14, ASTM G5-14, ASTM G3-13, ASTM G5-13, ASTM G5-13e1, ASTM G5-13e2, ASTM F86-12a, ASTM G5-12. Understanding these relationships helps ensure you are using the most current and applicable version of the standard.
ASTM F746-04(2021) is available in PDF format for immediate download after purchase. The document can be added to your cart and obtained through the secure checkout process. Digital delivery ensures instant access to the complete standard document.
Standards Content (Sample)
This international standard was developed in accordance with internationally recognized principles on standardization established in the Decision on Principles for the
Development of International Standards, Guides and Recommendations issued by the World Trade Organization Technical Barriers to Trade (TBT) Committee.
Designation: F746 − 04 (Reapproved 2021)
Standard Test Method for
Pitting or Crevice Corrosion of Metallic Surgical Implant
Materials
ThisstandardisissuedunderthefixeddesignationF746;thenumberimmediatelyfollowingthedesignationindicatestheyearoforiginal
adoptionor,inthecaseofrevision,theyearoflastrevision.Anumberinparenthesesindicatestheyearoflastreapproval.Asuperscript
epsilon (´) indicates an editorial change since the last revision or reapproval.
1. Scope 2. Referenced Documents
2.1 ASTM Standards:
1.1 This test method covers the determination of resistance
D1193Specification for Reagent Water
to either pitting or crevice corrosion of metals and alloys from
F86Practice for Surface Preparation and Marking of Metal-
which surgical implants will be produced. It is a modified
2 lic Surgical Implants
versionofanestablishedtest andisusedasascreeningtestto
F2129Test Method for Conducting Cyclic Potentiodynamic
rank surgical implant alloys in order of their resistance to
Polarization Measurements to Determine the Corrosion
localized corrosion.
Susceptibility of Small Implant Devices
1.2 This test method applies only to passive metals and G3Practice for Conventions Applicable to Electrochemical
Measurements in Corrosion Testing
alloys. Nonpassive alloys (other than noble alloys) are suscep-
G5Reference Test Method for Making Potentiodynamic
tible to general corrosion and are not normally suitable for
Anodic Polarization Measurements
implant use.
G15TerminologyRelatingtoCorrosionandCorrosionTest-
1.3 This test method is intended for use as a laboratory
ing (Withdrawn 2010)
screening test for metals and alloys which undergo pitting or
crevice corrosion, or both. 3. Summary of Test Method
3.1 Acylindricalspecimenfittedwithaninerttaperedcollar
1.4 The values stated in either SI units or inch-pound units
is immersed in a phosphate buffered saline electrolyte at 37°C
are to be regarded separately as standard. The values stated in
for1hto establish a corrosion potential. Pitting (or crevice
each system may not be exact equivalents; therefore, each
corrosion) is then stimulated by potentiostatically polarizing
system shall be used independently of the other. Combining
thespecimentoapotentialmuchmorenoblethanthecorrosion
values from the two systems may result in nonconformance
potential. Stimulation of pitting (or crevice corrosion) will be
with the standard.
marked by a large and generally increasing polarizing current.
1.5 This standard does not purport to address all of the
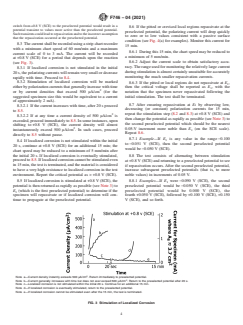
3.2 Immediately after the stimulation step, the potential is
safety concerns, if any, associated with its use. It is the
decreased as rapidly as possible to one of several preselected
responsibility of the user of this standard to establish appro-
potentials at, or more noble than, the corrosion potential. If the
priate safety, health, and environmental practices and deter-
alloy is susceptible to pitting (or crevice corrosion) at the
mine the applicability of regulatory limitations prior to use.
preselected potential, the polarizing current will remain at
1.6 This international standard was developed in accor-
relatively high values and will fluctuate or increase with time.
dance with internationally recognized principles on standard-
A post-test examination of the metal specimen establishes
ization established in the Decision on Principles for the
whether localized corrosion has occurred by pitting of the
Development of International Standards, Guides and Recom-
exposed surface or by preferential attack at the crevice formed
mendations issued by the World Trade Organization Technical by the tapered collar, or both.
Barriers to Trade (TBT) Committee.
3.3 If the pit (or crevice) surface repassivates at the prese-
lectedpotentialandlocalizedcorrosionishalted,thepolarizing
ThistestmethodisunderthejurisdictionofASTMCommitteeF04onMedical
andSurgicalMaterialsandDevicesandisthedirectresponsibilityofSubcommittee For referenced ASTM standards, visit the ASTM website, www.astm.org, or
F04.15 on Material Test Methods. contact ASTM Customer Service at service@astm.org. For Annual Book of ASTM
Current edition approved Aug. 1, 2021. Published August 2021. Originally Standards volume information, refer to the standard’s Document Summary page on
approved in 1981. Last previous edition approved in 2014 as F746–04 (2014). the ASTM website.
DOI: 10.1520/F0746-04R21. The last approved version of this historical standard is referenced on
Syrett, B. C., Corrosion, Vol 33, 1977, p. 221. www.astm.org.
Copyright © ASTM International, 100 Barr Harbor Drive, PO Box C700, West Conshohocken, PA 19428-2959. United States
F746 − 04 (2021)
current will drop to values typical for passive surfaces and the that the part of the cylindrical specimen that is exposed to the
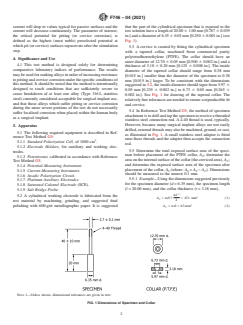
current will decrease continuously. The parameter of interest, testsolutionhavealengthof20.00 61.00mm[0.787 60.039
the critical potential for pitting (or crevice corrosion), is in.]andadiameterof6.35 60.03mm[0.250 60.001in.](see
defined as the highest (most noble) preselected potential at Fig. 1).
whichpit(orcrevice)surfacesrepassivateafterthestimulation
5.3 A crevice is created by fitting the cylindrical specimen
step.
with a tapered collar, machined from commercial purity
polytetrafluoroethylene (PTFE). The collar should have an
4. Significance and Use
outer diameter of 12.70 6 0.05 mm [0.500 6 0.002 in.] and a
4.1 This test method is designed solely for determining
thickness of 3.18 6 0.20 mm [0.125 6 0.008 in.]. The inside
comparative laboratory indices of performance. The results
diameter of the tapered collar should range from 0.38 mm
maybeusedforrankingalloysinorderofincreasingresistance
[0.015 in.] smaller than the diameter of the specimen to 0.38
topittingandcrevicecorrosionunderthespecificconditionsof
mm [0.015 in.] larger. To be consistent with the dimensions
this method. It should be noted that the method is intentionally
suggested in 5.2, the inside diameter should taper from 5.97 6
designed to reach conditions that are sufficiently severe to
0.05 mm [0.235 6 0.002 in.] to 6.73 6 0.05 mm [0.265 6
cause breakdown of at least one alloy (Type 316L stainless
0.002 in.]. See Fig. 1 for drawing of the tapered collar. The
steel) currently considered acceptable for surgical implant use,
relativelyfinetolerancesareneededtoensureareproduciblefit
and that those alloys which suffer pitting or crevice corrosion
and crevice.
during the more severe portions of the test do not necessarily
5.4 In Reference Test Method G5, the method of specimen
suffer localized corrosion when placed within the human body
attachmentistodrillandtapthespecimentoreceiveathreaded
as a surgical implant.
stainless steel connection rod.A4-40 thread is used, typically.
However, because many surgical implant alloys are not easily
5. Apparatus
drilled,externalthreadsmayalsobemachined,ground,orcast,
5.1 The following required equipment is described in Ref-
as illustrated in Fig. 1. A small stainless steel adapter is fitted
erence Test Method G5:
onto these threads and the adapter then accepts the connection
5.1.1 Standard Polarization Cell, of 1000 cm .
rod.
5.1.2 Electrode Holders, for auxiliary and working elec-
5.5 Determine the total exposed surface area of the speci-
trodes.
men before placement of the PTFE collar, A ; determine the
T
5.1.3 Potentiostat, calibrated in accordance with Reference
areaontheinternalsurfaceofthecollar(thecrevicedarea),A ;
C
Test Method G5.
and determine the exposed surface area of the specimen after
5.1.4 Potential-Measuring Instrument.
placement of the collar, A (where: A =A −A ). Dimensions
S S T C
5.1.5 Current-Measuring Instrument.
should be measured to the nearest 0.1 mm.
5.1.6 Anodic Polarization Circuit.
5.5.1 Example—Usingthedimensionssuggestedpreviously
5.1.7 Platinum Auxiliary Electrodes.
for the specimen diameter (d=6.35 mm), the specimen length
5.1.8 Saturated Calomel Electrode (SCE).
(l=20.00 mm), and the collar thickness (t=3.18 mm),
5.1.9 Salt Bridge Probe.
πd
5.2 A cylindrical working electrode is fabricated from the
A 5 πdl1 5431 mm (1)
T
test material by machining, grinding, and suggested final
polishing with 600-grit metallographic paper. It is suggested A 5 πdt 563mm (2)
C
NOTE 1—Unless shown, dimensional tolerances are given in text.
FIG. 1 Dimensions of Specimen and Collar
F746 − 04 (2021)
A 5 A 2 A 5386mm (3) 7.6 Place the platinum auxiliary electrodes, salt bridge
S T C
probe, and other components in the test cell and temporarily
6. Reagents closethecenteropeningwithastopper.Fillthesaltbridgewith
the electrolyte.
6.1 Electrolyte—Unless otherwise specified, phosphate
buffered saline (PBS) should be used as the standard test
NOTE2—Thelevelsofthesolutioninthereferenceandthepolarization
solution. A standard PBS formulation (see TableX2.3 of Test cells should be the same to avoid siphoning. If this is not possible, a
solution-wet (not greased) stopcock can be used in the salt bridge to
Method F2129) is the following: NaCl 8.0 g/L, KCl 0.2 g/L,
eliminate siphoning.
Na HPO ·12H O 1.15 g/L, KH PO 0.2 g/L, and bring to 1 L
2 4 2 2 4
7.7 Transferthespecimenelectrodeassemblytothetestcell
volumetrically using distilled water.
and adjust the submerged salt bridge probe tip so it is about
6.1.1 The water shall be distilled conforming to the purity
2mm [0.08 in.] from the center of the bottom portion of the
requirements of Specification D1193, Type IV reagent water.
specimen (below the collar).
6.1.2 After transferring the appropriate amount of electro-
lyte to the test cell (7.5), the pH is measured both before and
8. Procedure
after the test.
8.1 Continuouslyrecordthecorrosionpotentialofthework-
7. Preparation of Specimens and Conditioning
ing electrode (specimen) with respect to the saturated calomel
7.1 Prepare the test specimen surface within1hofthe start electrode for 1 h, starting immediately after immersing the
of the experiment by the method described in Reference Test specimen. The potential observed upon immersion in the
Method G5. electrolyte shall be called the initial corrosion potential. The
potential at the end of the 1 h shall be known as the final
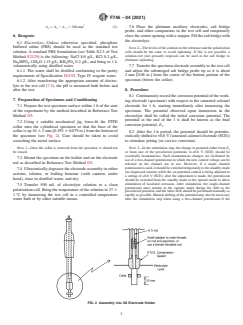
7.2 Using a suitable mechanical jig, force-fit the PTFE
corrosion potential, E .
collar onto the cylindrical specimen so that the base of the
collarisup10 62mm[0.393 60.079in.]fromthebottomof
8.2 After the 1-h period, the potential should be potentio-
the specimen (see Fig. 2). Care should be taken to avoid staticallyshiftedto+0.8V(saturatedcalomelelectrode(SCE))
scratching the metal surface.
to stimulate pitting (or crevice corrosion).
NOTE 1—Once the collar is removed from the specimen, it should not NOTE 3—In the stimulation step, the change in potential either from E
be reused.
or from one of the preselected potentials to+0.8 V (SCE) should be
essentially instantaneous. Such instantaneous changes are facilitated by
7.3 Mount the specimen on the holder and on the electrode
use of a two-channel potentiostat in which the new control voltage can be
rod as described in Reference Test Method G5.
selected on the channel not in use. However, if a single channel
potentiostatisused,itshouldbeswitchedtemporarilytothestandbymode
7.4 Ultrasonically degrease the electrode assembly in either
(no impressed current) while the set-potential control is being adjusted to
acetone, toluene, or boiling benzene (with caution, under
a setting of+0.8 V (SCE); after the adjustment is made, the potentiostat
hood), rinse in distilled water, and dry.
should be switched from the standby mode to the operate mode to allow
stimulation of localized corrosion. After stimulation, the single-channel
7.5 Transfer 500 mL of electrolyte solution to a clean
potentiostat must remain in the operate mode during the shift to the
polarizationcell.Bringthetemperatureofthesolutionto37 6
preselectedpotential,andthelattershiftshouldbeperformedmanuallyas
1°C by immersing the test cell in a controlled temperature
rapidlyaspossible.Manualshiftingofthepotentialmayalsobenecessary
water bath or by other suitable means. after the stimulation step when using a two-channel potentiostat if the
FIG. 2 Assembly into G5 Electrode Holder
F746 − 04 (2021)
switch from+0.8 V (SCE) to the preselected potential would result in a
8.6 If the pitted or creviced local regions repassivate at the
potential transient to values more active than the preselected potential.
...


Questions, Comments and Discussion
Ask us and Technical Secretary will try to provide an answer. You can facilitate discussion about the standard in here.
Loading comments...