ASTM E2023-10(2014)
(Practice)Standard Practice for Fabrication of Neutron Radiographic Sensitivity Indicators
Standard Practice for Fabrication of Neutron Radiographic Sensitivity Indicators
SIGNIFICANCE AND USE
5.1 The only truly valid image quality indicator is a material or component, equivalent to the part being neutron radiographed, with a known standard discontinuity, inclusion, omission or flaw (reference standard comparison part). The SI is designed to substitute for the reference standard, providing qualitative information on hole and gap sensitivity in a single unit. Fabrication in accordance with this practice is vital for accurate and consistent measurements.
5.2 This practice shall be followed for the fabrication of all SIs to be used with Method E545 to determine image quality in direct thermal neutron radiography.
SCOPE
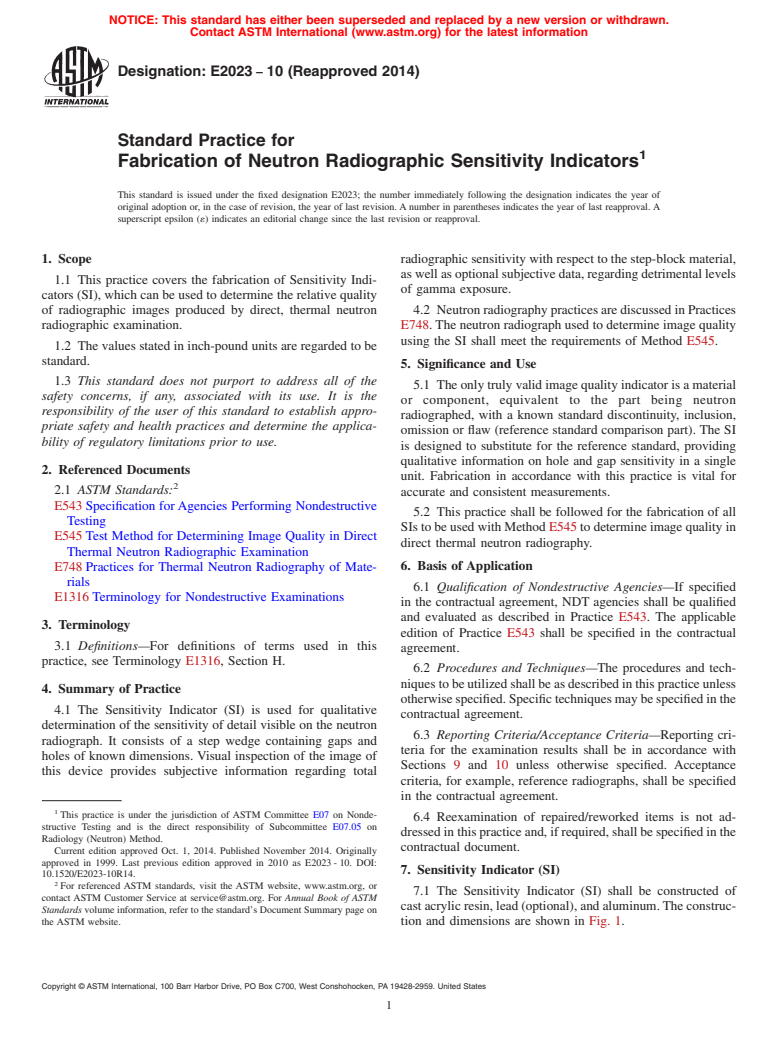
1.1 This practice covers the fabrication of Sensitivity Indicators (SI), which can be used to determine the relative quality of radiographic images produced by direct, thermal neutron radiographic examination.
1.2 The values stated in inch-pound units are regarded to be standard.
1.3 This standard does not purport to address all of the safety concerns, if any, associated with its use. It is the responsibility of the user of this standard to establish appropriate safety and health practices and determine the applicability of regulatory limitations prior to use.
General Information
Relations
Buy Standard
Standards Content (Sample)
NOTICE: This standard has either been superseded and replaced by a new version or withdrawn.
Contact ASTM International (www.astm.org) for the latest information
Designation: E2023 − 10 (Reapproved 2014)
Standard Practice for
Fabrication of Neutron Radiographic Sensitivity Indicators
This standard is issued under the fixed designation E2023; the number immediately following the designation indicates the year of
original adoption or, in the case of revision, the year of last revision. A number in parentheses indicates the year of last reapproval. A
superscript epsilon (´) indicates an editorial change since the last revision or reapproval.
1. Scope radiographic sensitivity with respect to the step-block material,
aswellasoptionalsubjectivedata,regardingdetrimentallevels
1.1 This practice covers the fabrication of Sensitivity Indi-
of gamma exposure.
cators (SI), which can be used to determine the relative quality
of radiographic images produced by direct, thermal neutron 4.2 NeutronradiographypracticesarediscussedinPractices
radiographic examination. E748. The neutron radiograph used to determine image quality
using the SI shall meet the requirements of Method E545.
1.2 The values stated in inch-pound units are regarded to be
standard.
5. Significance and Use
1.3 This standard does not purport to address all of the
5.1 Theonlytrulyvalidimagequalityindicatorisamaterial
safety concerns, if any, associated with its use. It is the
or component, equivalent to the part being neutron
responsibility of the user of this standard to establish appro-
radiographed, with a known standard discontinuity, inclusion,
priate safety and health practices and determine the applica-
omission or flaw (reference standard comparison part). The SI
bility of regulatory limitations prior to use.
is designed to substitute for the reference standard, providing
qualitative information on hole and gap sensitivity in a single
2. Referenced Documents
unit. Fabrication in accordance with this practice is vital for
2.1 ASTM Standards:
accurate and consistent measurements.
E543 Specification forAgencies Performing Nondestructive
5.2 This practice shall be followed for the fabrication of all
Testing
SIstobeusedwithMethodE545todetermineimagequalityin
E545 Test Method for Determining Image Quality in Direct
direct thermal neutron radiography.
Thermal Neutron Radiographic Examination
E748 Practices for Thermal Neutron Radiography of Mate- 6. Basis of Application
rials
6.1 Qualification of Nondestructive Agencies—If specified
E1316 Terminology for Nondestructive Examinations
in the contractual agreement, NDT agencies shall be qualified
and evaluated as described in Practice E543. The applicable
3. Terminology
edition of Practice E543 shall be specified in the contractual
3.1 Definitions—For definitions of terms used in this
agreement.
practice, see Terminology E1316, Section H.
6.2 Procedures and Techniques—The procedures and tech-
niquestobeutilizedshallbeasdescribedinthispracticeunless
4. Summary of Practice
otherwisespecified.Specifictechniquesmaybespecifiedinthe
4.1 The Sensitivity Indicator (SI) is used for qualitative
contractual agreement.
determination of the sensitivity of detail visible on the neutron
6.3 Reporting Criteria/Acceptance Criteria—Reporting cri-
radiograph. It consists of a step wedge containing gaps and
teria for the examination results shall be in accordance with
holes of known dimensions. Visual inspection of the image of
Sections 9 and 10 unless otherwise specified. Acceptance
this device provides subjective information regarding total
criteria, for example, reference radiographs, shall be specified
in the contractual agreement.
This practice is under the jurisdiction of ASTM Committee E07 on Nonde-
6.4 Reexamination of repaired/reworked items is not ad-
structive Testing and is the direct responsibility of Subcommittee E07.05 on
dressedinthispracticeand,ifrequired,shallbespecifiedinthe
Radiology (Neutron) Method.
contractual document.
Current edition approved Oct. 1, 2014. Published November 2014. Originally
approved in 1999. Last previous edition approved in 2010 as E2023 - 10. DOI:
7. Sensitivity Indicator (SI)
10.1520/E2023-10R14.
For referenced ASTM standards, visit the ASTM website, www.astm.org, or
7.1 The Sensitivity Indicator (SI) shall be constructed of
contact ASTM Customer Service at service@astm.org. For Annual Book of ASTM
castacrylicresin,lead(optional),andaluminum.Theconstruc-
Standards volume information, refer to the standard’s Document Summary page on
the ASTM website. tion and dimensions are shown in Fig. 1.
Copyright © ASTM International, 100 Barr Harbor Drive, PO Box C700, West Conshohocken, PA 19428-2959. United States
E2023 − 10 (2014)
Material — Methylmethacrylate
Shim Thickness Hole Diameter
A 0.005 0.005
B 0.010 0.010
C 0.020 0.020
D 0.010 0.010
NOTE 1—All dimensions are in inches.
NOTE 2—The lead step may be replaced with a methylmethacrylate strip with the D shim eliminated.
FIG. 1 Sensitivity Indicator
7.2 The optional lead step in the SI may be replaced with a 8.1.1 Mill a Channel,0.850-in.wideby6.5-in.longfroman
blank, cast acrylic resin step. The lead provides a visual aluminumblock,1-in.widebyatleast0.303-in.highby6.5-in.
indication of beam gamma content; however, the lead image is long. The channel should begin 0.075-in. from edge A and
not used for any of the SI calculations of Method E545. leave0.103-in.aluminuminthebottomofthechannel(seeFig.
2).
7.3 The acrylic resin shall be methylmethacrylate.
8.1.2 Mill the A Channel (see Fig. 1), within this channel,
7.4 All dimensional tolerances are as noted on the figures.
0.125-in.wideby0.005-in.deepby6.5-in.long.Thenearedge
7.5 Aluminum shims and strips shall be 99.9 % pure el-
of channel A should be 0.450-in. from edge A (see Fig. 3).
emental material.
8.1.3 Mill the B Channel, adjacent to the A channel,
7.6 The SI may be encased in a 6061 aluminum dust cover, 0.125-in.wideby0.010-in.deepby6.5-in.long.Thenearedge
of channel B should be 0.325-in. from edge A (see Fig. 3).
0.012-in. thick.
8.1.4 Mill the C Channel, adjacent to the B channel,
7.7 When used, the optional lead shim shall be at least
0.125-in.wideby0.020-in.deepby6.5-in.long.Thenearedge
99.9 % pure elemental material.
of channel C should be 0.200 in. from edge A (see Fig. 3).
8. Fabrication
8.1.5 Optional—Mill the D channel adjacent to the C
channel, 0.125-in. wide by 0.010-in. deep by 6.5-in. long. The
8.1 Components:
near edge of channel D should be 0.075-in. from edge A.
NOTE 1—The D channel is not required and shall not be milled if the
The instructions in Section 8 assume the simultaneous fabrication of five units
for practical reasons. Units may be fabricated singly, if desired. lead shim is not to be used.
E2023 − 10 (2014)
NOTE 1—Unless otherwise specified, use the following:
Dimensions are in inches.
Tolerances on machined dimensions: .XX = 6 .01 .XXX = 6 .002.
FIG. 2 Main Channel in Aluminum Block
NOTE 1—Unless otherwise specified, use the following:
Dimensions are in inches.
Tolerances on machined dimensions: .XX = 6 .01 .XXX = 6 .002.
FIG. 3 Channels A Through D in Main Channel
E2023 − 10 (2014)
8.1.6 Prepare five methylmethacrylate strips, 0.060-in. thick 8.1.11 To keep the SI intact during use, it is highly recom-
by at least 0.200-in. wide by 6.5-in. long. These strips will be mended that a dust cover be kept on the unit. One dust cover
used in 8.2.11. for each SI may be prepared from aluminum shim stock,
2 2
8.1.7 Prepare four methylmethacrylate strips, 0.125-in. 0.012-in. thick by 1.50-in. by cutting out a 0.250-in. from
thick by at least 0.200-in. wide by 6.5-in. long. One of the eachcornerandfoldingthealuminumtoformacover,1-in. by
methylmethacrylate strips may be replaced with an optional 0.250-in. high (see Fig. 1).
lead strip of the same dimensions. These strips will be used in
8.2 Assembly:
8.2.5.
8.2.1 Insert Shim C into the C channel milled in 8.1.4 (see
8.1.8 Prepare one strip each from aluminum shim stock, at
Fig. 5).
least 0.200-in. wide by 6.5-in. long, with the following
8.2.2 Insert Shim B into the adjacent B channel milled in
thicknesses:
8.1.3 (see Fig. 5).
0.0005 in.
8.2.3 Insert Shi
...
This document is not an ASTM standard and is intended only to provide the user of an ASTM standard an indication of what changes have been made to the previous version. Because
it may not be technically possible to adequately depict all changes accurately, ASTM recommends that users consult prior editions as appropriate. In all cases only the current version
of the standard as published by ASTM is to be considered the official document.
Designation: E2023 − 10 E2023 − 10 (Reapproved 2014)
Standard Practice for
Fabrication of Neutron Radiographic Sensitivity Indicators
This standard is issued under the fixed designation E2023; the number immediately following the designation indicates the year of
original adoption or, in the case of revision, the year of last revision. A number in parentheses indicates the year of last reapproval. A
superscript epsilon (´) indicates an editorial change since the last revision or reapproval.
1. Scope
1.1 This practice covers the fabrication of Sensitivity Indicators (SI), which can be used to determine the relative quality of
radiographic images produced by direct, thermal neutron radiographic examination.
1.2 The values stated in inch-pound units are regarded to be standard.
1.3 This standard does not purport to address all of the safety concerns, if any, associated with its use. It is the responsibility
of the user of this standard to establish appropriate safety and health practices and determine the applicability of regulatory
limitations prior to use.
2. Referenced Documents
2.1 ASTM Standards:
E543 Specification for Agencies Performing Nondestructive Testing
E545 Test Method for Determining Image Quality in Direct Thermal Neutron Radiographic Examination
E748 Practices for Thermal Neutron Radiography of Materials
E1316 Terminology for Nondestructive Examinations
3. Terminology
3.1 Definitions—For definitions of terms used in this practice, see Terminology E1316, Section H.
4. Summary of Practice
4.1 The Sensitivity Indicator (SI) is used for qualitative determination of the sensitivity of detail visible on the neutron
radiograph. It consists of a step wedge containing gaps and holes of known dimensions. Visual inspection of the image of this
device provides subjective information regarding total radiographic sensitivity with respect to the step-block material, as well as
optional subjective data, regarding detrimental levels of gamma exposure.
4.2 Neutron radiography practices are discussed in Practices E748. The neutron radiograph used to determine image quality
using the SI shall meet the requirements of Method E545.
5. Significance and Use
5.1 The only truly valid image quality indicator is a material or component, equivalent to the part being neutron radiographed,
with a known standard discontinuity, inclusion, omission or flaw (reference standard comparison part). The SI is designed to
substitute for the reference standard, providing qualitative information on hole and gap sensitivity in a single unit. Fabrication in
accordance with this practice is vital for accurate and consistent measurements.
5.2 This practice shall be followed for the fabrication of all SIs to be used with Method E545 to determine image quality in
direct thermal neutron radiography.
6. Basis of Application
6.1 Qualification of Nondestructive Agencies—If specified in the contractual agreement, NDT agencies shall be qualified and
evaluated as described in Practice E543. The applicable edition of Practice E543 shall be specified in the contractual agreement.
This practice is under the jurisdiction of ASTM Committee E07 on Nondestructive Testing and is the direct responsibility of Subcommittee E07.05 on Radiology
(Neutron) Method.
Current edition approved Jan. 1, 2010Oct. 1, 2014. Published February 2010November 2014. Originally approved in 1999. Last previous edition approved in 20042010
as E2023 - 99E2023 - 10.(2004). DOI: 10.1520/E2023-10.10.1520/E2023-10R14.
For referenced ASTM standards, visit the ASTM website, www.astm.org, or contact ASTM Customer Service at service@astm.org. For Annual Book of ASTM Standards
volume information, refer to the standard’s Document Summary page on the ASTM website.
Copyright © ASTM International, 100 Barr Harbor Drive, PO Box C700, West Conshohocken, PA 19428-2959. United States
E2023 − 10 (2014)
6.2 Procedures and Techniques—The procedures and techniques to be utilized shall be as described in this practice unless
otherwise specified. Specific techniques may be specified in the contractual agreement.
6.3 Reporting Criteria/Acceptance Criteria—Reporting criteria for the examination results shall be in accordance with Sections
9 and 10 unless otherwise specified. Acceptance criteria, for example, reference radiographs, shall be specified in the contractual
agreement.
6.4 Reexamination of repaired/reworked items is not addressed in this practice and, if required, shall be specified in the
contractual document.
Material — Methylmethacrylate
Shim Thickness Hole Diameter
A 0.005 0.005
B 0.010 0.010
C 0.020 0.020
D 0.010 0.010
NOTE 1—All dimensions are in inches.
NOTE 2—The lead step may be replaced with a methylmethacrylate strip with the D shim eliminated.
FIG. 1 Sensitivity Indicator
7. Sensitivity Indicator (SI)
7.1 The Sensitivity Indicator (SI) shall be constructed of cast acrylic resin, lead (optional), and aluminum. The construction and
dimensions are shown in Fig. 1.
7.2 The optional lead step in the SI may be replaced with a blank, cast acrylic resin step. The lead provides a visual indication
of beam gamma content; however, the lead image is not used for any of the SI calculations of Method E545.
7.3 The acrylic resin shall be methylmethacrylate.
7.4 All dimensional tolerances are as noted on the figures.
7.5 Aluminum shims and strips shall be 99.9 % pure elemental material.
7.6 The SI may be encased in a 6061 aluminum dust cover, 0.012-in. thick.
7.7 When used, the optional lead shim shall be at least 99.9 % pure elemental material.
E2023 − 10 (2014)
8. Fabrication
8.1 Components:
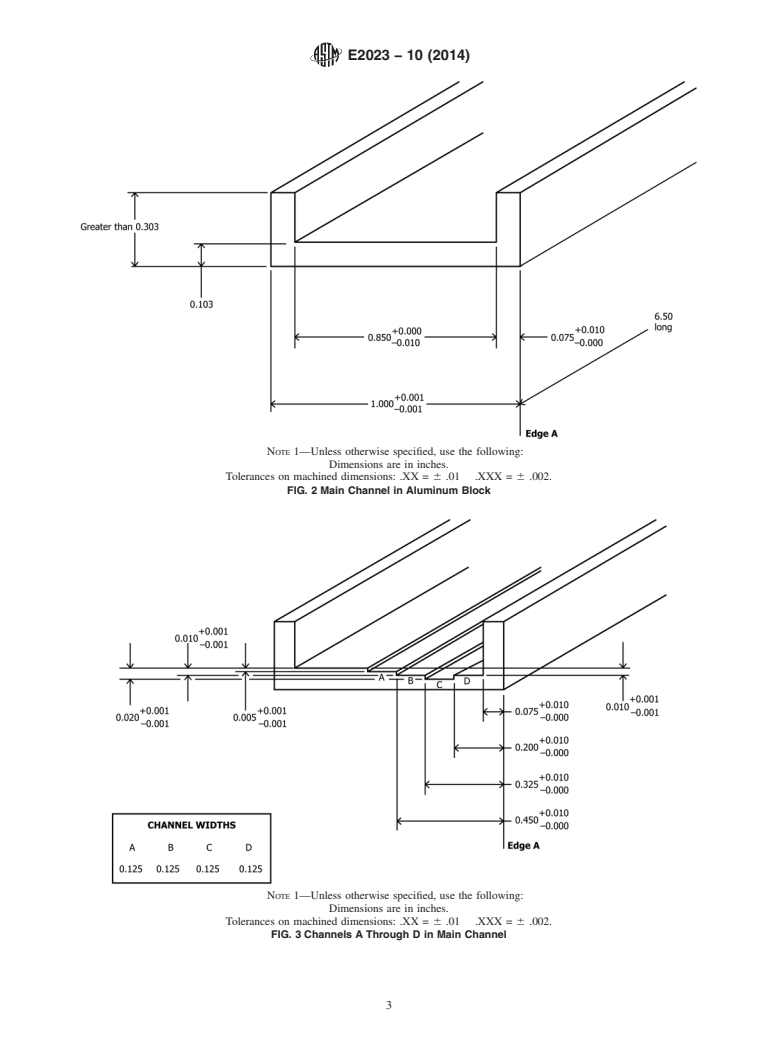
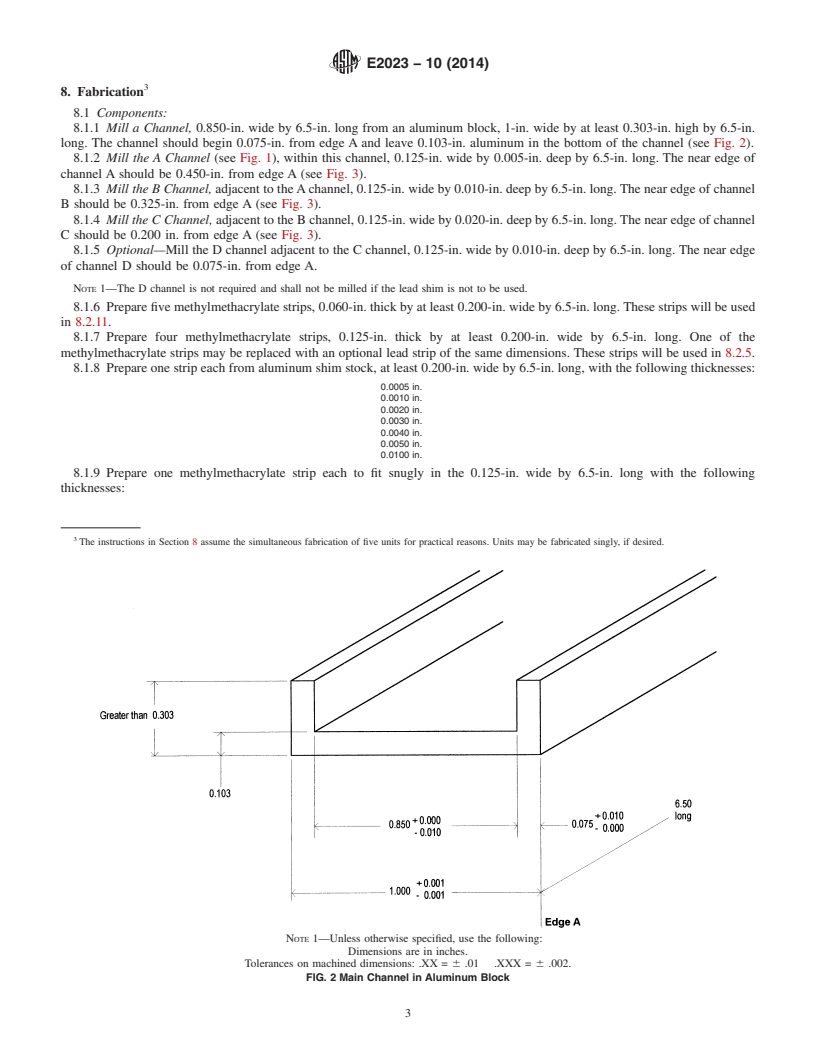
8.1.1 Mill a Channel, 0.850-in. wide by 6.5-in. long from an aluminum block, 1-in. wide by at least 0.303-in. high by 6.5-in.
long. The channel should begin 0.075-in. from edge A and leave 0.103-in. aluminum in the bottom of the channel (see Fig. 2).
8.1.2 Mill the A Channel (see Fig. 1), within this channel, 0.125-in. wide by 0.005-in. deep by 6.5-in. long. The near edge of
channel A should be 0.450-in. from edge A (see Fig. 3).
8.1.3 Mill the B Channel, adjacent to the A channel, 0.125-in. wide by 0.010-in. deep by 6.5-in. long. The near edge of channel
B should be 0.325-in. from edge A (see Fig. 3).
8.1.4 Mill the C Channel, adjacent to the B channel, 0.125-in. wide by 0.020-in. deep by 6.5-in. long. The near edge of channel
C should be 0.200 in. from edge A (see Fig. 3).
8.1.5 Optional—Mill the D channel adjacent to the C channel, 0.125-in. wide by 0.010-in. deep by 6.5-in. long. The near edge
of channel D should be 0.075-in. from edge A.
NOTE 1—The D channel is not required and shall not be milled if the lead shim is not to be used.
8.1.6 Prepare five methylmethacrylate strips, 0.060-in. thick by at least 0.200-in. wide by 6.5-in. long. These strips will be used
in 8.2.11.
8.1.7 Prepare four methylmethacrylate strips, 0.125-in. thick by at least 0.200-in. wide by 6.5-in. long. One of the
methylmethacrylate strips may be replaced with an optional lead strip of the same dimensions. These strips will be used in 8.2.5.
8.1.8 Prepare one strip each from aluminum shim stock, at least 0.200-in. wide by 6.5-in. long, with the following thicknesses:
0.0005 in.
0.0010 in.
0.0020 in.
0.0030 in.
0.0040 in.
0.0050 in.
0.0100 in.
8.1.9 Prepare one methylmethacrylate strip each to fit snugly in the 0.125-in. wide by 6.5-in. long with the following
thicknesses:
The instructions in Section 8 assume the simultaneous fabrication of five units for practical reasons. Units may be fabricated singly, if desired.
NOTE 1—Unless otherwise specified, use the following:
Dimensions are in inches.
Tolerances on machined dimensions: .XX = 6 .01 .XXX = 6 .002.
FIG. 2 Main Channel in Aluminum Block
E2023 − 10 (2014)
NOTE 1—Unless otherwise specified, use the following:
Dimensions are in inches.
Tolerances on machined dimensions: .XX = 6 .01 .XXX = 6 .002.
FIG. 3 Channels A Through D in Main Channel
0.0050 in. (Shim A)
0.0100 in. (Shim B)
0.0200 in. (Shim C)
0.0100 in. (Shim D) (If used, this strip is to be fabricated from
lead stock (see Fig. 4).
...


Questions, Comments and Discussion
Ask us and Technical Secretary will try to provide an answer. You can facilitate discussion about the standard in here.