ASTM A498/A498M-17(2023)
(Specification)Standard Specification for Seamless and Welded Carbon Steel Heat-Exchanger Tubes with Integral Fins
Standard Specification for Seamless and Welded Carbon Steel Heat-Exchanger Tubes with Integral Fins
ABSTRACT
This specification covers external helical, integral finned, seamless or welded low-carbon steel tubes for use in tubular heat exchangers, surface condensers, evaporators, superheaters, and similar heat-transfer apparatus in unfinned end diameters. The tube, prior to finning operation or unfinned portions of the finned tube, shall conform to the requirements for tensile properties prescribed in the governing plain-tube specification. Each tube after finning shall be subjected to a pressure test which shall permit easy visual leakage detection.
SCOPE
1.1 This specification describes seamless or welded low-carbon steel tubes on which the external or internal surface, or both, have been modified by a cold forming process to produce an integral increased surface area for improved heat transfer. The tubes are used in tubular heat exchangers, surface condensers, evaporators, superheaters, and similar heat-transfer apparatus in outside diameters up to 2 in. [50 mm], inclusive.
1.2 Units—This specification is expressed in both inch-pound units and in SI units; however, unless the purchase order or contract specifies the applicable M specification designation (SI units), the inch-pound units shall apply. The values stated in either inch-pound units or SI units are to be regarded separately as standard. Within the text, the SI units are shown in brackets. The values stated in each system may not be exact equivalents; therefore, each system shall be used independently of the other. Combining values from the two systems may result in non-conformance with the standard.
1.3 This international standard was developed in accordance with internationally recognized principles on standardization established in the Decision on Principles for the Development of International Standards, Guides and Recommendations issued by the World Trade Organization Technical Barriers to Trade (TBT) Committee.
General Information
- Status
- Published
- Publication Date
- 28-Feb-2023
- Technical Committee
- A01 - Steel, Stainless Steel and Related Alloys
- Drafting Committee
- A01.09 - Carbon Steel Tubular Products
Relations
- Effective Date
- 01-Mar-2024
- Effective Date
- 01-Mar-2024
- Effective Date
- 01-Nov-2023
- Effective Date
- 01-Nov-2023
- Effective Date
- 01-May-2019
- Effective Date
- 01-Sep-2018
- Effective Date
- 01-Sep-2018
- Effective Date
- 01-Sep-2018
- Effective Date
- 01-Mar-2018
- Effective Date
- 01-Sep-2017
- Effective Date
- 01-Sep-2017
- Effective Date
- 15-Mar-2017
- Effective Date
- 01-Nov-2015
- Effective Date
- 01-May-2015
- Effective Date
- 01-Mar-2014
Overview
ASTM A498/A498M-17(2023) is the internationally recognized standard specification developed by ASTM for seamless and welded carbon steel heat-exchanger tubes featuring integral fins. This standard sets out the requirements for low-carbon steel tubes that have been modified by a cold forming process to increase external or internal surface area, enhancing heat transfer efficiency. The specification is applicable to tubes with outside diameters up to 2 inches (50 mm) and can be expressed in both inch-pound and SI units. It covers tubes that are crucial components in tubular heat exchangers, surface condensers, evaporators, superheaters, and similar heat-transfer apparatus.
Key Topics
- Integral Fin Design: The specification details tubes with external helical or internal fins, or both, created through a cold-forming process to maximize heat transfer surface area.
- Material Types: Both seamless and welded low-carbon steel tubes are covered.
- Dimensional Criteria: Precise tolerances for outside diameter, wall thickness (including modifications under or at the fin groove), and tube length are prescribed.
- Mechanical Properties: Tubes must meet tensile property requirements according to the standard for plain tubes before modification.
- Testing Requirements:
- Pressure Test: Each finned tube undergoes a mandatory post-finning pressure test, including pneumatic or air-under-water methods, to ensure leak-tight integrity.
- Optional Tests: At the purchaser’s request, nondestructive eddy current or hydrostatic tests may also be performed.
- Finish and Workmanship: Finished tubes are required to be straight, free from defects, and have smoothed ends, ensuring suitability for critical heat-transfer applications.
- Marking and Packaging: Clear marking requirements are set out for traceability, including manufacturer details, specification references, material type, and barcoding adherence to industry standards.
Applications
Seamless and welded carbon steel tubes with integral fins manufactured as per ASTM A498/A498M are vital across multiple industries where high-performance heat transfer is required. Typical applications include:
- Tubular heat exchangers: Maximizing surface area for efficient thermal transfer in power plants, oil & gas processing, and industrial HVAC systems.
- Surface condensers: Used in steam turbine power generation, providing rapid heat dissipation.
- Evaporators and Superheaters: Critical components in both chemical and energy sectors, requiring robust, leak-resistant tubular materials.
- Other Heat-Transfer Apparatus: Such as refrigeration systems and petrochemical processing units, where both durability and enhanced heat transfer are paramount.
The standard provides guidance on ordering information, including tolerances, material condition (annealed or as-cold-worked), configuration of fins and ribs, and acceptance inspection procedures. This ensures products meet specific project performance criteria and regulatory requirements.
Related Standards
ASTM A498/A498M references several key documents that support its requirements and testing protocols:
- ASTM A179/A179M – Seamless cold-drawn low-carbon steel heat-exchanger and condenser tubes
- ASTM A214/A214M – Electric-resistance-welded carbon steel heat-exchanger and condenser tubes
- ASTM A334/A334M – Seamless and welded carbon and alloy-steel tubes for low-temperature service
- ASTM A450/A450M – General requirements for carbon and low alloy steel tubes
- ASTM A1016/A1016M – General requirements for ferritic alloy steel, austenitic alloy steel, and stainless steel tubes
- ASTM A1047/A1047M – Test method for pneumatic leak testing of tubing
- ASTM A941 – Terminology relating to steel, stainless steel, related alloys, and ferroalloys
These related standards ensure consistency in terminology, testing, chemical composition, and mechanical properties across steel tube specifications, contributing to safety, quality control, and global trade compliance for heat-exchanger tubes with integral fins.
Buy Documents
ASTM A498/A498M-17(2023) - Standard Specification for Seamless and Welded Carbon Steel Heat-Exchanger Tubes with Integral Fins
Get Certified
Connect with accredited certification bodies for this standard

Institut za varilstvo d.o.o. (Welding Institute)
Slovenia's leading welding institute since 1952. ISO 3834, EN 1090, pressure equipment certification, NDT personnel, welder qualification. Only IIW Au
Sponsored listings
Frequently Asked Questions
ASTM A498/A498M-17(2023) is a technical specification published by ASTM International. Its full title is "Standard Specification for Seamless and Welded Carbon Steel Heat-Exchanger Tubes with Integral Fins". This standard covers: ABSTRACT This specification covers external helical, integral finned, seamless or welded low-carbon steel tubes for use in tubular heat exchangers, surface condensers, evaporators, superheaters, and similar heat-transfer apparatus in unfinned end diameters. The tube, prior to finning operation or unfinned portions of the finned tube, shall conform to the requirements for tensile properties prescribed in the governing plain-tube specification. Each tube after finning shall be subjected to a pressure test which shall permit easy visual leakage detection. SCOPE 1.1 This specification describes seamless or welded low-carbon steel tubes on which the external or internal surface, or both, have been modified by a cold forming process to produce an integral increased surface area for improved heat transfer. The tubes are used in tubular heat exchangers, surface condensers, evaporators, superheaters, and similar heat-transfer apparatus in outside diameters up to 2 in. [50 mm], inclusive. 1.2 Units—This specification is expressed in both inch-pound units and in SI units; however, unless the purchase order or contract specifies the applicable M specification designation (SI units), the inch-pound units shall apply. The values stated in either inch-pound units or SI units are to be regarded separately as standard. Within the text, the SI units are shown in brackets. The values stated in each system may not be exact equivalents; therefore, each system shall be used independently of the other. Combining values from the two systems may result in non-conformance with the standard. 1.3 This international standard was developed in accordance with internationally recognized principles on standardization established in the Decision on Principles for the Development of International Standards, Guides and Recommendations issued by the World Trade Organization Technical Barriers to Trade (TBT) Committee.
ABSTRACT This specification covers external helical, integral finned, seamless or welded low-carbon steel tubes for use in tubular heat exchangers, surface condensers, evaporators, superheaters, and similar heat-transfer apparatus in unfinned end diameters. The tube, prior to finning operation or unfinned portions of the finned tube, shall conform to the requirements for tensile properties prescribed in the governing plain-tube specification. Each tube after finning shall be subjected to a pressure test which shall permit easy visual leakage detection. SCOPE 1.1 This specification describes seamless or welded low-carbon steel tubes on which the external or internal surface, or both, have been modified by a cold forming process to produce an integral increased surface area for improved heat transfer. The tubes are used in tubular heat exchangers, surface condensers, evaporators, superheaters, and similar heat-transfer apparatus in outside diameters up to 2 in. [50 mm], inclusive. 1.2 Units—This specification is expressed in both inch-pound units and in SI units; however, unless the purchase order or contract specifies the applicable M specification designation (SI units), the inch-pound units shall apply. The values stated in either inch-pound units or SI units are to be regarded separately as standard. Within the text, the SI units are shown in brackets. The values stated in each system may not be exact equivalents; therefore, each system shall be used independently of the other. Combining values from the two systems may result in non-conformance with the standard. 1.3 This international standard was developed in accordance with internationally recognized principles on standardization established in the Decision on Principles for the Development of International Standards, Guides and Recommendations issued by the World Trade Organization Technical Barriers to Trade (TBT) Committee.
ASTM A498/A498M-17(2023) is classified under the following ICS (International Classification for Standards) categories: 23.040.10 - Iron and steel pipes. The ICS classification helps identify the subject area and facilitates finding related standards.
ASTM A498/A498M-17(2023) has the following relationships with other standards: It is inter standard links to ASTM A179/A179M-24, ASTM A941-24, ASTM A1016/A1016M-23, ASTM A450/A450M-23, ASTM A214/A214M-19, ASTM A1016/A1016M-18a, ASTM A450/A450M-18, ASTM A214/A214M-96(2018), ASTM A1016/A1016M-18, ASTM A1016/A1016M-17a, ASTM A941-17, ASTM A1016/A1016M-17, ASTM A941-15, ASTM A450/A450M-15, ASTM A1016/A1016M-14e1. Understanding these relationships helps ensure you are using the most current and applicable version of the standard.
ASTM A498/A498M-17(2023) is available in PDF format for immediate download after purchase. The document can be added to your cart and obtained through the secure checkout process. Digital delivery ensures instant access to the complete standard document.
Standards Content (Sample)
This international standard was developed in accordance with internationally recognized principles on standardization established in the Decision on Principles for the
Development of International Standards, Guides and Recommendations issued by the World Trade Organization Technical Barriers to Trade (TBT) Committee.
Designation: A498/A498M − 17 (Reapproved 2023)
Standard Specification for
Seamless and Welded Carbon Steel Heat-Exchanger Tubes
with Integral Fins
This standard is issued under the fixed designation A498/A498M; the number immediately following the designation indicates the year
of original adoption or, in the case of revision, the year of last revision. A number in parentheses indicates the year of last reapproval.
A superscript epsilon (´) indicates an editorial change since the last revision or reapproval.
1. Scope* A334/A334M Specification for Seamless and Welded Car-
bon and Alloy-Steel Tubes for Low-Temperature Service
1.1 This specification describes seamless or welded low-
A450/A450M Specification for General Requirements for
carbon steel tubes on which the external or internal surface, or
Carbon and Low Alloy Steel Tubes
both, have been modified by a cold forming process to produce
A941 Terminology Relating to Steel, Stainless Steel, Related
an integral increased surface area for improved heat transfer.
Alloys, and Ferroalloys
The tubes are used in tubular heat exchangers, surface
A1016/A1016M Specification for General Requirements for
condensers, evaporators, superheaters, and similar heat-
Ferritic Alloy Steel, Austenitic Alloy Steel, and Stainless
transfer apparatus in outside diameters up to 2 in. [50 mm],
Steel Tubes
inclusive.
A1047/A1047M Test Method for Pneumatic Leak Testing of
1.2 Units—This specification is expressed in both inch-
Tubing
pound units and in SI units; however, unless the purchase order
or contract specifies the applicable M specification designation
3. Terminology
(SI units), the inch-pound units shall apply. The values stated in
3.1 Definitions—For definitions of general terms used in this
either inch-pound units or SI units are to be regarded separately
specification, refer to Terminology A941.
as standard. Within the text, the SI units are shown in brackets.
The values stated in each system may not be exact equivalents;
3.2 Definitions of Terms Specific to This Standard:
therefore, each system shall be used independently of the other. 3.2.1 land—a length of unmodified tube between adjacent
Combining values from the two systems may result in non-
sections of modified tube; used as support zones for baffles, or
conformance with the standard. for bending where surface modification might compromise
material integrity, or for other reasons.
1.3 This international standard was developed in accor-
dance with internationally recognized principles on standard-
3.2.2 modified surface—the surface of a tube having a series
ization established in the Decision on Principles for the
of integral fins, grooves, or ribs on the outside diameter, inside
Development of International Standards, Guides and Recom-
diameter, or both, for the purpose of increasing the surface area
mendations issued by the World Trade Organization Technical
and improving heat transfer.
Barriers to Trade (TBT) Committee.
3.2.3 unmodified surface—the cylindrical surface of a tube
made to the reference standards.
2. Referenced Documents
3.3 Symbols (Integral Fin Tube Nomenclature):
2.1 ASTM Standards:
3.3.1 Bare tube symbols, see Fig. 1, Fig. 2, or Fig. 3.
A179/A179M Specification for Seamless Cold-Drawn Low-
3.3.1.1 OD = outside diameter of unmodified sections, and
Carbon Steel Heat-Exchanger and Condenser Tubes
3.3.1.2 W = wall thickness of unmodified sections.
A214/A214M Specification for Electric-Resistance-Welded
3.3.2 OD surface modification symbols, see Fig. 1.
Carbon Steel Heat-Exchanger and Condenser Tubes
3.3.2.1 od = outside diameter of modified sections,
3.3.2.2 rd = root diameter of outside fins,
This specification is under the jurisdiction of ASTM Committee A01 on Steel, 3.3.2.3 W = wall thickness at fin groove, either minimum or
f
Stainless Steel and Related Alloys and is the direct responsibility of Subcommittee
average,
A01.09 on Carbon Steel Tubular Products.
3.3.2.4 FH = fin height,
Current edition approved March 1, 2023. Published March 2023. Originally
3.3.2.5 N = number of fins per unit length, the reciprocal
approved in 1963. Last previous edition approved in 2017 as A498/A498M – 17.
fpu
DOI: 10.1520/A0498_A0498M-17R23.
of p,
For referenced ASTM standards, visit the ASTM website, www.astm.org, or
3.3.2.6 p = pitch, the distance from a point on one fin to the
contact ASTM Customer Service at service@astm.org. For Annual Book of ASTM
corresponding point on the adjacent fin along the tube longi-
Standards volume information, refer to the standard’s Document Summary page on
the ASTM website. tudinal axis, and
*A Summary of Changes section appears at the end of this standard
Copyright © ASTM International, 100 Barr Harbor Drive, PO Box C700, West Conshohocken, PA 19428-2959. United States
A498/A498M − 17 (2023)
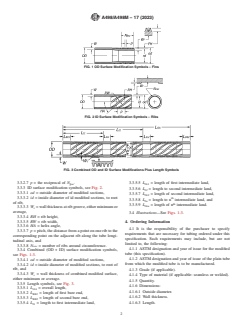
FIG. 1 OD Surface Modification Symbols – Fins
FIG. 2 ID Surface Modification Symbols – Ribs
FIG. 3 Combined OD and ID Surface Modifications Plus Length Symbols
3.3.2.7 p = the reciprocal of N . 3.3.5.5 L = length of first intermediate land,
fpu IL1
3.3.3 ID surface modification symbols, see Fig. 2.
3.3.5.6 L = length to second intermediate land,
I2
3.3.3.1 od = outside diameter of modified sections,
3.3.5.7 L = length of second intermediate land,
IL2
3.3.3.2 id = inside diameter of id modified sections, to root th
3.3.5.8 L = length to n intermediate land, and
In
of rib,
th
3.3.5.9 L = length of n intermediate land.
ILn
3.3.3.3 W = wall thickness at rib groove, either minimum or
r
average,
3.4 Illustrations—See Figs. 1-3.
3.3.3.4 RH = rib height,
3.3.3.5 RW = rib width,
4. Ordering Information
3.3.3.6 HA = helix angle,
4.1 It is the responsibility of the purchaser to specify
3.3.3.7 p = pitch, the distance from a point on one rib to the
requirements that are necessary for tubing ordered under this
corresponding point on the adjacent rib along the tube longi-
specification. Such requirements may include, but are not
tudinal axis, and
limited to, the following:
3.3.3.8 N = number of ribs around circumference.
rac
4.1.1 ASTM designation and year of issue for the modified
3.3.4 Combined (OD + ID) surface modification symbols,
tube (this specification).
see Figs. 1-3.
4.1.2 ASTM designation and year of issue of the plain tube
3.3.4.1 od = outside diameter of modified sections,
from which the modified tube is to be manufactured.
3.3.4.2 id = inside diameter of modified sections, to root of
rib, and
4.1.3 Grade (if applicable).
3.3.4.3 W = wall thickness of combined modified surface,
c
4.1.4 Type of material (if applicable: seamless or welded).
either minimum or average.
4.1.5 Quantity.
3.3.5 Length symbols, see Fig. 3.
4.1.6 Dimensions:
3.3.5.1 L = overall length,
OA
4.1.6.1 Outside diameter.
3.3.5.2 L = length of first bare end,
BE1
4.1.6.2 Wall thickness.
3.3.5.3 L = length of second bare end,
BE2
3.3.5.4 L = length to first intermediate land, 4.1.6.3 Length.
I1
A498/A498M − 17 (2023)
4.1.6.4 All other desired dimensional attributes as described specification, plus 0.002 in. [0.05 mm]. The length of the ring
in 3.3.2 – 3.3.5. Configuration of these modified surface gauge shall be not less than 1 in. [25 mm].
attributes shall be as agreed between the purchaser and the
9.2 Wall Thickness Tolerance—Wall thickness is defined as
manufacturer.
the thickness “under the fin groove”, “under the rib groove”, or
4.1.7 Temper (as-cold-worked or annealed).
the combination of both, as illustrated in Figs. 1-3.
4.1.8 Packaging.
9.2.1 Tubes Ordered to Minimum Wall Thickness at the
4.1.9 Customer inspection.
Modified Section—No tube at its thinnest point in the modified
4.1.10 Certification.
section shall be less than the minimum specified wall thick-
4.1.11 Special requirements and any supplementary require-
ness; nor greater than 18 % over the specified wall thickness.
ments selected.
9.2.2 Tubes Ordered to Average Wall Thickness at the
Modified Section—No tube at its thinnest point in the modified
5. Material and Manufacture
section shall be less than 9 % under the specified wall
5.1 The modified surface tubes shall be manufactured from
thickness; nor greater than 9 % over the specified wall thick-
plain tubes that conform to one of the following ASTM
ness.
Specifications: A179/A179M, A214/A214M, or A334/A334M.
9.3 Length Tolerance:
5.2 The modified surface tubes shall be produced by cold 9.3.1 Overall Length—The length of the tubes shall not be
forming of steel plain tubes. To comply with this specification,
less than that specified when measured at a temperature of 68
the modified surface and tube material must be integral. °F [20 °C], but may exceed the speci
...


Questions, Comments and Discussion
Ask us and Technical Secretary will try to provide an answer. You can facilitate discussion about the standard in here.
Loading comments...