ASTM B350/B350M-11(2016)
(Specification)Standard Specification for Zirconium and Zirconium Alloy Ingots for Nuclear Application
Standard Specification for Zirconium and Zirconium Alloy Ingots for Nuclear Application
ABSTRACT
This specification covers vacuum-melted zirconium and zirconium alloy ingots for nuclear application. Materials covered shall be produced by multiple vacuum arc melting, or electron beam melting, or other melting processes conventionally used for reactive metals. Unless otherwise specified, ingots shall be conditioned by machining or grinding or both to remove surface and subsurface defects detrimental to subsequent fabrication. The ingot shall conform to the chemical composition requirements prescribed. The ingots shall be analyzed for the alloying and impurity elements prescribed. Ingots shall be inspected ultrasonically using the prescribed methods. The test shall be conducted in accordance with practice E 114.
SIGNIFICANCE AND USE
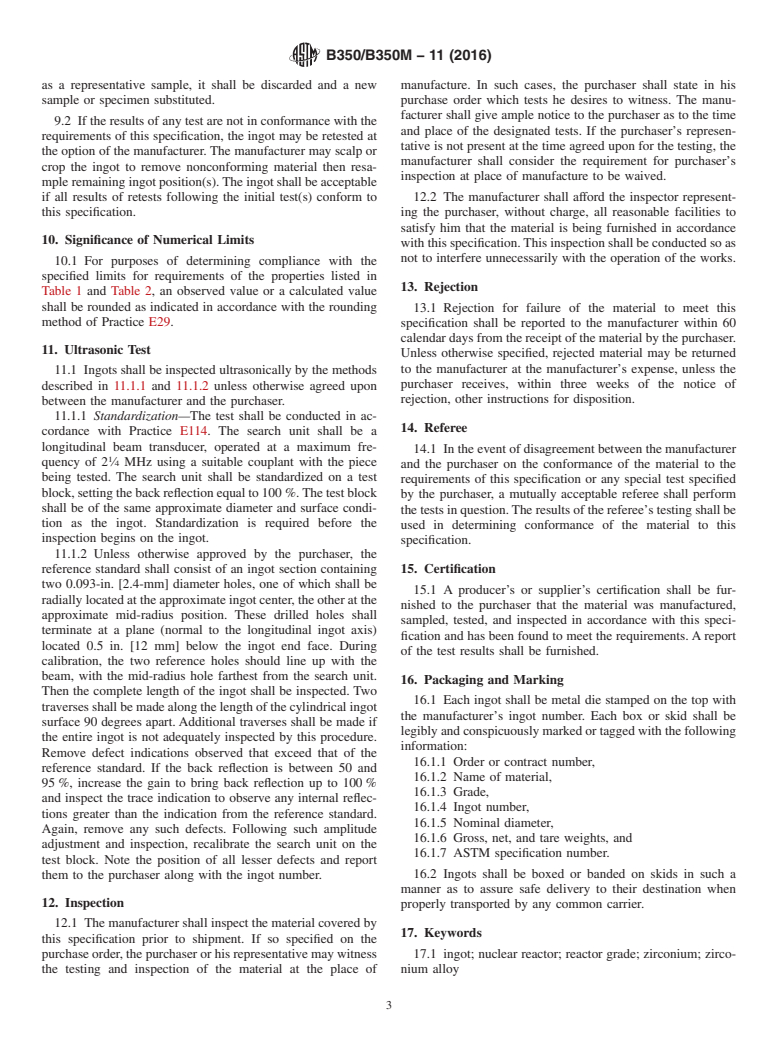
10.1 For purposes of determining compliance with the specified limits for requirements of the properties listed in Table 1 and Table 2, an observed value or a calculated value shall be rounded as indicated in accordance with the rounding method of Practice E29.
SCOPE
1.1 This specification covers vacuum-melted zirconium and zirconium alloy ingots for nuclear application.
1.2 The values stated in either inch-pound units or SI units are to be regarded separately as standard. Within the text, the SI units are shown in brackets. The values stated in each system are not exact equivalents; therefore, each system shall be used independently of the other. Combining values from the two systems may result in nonconformance with the specification.
1.3 The following precautionary caveat pertains only to the test method portions of this specification: This standard does not purport to address all of the safety concerns, if any, associated with its use. It is the responsibility of the user of this standard to establish appropriate safety and health practices and determine the applicability of regulatory limitations prior to use.
General Information
Relations
Buy Standard
Standards Content (Sample)
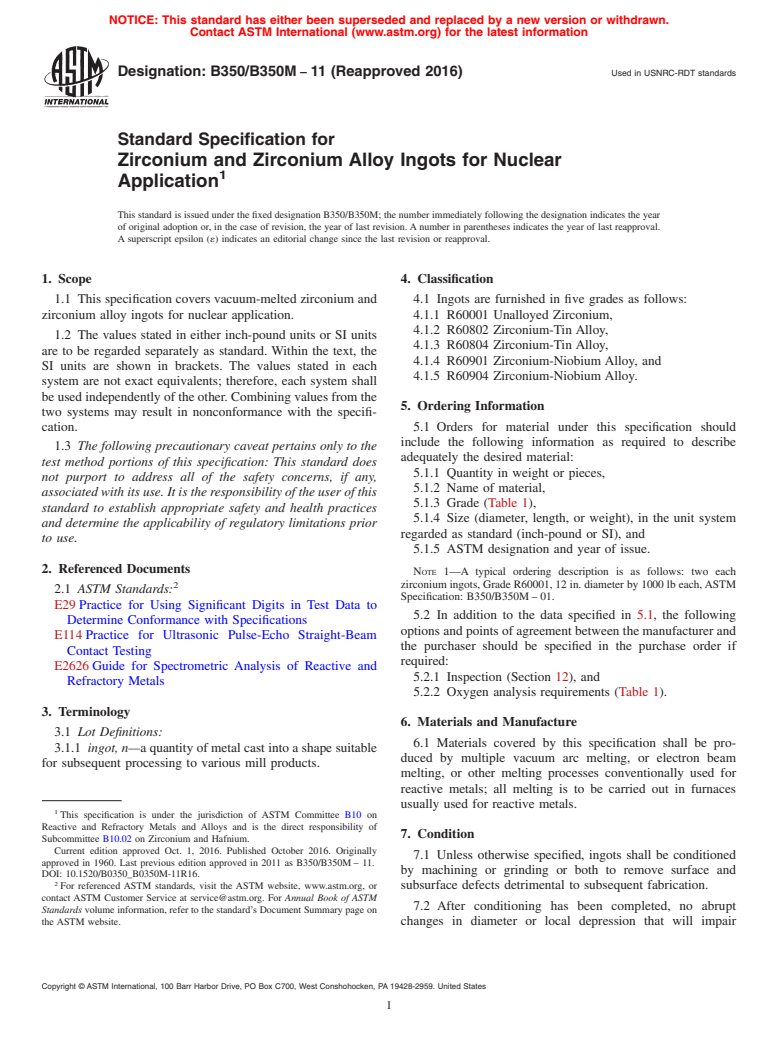
NOTICE: This standard has either been superseded and replaced by a new version or withdrawn.
Contact ASTM International (www.astm.org) for the latest information
Designation:B350/B350M −11 (Reapproved 2016) Used in USNRC-RDT standards
Standard Specification for
Zirconium and Zirconium Alloy Ingots for Nuclear
Application
This standard is issued under the fixed designation B350/B350M; the number immediately following the designation indicates the year
of original adoption or, in the case of revision, the year of last revision. A number in parentheses indicates the year of last reapproval.
A superscript epsilon (´) indicates an editorial change since the last revision or reapproval.
1. Scope 4. Classification
1.1 This specification covers vacuum-melted zirconium and 4.1 Ingots are furnished in five grades as follows:
zirconium alloy ingots for nuclear application. 4.1.1 R60001 Unalloyed Zirconium,
4.1.2 R60802 Zirconium-Tin Alloy,
1.2 The values stated in either inch-pound units or SI units
4.1.3 R60804 Zirconium-Tin Alloy,
are to be regarded separately as standard. Within the text, the
4.1.4 R60901 Zirconium-Niobium Alloy, and
SI units are shown in brackets. The values stated in each
4.1.5 R60904 Zirconium-Niobium Alloy.
system are not exact equivalents; therefore, each system shall
be used independently of the other. Combining values from the
5. Ordering Information
two systems may result in nonconformance with the specifi-
cation. 5.1 Orders for material under this specification should
include the following information as required to describe
1.3 The following precautionary caveat pertains only to the
adequately the desired material:
test method portions of this specification: This standard does
5.1.1 Quantity in weight or pieces,
not purport to address all of the safety concerns, if any,
5.1.2 Name of material,
associated with its use. It is the responsibility of the user of this
5.1.3 Grade (Table 1),
standard to establish appropriate safety and health practices
5.1.4 Size (diameter, length, or weight), in the unit system
and determine the applicability of regulatory limitations prior
regarded as standard (inch-pound or SI), and
to use.
5.1.5 ASTM designation and year of issue.
2. Referenced Documents
NOTE 1—A typical ordering description is as follows: two each
2 zirconium ingots, Grade R60001, 12 in. diameter by 1000 lb each,ASTM
2.1 ASTM Standards:
Specification: B350/B350M – 01.
E29 Practice for Using Significant Digits in Test Data to
5.2 In addition to the data specified in 5.1, the following
Determine Conformance with Specifications
options and points of agreement between the manufacturer and
E114 Practice for Ultrasonic Pulse-Echo Straight-Beam
the purchaser should be specified in the purchase order if
Contact Testing
required:
E2626 Guide for Spectrometric Analysis of Reactive and
5.2.1 Inspection (Section 12), and
Refractory Metals
5.2.2 Oxygen analysis requirements (Table 1).
3. Terminology
6. Materials and Manufacture
3.1 Lot Definitions:
6.1 Materials covered by this specification shall be pro-
3.1.1 ingot, n—a quantity of metal cast into a shape suitable
duced by multiple vacuum arc melting, or electron beam
for subsequent processing to various mill products.
melting, or other melting processes conventionally used for
reactive metals; all melting is to be carried out in furnaces
usually used for reactive metals.
This specification is under the jurisdiction of ASTM Committee B10 on
Reactive and Refractory Metals and Alloys and is the direct responsibility of
7. Condition
Subcommittee B10.02 on Zirconium and Hafnium.
Current edition approved Oct. 1, 2016. Published October 2016. Originally
7.1 Unless otherwise specified, ingots shall be conditioned
approved in 1960. Last previous edition approved in 2011 as B350/B350M – 11.
by machining or grinding or both to remove surface and
DOI: 10.1520/B0350_B0350M-11R16.
For referenced ASTM standards, visit the ASTM website, www.astm.org, or subsurface defects detrimental to subsequent fabrication.
contact ASTM Customer Service at service@astm.org. For Annual Book of ASTM
7.2 After conditioning has been completed, no abrupt
Standards volume information, refer to the standard’s Document Summary page on
the ASTM website. changes in diameter or local depression that will impair
Copyright © ASTM International, 100 Barr Harbor Drive, PO Box C700, West Conshohocken, PA 19428-2959. United States
B350/B350M−11 (2016)
TABLE 1 Chemical Requirements
Composition, Weight %
Element
UNS R60001 UNS R60802 UNS R60804 UNS R60901 UNS R60904
Tin . 1.20–1.70 1.20–1.70 . .
Iron . 0.07–0.20 0.18–0.24 . .
Chromium . 0.05–0.15 0.07–0.13 . .
Nickel . 0.03–0.08 . . .
Niobium (columbium) . . . 2.40–2.80 2.50–2.80
AA A A
Oxygen 0.09–0.15
Iron + chromium + nickel . 0.18–0.38 . . .
Iron + chromium . . 0.28–0.37 . .
Maximum Impurities, Weight %
Aluminum 0.0075 0.0075 0.0075 0.0075 0.0075
Boron 0.00005 0.00005 0.00005 0.00005 0.00005
Cadmium 0.00005 0.00005 0.00005 0.00005 0.00005
Calcium . 0.0030 0.0030 . .
Carbon 0.027 0.027 0.027 0.027 0.027
Chromium 0.020 . . 0.020 0.020
Cobalt 0.0020 0.0020 0.0020 0.0020 0.0020
Copper 0.0050 0.0050 0.0050 0.0050 0.0050
Hafnium 0.010 0.010 0.010 0.010 0.010
Hydrogen 0.0025 0.0025 0.0025 0.0025 0.0010
Iron 0.150 . . 0.150 0.150
Magnesium 0.0020 0.0020 0.0020 0.0020 0.0020
Manganese 0.0050 0.0050 0.0050 0.0050 0.0050
Molybdenum 0.0050 0.0050 0.0050 0.0050 0.0050
Nickel 0.0070 . 0.0070 0.0070 0.0070
Niobium . 0.0100 0.0100 . .
Nitrogen 0.0080 0.0080 0.0080 0.0080 0.0080
Phosphorus . . . 0.0020 0.0020
Silicon 0.0120 0.0120 0.0120 0.0120 0.012
Tin 0.0050 . . 0.010 0.010
Tungsten 0.010 0.010 0.010 0.010 0.010
Titanium 0.0050 0.0050 0.0050 0.0050 0.0050
Uranium (total) 0.00035 0.00035 0.00035 0.00035 0.00035
A
When so specified in the purchase order, oxygen shall be determined and reported. Maximum, minimum, or both, permissible values should be specified in the purchase
order.
subsequent fabrication shall be permitted. The difference 8.5 Product Check Analysis—Product check analysis is an
between the maximum and minimum radii of the conditioned analysis made by or for the purchaser for the purpose of
ingot shall not exceed 20 % of the maximum radius. Lands, verifying the composition of the ingot. The check analysis
grooves, and local depressions shall be blended to a maximum tolerances reflect the variation between laboratories in the
angle of 30° to the axis of the ingot. Each end of the ingot shall measurement of chemical composition. The permissible varia-
be chamfered or radiused. The minimum chamfer or radius tion in the product check analysis from the specified range is as
shall be ⁄2 in. [12 mm]. prescribed in Table 2.
8. Chemical Requirements
TABLE 2 Permissible Variations in Product Analysis
8.1 The ingot shall conform to the requirements for chemi-
Permissible Variation from
Alloying
cal composition as prescribed in Table 1. Guide E2626 may be the Specified Range
Elements
(Table 1), %
used as a guide for chemical analysis techniques.
Tin 0.050
8.2 The ingot shall be sampled in sufficient places along the
Iron 0.020
Chromium 0.010
side wall so that the top sample is within 5 in. [125 mm] of the
Nickel 0.010
top face and the distance between samples or between the
Iron + chromium 0.020
bottom face and a sample does not exceed one ingot diameter.
Iron + chromium + nickel 0.020
Niobium 0.050
A minimum of three samples per ingot is required.
Oxygen 0.020
8.3 These samples shall be analyzed for the alloying and 20 ppm or 20 % of the specified
Each impurity element
limit, whicheve
...
This document is not an ASTM standard and is intended only to provide the user of an ASTM standard an indication of what changes have been made to the previous version. Because
it may not be technically possible to adequately depict all changes accurately, ASTM recommends that users consult prior editions as appropriate. In all cases only the current version
of the standard as published by ASTM is to be considered the official document.
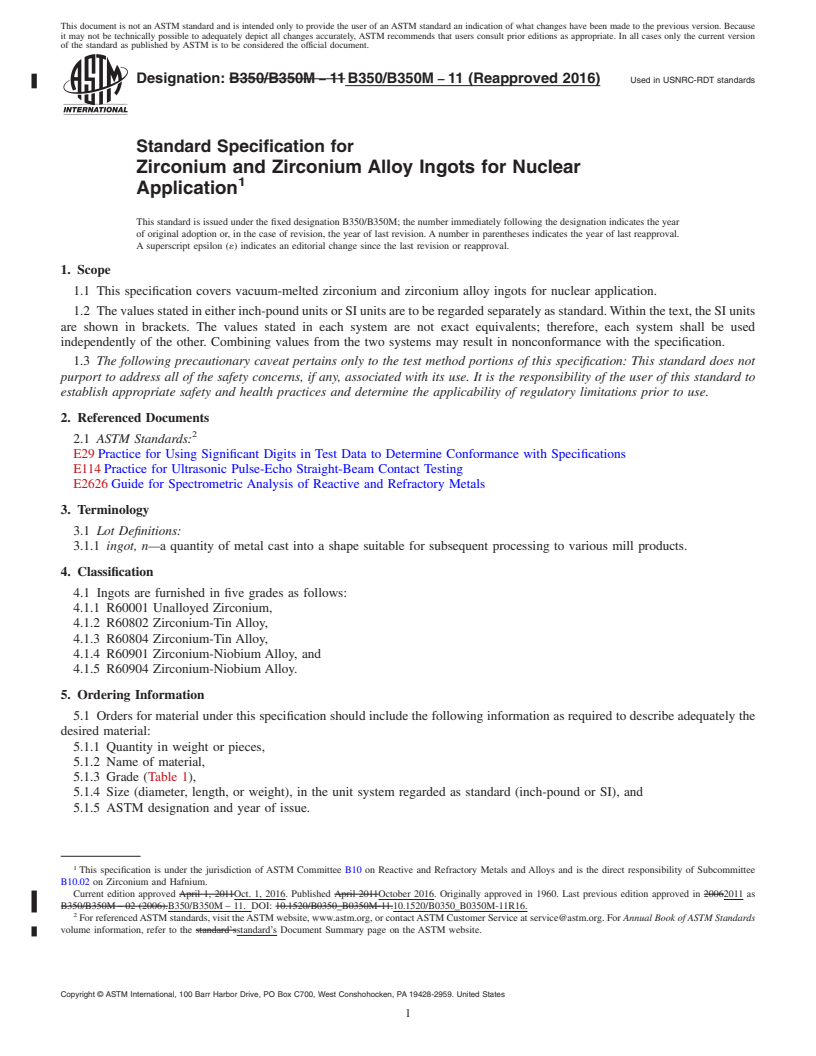
Designation: B350/B350M − 11 B350/B350M − 11 (Reapproved 2016) Used in USNRC-RDT standards
Standard Specification for
Zirconium and Zirconium Alloy Ingots for Nuclear
Application
This standard is issued under the fixed designation B350/B350M; the number immediately following the designation indicates the year
of original adoption or, in the case of revision, the year of last revision. A number in parentheses indicates the year of last reapproval.
A superscript epsilon (´) indicates an editorial change since the last revision or reapproval.
1. Scope
1.1 This specification covers vacuum-melted zirconium and zirconium alloy ingots for nuclear application.
1.2 The values stated in either inch-pound units or SI units are to be regarded separately as standard. Within the text, the SI units
are shown in brackets. The values stated in each system are not exact equivalents; therefore, each system shall be used
independently of the other. Combining values from the two systems may result in nonconformance with the specification.
1.3 The following precautionary caveat pertains only to the test method portions of this specification: This standard does not
purport to address all of the safety concerns, if any, associated with its use. It is the responsibility of the user of this standard to
establish appropriate safety and health practices and determine the applicability of regulatory limitations prior to use.
2. Referenced Documents
2.1 ASTM Standards:
E29 Practice for Using Significant Digits in Test Data to Determine Conformance with Specifications
E114 Practice for Ultrasonic Pulse-Echo Straight-Beam Contact Testing
E2626 Guide for Spectrometric Analysis of Reactive and Refractory Metals
3. Terminology
3.1 Lot Definitions:
3.1.1 ingot, n—a quantity of metal cast into a shape suitable for subsequent processing to various mill products.
4. Classification
4.1 Ingots are furnished in five grades as follows:
4.1.1 R60001 Unalloyed Zirconium,
4.1.2 R60802 Zirconium-Tin Alloy,
4.1.3 R60804 Zirconium-Tin Alloy,
4.1.4 R60901 Zirconium-Niobium Alloy, and
4.1.5 R60904 Zirconium-Niobium Alloy.
5. Ordering Information
5.1 Orders for material under this specification should include the following information as required to describe adequately the
desired material:
5.1.1 Quantity in weight or pieces,
5.1.2 Name of material,
5.1.3 Grade (Table 1),
5.1.4 Size (diameter, length, or weight), in the unit system regarded as standard (inch-pound or SI), and
5.1.5 ASTM designation and year of issue.
This specification is under the jurisdiction of ASTM Committee B10 on Reactive and Refractory Metals and Alloys and is the direct responsibility of Subcommittee
B10.02 on Zirconium and Hafnium.
Current edition approved April 1, 2011Oct. 1, 2016. Published April 2011October 2016. Originally approved in 1960. Last previous edition approved in 20062011 as
B350/B350M – 02 (2006).B350/B350M – 11. DOI: 10.1520/B0350_B0350M-11.10.1520/B0350_B0350M-11R16.
For referenced ASTM standards, visit the ASTM website, www.astm.org, or contact ASTM Customer Service at service@astm.org. For Annual Book of ASTM Standards
volume information, refer to the standard’sstandard’s Document Summary page on the ASTM website.
Copyright © ASTM International, 100 Barr Harbor Drive, PO Box C700, West Conshohocken, PA 19428-2959. United States
B350/B350M − 11 (2016)
TABLE 1 Chemical Requirements
Composition, Weight %
Element
UNS R60001 UNS R60802 UNS R60804 UNS R60901 UNS R60904
Tin . 1.20–1.70 1.20–1.70 . .
Iron . 0.07–0.20 0.18–0.24 . .
Chromium . 0.05–0.15 0.07–0.13 . .
Nickel . 0.03–0.08 . . .
Niobium (columbium) . . . 2.40–2.80 2.50–2.80
A A A A
Oxygen 0.09–0.15
Iron + chromium + nickel . 0.18–0.38 . . .
Iron + chromium . . 0.28–0.37 . .
Maximum Impurities, Weight %
Aluminum 0.0075 0.0075 0.0075 0.0075 0.0075
Boron 0.00005 0.00005 0.00005 0.00005 0.00005
Cadmium 0.00005 0.00005 0.00005 0.00005 0.00005
Calcium . 0.0030 0.0030 . .
Carbon 0.027 0.027 0.027 0.027 0.027
Chromium 0.020 . . 0.020 0.020
Cobalt 0.0020 0.0020 0.0020 0.0020 0.0020
Copper 0.0050 0.0050 0.0050 0.0050 0.0050
Hafnium 0.010 0.010 0.010 0.010 0.010
Hydrogen 0.0025 0.0025 0.0025 0.0025 0.0010
Iron 0.150 . . 0.150 0.150
Magnesium 0.0020 0.0020 0.0020 0.0020 0.0020
Manganese 0.0050 0.0050 0.0050 0.0050 0.0050
Molybdenum 0.0050 0.0050 0.0050 0.0050 0.0050
Nickel 0.0070 . 0.0070 0.0070 0.0070
Niobium . 0.0100 0.0100 . .
Nitrogen 0.0080 0.0080 0.0080 0.0080 0.0080
Phosphorus . . . 0.0020 0.0020
Silicon 0.0120 0.0120 0.0120 0.0120 0.012
Tin 0.0050 . . 0.010 0.010
Tungsten 0.010 0.010 0.010 0.010 0.010
Titanium 0.0050 0.0050 0.0050 0.0050 0.0050
Uranium (total) 0.00035 0.00035 0.00035 0.00035 0.00035
A
When so specified in the purchase order, oxygen shall be determined and reported. Maximum, minimum, or both, permissible values should be specified in the purchase
order.
NOTE 1—A typical ordering description is as follows: two each zirconium ingots, Grade R60001, 12 in. diameter by 1000 lb each, ASTM Specification:
B350/B350M – 01.
5.2 In addition to the data specified in 5.1, the following options and points of agreement between the manufacturer and the
purchaser should be specified in the purchase order if required:
5.2.1 Inspection (Section 12), and
5.2.2 Oxygen analysis requirements (Table 1).
6. Materials and Manufacture
6.1 Materials covered by this specification shall be produced by multiple vacuum arc melting, or electron beam melting, or other
melting processes conventionally used for reactive metals; all melting is to be carried out in furnaces usually used for reactive
metals.
7. Condition
7.1 Unless otherwise specified, ingots shall be conditioned by machining or grinding or both to remove surface and subsurface
defects detrimental to subsequent fabrication.
7.2 After conditioning has been completed, no abrupt changes in diameter or local depression that will impair subsequent
fabrication shall be permitted. The difference between the maximum and minimum radii of the conditioned ingot shall not exceed
20 % of the maximum radius. Lands, grooves, and local depressions shall be blended to a maximum angle of 30° to the axis of
the ingot. Each end of the ingot shall be chamfered or radiused. The minimum chamfer or radius shall be ⁄2 in. [12 mm].
8. Chemical Requirements
8.1 The ingot shall conform to the requirements for chemical composition as prescribed in Table 1. Guide E2626 may be used
as a guide for chemical analysis techniques.
B350/B350M − 11 (2016)
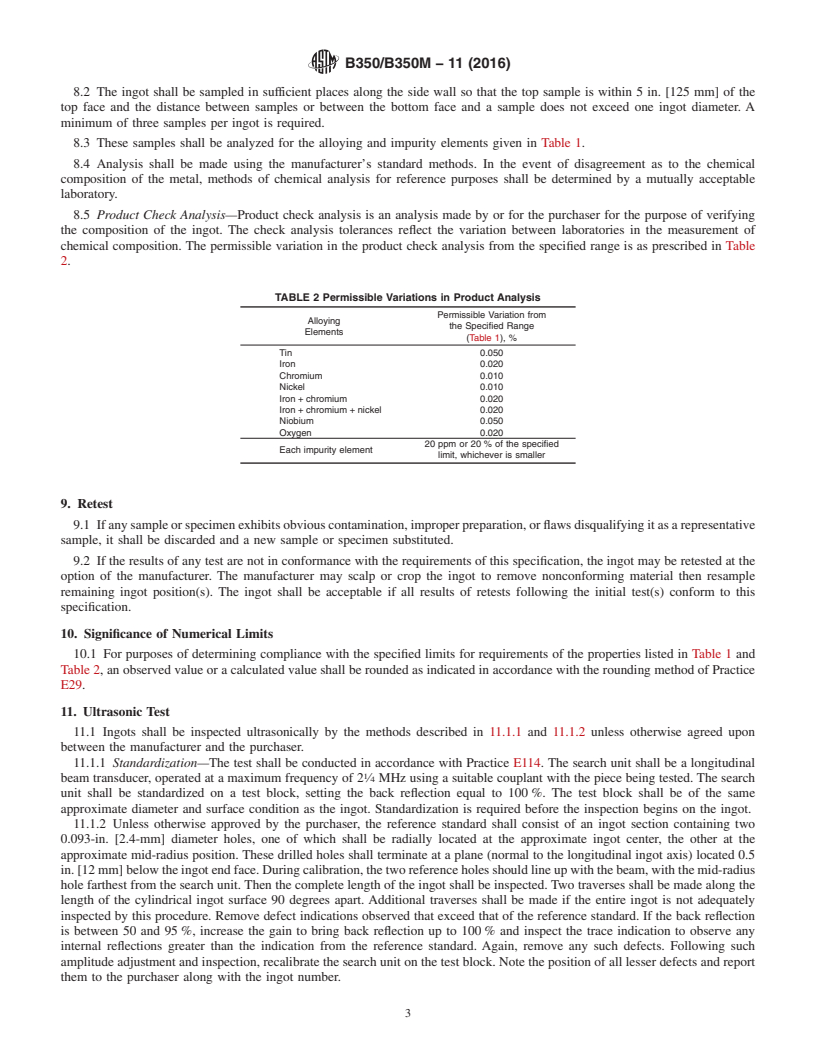
8.2 The ingot shall be sampled in sufficient places along the side wall so that the top sample is within 5 in. [125 mm] of the
top face and the distance between samples or between the bottom face and a sample does not exceed one ingot diameter. A
minimum of three samples per ingot is required.
8.3 These samples shall be analyzed for the alloying and impurity elements given in Table 1.
8.4 Analysis shall be made using the manufacturer’s standard methods. In the event of disagreement as to the chemical
composition of the metal, methods of chemical analysis for reference purposes shall be determined by a mutually acceptable
laboratory.
8.5 Product Check Analysis—Product check analysis is an analysis made by or for the purchaser for the purpose of verifying
the composition of the ingot. The ch
...


Questions, Comments and Discussion
Ask us and Technical Secretary will try to provide an answer. You can facilitate discussion about the standard in here.