ASTM F897-19
(Test Method)Standard Test Method for Measuring Fretting Corrosion of Osteosynthesis Plates and Screws
Standard Test Method for Measuring Fretting Corrosion of Osteosynthesis Plates and Screws
SIGNIFICANCE AND USE
4.1 It is well known from examination of implants after use that plates and screws used for osteosynthesis are subjected to metal loss due to corrosion at the plate-screw interfaces. One of the mechanisms of this corrosive attack is fretting corrosion due to relative motion (micromotion) between the screw heads and plate-hole countersinks.
4.2 It is also known that release of corrosion products into the tissues surrounding an implant may have adverse effects on local tissue or have systemic effects. Thus, it is important to minimize the amount of tissue exposure to corrosion products.
4.3 Screws and plates are available in different configurations in accordance with Specifications F543 and F382. This test method may be used to evaluate the effects of different combinations of screw and plate designs. As new materials and device designs are developed for use in the treatment of fractured bones, it is important to determine the effects these developments have on the amount of metal loss due to fretting corrosion.
4.4 This test method provides a standardized screening test for ranking metal plates and screws in terms of resistance to fretting corrosion and for determining the influence of different solutions on fretting corrosion rates.
4.5 This test method may also be used to generate corrosion products either for chemical analysis of the products or for testing for biological reactions to corrosion products using animal or cell culture methods.
4.6 It is well known that fretting corrosion rates depend on normal load or pressure, frequency, sliding amplitude, materials, surface treatments, and environmental factors. (4) Therefore, when determining the effect of changing one of these parameters (for example, material or environment), all others must be kept constant to facilitate interpretation of the results.
SCOPE
1.1 This test method provides a screening test for determining the amount of metal loss from plates and screws used for osteosynthesis (internal fixation of broken bones) due to fretting corrosion in the contact area between the screw head and the plate hole countersink area. The implants are used in the form they would be used clinically. The machine described generates a relative motion between plates and screws which simulates one type of motion pattern that can occur when these devices are used clinically.
1.2 Since the environmental and stress conditions used in this test method may not be identical to those experienced by bone plates in the human body, this test method may produce fretting corrosion rates that are lower or higher than those experienced in practice. The recommended axial load of 400 N was selected as being in a range where the amount of fretting corrosion is not sensitive to small changes in axial load (1).2 The combination of the recommended load and angular displacement are such that a measurable amount of fretting corrosion of surgical alloys occurs in a comparatively short period of time (7 to 14 days). (Refs 1-3)
1.3 The device is designed so as to facilitate sterilization of the test specimens and test chambers to permit testing with proteinaceous solutions that would become contaminated with microbial growth in nonsterile conditions.
1.4 The specimens used can be standard osteosynthesis implants or can be materials fabricated into the appropriate shapes.
1.5 This test method may be used for testing the fretting corrosion of metal plates and screws of similar or different alloy compositions, or it may be used for testing the fretting corrosion of metal-nonmetal combinations. This test method may also be used for wear or degradation studies of nonmetallic materials. This test method may be used as a screening test to rank the corrosivities of saline or proteinaceous solutions, or to rank metal-to-metal couples for resistance to fretting corrosion, or to study other material combinations.
1.6 The values stated in either SI unit...
General Information
- Status
- Published
- Publication Date
- 31-Oct-2019
- Technical Committee
- F04 - Medical and Surgical Materials and Devices
- Drafting Committee
- F04.15 - Material Test Methods
Relations
- Effective Date
- 01-Nov-2019
- Effective Date
- 01-Nov-2014
- Effective Date
- 01-May-2013
- Effective Date
- 01-May-2013
- Refers
ASTM F86-12a - Standard Practice for Surface Preparation and Marking of Metallic Surgical Implants - Effective Date
- 01-Dec-2012
- Refers
ASTM F86-12 - Standard Practice for Surface Preparation and Marking of Metallic Surgical Implants - Effective Date
- 15-May-2012
- Effective Date
- 01-Dec-2011
- Effective Date
- 01-Dec-2009
- Effective Date
- 01-Nov-2008
- Effective Date
- 01-Nov-2008
- Effective Date
- 01-Oct-2008
- Effective Date
- 01-Jun-2007
- Effective Date
- 01-Jun-2007
- Effective Date
- 01-Jun-2007
- Refers
ASTM F86-04 - Standard Practice for Surface Preparation and Marking of Metallic Surgical Implants - Effective Date
- 01-Oct-2004
Overview
ASTM F897-19, "Standard Test Method for Measuring Fretting Corrosion of Osteosynthesis Plates and Screws," is a critical international standard published by ASTM International. This test method outlines a reproducible and controlled laboratory procedure for evaluating the fretting corrosion resistance of osteosynthesis plates and screws-devices widely used in the internal fixation of fractures. Fretting corrosion, caused by microscopic relative motion at the plate-screw interface, can result in metal degradation, potentially affecting implant integrity and releasing corrosion products into surrounding tissue. This standard provides a practical screening method to quantify metal loss and compare different material combinations, device designs, and environmental variables.
Key Topics
- Fretting Corrosion Mechanisms: The standard focuses on corrosion due to micromotion between screw heads and plate-hole countersinks in osteosynthesis devices.
- Test Assembly: Plates and screws are assembled as they would be used clinically and subjected to controlled motion mimicking in vivo conditions.
- Evaluation Metrics:
- Weight loss of both plates and screws
- Chemical analysis of corrosion products in the test solution
- Observations of visual damage or degradation
- Flexibility:
- Applicable to a range of metallic and non-metallic material combinations and device designs
- Capable of ranking materials, surface finishes, and environmental solutions for corrosion resistance
- Controlled Parameters: Test variables such as applied load, frequency, materials, and solution composition are carefully standardized to ensure meaningful comparisons.
Applications
ASTM F897-19 is widely used by manufacturers, researchers, and regulatory agencies to:
- Screen New Device Materials and Designs: Evaluate the relative fretting corrosion resistance of different alloy compositions, surface treatments, or mechanical designs before clinical use.
- Compare Environmental Effects: Assess the corrosivity of various solutions-such as saline or protein-rich simulants-on osteosynthesis hardware.
- Support R&D and Regulatory Submissions: Generate standardized corrosion data required for product development, quality assurance, and regulatory filings for medical implants.
- Biological Testing: Produce corrosion products for further chemical or biological testing, supporting evaluations of local or systemic tissue responses to corrosion byproducts.
- Address Patient Safety: Minimize the release of harmful metal ions and particles into surrounding tissue to reduce adverse biological reactions and implant failures.
Related Standards
For comprehensive testing and characterization of medical device materials, ASTM F897-19 should be used in conjunction with related standards, including:
- ASTM F543 - Specifications and Test Methods for Metallic Medical Bone Screws
- ASTM F382 - Specification and Test Method for Metallic Bone Plates
- ASTM F86 - Practice for Surface Preparation and Marking of Metallic Surgical Implants
- ASTM G1 - Practice for Preparing, Cleaning, and Evaluating Corrosion Test Specimens
- ASTM D1886 - Test Methods for Nickel in Water
These supplementary standards provide guidance on aspects such as implant configuration, cleaning, surface preparation, and compositional analysis, enabling more robust fretting corrosion assessments.
By following ASTM F897-19, organizations can reliably measure and compare fretting corrosion in osteosynthesis implants, enhance patient safety, and accelerate the development of more durable orthopedic devices. For detailed procedures and compliance requirements, always refer to the latest official ASTM publication.
Buy Documents
ASTM F897-19 - Standard Test Method for Measuring Fretting Corrosion of Osteosynthesis Plates and Screws
REDLINE ASTM F897-19 - Standard Test Method for Measuring Fretting Corrosion of Osteosynthesis Plates and Screws
Get Certified
Connect with accredited certification bodies for this standard

BSI Group
BSI (British Standards Institution) is the business standards company that helps organizations make excellence a habit.

TÜV Rheinland
TÜV Rheinland is a leading international provider of technical services.

TÜV SÜD
TÜV SÜD is a trusted partner of choice for safety, security and sustainability solutions.
Sponsored listings
Frequently Asked Questions
ASTM F897-19 is a standard published by ASTM International. Its full title is "Standard Test Method for Measuring Fretting Corrosion of Osteosynthesis Plates and Screws". This standard covers: SIGNIFICANCE AND USE 4.1 It is well known from examination of implants after use that plates and screws used for osteosynthesis are subjected to metal loss due to corrosion at the plate-screw interfaces. One of the mechanisms of this corrosive attack is fretting corrosion due to relative motion (micromotion) between the screw heads and plate-hole countersinks. 4.2 It is also known that release of corrosion products into the tissues surrounding an implant may have adverse effects on local tissue or have systemic effects. Thus, it is important to minimize the amount of tissue exposure to corrosion products. 4.3 Screws and plates are available in different configurations in accordance with Specifications F543 and F382. This test method may be used to evaluate the effects of different combinations of screw and plate designs. As new materials and device designs are developed for use in the treatment of fractured bones, it is important to determine the effects these developments have on the amount of metal loss due to fretting corrosion. 4.4 This test method provides a standardized screening test for ranking metal plates and screws in terms of resistance to fretting corrosion and for determining the influence of different solutions on fretting corrosion rates. 4.5 This test method may also be used to generate corrosion products either for chemical analysis of the products or for testing for biological reactions to corrosion products using animal or cell culture methods. 4.6 It is well known that fretting corrosion rates depend on normal load or pressure, frequency, sliding amplitude, materials, surface treatments, and environmental factors. (4) Therefore, when determining the effect of changing one of these parameters (for example, material or environment), all others must be kept constant to facilitate interpretation of the results. SCOPE 1.1 This test method provides a screening test for determining the amount of metal loss from plates and screws used for osteosynthesis (internal fixation of broken bones) due to fretting corrosion in the contact area between the screw head and the plate hole countersink area. The implants are used in the form they would be used clinically. The machine described generates a relative motion between plates and screws which simulates one type of motion pattern that can occur when these devices are used clinically. 1.2 Since the environmental and stress conditions used in this test method may not be identical to those experienced by bone plates in the human body, this test method may produce fretting corrosion rates that are lower or higher than those experienced in practice. The recommended axial load of 400 N was selected as being in a range where the amount of fretting corrosion is not sensitive to small changes in axial load (1).2 The combination of the recommended load and angular displacement are such that a measurable amount of fretting corrosion of surgical alloys occurs in a comparatively short period of time (7 to 14 days). (Refs 1-3) 1.3 The device is designed so as to facilitate sterilization of the test specimens and test chambers to permit testing with proteinaceous solutions that would become contaminated with microbial growth in nonsterile conditions. 1.4 The specimens used can be standard osteosynthesis implants or can be materials fabricated into the appropriate shapes. 1.5 This test method may be used for testing the fretting corrosion of metal plates and screws of similar or different alloy compositions, or it may be used for testing the fretting corrosion of metal-nonmetal combinations. This test method may also be used for wear or degradation studies of nonmetallic materials. This test method may be used as a screening test to rank the corrosivities of saline or proteinaceous solutions, or to rank metal-to-metal couples for resistance to fretting corrosion, or to study other material combinations. 1.6 The values stated in either SI unit...
SIGNIFICANCE AND USE 4.1 It is well known from examination of implants after use that plates and screws used for osteosynthesis are subjected to metal loss due to corrosion at the plate-screw interfaces. One of the mechanisms of this corrosive attack is fretting corrosion due to relative motion (micromotion) between the screw heads and plate-hole countersinks. 4.2 It is also known that release of corrosion products into the tissues surrounding an implant may have adverse effects on local tissue or have systemic effects. Thus, it is important to minimize the amount of tissue exposure to corrosion products. 4.3 Screws and plates are available in different configurations in accordance with Specifications F543 and F382. This test method may be used to evaluate the effects of different combinations of screw and plate designs. As new materials and device designs are developed for use in the treatment of fractured bones, it is important to determine the effects these developments have on the amount of metal loss due to fretting corrosion. 4.4 This test method provides a standardized screening test for ranking metal plates and screws in terms of resistance to fretting corrosion and for determining the influence of different solutions on fretting corrosion rates. 4.5 This test method may also be used to generate corrosion products either for chemical analysis of the products or for testing for biological reactions to corrosion products using animal or cell culture methods. 4.6 It is well known that fretting corrosion rates depend on normal load or pressure, frequency, sliding amplitude, materials, surface treatments, and environmental factors. (4) Therefore, when determining the effect of changing one of these parameters (for example, material or environment), all others must be kept constant to facilitate interpretation of the results. SCOPE 1.1 This test method provides a screening test for determining the amount of metal loss from plates and screws used for osteosynthesis (internal fixation of broken bones) due to fretting corrosion in the contact area between the screw head and the plate hole countersink area. The implants are used in the form they would be used clinically. The machine described generates a relative motion between plates and screws which simulates one type of motion pattern that can occur when these devices are used clinically. 1.2 Since the environmental and stress conditions used in this test method may not be identical to those experienced by bone plates in the human body, this test method may produce fretting corrosion rates that are lower or higher than those experienced in practice. The recommended axial load of 400 N was selected as being in a range where the amount of fretting corrosion is not sensitive to small changes in axial load (1).2 The combination of the recommended load and angular displacement are such that a measurable amount of fretting corrosion of surgical alloys occurs in a comparatively short period of time (7 to 14 days). (Refs 1-3) 1.3 The device is designed so as to facilitate sterilization of the test specimens and test chambers to permit testing with proteinaceous solutions that would become contaminated with microbial growth in nonsterile conditions. 1.4 The specimens used can be standard osteosynthesis implants or can be materials fabricated into the appropriate shapes. 1.5 This test method may be used for testing the fretting corrosion of metal plates and screws of similar or different alloy compositions, or it may be used for testing the fretting corrosion of metal-nonmetal combinations. This test method may also be used for wear or degradation studies of nonmetallic materials. This test method may be used as a screening test to rank the corrosivities of saline or proteinaceous solutions, or to rank metal-to-metal couples for resistance to fretting corrosion, or to study other material combinations. 1.6 The values stated in either SI unit...
ASTM F897-19 is classified under the following ICS (International Classification for Standards) categories: 11.040.40 - Implants for surgery, prosthetics and orthotics. The ICS classification helps identify the subject area and facilitates finding related standards.
ASTM F897-19 has the following relationships with other standards: It is inter standard links to ASTM F897-02(2013), ASTM F382-14, ASTM F543-13e1, ASTM F543-13, ASTM F86-12a, ASTM F86-12, ASTM G1-03(2011), ASTM F86-04(2009), ASTM F382-99(2008)e1, ASTM F382-99(2008), ASTM D1886-08, ASTM F543-07, ASTM F543-07e2, ASTM F543-07e1, ASTM F86-04. Understanding these relationships helps ensure you are using the most current and applicable version of the standard.
ASTM F897-19 is available in PDF format for immediate download after purchase. The document can be added to your cart and obtained through the secure checkout process. Digital delivery ensures instant access to the complete standard document.
Standards Content (Sample)
This international standard was developed in accordance with internationally recognized principles on standardization established in the Decision on Principles for the
Development of International Standards, Guides and Recommendations issued by the World Trade Organization Technical Barriers to Trade (TBT) Committee.
Designation: F897 − 19
Standard Test Method for
Measuring Fretting Corrosion of Osteosynthesis Plates and
Screws
ThisstandardisissuedunderthefixeddesignationF897;thenumberimmediatelyfollowingthedesignationindicatestheyearoforiginal
adoption or, in the case of revision, the year of last revision.Anumber in parentheses indicates the year of last reapproval.Asuperscript
epsilon (´) indicates an editorial change since the last revision or reapproval.
1. Scope tallic materials. This test method may be used as a screening
test to rank the corrosivities of saline or proteinaceous
1.1 This test method provides a screening test for determin-
solutions, or to rank metal-to-metal couples for resistance to
ing the amount of metal loss from plates and screws used for
fretting corrosion, or to study other material combinations.
osteosynthesis (internal fixation of broken bones) due to
fretting corrosion in the contact area between the screw head 1.6 The values stated in either SI units or inch-pound units
and the plate hole countersink area. The implants are used in are to be regarded separately as standard. The values stated in
the form they would be used clinically. The machine described each system are not necessarily exact equivalents; therefore, to
generates a relative motion between plates and screws which ensure conformance with the standard, each system shall be
simulates one type of motion pattern that can occur when these used independently of the other, and values from the two
devices are used clinically. systems shall not be combined.
1.7 This standard does not purport to address all of the
1.2 Since the environmental and stress conditions used in
safety concerns, if any, associated with its use. It is the
this test method may not be identical to those experienced by
responsibility of the user of this standard to establish appro-
bone plates in the human body, this test method may produce
priate safety, health, and environmental practices and deter-
fretting corrosion rates that are lower or higher than those
mine the applicability of regulatory limitations prior to use.
experienced in practice.The recommended axial load of 400 N
1.8 This international standard was developed in accor-
was selected as being in a range where the amount of fretting
dance with internationally recognized principles on standard-
corrosion is not sensitive to small changes in axial load (1).
ization established in the Decision on Principles for the
The combination of the recommended load and angular dis-
Development of International Standards, Guides and Recom-
placement are such that a measurable amount of fretting
mendations issued by the World Trade Organization Technical
corrosion of surgical alloys occurs in a comparatively short
Barriers to Trade (TBT) Committee.
period of time (7 to 14 days). (Refs 1-3)
1.3 The device is designed so as to facilitate sterilization of
2. Referenced Documents
the test specimens and test chambers to permit testing with
2.1 ASTM Standards:
proteinaceous solutions that would become contaminated with
D1886 Test Methods for Nickel in Water
microbial growth in nonsterile conditions.
F86 Practice for Surface Preparation and Marking of Metal-
1.4 The specimens used can be standard osteosynthesis
lic Surgical Implants
implants or can be materials fabricated into the appropriate
F382 SpecificationandTestMethodforMetallicBonePlates
shapes.
F543 Specification and Test Methods for Metallic Medical
1.5 This test method may be used for testing the fretting Bone Screws
corrosion of metal plates and screws of similar or different G1 Practice for Preparing, Cleaning, and Evaluating Corro-
alloy compositions, or it may be used for testing the fretting sion Test Specimens
corrosion of metal-nonmetal combinations. This test method
3. Summary of Test Method
may also be used for wear or degradation studies of nonme-
3.1 A two-hole plate is attached to two plastic rods with
bone screws, with flexible spacers between the plate and the
This test method is under the jurisdiction ofASTM Committee F04 on Medical
rods, placed in a glass beaker, and the beaker sealed with a
and Surgical Materials and Devices and is the direct responsibility of Subcommittee
F04.15 on Material Test Methods.
Current edition approved Nov. 1, 2019. Published December 2019. Originally
approvedin1984.Lastpreviouseditionapprovedin2013asF897 – 02(2013).DOI: For referenced ASTM standards, visit the ASTM website, www.astm.org, or
10.1520/F0897-19. contact ASTM Customer Service at service@astm.org. For Annual Book of ASTM
The boldface numbers in parentheses refer to the list of references at the end of Standards volume information, refer to the standard’s Document Summary page on
this standard. the ASTM website.
Copyright © ASTM International, 100 Barr Harbor Drive, PO Box C700, West Conshohocken, PA 19428-2959. United States
F897 − 19
flexible rubber cover. This assembly is steam sterilized, and fretting corrosion and for determining the influence of different
then a sterile solution is injected through the rubber cover into solutions on fretting corrosion rates.
the beaker. This assembly is then mounted in the fretting
4.5 This test method may also be used to generate corrosion
apparatus which, when set in motion, produces a rocking
products either for chemical analysis of the products or for
motion and, therefore, a small cyclic displacement between the
testing for biological reactions to corrosion products using
mating surfaces of the plate and screws.The amount of fretting
animal or cell culture methods.
corrosion is determined at the end of the test by measurement
4.6 It is well known that fretting corrosion rates depend on
of the weight loss of the plates and screws and by chemical
normal load or pressure, frequency, sliding amplitude,
analysis of the solutions.
materials, surface treatments, and environmental factors. (4)
4. Significance and Use Therefore, when determining the effect of changing one of
these parameters (for example, material or environment), all
4.1 It is well known from examination of implants after use
others must be kept constant to facilitate interpretation of the
that plates and screws used for osteosynthesis are subjected to
results.
metallossduetocorrosionattheplate-screwinterfaces.Oneof
the mechanisms of this corrosive attack is fretting corrosion
5. Apparatus
due to relative motion (micromotion) between the screw heads
5.1 Steam Autoclave, capable of maintaining 121 6 2°C
and plate-hole countersinks.
[250 6 4°F], and equipped with a thermometer, pressure
4.2 It is also known that release of corrosion products into
gauge, vent cock, and a rack to hold the test assemblies above
the tissues surrounding an implant may have adverse effects on
the water level.
local tissue or have systemic effects. Thus, it is important to
5.2 Microbalance, with a 0.01-mg scale.
minimize the amount of tissue exposure to corrosion products.
5.3 Fretting Apparatus, as described in 5.3.1 – 5.3.4 and
4.3 Screws and plates are available in different configura-
illustrated in Fig. 1 and Fig. 2.
tions in accordance with Specifications F543 and F382. This
5.3.1 The fretting apparatus is driven by a slow speed gear
test method may be used to evaluate the effects of different
motor connected to a horizontal rotating shaft. Round disks
combinations of screw and plate designs.As new materials and
with machined flats (cams) are mounted on the shaft as shown
device designs are developed for use in the treatment of
in Fig. 1. For multiple specimen testing, there may be more
fractured bones, it is important to determine the effects these
than one cam on the drive shaft.
developments have on the amount of metal loss due to fretting
5.3.2 Theflatsonthecamsaremachinedsoastoproduce2°
corrosion.
of relative motion between the posts of the test assemblies.
4.4 This test method provides a standardized screening test
for ranking metal plates and screws in terms of resistance to NOTE 1—A suggested combination of short post length and plunger
NOTE 1—Figure shows assembly drawings of one pair of test positions on each side of a cam, and of the relationships between the screws, plate,
spacers, and polyacetal rods.
FIG. 1 Two-Hole Plate Fretting (THPF) Testing System
F897 − 19
6. Reagents and Materials
6.1 The basic test solution shall be 0.9 % NaCl in distilled
water. Measure the pH of the solutions before conducting the
test. If necessary, buffer them to ensure they are in the range of
6.5 to 7.5.
6.2 Other solutions may include other “physiologic” saline
and electrolyte solutions for injection (USP) or saline and
protein solutions. If proteins are used, the solutions shall be
sterileinaccordancewith8.1.5.Proteinsolutionsmayeitherbe
purchased sterile, or sterilized by filtration. These shall be
reported in accordance with 10.1.
7. Test Specimens
FIG. 2 Assembled Test Chamber with Rubber Seal
7.1 Plates:
7.1.1 The plates used for these tests may be cut from
commercially available plates for osteosynthesis.
displacement is a 5-cm post with a 1.9-mm displacement.
7.1.2 Platesmaybefabricatedfrom3.5-mmorthickermetal
sheet or strip. Holes may be prepared in accordance with
5.3.3 The shaft rotation rate and the number of machined
Specification F382. Holes may be round, or slotted, or “self-
flats shall be such that the flats produce one oscillation of the
compressing” type.
plunger per second.
7.2 Screws:
5.3.4 Testassemblyholdinganddrivingframesaremounted
7.2.1 Screws used for this test may be commercially avail-
symmetrically on each side of the rotating cams. The oscillat-
able bone screws. Heads should be spherical, although other
ing plunger is springloaded and held in the guide sleeve. The
shapes may be used.
hole in the top plate is slotted to permit adjustment of the
7.2.2 Screws may be fabricated from rod stock in accor-
position of the test assemblies.
dance with Specification F543.
5.4 Test Assemblies, consisting of two plastic rods, and two
7.3 Test specimens may be used in the condition as received
flexible spacers, the two-hole plate, two bone screws, one
from the implant manufacturer; custom fabricated specimens
beaker, and the rubber cover.
should be prepared in accordance with Practice F86.
5.4.1 The longer rod is threaded at one end to mate with a
mounting screw, while the other end is threaded to mate with
8. Procedure
the bone screw.
8.1 Test Assembly Preparation (see Fig. 1):
5.4.2 The shorter rod has a reduced diameter at one end to
8.1.1 Clean the plates and screws ultrasonically with deter-
mate with the oscillating horizontal plunger, while the other
gent or other degreasing agent to ensure that they are free from
end is threaded to mate with a bone screw.
gr
...
This document is not an ASTM standard and is intended only to provide the user of an ASTM standard an indication of what changes have been made to the previous version. Because
it may not be technically possible to adequately depict all changes accurately, ASTM recommends that users consult prior editions as appropriate. In all cases only the current version
of the standard as published by ASTM is to be considered the official document.
Designation: F897 − 02 (Reapproved 2013) F897 − 19
Standard Test Method for
Measuring Fretting Corrosion of Osteosynthesis Plates and
Screws
This standard is issued under the fixed designation F897; the number immediately following the designation indicates the year of original
adoption or, in the case of revision, the year of last revision. A number in parentheses indicates the year of last reapproval. A superscript
epsilon (´) indicates an editorial change since the last revision or reapproval.
1. Scope
1.1 This test method provides a screening test for determining the amount of metal loss from plates and screws used for
osteosynthesis (internal fixation of broken bones) due to fretting corrosion in the contact area between the screw head and the plate
hole countersink area. The implants are used in the form they would be used clinically. The machine described generates a relative
motion between plates and screws which simulates one type of motion pattern that can occur when these devices are used clinically.
1.2 Since the environmental and stress conditions used in this test method may not be identical to those experienced by bone
plates in the human body, this test method may produce fretting corrosion rates that are lower or higher than those experienced
in practice. The recommended axial load of 400 N was selected as being in a range where the amount of fretting corrosion is not
sensitive to small changes in axial load (1). The combination of the recommended load and angular displacement are such that
a measurable amount of fretting corrosion of surgical alloys occurs in a comparatively short period of time (7 to 14 days). (Refs
1-3)
1.3 The device is designed so as to facilitate sterilization of the test specimens and test chambers to permit testing with
proteinaceous solutions that would become contaminated with microbial growth in nonsterile conditions.
1.4 The specimens used can be standard osteosynthesis implants or can be materials fabricated into the appropriate shapes.
1.5 This test method may be used for testing the fretting corrosion of metal plates and screws of similar or different alloy
compositions, or it may be used for testing the fretting corrosion of metal-nonmetal combinations. This test method may also be
used for wear or degradation studies of nonmetallic materials. This test method may be used as a screening test to rank the
corrosivities of saline or proteinaceous solutions, or to rank metal-to-metal couples for resistance to fretting corrosion, or to study
other material combinations.
1.6 The values stated in either SI units or inch-pound units are to be regarded separately as standard. The values stated in each
system are not necessarily exact equivalents; therefore, to ensure conformance with the standard, each system shall be used
independently of the other, and values from the two systems shall not be combined.
1.7 This standard may involve hazardous materials, operations, and equipment. This standard does not purport to address all
of the safety concerns concerns, if any, associated with its use. It is the responsibility of whoever uses the user of this standard
to consult and establish appropriate safety safety, health, and healthenvironmental practices and determine the applicability of
regulatory limitations prior to use.
1.8 This international standard was developed in accordance with internationally recognized principles on standardization
established in the Decision on Principles for the Development of International Standards, Guides and Recommendations issued
by the World Trade Organization Technical Barriers to Trade (TBT) Committee.
2. Referenced Documents
2.1 ASTM Standards:
D1886 Test Methods for Nickel in Water
F86 Practice for Surface Preparation and Marking of Metallic Surgical Implants
This test method is under the jurisdiction of ASTM Committee F04 on Medical and Surgical Materials and Devices and is the direct responsibility of Subcommittee
F04.15 on Material Test Methods.
Current edition approved March 1, 2013Nov. 1, 2019. Published March 2013December 2019. Originally approved in 1984. Last previous edition approved in 20072013
as F897 – 02(2007).(2013). DOI: 10.1520/F0897-02R13.10.1520/F0897-19.
The boldface numbers in parentheses refer to the list of references at the end of this standard.
For referenced ASTM standards, visit the ASTM website, www.astm.org, or contact ASTM Customer Service at service@astm.org. For Annual Book of ASTM Standards
volume information, refer to the standard’s Document Summary page on the ASTM website.
Copyright © ASTM International, 100 Barr Harbor Drive, PO Box C700, West Conshohocken, PA 19428-2959. United States
F897 − 19
F382 Specification and Test Method for Metallic Bone Plates
F543 Specification and Test Methods for Metallic Medical Bone Screws
G1 Practice for Preparing, Cleaning, and Evaluating Corrosion Test Specimens
3. Summary of Test Method
3.1 A two-hole plate is attached to two plastic rods with bone screws, with flexible spacers between the plate and the rods,
placed in a glass beaker, and the beaker sealed with a flexible rubber cover. This assembly is steam sterilized, and then a sterile
solution is injected through the rubber cover into the beaker. This assembly is then mounted in the fretting apparatus which, when
set in motion, produces a rocking motion and, therefore, a small cyclic displacement between the mating surfaces of the plate and
screws. The amount of fretting corrosion is determined at the end of the test by measurement of the weight loss of the plates and
screws and by chemical analysis of the solutions.
4. Significance and Use
4.1 It is well known from examination of implants after use that plates and screws used for osteosynthesis are subjected to metal
loss due to corrosion at the plate-screw interfaces. One of the mechanisms of this corrosive attack is fretting corrosion due to
relative motion (micromotion) between the screw heads and plate-hole countersinks.
4.2 It is also known that release of corrosion products into the tissues surrounding an implant may have adverse effects on local
tissue or have systemic effects. Thus, it is important to minimize the amount of tissue exposure to corrosion products.
4.3 Screws and plates are available in different configurations in accordance with Specifications F543 and F382. This test
method may be used to evaluate the effects of different combinations of screw and plate designs. As new materials and device
designs are developed for use in the treatment of fractured bones, it is important to determine the effects these developments have
on the amount of metal loss due to fretting corrosion.
4.4 This test method provides a standardized screening test for ranking metal plates and screws in terms of resistance to fretting
corrosion and for determining the influence of different solutions on fretting corrosion rates.
4.5 This test method may also be used to generate corrosion products either for chemical analysis of the products or for testing
for biological reactions to corrosion products using animal or cell culture methods.
4.6 It is well known that fretting corrosion rates depend on normal load or pressure, frequency, sliding amplitude, materials,
surface treatments, and environmental factors. (4) Therefore, when determining the effect of changing one of these parameters (for
example, material or environment), all others must be kept constant to facilitate interpretation of the results.
5. Apparatus
5.1 Steam Autoclave, capable of maintaining 121 6 2°C [250 6 4°F], and equipped with a thermometer, pressure gauge, vent
cock, and a rack to hold the test assemblies above the water level.
5.2 Microbalance, with a 0.01-mg scale.
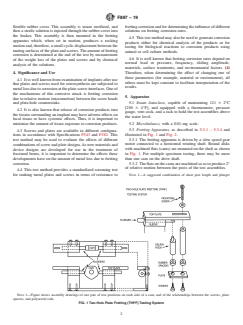
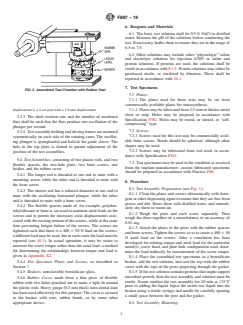
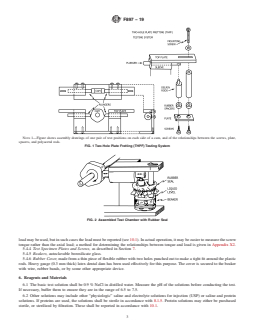
5.3 Fretting Apparatus, as described in 5.3.1 – 5.3.4 and illustrated in Fig. 1 and Fig. 2.
5.3.1 The fretting apparatus is driven by a slow speed gear motor connected to a horizontal rotating shaft. Round disks with
machined flats (cams) are mounted on the shaft as shown in Fig. 1. For multiple specimen testing, there may be more than one
cam on the drive shaft.
5.3.2 The flats on the cams are machined so as to produce 2° of relative motion between the posts of the test assemblies.
NOTE 1—A suggested combination of short post length and plunger displacement is a 5-cm post with a 1.9-mm displacement.
5.3.3 The shaft rotation rate and the number of machined flats shall be such that the flats produce one oscillation of the plunger
per second.
5.3.4 Test assembly holding and driving frames are mounted symmetrically on each side of the rotating cams. The oscillating
plunger is springloaded and held in the guide sleeve. The hole in the top plate is slotted to permit adjustment of the position of
the test assemblies.
5.4 Test Assemblies, consisting of two plastic rods, and two flexible spacers, the two-hole plate, two bone screws, one beaker,
and the rubber cover.
5.4.1 The longer rod is threaded at one end to mate with a mounting screw, while the other end is threaded to mate with the
bone screw.
5.4.2 The shorter rod has a reduced diameter at one end to mate with the oscillating horizontal plunger, while the other end is
threaded to mate with a bone screw.
5.4.3 The flexible spacers made of, for example, polydimethylsiloxane or buna-n, are used to maintain axial loads on the screws
and to permit the necessary axial displacements associated with the rocking motion of the screws, while at the same time
preventing fatigue failure of the screws. The screws are tightened such that there is a 400 6 50 N load on the screws; a different
F897 − 19
NOTE 1—Figure shows assembly drawings of one pair of test positions on each side of a cam, and of the relationships between the screws, plate,
spacers, and polyacetal rods.
FIG. 1 Two-Hole Plate Fretting (THPF) Testing System
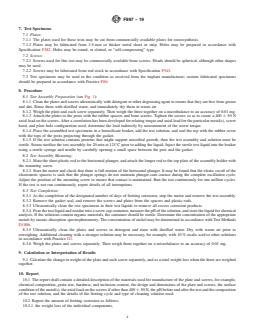
FIG. 2 Assembled Test Chamber with Rubber Seal
load may be used, but in such cases the load must be reported (see 10.1). In actual operation, it may be easier to measure the screw
torque rather than the axial load; a method for determining the relationships between torque and load is given in Appendix X2.
5.4.4 Test Specimen Plates and Screws, as described in Section 7.
5.4.5 Beakers, autoclavable borosilicate glass.
5.4.6 Rubber Cover, made from a thin piece of flexible rubber with two holes punched out to make a tight fit around the plastic
rods. Heavy gauge (0.3 mm thick) latex dental dam has been used effectively for this purpose. The cover is secured to the beaker
with wire, rubber bands, or by some other appropriate device.
6. Reagents and Materials
6.1 The basic test solution shall be 0.9 % NaCl in distilled water. Measure the pH of the solutions before conducting the test.
If necessary, buffer them to ensure they are in the range of 6.5 to 7.5.
6.2 Other solutions may include other “physiologic” saline and electrolyte solutions for injection (USP) or s
...
Questions, Comments and Discussion
Ask us and Technical Secretary will try to provide an answer. You can facilitate discussion about the standard in here.
Loading comments...