ASTM G81-97a(2018)
(Test Method)Standard Test Method for Jaw Crusher Gouging Abrasion Test
Standard Test Method for Jaw Crusher Gouging Abrasion Test
SIGNIFICANCE AND USE
5.1 A number of types of jaw crushers have been used for laboratory abrasion tests, see Refs (1-5)4 and a limited amount of data has been published (6-10). With emphasis on the crusher described in Section 6, this test method ranks materials and also indicates differences in wear life for that type of abrasion defined as gouging abrasion, as is found in crushing equipment and in many mining and earthmoving applications. This test method is considered useful for research and development purposes, but not to specify universal wear ratios, since the wear ranking and severity of wear may change dramatically with a change of the characteristics (chemistry, shape, angularity, etc.) of the crushed material or type of machinery.
SCOPE
1.1 This test method covers a laboratory procedure to determine the relative gouging abrasion resistance of materials. Materials homogeneous in structure and properties are the most appropriate test materials; however, surface-treated and composite materials can also be tested. The test involves a small laboratory jaw crusher that crushes presized hard rock materials, such as a hard morainal gravel, or some other crushable substance.
1.2 This standard does not purport to address all of the safety concerns, if any, associated with its use. It is the responsibility of the user of this standard to establish appropriate safety, health, and environmental practices and determine the applicability of regulatory limitations prior to use. (See 8.1 on Safety Precautions.)
1.3 This international standard was developed in accordance with internationally recognized principles on standardization established in the Decision on Principles for the Development of International Standards, Guides and Recommendations issued by the World Trade Organization Technical Barriers to Trade (TBT) Committee.
General Information
- Status
- Published
- Publication Date
- 30-Nov-2018
- Technical Committee
- G02 - Wear and Erosion
- Drafting Committee
- G02.30 - Abrasive Wear
Relations
- Effective Date
- 01-Dec-2018
- Effective Date
- 15-Nov-2023
- Effective Date
- 01-Nov-2023
- Effective Date
- 01-May-2019
- Effective Date
- 15-Nov-2018
- Effective Date
- 01-Jul-2018
- Effective Date
- 01-Jul-2017
- Effective Date
- 15-Mar-2017
- Effective Date
- 01-Nov-2015
- Effective Date
- 01-May-2014
- Effective Date
- 01-May-2014
- Effective Date
- 15-Oct-2013
- Effective Date
- 01-Jun-2013
- Effective Date
- 01-May-2013
- Effective Date
- 01-Dec-2012
Overview
ASTM G81-97a(2018) is the international standard titled Standard Test Method for Jaw Crusher Gouging Abrasion Test, developed by ASTM International. This test method establishes a laboratory procedure for determining the relative gouging abrasion resistance of various materials using a small laboratory jaw crusher. It is particularly significant for assessing materials commonly subjected to high-stress abrasive wear, such as those used in mining, earthmoving, and mineral processing equipment.
The standard focuses on evaluating wear by simulating severe abrasion caused by the interaction of hard, angular materials with crushing equipment. This process provides a ranking of materials in terms of resistance to gouging abrasion, beneficial for research and development of new alloys and surface treatments. While the test provides valuable comparative data, it is not intended to establish universal wear ratios due to the effect of material and equipment variability.
Key Topics
- Gouging Abrasion Resistance: The test quantifies the ability of materials (both homogeneous and composite) to withstand the severe, localized wear caused by high-force contact, creating gouges, grooves, or deep scratches.
- Test Apparatus: Utilizes a laboratory jaw crusher with a feed opening of approximately 100 by 150 mm, modified to accept easily machined, interchangeable wear plates.
- Test Procedure: Pre-sized, hard rock (e.g., morainal gravel) is crushed in a controlled sequence. Mass and volume loss of test and reference plates are measured, and a wear ratio is calculated.
- Calibration and Repeatability: The method includes guidelines for calibration using reference materials to ensure repeatable and reliable results.
- Safety and Precautions: Emphasizes the importance of guarding machinery, preventing accidental startup, and following applicable safety, health, and environmental practices.
Applications
This abrasion test is widely used in:
- Mining and Quarrying: For evaluating materials used in jaw crushers, liners, and wear parts exposed to abrasive ore and rock.
- Material Development and R&D: Essential for researchers developing new steels, irons, alloys, and coatings to improve the wear life of critical components.
- Quality Control: Employed by manufacturers of crushing and grinding equipment to benchmark material performance and maintain product integrity.
- Earthmoving Equipment: Useful for materials in applications where high-stress abrasion is a primary wear mechanism.
The method's comparative results help stakeholders make informed decisions in material selection, improving operational efficiency and lowering maintenance costs for heavy machinery.
Related Standards
Several standards are typically referenced alongside ASTM G81-97a(2018) for comprehensive wear and material property evaluation:
- ASTM A128/A128M - Steel Castings, Austenitic Manganese
- ASTM A514/A514M and A517/A517M - High-strength alloy steel plates
- ASTM E10 & E18 - Test methods for hardness (Brinell and Rockwell)
- ASTM E140 - Hardness Conversion Tables for Metals
- ASTM E691 - Practice for Interlaboratory Study for Test Methods
- ASTM G40 - Terminology Relating to Wear and Erosion
- ASTM E30 & E350 - Chemical Analysis of Iron and Steel
These related standards provide the necessary context for interpreting gouging abrasion results and ensure consistent, internationally recognized test protocols.
Conclusion
ASTM G81-97a(2018) offers a standardized, reliable approach for ranking the gouging abrasion resistance of materials exposed to harsh operational environments. Its use is critical for materials selection, product development, and life extension strategies in mining, mineral processing, and heavy equipment industries. Adhering to this standard helps ensure that testing methods are safe, repeatable, and internationally accepted, supporting advancements in high-performance materials for abrasive conditions.
Buy Documents
ASTM G81-97a(2018) - Standard Test Method for Jaw Crusher Gouging Abrasion Test
Get Certified
Connect with accredited certification bodies for this standard

BSMI (Bureau of Standards, Metrology and Inspection)
Taiwan's standards and inspection authority.
Sponsored listings
Frequently Asked Questions
ASTM G81-97a(2018) is a standard published by ASTM International. Its full title is "Standard Test Method for Jaw Crusher Gouging Abrasion Test". This standard covers: SIGNIFICANCE AND USE 5.1 A number of types of jaw crushers have been used for laboratory abrasion tests, see Refs (1-5)4 and a limited amount of data has been published (6-10). With emphasis on the crusher described in Section 6, this test method ranks materials and also indicates differences in wear life for that type of abrasion defined as gouging abrasion, as is found in crushing equipment and in many mining and earthmoving applications. This test method is considered useful for research and development purposes, but not to specify universal wear ratios, since the wear ranking and severity of wear may change dramatically with a change of the characteristics (chemistry, shape, angularity, etc.) of the crushed material or type of machinery. SCOPE 1.1 This test method covers a laboratory procedure to determine the relative gouging abrasion resistance of materials. Materials homogeneous in structure and properties are the most appropriate test materials; however, surface-treated and composite materials can also be tested. The test involves a small laboratory jaw crusher that crushes presized hard rock materials, such as a hard morainal gravel, or some other crushable substance. 1.2 This standard does not purport to address all of the safety concerns, if any, associated with its use. It is the responsibility of the user of this standard to establish appropriate safety, health, and environmental practices and determine the applicability of regulatory limitations prior to use. (See 8.1 on Safety Precautions.) 1.3 This international standard was developed in accordance with internationally recognized principles on standardization established in the Decision on Principles for the Development of International Standards, Guides and Recommendations issued by the World Trade Organization Technical Barriers to Trade (TBT) Committee.
SIGNIFICANCE AND USE 5.1 A number of types of jaw crushers have been used for laboratory abrasion tests, see Refs (1-5)4 and a limited amount of data has been published (6-10). With emphasis on the crusher described in Section 6, this test method ranks materials and also indicates differences in wear life for that type of abrasion defined as gouging abrasion, as is found in crushing equipment and in many mining and earthmoving applications. This test method is considered useful for research and development purposes, but not to specify universal wear ratios, since the wear ranking and severity of wear may change dramatically with a change of the characteristics (chemistry, shape, angularity, etc.) of the crushed material or type of machinery. SCOPE 1.1 This test method covers a laboratory procedure to determine the relative gouging abrasion resistance of materials. Materials homogeneous in structure and properties are the most appropriate test materials; however, surface-treated and composite materials can also be tested. The test involves a small laboratory jaw crusher that crushes presized hard rock materials, such as a hard morainal gravel, or some other crushable substance. 1.2 This standard does not purport to address all of the safety concerns, if any, associated with its use. It is the responsibility of the user of this standard to establish appropriate safety, health, and environmental practices and determine the applicability of regulatory limitations prior to use. (See 8.1 on Safety Precautions.) 1.3 This international standard was developed in accordance with internationally recognized principles on standardization established in the Decision on Principles for the Development of International Standards, Guides and Recommendations issued by the World Trade Organization Technical Barriers to Trade (TBT) Committee.
ASTM G81-97a(2018) is classified under the following ICS (International Classification for Standards) categories: 17.040.20 - Properties of surfaces. The ICS classification helps identify the subject area and facilitates finding related standards.
ASTM G81-97a(2018) has the following relationships with other standards: It is inter standard links to ASTM G81-97a(2013), ASTM E350-23, ASTM A517/A517M-17(2023), ASTM A128/A128M-19, ASTM A514/A514M-18, ASTM E18-18, ASTM E18-17, ASTM A128/A128M-93(2017), ASTM G40-15, ASTM E10-14, ASTM A514/A514M-14, ASTM A514/A514M-13, ASTM G40-13, ASTM E691-13, ASTM E18-12. Understanding these relationships helps ensure you are using the most current and applicable version of the standard.
ASTM G81-97a(2018) is available in PDF format for immediate download after purchase. The document can be added to your cart and obtained through the secure checkout process. Digital delivery ensures instant access to the complete standard document.
Standards Content (Sample)
This international standard was developed in accordance with internationally recognized principles on standardization established in the Decision on Principles for the
Development of International Standards, Guides and Recommendations issued by the World Trade Organization Technical Barriers to Trade (TBT) Committee.
Designation: G81 − 97a (Reapproved 2018)
Standard Test Method for
Jaw Crusher Gouging Abrasion Test
ThisstandardisissuedunderthefixeddesignationG81;thenumberimmediatelyfollowingthedesignationindicatestheyearoforiginal
adoptionor,inthecaseofrevision,theyearoflastrevision.Anumberinparenthesesindicatestheyearoflastreapproval.Asuperscript
epsilon (´) indicates an editorial change since the last revision or reapproval.
1. Scope E30TestMethodsforChemicalAnalysisofSteel,CastIron,
Open-Hearth Iron, and Wrought Iron (Withdrawn 1995)
1.1 This test method covers a laboratory procedure to
E140Hardness Conversion Tables for Metals Relationship
determinetherelativegougingabrasionresistanceofmaterials.
Among Brinell Hardness, Vickers Hardness, Rockwell
Materialshomogeneousinstructureandpropertiesarethemost
Hardness, Superficial Hardness, Knoop Hardness, Sclero-
appropriate test materials; however, surface-treated and com-
scope Hardness, and Leeb Hardness
posite materials can also be tested. The test involves a small
E350Test Methods for Chemical Analysis of Carbon Steel,
laboratory jaw crusher that crushes presized hard rock
Low-Alloy Steel, Silicon Electrical Steel, Ingot Iron, and
materials, such as a hard morainal gravel, or some other
Wrought Iron
crushable substance.
E691Practice for Conducting an Interlaboratory Study to
1.2 This standard does not purport to address all of the
Determine the Precision of a Test Method
safety concerns, if any, associated with its use. It is the
G40Terminology Relating to Wear and Erosion
responsibility of the user of this standard to establish appro-
priate safety, health, and environmental practices and deter-
3. Terminology
mine the applicability of regulatory limitations prior to use.
3.1 Definitions:
(See 8.1 on Safety Precautions.)
3.1.1 gouging abrasion—severe form of abrasive wear in
1.3 This international standard was developed in accor-
which the force between an abrading body and the wearing
dance with internationally recognized principles on standard-
surface is sufficiently large that a macroscopic gouge, groove,
ization established in the Decision on Principles for the
deep scratch, or indentation can be produced in a single
Development of International Standards, Guides and Recom-
contact.
mendations issued by the World Trade Organization Technical
3.1.2 The definitions of some other related terms may be
Barriers to Trade (TBT) Committee.
found in Terminology G40.
2. Referenced Documents
3.2 Definitions of Terms Specific to This Standard:
3.2.1 cheek plates—wear liners that protect the sides of the
2.1 ASTM Standards:
crusher adjacent to the movable and stationary jaws.
A128/A128MSpecification for Steel Castings, Austenitic
Manganese
3.2.2 movable jaw—part of the crusher that moves against
A514/A514M Specification for High-Yield-Strength, the material being crushed.
Quenched and Tempered Alloy Steel Plate, Suitable for
3.2.3 reference plate—jawplatemadeofamaterialuniform
Welding
in microstructure and hardness and not varying significantly
A517/A517MSpecificationforPressureVesselPlates,Alloy
from one piece to another; such a plate will give highly
Steel, High-Strength, Quenched and Tempered
reproducible results, to which other materials to be tested may
E10Test Method for Brinell Hardness of Metallic Materials
be compared.
E18Test Methods for Rockwell Hardness of Metallic Ma-
3.2.4 stationary jaw—part of the crusher that does not
terials
articulate, but is directly opposite the movable jaw and is in
direct crushing contact.
This test method is under the jurisdiction of ASTM Committee G02 on Wear
3.2.5 test plate—jaw plate made of a material for which the
and Erosion and is the direct responsibility of Subcommittee G02.30 on Abrasive
gouging abrasion resistance is to be measured.
Wear.
Current edition approved Dec. 1, 2018. Published December 2018. Originally
3.2.6 toggle plate—plate that holds the bottom edge of the
approved in 1983. Last previous edition approved in 2013 as G81–97a (2013).
movable jaw relative to the stationary jaw.
DOI: 10.1520/G0081-97AR18.
For referenced ASTM standards, visit the ASTM website, www.astm.org, or
contact ASTM Customer Service at service@astm.org. For Annual Book of ASTM
Standards volume information, refer to the standard’s Document Summary page on The last approved version of this historical standard is referenced on
the ASTM website. www.astm.org.
Copyright © ASTM International, 100 Barr Harbor Drive, PO Box C700, West Conshohocken, PA 19428-2959. United States
G81 − 97a (2018)
4. Summary of Test Method ducible positioning of the bottom of each test plate for each
test. The crusher shaft bearings should be roller or needle
4.1 A small laboratory jaw crusher with a feed opening of
bearings to hold consistent tolerances. Spacers may be affixed
about 100 by 150 mm (4 by 6 in.) is modified to accept an
totheshafttopreventthemovableheadfromchangingthegap
easily machined identical pair of reference wear plates and a
on the sides of the jaws. The toggle plate should be easily
pairofsimilartestwearplates.Onetestplateandonereference
removed for rebuilding. The machine should have easily
plate are attached to the stationary jaw frame of the crusher,
replaceable wear liners for the toggle plate holders.
and the other test and reference plate are attached to the
movable jaw frame, such that a reference plate and a test plate 6.3 Amotor of higher power than a standard crusher motor
oppose one another. The minimum jaw opening is set at may be necessary, since the flat wear plate design takes more
3.2mm (0.125 in.), and a 225-kg (500-lb) load of prescreened powertocrushtherock.A5.2-kW(7-hp)motorhasbeenfound
material of suitable hardness is run through the crusher. The to be satisfactory for this test method.
minimum opening is then reset to 3.2 mm (0.125 in.) and
6.4 Important Tolerances:
another 225 kg (500 lb) of rock is crushed. This is repeated
6.4.1 Toggle Plate Length, +0 to −1.5 mm (+0 to −0.062
until a minimum of 900 kg (2000 lb) of rock is crushed. The
in.).
precleaned and weighed test plates are then recleaned and
6.4.2 Wear Liners in Toggle Plate Holders,+0to−0.75mm
weighed,andthemassloss(ingrams)isrecorded.Thevolume
(+0 to −0.031 in.).
loss may be calculated from the mass loss and the known
6.4.3 Side to Side Movement of Movable Frame, 60.75mm
densities of the test materials, or it may be measured for
(60.031 in.).
nonmonolithicmaterials.Awearratioisdevelopedbydividing
6.4.4 Wear Groove in Cheek Plates, no deeper than 6 mm
the volume loss of the test plate by the volume loss of the
(0.250 in.).
reference plate. This is done separately for the stationary and
6.4.5 Shaft Movement Relative to Crusher Frame, less than
the movable plates. The two wear ratios are then averaged for
0.25 mm (0.010 in.).
a final test wear ratio. The smaller the decimal figure for the
6.4.6 Movable Jaw Frame Movement Relative to Shaft, less
wear ratio the better the wear resistance of the test plate
than 0.25 mm (0.010 in.).
compared to the reference plate. When highly wear resistant
6.4.7 Difference in Toe-to-Toe Spacing, no more than 0.25
testandreferenceplatesareusedthetotalamountofrockmust
mm (0.010 in.) across the width of the crusher exit.
be increased to 1800 kg (4000 lb) or more.
6.5 A frame should be made to support the crusher. The
5. Significance and Use framework must include a hopper above the crusher that will
holdaminimumof225kg(500lb)ofrockatonetime.Below
5.1 A number of types of jaw crushers have been used for
4 the hopper a lever-actuated control gate and a chute should be
laboratory abrasion tests, see Refs (1-5) and a limited amount
attachedtodelivertherockintothecrusheropening.Belowthe
of data has been published (6-10). With emphasis on the
crusheraremovableboxmaybeinstalledthatwillhold225kg
crusherdescribedinSection6,thistestmethodranksmaterials
(500 lb) minimum of crushed rock.This box should have a lid
and also indicates differences in wear life for that type of
with an opening just below the crusher exit.
abrasion defined as gouging abrasion, as is found in crushing
equipment and in many mining and earthmoving applications. 6.6 An evacuation blower should be installed on the frame
This test method is considered useful for research and devel- to pull dust out of the crushing area and the receiving box and
opmentpurposes,butnottospecifyuniversalwearratios,since move it to an acceptable collection or dump area.Aprotective
thewearrankingandseverityofwearmaychangedramatically magnetic grate should be installed at the top of the hopper to
with a change of the characteristics (chemistry, shape, collect any tramp iron or steel in the rock.
angularity, etc.) of the crushed material or type of machinery.
6.7 One or more dump boxes are recommended that will
hold225kg(500lb)ofrock.Thisisforweighingtherockand
6. Apparatus
transporting it to the hopper above the crusher.
6.1 Ajaw crusher with an approximate feed opening of 100
5 6.8 A method of weighing 225 kg (500 lb) of rock and the
by 150 mm (4 by 6 in.) is used. This should have a single
container should be available.
movable jaw and be of very rugged construction (see Fig. 1).
6.9 Abalance of sufficient capacity to weigh the test plates
6.2 The jaw crusher should be capable of accepting two
is necessary. The sensitivity should be at least 60.1 g.
identical wear plates on the stationary jaw frame and two wear
plates of the same design on the movable jaw frame. Plate
7. Materials
locatingdevicesshouldbeattachedtoholdtheplatestightlyin
position. The plate-bottom locating device shall ensure repro-
7.1 Reference Plates:
7.1.1 Reference plates can be made of any readily available
4 material that gives wear behavior consistent with Section 9.
The boldface numbers in parentheses refer to a list of references at the end of
7.1.2 The most common reference wear plate materials are
this standard.
A Massco laboratory jaw crusher from Mine and Smelter, P.O. Box 16067,
Specification A514/A514M, Grade B steel plate, or Specifica-
Denver, CO 80216 has been successfully modified for this test. If you are aware of
tion A517/A517M, Grade B plate, quenched and tempered. It
alternative suppliers, please provide this information to ASTM International
is suggested that an effort be made to select a plate as close as
Headquarters.Your comments will receive careful consideration at a meeting of the
responsible technical committee, which you may attend. possible (68 HB maximum) to 269 HB hardness (see Test
G81 − 97a (2018)
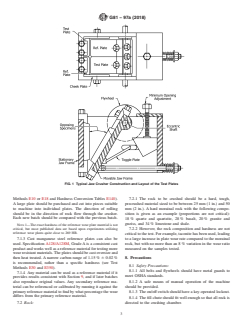
FIG. 1 Typical Jaw Crusher Construction and Layout of the Test Plates
Methods E10 or E18 and Hardness Conversion Tables E140). 7.2.1 The rock to be crushed should be a hard, tough,
Alarge plate should be purchased and cut into pieces suitable precrushed material sized to be between 25 mm (1 in.) and 50
to machine into individual plates. The direction of rolling
mm (2 in.). A hard morainal rock with the following compo-
should be in the direction of rock flow through the crusher. sition is given as an example (proportions are not critical):
Each new batch should be compared with the previous batch.
18% quartz and quartzite, 28% basalt, 20% granite and
gneiss, and 34% limestone and shale.
NOTE 1—The exact hardness of the reference wear plate material is not
critical, but most published data are based upon experiments utilizing 7.2.2 However, the rock composition and hardness are not
reference wear plates quite close to 269 HB.
criticaltothetest.Forexample,taconitehasbeenused,leading
7.1.3 Cast manganese steel reference plates can also be to a large increase in plate wear rate compared to the morainal
used. Specification A128/A128M, GradeAis a consistent cast rock, but with no more than an 8% variation in the wear ratio
productandworkswellasareferencematerialfortestingmore measured on the samples tested.
wearresistantmaterials.Theplatesshouldbecastoversizeand
then heat treated.Anarrow carbon range of 1.15% 6 0.02% 8. Precautions
is recommended, rather than a specific hardness (see Test
8.1 Safety Precautions:
Methods E30 and E350).
8.1.1 All belts and flywheels should have metal guards to
7.1.4 Any material can be used as a reference material if it
meet OSHA standards.
provides results consistent with Section 9, and if later batches
also reproduce original values. Any secondary reference ma- 8.1.2 A safe means of manual operation of the machine
should be provided.
terial can be referenced or calibrated by running it against the
primaryreferencematerialtofindbywhatpercentagethewear
8.1.3 Theon/offswitchshouldhaveakey-operatedlockout.
differs from the primary reference material.
8.1.4 The fill chute should fit well enough so that all rock is
7.2 Rock: directed to the crushing chamber.
G81 − 97a (2018)
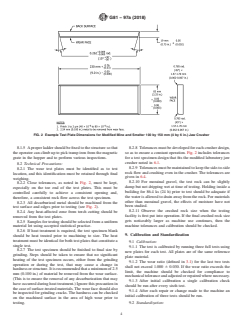
FIG. 2 Example Test Plate Dimensions for Modified Mine and Smelter 100 by 150 mm (4 by 6 in.) Jaw Crusher
8.1.5 Aproperladdershouldbefixedtothestructuresothat 8.2.8 Tolerancesmustbedevelopedforeachcrusherdesign,
theoperatorcanclimbuptopicktrampironfromthemagnetic so as to ensure a constant operation. Fig. 2 includes tolerances
grate in the hopper and to perform various inspections. for a test specimen design that fits the modified laboratory jaw
crusher noted in 6.1.
8.2 Technical Pr
...


Questions, Comments and Discussion
Ask us and Technical Secretary will try to provide an answer. You can facilitate discussion about the standard in here.
Loading comments...