ASTM D6606-00(2010)
(Test Method)Standard Test Method for Viscosity and Yield of Vehicles and Varnishes by the Duke Viscometer
Standard Test Method for Viscosity and Yield of Vehicles and Varnishes by the Duke Viscometer
SIGNIFICANCE AND USE
Actual direct measurements of apparent viscosity and stress at shear rates of interest can be useful in the practical control of ink viscosity during production and the specification acceptance between supplier and purchaser.
Use of the Duke automated viscometer provides direct measurements for viscosity and yield value versus extrapolating data points that may be far from the desired shear rates.
SCOPE
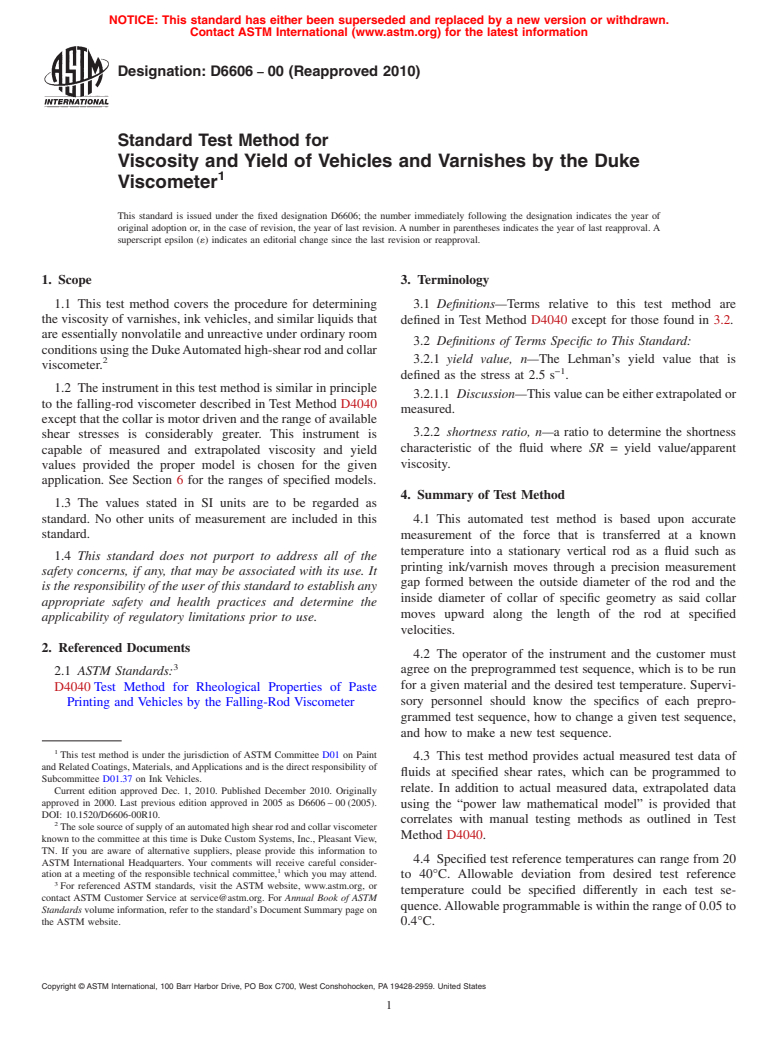
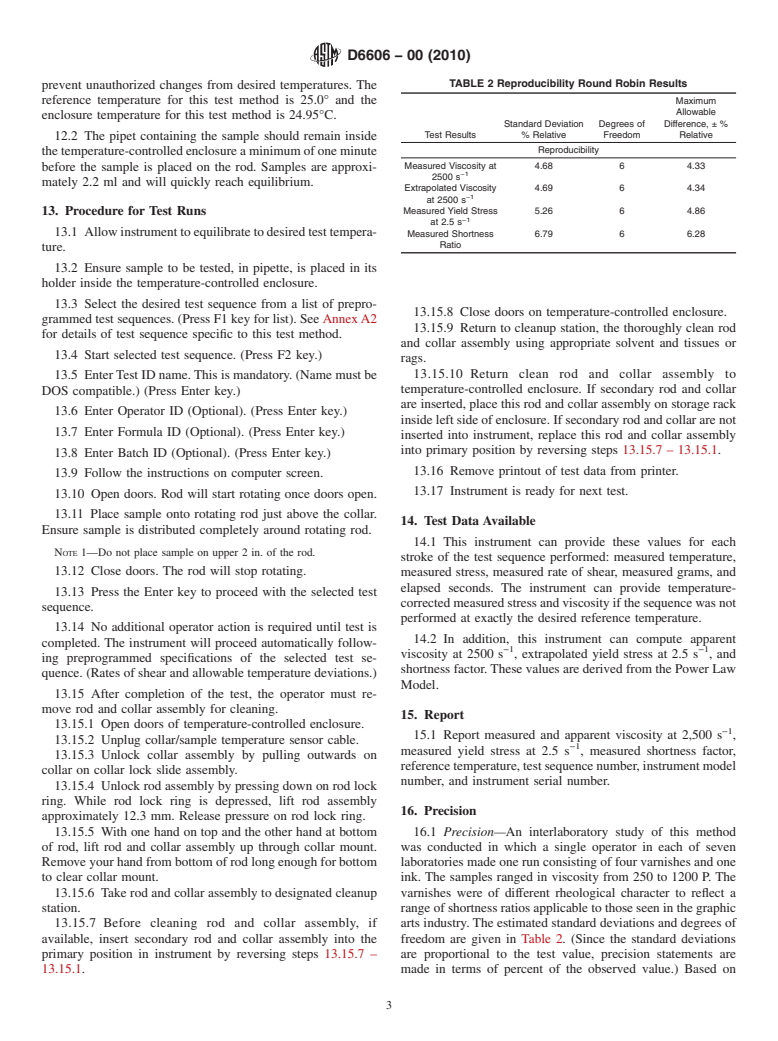
1.1 This test method covers the procedure for determining the viscosity of varnishes, ink vehicles, and similar liquids that are essentially nonvolatile and unreactive under ordinary room conditions using the Duke Automated high-shear rod and collar viscometer.
1.2 The instrument in this test method is similar in principle to the falling-rod viscometer described in Test Method D4040 except that the collar is motor driven and the range of available shear stresses is considerably greater. This instrument is capable of measured and extrapolated viscosity and yield values provided the proper model is chosen for the given application. See Section 6 for the ranges of specified models.
1.3 The values stated in SI units are to be regarded as standard. No other units of measurement are included in this standard.
1.4 This standard does not purport to address all of the safety concerns, if any, that may be associated with its use. It is the responsibility of the user of this standard to establish any appropriate safety and health practices and determine the applicability of regulatory limitations prior to use.
General Information
Relations
Standards Content (Sample)
NOTICE: This standard has either been superseded and replaced by a new version or withdrawn.
Contact ASTM International (www.astm.org) for the latest information
Designation: D6606 − 00 (Reapproved 2010)
Standard Test Method for
Viscosity and Yield of Vehicles and Varnishes by the Duke
Viscometer
This standard is issued under the fixed designation D6606; the number immediately following the designation indicates the year of
original adoption or, in the case of revision, the year of last revision.Anumber in parentheses indicates the year of last reapproval.A
superscript epsilon (´) indicates an editorial change since the last revision or reapproval.
1. Scope 3. Terminology
1.1 This test method covers the procedure for determining 3.1 Definitions—Terms relative to this test method are
theviscosityofvarnishes,inkvehicles,andsimilarliquidsthat
defined in Test Method D4040 except for those found in 3.2.
are essentially nonvolatile and unreactive under ordinary room
3.2 Definitions of Terms Specific to This Standard:
conditionsusingtheDukeAutomatedhigh-shearrodandcollar
3.2.1 yield value, n—The Lehman’s yield value that is
viscometer.
−1
defined as the stress at 2.5 s .
1.2 Theinstrumentinthistestmethodissimilarinprinciple
3.2.1.1 Discussion—Thisvaluecanbeeitherextrapolatedor
to the falling-rod viscometer described in Test Method D4040
measured.
exceptthatthecollarismotordrivenandtherangeofavailable
3.2.2 shortness ratio, n—a ratio to determine the shortness
shear stresses is considerably greater. This instrument is
characteristic of the fluid where SR = yield value/apparent
capable of measured and extrapolated viscosity and yield
viscosity.
values provided the proper model is chosen for the given
application. See Section 6 for the ranges of specified models.
4. Summary of Test Method
1.3 The values stated in SI units are to be regarded as
standard. No other units of measurement are included in this 4.1 This automated test method is based upon accurate
standard.
measurement of the force that is transferred at a known
temperature into a stationary vertical rod as a fluid such as
1.4 This standard does not purport to address all of the
printing ink/varnish moves through a precision measurement
safety concerns, if any, that may be associated with its use. It
gap formed between the outside diameter of the rod and the
is the responsibility of the user of this standard to establish any
inside diameter of collar of specific geometry as said collar
appropriate safety and health practices and determine the
moves upward along the length of the rod at specified
applicability of regulatory limitations prior to use.
velocities.
2. Referenced Documents
4.2 The operator of the instrument and the customer must
agree on the preprogrammed test sequence, which is to be run
2.1 ASTM Standards:
for a given material and the desired test temperature. Supervi-
D4040Test Method for Rheological Properties of Paste
sory personnel should know the specifics of each prepro-
Printing and Vehicles by the Falling-Rod Viscometer
grammed test sequence, how to change a given test sequence,
and how to make a new test sequence.
This test method is under the jurisdiction of ASTM Committee D01 on Paint
4.3 This test method provides actual measured test data of
and Related Coatings, Materials, andApplications and is the direct responsibility of
fluids at specified shear rates, which can be programmed to
Subcommittee D01.37 on Ink Vehicles.
relate. In addition to actual measured data, extrapolated data
Current edition approved Dec. 1, 2010. Published December 2010. Originally
approved in 2000. Last previous edition approved in 2005 as D6606–00(2005).
using the “power law mathematical model” is provided that
DOI: 10.1520/D6606-00R10.
correlates with manual testing methods as outlined in Test
Thesolesourceofsupplyofanautomatedhighshearrodandcollarviscometer
Method D4040.
known to the committee at this time is Duke Custom Systems, Inc., Pleasant View,
TN. If you are aware of alternative suppliers, please provide this information to
4.4 Specified test reference temperatures can range from 20
ASTM International Headquarters. Your comments will receive careful consider-
ation at a meeting of the responsible technical committee, which you may attend.
to 40°C. Allowable deviation from desired test reference
For referenced ASTM standards, visit the ASTM website, www.astm.org, or
temperature could be specified differently in each test se-
contact ASTM Customer Service at service@astm.org. For Annual Book of ASTM
quence.Allowableprogrammableiswithintherangeof0.05to
Standards volume information, refer to the standard’s Document Summary page on
the ASTM website. 0.4°C.
Copyright © ASTM International, 100 Barr Harbor Drive, PO Box C700, West Conshohocken, PA 19428-2959. United States
D6606 − 00 (2010)
TABLE 1 Performance Ranges For Each Model
Model Number Stress Range (Dynes/ Viscosity Range Shear Rate Range Temperature Range °C
2 −1 −1
cm ) Poise at 2500sec (sec )
D-2010 D-2010E 75 − 1.0×10 4 − 400 2.5 − 10,000 19–40
D-2012 D-2012E
D-2020 D-2020E 150 − 2.0×10 10 − 800 2.5 − 10,000 19–40
D-2022 D-2022E
D-2050 D-2050E 300 − 5.0×10 20 − 1,600 2.5 − 7,500 19–40
D-2052 D-2052E
D-2100 D-2100E 600 − 10.0×10 40 − 3,200 2.5 − 7,500 19–40
D-2102 D-2102E
5. Significance and Use 9.2 Locate the viscometer in an area free of direct sunlight
to prevent sun-induced heating inside the clear temperature-
5.1 Actual direct measurements of apparent viscosity and
controlled enclosure.
stress at shear rates of interest can be useful in the practical
9.3 Leveltheviscometerbyturningtheadjustablefeetupor
controlofinkviscosityduringproductionandthespecification
acceptance between supplier and purchaser. downuntilthespiritleveliscenteredandtheinstrumentisfree
from wobble.
5.2 Use of the Duke automated viscometer provides direct
9.4 Clean the rod and collar thoroughly with tissues wetted
measurements for viscosity and yield value versus extrapolat-
with naphtha or other appropriate solvent. Remove residual
ing data points that may be far from the desired shear rates.
solvent with clean dry tissue. Ensure rod and collar are free of
6. Apparatus
lint or other particles from tissue or environment. Warning:
Failure to clean instrument adequately will severely influence
6.1 Table 1 describes each model of the Duke automated
results.
high shear rod and collar viscometer with the appropriate
ranges for the ink or varnish being tested.
9.5 Ensure identification code on rod and collar match.
9.6 Properly install and lock into viscometer the rod with
7. Materials
rod cup and collar in accordance with manufacturer’s recom-
7.1 ASTM Standard Viscosity Fluids—(For calibration pur-
mendations.
poses only.) At approximately 100, 200, and 400 poise, span
9.7 Plug in collar/sample temperature probe.
the practical range of the instrument without inducing self-
9.8 Allow instrument to equilibrate at a desired test tem-
heating errors. The required fluids are N4000 (100 poise at
perature.
25°C), S8000 (200 poise at 25°C), and N15000 (400 poise at
25°C).
10. Calibration
7.2 Lint and Metal-Free Rags or Tissuesofappropriatesize,
10.1 Ensure instrument is within calibration window by
so that they may be pulled or pushed completely through the
reading information contained in “Days to Next Calibration
collar in a single pass.
Window”onthecomputerscreen.Thenumberofdaysuntilthe
next factory-authorized calibration is displayed whenever the
7.3 Naphtha or other Low-Boiling Solvent in a wash bottle
or closed metal container. instrument is not in active use.
10.2 Periodically check calibration as in Annex A1.
8. Hazards
11. Sample Preparation
8.1 Warning: Solvents may be hazardous to the skin and
11.1 Transport sample to be tested to the test area and
eyes. In addition to other precautions, always wear protective
gloves and safety glasses during cleanup to avoid solvent preserveinasuitablecleanclosedcontainer.Skinpapershould
be used for oxidative fluids.
contact with skin and eyes. See supplier’s material safety data
sheet for further information on each solvent used.
11.2 Samples should be uniform dispersions or structures
throughout. Samples to be tested should be free of bubbles,
8.2 Instrument Warning: Never operate the instrument
skin,orotherdebris.Ifvariationsinstructurearesuspected,the
with the rod installed without fluid in the collar.
sample must be remixed until it is of uniform consistency.
9. Preparation of Apparatus
11.3 Fillpipetwiththesampleandplacefilledpipetintothe
9.1 Set the viscometer up on a sturdy vibration-free bench
temperature-controlled enclosure of viscometer. Warning: Do
capable of supporting at least 6.75 sq. m. not work the sample vigorously. Be sure to close the sample
container immediately after removing the desired sample to be
tested.
The sole source of supply of the certified standard viscosity oil known to the
committee at this time is Cannon Instrument Company, P.O. Box 16, State College,
12. Conditioning
PA16801. If you are aware of alternative suppliers, please provide this information
12.1 The test sequence and reference temperatures are
to ASTM International Headquarters. Your comments will receive careful consid-
erationatameetingoftheresponsibletechnicalcommittee, whichyoumayattend. programmable and are protected by password security to
D6606 − 00 (2010)
TABLE 2 Reproducibility Round Robin Results
prevent unauthorized changes fro
...


Questions, Comments and Discussion
Ask us and Technical Secretary will try to provide an answer. You can facilitate discussion about the standard in here.