ASTM D6749-24
(Test Method)Standard Test Method for Pour Point of Petroleum Products (Automatic Air Pressure Method)
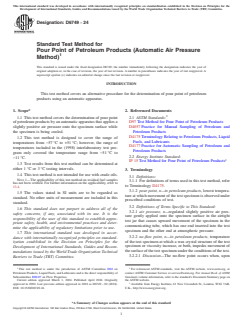
Standard Test Method for Pour Point of Petroleum Products (Automatic Air Pressure Method)
SIGNIFICANCE AND USE
5.1 The pour point of a petroleum product is an index of the lowest temperature of its utility for certain applications. Flow characteristics, like pour point, can be critical for the correct operation of lubricating systems, fuel systems, and pipeline operations.
5.2 Petroleum blending operations require precise measurement of the pour point.
5.3 Test results from this test method can be determined at either 1 °C or 3 °C intervals.
5.4 This test method yields a pour point in a format similar to Test Method D97/IP 15 when the 3 °C interval results are reported. However, when specification requires Test Method D97/IP 15, do not substitute this test method.
Note 2: Since some users may wish to report their results in a format similar to Test Method D97/IP 15 (in 3 °C intervals), the precision data were derived for the 3 °C intervals. For statements on bias relative to Test Method D97/IP 15, see 13.3.1.
5.5 This test method has better repeatability and reproducibility relative to Test Method D97/IP 15 as measured in the 1998 interlaboratory test program (see Section 13).
SCOPE
1.1 This test method covers the determination of pour point of petroleum products by an automatic apparatus that applies a slightly positive air pressure onto the specimen surface while the specimen is being cooled.
1.2 This test method is designed to cover the range of temperatures from −57 °C to +51 °C; however, the range of temperatures included in the (1998) interlaboratory test program only covered the temperature range from −51 °C to −11 °C.
1.3 Test results from this test method can be determined at either 1 °C or 3 °C testing intervals.
1.4 This test method is not intended for use with crude oils.
Note 1: The applicability of this test method on residual fuel samples has not been verified. For further information on the applicability, refer to 13.4.
1.5 The values stated in SI units are to be regarded as standard. No other units of measurement are included in this standard.
1.6 This standard does not purport to address all of the safety concerns, if any, associated with its use. It is the responsibility of the user of this standard to establish appropriate safety, health, and environmental practices and determine the applicability of regulatory limitations prior to use.
1.7 This international standard was developed in accordance with internationally recognized principles on standardization established in the Decision on Principles for the Development of International Standards, Guides and Recommendations issued by the World Trade Organization Technical Barriers to Trade (TBT) Committee.
General Information
- Status
- Published
- Publication Date
- 29-Feb-2024
- Technical Committee
- D02 - Petroleum Products, Liquid Fuels, and Lubricants
- Drafting Committee
- D02.07 - Flow Properties
Relations
- Effective Date
- 01-Mar-2024
- Effective Date
- 01-Mar-2024
- Effective Date
- 01-Mar-2024
- Effective Date
- 01-Mar-2024
- Effective Date
- 01-Mar-2024
Overview
ASTM D6749-24: Standard Test Method for Pour Point of Petroleum Products (Automatic Air Pressure Method) establishes a reliable procedure for determining the pour point of petroleum products using an automatic apparatus. This internationally recognized standard helps ensure consistent and precise measurement of the lowest temperature at which petroleum products remain fluid under controlled conditions. The pour point is a critical property for operational efficiency in applications such as lubrication systems, fuel distribution, and pipeline transport.
ASTM D6749-24 covers testing petroleum products (excluding crude oil), across a wide temperature range, using a microprocessor-controlled device that applies a gentle, positive air pressure to detect flow or no-flow conditions as the sample cools.
Key Topics
- Pour Point Determination: The main focus is to identify the pour point, which indicates the lowest temperature a petroleum product will flow under standardized conditions.
- Automatic Apparatus: The method utilizes an automatic device that heats and then cools the sample, applying positive air pressure to detect surface movement. The apparatus is engineered for high repeatability and reproducibility.
- Test Intervals: Results can be reported at 1 °C or 3 °C intervals, making the data compatible for comparison with other standards, such as ASTM D97/IP 15.
- Precision and Repeatability: This method demonstrates improved repeatability and reproducibility compared to some manual test methods, supported by interlaboratory study data.
- Sample Limitations: The standard is not intended for crude oils, and its applicability to residual fuels requires further verification.
- SI Units: Measurements and results are specified in SI units only.
Applications
ASTM D6749-24 is crucial for industries that rely on accurate measurement of petroleum product properties to maintain operational safety and efficiency. Applications include:
- Lubricant Manufacturing: Ensures lubricants maintain flow at low temperatures, preventing equipment failure.
- Fuel System Design: Supports assessment of fuels for cold-weather operability and appropriate fuel selection for specific climates.
- Pipeline Transport: Assists in predicting flow behavior in pipelines, reducing risks of blockages or interruptions.
- Petroleum Product Blending: Provides precise data for formulating products with desired low-temperature performance characteristics.
- Quality Control: Enables refineries, blending plants, and laboratories to rapidly and reliably monitor product attributes.
Related Standards
Understanding ASTM D6749-24 in context with other standards enhances compliance and interoperability:
- ASTM D97/IP 15: Standard Test Method for Pour Point of Petroleum Products - Manual method commonly referenced for pour point determination.
- ASTM D4057: Practice for Manual Sampling of Petroleum and Petroleum Products.
- ASTM D4175: Terminology Relating to Petroleum Products, Liquid Fuels, and Lubricants.
- ASTM D4177: Practice for Automatic Sampling of Petroleum and Petroleum Products.
- Energy Institute IP 15: Equivalent pour point testing methodology.
Adhering to ASTM D6749-24 and related standards ensures consistent evaluation and reporting of pour points, supporting regulatory compliance, product quality, and international trade requirements in the petroleum industry.
Keywords: ASTM D6749-24, pour point, petroleum products, automatic air pressure method, fuel testing, lubricants, pipeline operation, low-temperature properties, international standard, quality control.
Buy Documents
ASTM D6749-24 - Standard Test Method for Pour Point of Petroleum Products (Automatic Air Pressure Method)
REDLINE ASTM D6749-24 - Standard Test Method for Pour Point of Petroleum Products (Automatic Air Pressure Method)
Get Certified
Connect with accredited certification bodies for this standard

ABS Quality Evaluations Inc.
American Bureau of Shipping quality certification.

Element Materials Technology
Materials testing and product certification.

ABS Group Brazil
ABS Group certification services in Brazil.
Sponsored listings
Frequently Asked Questions
ASTM D6749-24 is a standard published by ASTM International. Its full title is "Standard Test Method for Pour Point of Petroleum Products (Automatic Air Pressure Method)". This standard covers: SIGNIFICANCE AND USE 5.1 The pour point of a petroleum product is an index of the lowest temperature of its utility for certain applications. Flow characteristics, like pour point, can be critical for the correct operation of lubricating systems, fuel systems, and pipeline operations. 5.2 Petroleum blending operations require precise measurement of the pour point. 5.3 Test results from this test method can be determined at either 1 °C or 3 °C intervals. 5.4 This test method yields a pour point in a format similar to Test Method D97/IP 15 when the 3 °C interval results are reported. However, when specification requires Test Method D97/IP 15, do not substitute this test method. Note 2: Since some users may wish to report their results in a format similar to Test Method D97/IP 15 (in 3 °C intervals), the precision data were derived for the 3 °C intervals. For statements on bias relative to Test Method D97/IP 15, see 13.3.1. 5.5 This test method has better repeatability and reproducibility relative to Test Method D97/IP 15 as measured in the 1998 interlaboratory test program (see Section 13). SCOPE 1.1 This test method covers the determination of pour point of petroleum products by an automatic apparatus that applies a slightly positive air pressure onto the specimen surface while the specimen is being cooled. 1.2 This test method is designed to cover the range of temperatures from −57 °C to +51 °C; however, the range of temperatures included in the (1998) interlaboratory test program only covered the temperature range from −51 °C to −11 °C. 1.3 Test results from this test method can be determined at either 1 °C or 3 °C testing intervals. 1.4 This test method is not intended for use with crude oils. Note 1: The applicability of this test method on residual fuel samples has not been verified. For further information on the applicability, refer to 13.4. 1.5 The values stated in SI units are to be regarded as standard. No other units of measurement are included in this standard. 1.6 This standard does not purport to address all of the safety concerns, if any, associated with its use. It is the responsibility of the user of this standard to establish appropriate safety, health, and environmental practices and determine the applicability of regulatory limitations prior to use. 1.7 This international standard was developed in accordance with internationally recognized principles on standardization established in the Decision on Principles for the Development of International Standards, Guides and Recommendations issued by the World Trade Organization Technical Barriers to Trade (TBT) Committee.
SIGNIFICANCE AND USE 5.1 The pour point of a petroleum product is an index of the lowest temperature of its utility for certain applications. Flow characteristics, like pour point, can be critical for the correct operation of lubricating systems, fuel systems, and pipeline operations. 5.2 Petroleum blending operations require precise measurement of the pour point. 5.3 Test results from this test method can be determined at either 1 °C or 3 °C intervals. 5.4 This test method yields a pour point in a format similar to Test Method D97/IP 15 when the 3 °C interval results are reported. However, when specification requires Test Method D97/IP 15, do not substitute this test method. Note 2: Since some users may wish to report their results in a format similar to Test Method D97/IP 15 (in 3 °C intervals), the precision data were derived for the 3 °C intervals. For statements on bias relative to Test Method D97/IP 15, see 13.3.1. 5.5 This test method has better repeatability and reproducibility relative to Test Method D97/IP 15 as measured in the 1998 interlaboratory test program (see Section 13). SCOPE 1.1 This test method covers the determination of pour point of petroleum products by an automatic apparatus that applies a slightly positive air pressure onto the specimen surface while the specimen is being cooled. 1.2 This test method is designed to cover the range of temperatures from −57 °C to +51 °C; however, the range of temperatures included in the (1998) interlaboratory test program only covered the temperature range from −51 °C to −11 °C. 1.3 Test results from this test method can be determined at either 1 °C or 3 °C testing intervals. 1.4 This test method is not intended for use with crude oils. Note 1: The applicability of this test method on residual fuel samples has not been verified. For further information on the applicability, refer to 13.4. 1.5 The values stated in SI units are to be regarded as standard. No other units of measurement are included in this standard. 1.6 This standard does not purport to address all of the safety concerns, if any, associated with its use. It is the responsibility of the user of this standard to establish appropriate safety, health, and environmental practices and determine the applicability of regulatory limitations prior to use. 1.7 This international standard was developed in accordance with internationally recognized principles on standardization established in the Decision on Principles for the Development of International Standards, Guides and Recommendations issued by the World Trade Organization Technical Barriers to Trade (TBT) Committee.
ASTM D6749-24 is classified under the following ICS (International Classification for Standards) categories: 75.080 - Petroleum products in general. The ICS classification helps identify the subject area and facilitates finding related standards.
ASTM D6749-24 has the following relationships with other standards: It is inter standard links to ASTM D6749-02(2018), ASTM D6074-15(2022), ASTM D8240-22e1, ASTM D396-21, ASTM D2880-23. Understanding these relationships helps ensure you are using the most current and applicable version of the standard.
ASTM D6749-24 is available in PDF format for immediate download after purchase. The document can be added to your cart and obtained through the secure checkout process. Digital delivery ensures instant access to the complete standard document.
Standards Content (Sample)
This international standard was developed in accordance with internationally recognized principles on standardization established in the Decision on Principles for the
Development of International Standards, Guides and Recommendations issued by the World Trade Organization Technical Barriers to Trade (TBT) Committee.
Designation: D6749 − 24
Standard Test Method for
Pour Point of Petroleum Products (Automatic Air Pressure
Method)
This standard is issued under the fixed designation D6749; the number immediately following the designation indicates the year of
original adoption or, in the case of revision, the year of last revision. A number in parentheses indicates the year of last reapproval. A
superscript epsilon (´) indicates an editorial change since the last revision or reapproval.
INTRODUCTION
This test method covers an alternative procedure for the determination of pour point of petroleum
products using an automatic apparatus.
1. Scope* 2. Referenced Documents
1.1 This test method covers the determination of pour point 2.1 ASTM Standards:
of petroleum products by an automatic apparatus that applies a D97 Test Method for Pour Point of Petroleum Products
slightly positive air pressure onto the specimen surface while D4057 Practice for Manual Sampling of Petroleum and
the specimen is being cooled. Petroleum Products
D4175 Terminology Relating to Petroleum Products, Liquid
1.2 This test method is designed to cover the range of
Fuels, and Lubricants
temperatures from −57 °C to +51 °C; however, the range of
D4177 Practice for Automatic Sampling of Petroleum and
temperatures included in the (1998) interlaboratory test pro-
Petroleum Products
gram only covered the temperature range from −51 °C to
2.2 Energy Institute Standard:
−11 °C.
IP 15 Test Method for Pour Point of Petroleum Products
1.3 Test results from this test method can be determined at
either 1 °C or 3 °C testing intervals.
3. Terminology
1.4 This test method is not intended for use with crude oils.
3.1 Definitions:
NOTE 1—The applicability of this test method on residual fuel samples
3.1.1 For definitions of terms used in this test method, refer
has not been verified. For further information on the applicability, refer to
to Terminology D4175.
13.4.
3.1.2 pour point, n—in petroleum products, lowest tempera-
1.5 The values stated in SI units are to be regarded as
ture at which movement of the test specimen is observed under
standard. No other units of measurement are included in this
prescribed conditions of test.
standard.
3.2 Definitions of Terms Specific to This Standard:
1.6 This standard does not purport to address all of the
3.2.1 air pressure, n—regulated slightly positive air pres-
safety concerns, if any, associated with its use. It is the
sure gently applied onto the specimen surface in the airtight
responsibility of the user of this standard to establish appro-
test jar that causes upward movement of the specimen in the
priate safety, health, and environmental practices and deter-
communicating tube, which has one end inserted into the test
mine the applicability of regulatory limitations prior to use.
specimen and the other end at atmospheric pressure.
1.7 This international standard was developed in accor-
3.2.2 no-flow point, n—in petroleum products, temperature
dance with internationally recognized principles on standard-
of the test specimen at which a wax crystal structure of the test
ization established in the Decision on Principles for the
specimen or viscosity increase, or both, impedes movement of
Development of International Standards, Guides and Recom-
the surface of the test specimen under the conditions of the test.
mendations issued by the World Trade Organization Technical
3.2.2.1 Discussion—The no-flow point occurs when, upon
Barriers to Trade (TBT) Committee.
1 2
This test method is under the jurisdiction of ASTM Committee D02 on For referenced ASTM standards, visit the ASTM website, www.astm.org, or
Petroleum Products, Liquid Fuels, and Lubricants and is the direct responsibility of contact ASTM Customer Service at service@astm.org. For Annual Book of ASTM
Subcommittee D02.07 on Flow Properties. Standards volume information, refer to the standard’s Document Summary page on
Current edition approved March 1, 2024. Published April 2024. Originally the ASTM website.
approved in 2002. Last previous edition approved in 2018 as D6749 – 02 (2018). Available from Energy Institute, 61 New Cavendish St., London, W1G 7AR,
DOI: 10.1520/D6749-24. U.K., http://www.energyinst.org.
*A Summary of Changes section appears at the end of this standard
Copyright © ASTM International, 100 Barr Harbor Drive, PO Box C700, West Conshohocken, PA 19428-2959. United States
D6749 − 24
cooling, the formation of wax crystal structures or viscosity 6. Apparatus
increase, or both, has progressed to the point where the applied 4,5
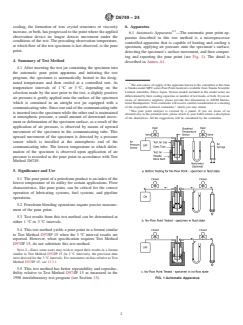
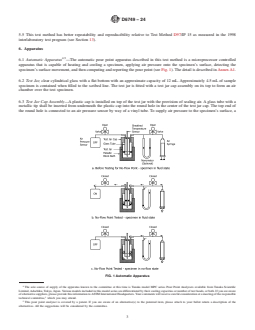
6.1 Automatic Apparatus —The automatic pour point ap-
observation device no longer detects movement under the
paratus described in this test method is a microprocessor
conditions of the test. The preceding observation temperature,
controlled apparatus that is capable of heating and cooling a
at which flow of the test specimen is last observed, is the pour
specimen, applying air pressure onto the specimen’s surface,
point.
detecting the specimen’s surface movement, and then comput-
ing and reporting the pour point (see Fig. 1). The detail is
4. Summary of Test Method
described in Annex A1.
4.1 After inserting the test jar containing the specimen into
the automatic pour point apparatus and initiating the test
program, the specimen is automatically heated to the desig-
nated temperature and then cooled at a controlled rate. At
The sole source of supply of the apparatus known to the committee at this time
temperature intervals of 1 °C or 3 °C, depending on the is Tanaka model MPC series Pour Point Analyzers available from Tanaka Scientific
Limited, Adachiku, Tokyo, Japan. Various models included in this model series are
selection made by the user prior to the test, a slightly positive
differentiated by their cooling capacities or number of test heads, or both. If you are
air pressure is gently applied onto the surface of the specimen
aware of alternative suppliers, please provide this information to ASTM Interna-
which is contained in an airtight test jar equipped with a
tional Headquarters. Your comments will receive careful consideration at a meeting
of the responsible technical committee, which you may attend.
communicating tube. Since one end of the communicating tube
This pour point analyzer is covered by a patent. If you are aware of an
is inserted into the specimen while the other end is maintained
alternative(s) to the patented item, please attach to your ballot return a description
at atmospheric pressure, a small amount of downward move-
of the alternatives. All the suggestions will be considered by the committee.
ment or deformation of the specimen surface, as a result of the
application of air pressure, is observed by means of upward
movement of the specimen in the communicating tube. This
upward movement of the specimen is detected by a pressure
sensor which is installed at the atmospheric end of the
communicating tube. The lowest temperature at which defor-
mation of the specimen is observed upon application of air
pressure is recorded as the pour point in accordance with Test
Method D6749.
5. Significance and Use
5.1 The pour point of a petroleum product is an index of the
lowest temperature of its utility for certain applications. Flow
characteristics, like pour point, can be critical for the correct
operation of lubricating systems, fuel systems, and pipeline
operations.
5.2 Petroleum blending operations require precise measure-
ment of the pour point.
5.3 Test results from this test method can be determined at
either 1 °C or 3 °C intervals.
5.4 This test method yields a pour point in a format similar
to Test Method D97/IP 15 when the 3 °C interval results are
reported. However, when specification requires Test Method
D97/IP 15, do not substitute this test method.
NOTE 2—Since some users may wish to report their results in a format
similar to Test Method D97/IP 15 (in 3 °C intervals), the precision data
were derived for the 3 °C intervals. For statements on bias relative to Test
Method D97/IP 15, see 13.3.1.
5.5 This test method has better repeatability and reproduc-
ibility relative to Test Method D97/IP 15 as measured in the
1998 interlaboratory test program (see Section 13). FIG. 1 Automatic Apparatus
D6749 − 24
6.2 Test Jar, clear cylindrical glass with a flat bottom with 10.2 Check the position of the temperature sensor and glass
an approximate capacity of 12 mL. Approximately 4.5 mL of tube according to the manufacturer’s instructions and, when
sample specimen is contained when filled to the scribed line. necessary, make appropriate adjustments.
The test jar is fitted with a test jar cap assembly on its top to
10.3 A sample with a well documented pour point can be
form an air chamber over the test specimen.
used to verify the performance of the automatic apparatus.
Alternatively, a sample which has been extensively tested in a
6.3 Test Jar Cap Assembly—A plastic cap is installed on top
pour point interlaboratory study can be used.
of the test jar with the provision of sealing air. A glass tube with
a metallic tip shall be inserted from underneath the plastic cap
into the round hole in the center of the test jar cap. The top end 11. Procedure
of the round hole is connected to an air pressure sensor by way
11.1 Pour the sample specimen into the test jar to the scribed
of a vinyl tube. To supply air pressure to the specimen’s
mark. When necessary, heat the sample in a bath or oven until
surface, a vinyl tube connected to an air syringe is located
it is just sufficiently fluid to pour into the test jar. Samples with
adjacent to the glass tube through an orifice in the plastic cap.
an expected pour point above 36 °C or samples which appear
When a specimen is to be tested, the test jar cap assembly is
solid at room temperature can be heated above 45 °C, but shall
installed on the test jar with the lower end of the glass tube
not be heated above 70 °C.
inserted into the specimen in the test jar. The glass tube and the
11.2 Insert the charged test jar into the metallic block bath
test jar form a communicating tube. A temperature sensor in a
and install the test jar cap assembly snugly.
small diameter metallic sheath shall be installed in the center of
the glass tube.
11.3 Select the desired test mode, including the pour point
testing interval, according to the manufacturer’s instructions.
6.4 Metallic Block Bath, a metallic block with a cylindrical
Should the user wish to provide results with a similar format to
hole to fit the test jar. The metallic block assembly shall have
Test Method D97/IP 15, then testing at a 3 °C interval shall be
a provision for cooling/heating. A temperature sensor is em-
selected. Start the automatic sample preheating function, and
bedded in the metallic block to monitor its temperature.
then enter the expected pour point (EPP). When the 3 °C
testing interval is chosen, the EPP needs to be a multiple of
7. Reagents and Materials
3 °C.
7.1 Cleaning Agents, capable of cleaning and drying the test
11.4 Start the test program. The sample is automatically
jar, temperature sensor, and glass tube after each test. Chemical
preheated by the automatic apparatus to 45 °C or to EPP +
agents such as alcohol, petroleum-based solvents, and acetone
9 °C, whichever is hi
...
This document is not an ASTM standard and is intended only to provide the user of an ASTM standard an indication of what changes have been made to the previous version. Because
it may not be technically possible to adequately depict all changes accurately, ASTM recommends that users consult prior editions as appropriate. In all cases only the current version
of the standard as published by ASTM is to be considered the official document.
Designation: D6749 − 02 (Reapproved 2018) D6749 − 24
Standard Test Method for
Pour Point of Petroleum Products (Automatic Air Pressure
Method)
This standard is issued under the fixed designation D6749; the number immediately following the designation indicates the year of
original adoption or, in the case of revision, the year of last revision. A number in parentheses indicates the year of last reapproval. A
superscript epsilon (´) indicates an editorial change since the last revision or reapproval.
INTRODUCTION
This test method covers an alternative procedure for the determination of pour point of petroleum
products using an automatic apparatus.
1. Scope Scope*
1.1 This test method covers the determination of pour point of petroleum products by an automatic apparatus that applies a slightly
positive air pressure onto the specimen surface while the specimen is being cooled.
1.2 This test method is designed to cover the range of temperatures from −57 °C to +51 °C; however, the range of temperatures
included in the (1998) interlaboratory test program only covered the temperature range from −51 °C to −11 °C.
1.3 Test results from this test method can be determined at either 1 °C or 3 °C testing intervals.
1.4 This test method is not intended for use with crude oils.
NOTE 1—The applicability of this test method on residual fuel samples has not been verified. For further information on the applicability, refer to 13.4.
1.5 The values stated in SI units are to be regarded as standard. No other units of measurement are included in this standard.
1.6 This standard does not purport to address all of the safety concerns, if any, associated with its use. It is the responsibility
of the user of this standard to establish appropriate safety, health, and environmental practices and determine the applicability of
regulatory limitations prior to use.
1.7 This international standard was developed in accordance with internationally recognized principles on standardization
established in the Decision on Principles for the Development of International Standards, Guides and Recommendations issued
by the World Trade Organization Technical Barriers to Trade (TBT) Committee.
2. Referenced Documents
2.1 ASTM Standards:
D97 Test Method for Pour Point of Petroleum Products
This test method is under the jurisdiction of ASTM Committee D02 on Petroleum Products, Liquid Fuels, and Lubricants and is the direct responsibility of Subcommittee
D02.07 on Flow Properties.
Current edition approved May 1, 2018March 1, 2024. Published June 2018April 2024. Originally approved in 2002. Last previous edition approved in 20122018 as
D6749 – 02 (2012).(2018). DOI: 10.1520/D6749-02R18.10.1520/D6749-24.
For referenced ASTM standards, visit the ASTM website, www.astm.org, or contact ASTM Customer Service at service@astm.org. For Annual Book of ASTM Standards
volume information, refer to the standard’s Document Summary page on the ASTM website.
*A Summary of Changes section appears at the end of this standard
Copyright © ASTM International, 100 Barr Harbor Drive, PO Box C700, West Conshohocken, PA 19428-2959. United States
D6749 − 24
D4057 Practice for Manual Sampling of Petroleum and Petroleum Products
D4175 Terminology Relating to Petroleum Products, Liquid Fuels, and Lubricants
D4177 Practice for Automatic Sampling of Petroleum and Petroleum Products
2.2 Energy Institute Standard:
IP 15 Test Method for Pour Point of Petroleum Products
3. Terminology
3.1 Definitions:
3.1.1 For definitions of terms used in this test method, refer to Terminology D4175.
3.1.2 pour point, n—in petroleum products, lowest temperature at which movement of the test specimen is observed under
prescribed conditions of test.
3.2 Definitions of Terms Specific to This Standard:
3.2.1 air pressure, n—regulated slightly positive air pressure gently applied onto the specimen surface in the airtight test jar that
causes upward movement of the specimen in the communicating tube, which has one end inserted into the test specimen and the
other end at atmospheric pressure.
3.2.2 no-flow point, n—in petroleum products, temperature of the test specimen at which a wax crystal structure of the test
specimen or viscosity increase, or both, impedes movement of the surface of the test specimen under the conditions of the test.
3.2.2.1 Discussion—
The no-flow point occurs when, upon cooling, the formation of wax crystal structures or viscosity increase, or both, has progressed
to the point where the applied observation device no longer detects movement under the conditions of the test. The preceding
observation temperature, at which flow of the test specimen is last observed, is the pour point.
4. Summary of Test Method
4.1 After inserting the test jar containing the specimen into the automatic pour point apparatus and initiating the test program, the
specimen is automatically heated to the designated temperature and then cooled at a controlled rate. At temperature intervals of
1 °C or 3 °C, depending on the selection made by the user prior to the test, a slightly positive air pressure is gently applied onto
the surface of the specimen which is contained in an airtight test jar equipped with a communicating tube. Since one end of the
communicating tube is inserted into the specimen while the other end is maintained at atmospheric pressure, a small amount of
downward movement or deformation of the specimen surface, as a result of the application of air pressure, is observed by means
of upward movement of the specimen in the communicating tube. This upward movement of the specimen is detected by a pressure
sensor which is installed at the atmospheric end of the communicating tube. The lowest temperature at which deformation of the
specimen is observed upon application of air pressure is recorded as the pour point in accordance with Test Method D6749.
5. Significance and Use
5.1 The pour point of a petroleum product is an index of the lowest temperature of its utility for certain applications. Flow
characteristics, like pour point, can be critical for the correct operation of lubricating systems, fuel systems, and pipeline
operations.
5.2 Petroleum blending operations require precise measurement of the pour point.
5.3 Test results from this test method can be determined at either 1 °C or 3 °C intervals.
5.4 This test method yields a pour point in a format similar to Test Method D97/IP 15 when the 3 °C interval results are reported.
However, when specification requires Test Method D97/IP 15, do not substitute this test method.
NOTE 2—Since some users may wish to report their results in a format similar to Test Method D97/IP 15 (in 3 °C intervals), the precision data were derived
for the 3 °C intervals. For statements on bias relative to Test Method D97/IP 15, see 13.3.1.
Available from Energy Institute, 61 New Cavendish St., London, W1G 7AR, U.K., http://www.energyinst.org.
D6749 − 24
5.5 This test method has better repeatability and reproducibility relative to Test Method D97/IP 15 as measured in the 1998
interlaboratory test program (see Section 13).
6. Apparatus
4,5
6.1 Automatic Apparatus —The automatic pour point apparatus described in this test method is a microprocessor controlled
apparatus that is capable of heating and cooling a specimen, applying air pressure onto the specimen’s surface, detecting the
specimen’s surface movement, and then computing and reporting the pour point (see Fig. 1). The detail is described in Annex A1.
6.2 Test Jar, clear cylindrical glass with a flat bottom with an approximate capacity of 12 mL. Approximately 4.5 mL of sample
specimen is contained when filled to the scribed line. The test jar is fitted with a test jar cap assembly on its top to form an air
chamber over the test specimen.
6.3 Test Jar Cap Assembly—A plastic cap is installed on top of the test jar with the provision of sealing air. A glass tube with a
metallic tip shall be inserted from underneath the plastic cap into the round hole in the center of the test jar cap. The top end of
the round hole is connected to an air pressure sensor by way of a vinyl tube. To supply air pressure to the specimen’s surface, a
FIG. 1 Automatic Apparatus
The sole source of supply of the apparatus known to the committee at this time is Tanaka model MPC series Pour Point Analyzers available from Tanaka Scientific
Limited, Adachiku, Tokyo, Japan. Various models included in this model series are differentiated by their cooling capacities or number of test heads, or both. If you are aware
of alternative suppliers, please provide this information to ASTM International Headquarters. Your comments will receive careful consideration at a meeting of the responsible
technical committee, which you may attend.
This pour point analyzer is covered by a patent. If you are aware of an alternative(s) to the patented item, please attach to your ballot return a description of the
alternatives. All the suggestions will be considered by the committee.
D6749 − 24
vinyl tube connected to an air syringe is located adjacent to the glass tube through an orifice in the plastic cap. When a specimen
is to be tested, the test jar cap assembly is installed on the test jar with the lower end of the glass tube inserted into the specimen
in the test jar. The glass tube and the test jar form a communicating tube. A temperature sensor in a small diameter metallic sheath
shall be installed in the center of the glass tube.
6.4 Metallic Block Bath, a metallic block with a cylindrical hole to fit the test jar. The metallic block assembly shall have a
provision for cooling/heating. A temperature sensor is embedded in the metallic block to monitor its temperature.
7. Reagents and Materials
7.1 Cleaning Agents, capable of cleaning and drying the test jar, temperature sensor, and glass tube after each test. Chemical agents
such as alcohol, petroleum-based solvents, and acetone have been found suitable to use. (Warning——Flammable.)Flammable.)
(Warning——MayMay be harmful by itself or when evaporated.)
8. Sampling
8.1 Obtain a sample in accordance with Practice D4057 or by Practice D4177.
8.2 Samples of very viscous materials may be warmed until they are reasonably fluid before they are transferred; however, no
sample shall be heated more than is absolutely necessary. The sample shall not be heated and transferred into the test jar unless
its temperature is 70 °C or lower.
NOTE 3—In the event the sample has been heated above this temperature, allow the sample to cool until its temperature is at least 70 °C before transferring.
9. Preparation of Apparatus
9.1 Install the automatic apparatus for operation in accordance with the manufacturer’s instructions.
9.2 Clean and dry the test jar, temperature sensor, and glass tube.
9.3 Turn on the main power switch of the automatic apparatus.
10. Calibration and Standardization
10.1 Ensure that all of the manufacturer’s instructions for calibrating, checking, and operating the automatic apparatus are
followed.
10.2 Check the position of the temperature sensor and glass tube according to the manufacturer’s instructions and, when necessary,
make appropriate adjustments.
10.3 A sample with a well documented pour point can be used to verify the performance of the automatic apparatus. Alternative
...
Questions, Comments and Discussion
Ask us and Technical Secretary will try to provide an answer. You can facilitate discussion about the standard in here.
Loading comments...