ASTM E1629-12(2020)
(Practice)Standard Practice for Determining the Impedance of Absolute Eddy-Current Probes
Standard Practice for Determining the Impedance of Absolute Eddy-Current Probes
SIGNIFICANCE AND USE
4.1 Eddy-current probes may be used for the nondestructive examination of parts or structures made of electrically conducting materials. Many of these examinations are intended to discover material defects, such as cracks, that may cause the part or structure to be unsafe or unfit for service. Eddy-current probes that fail to meet the performance level requirements of this practice shall not be used for the examination of material or hardware unless the probe is qualified by some other system or an agreement has been reached by the probe manufacturer and the purchaser, or both.
SCOPE
1.1 This practice covers a procedure for determining the impedance of absolute eddy-current probes (bridge-type, air or ferrite core, wire wound, shielded, or unshielded) used for finding material defects in electrically conducting material. This practice is intended to establish a uniform methodology to measure the impedance of eddy-current probes prior to receipt of these probes by the purchaser or the specifier.
1.2 Limitations—This practice does not address the characterization or measurement of the impedance of differential, a-c coupled, or transmit/receive types of probes. This practice does not address the use of magnetic materials in examination probes. This practice shall not be used as a basis for selection of the best probe for a particular application or as a means by which to calibrate or standardize a probe for a specific examination. This practice does not address differences in the impedance values that can be obtained when the probe and material are in relative motion, as in a rotating probe, since the procedure described here requires the probe and material to be stationary.
1.3 Units—The values stated in SI units are to be regarded as the standard. The values given in parentheses are mathematical conversions to inch-pound units that are provided for information only and are not considered standard.
1.4 This standard does not purport to address all of the safety concerns, if any, associated with its use. It is the responsibility of the user of this standard to establish appropriate safety, health, and environmental practices and determine the applicability of regulatory limitations prior to use.
1.5 This international standard was developed in accordance with internationally recognized principles on standardization established in the Decision on Principles for the Development of International Standards, Guides and Recommendations issued by the World Trade Organization Technical Barriers to Trade (TBT) Committee.
General Information
- Status
- Published
- Publication Date
- 14-Jan-2020
- Technical Committee
- E07 - Nondestructive Testing
- Drafting Committee
- E07.07 - Electromagnetic Method
Relations
- Replaces
ASTM E1629-12 - Standard Practice for Determining the Impedance of Absolute Eddy-Current Probes - Effective Date
- 15-Jan-2020
- Effective Date
- 01-Feb-2024
- Effective Date
- 01-Dec-2019
- Effective Date
- 01-Mar-2019
- Effective Date
- 01-Jan-2018
- Effective Date
- 15-Jun-2017
- Effective Date
- 01-Feb-2017
- Effective Date
- 01-Aug-2016
- Effective Date
- 01-Feb-2016
- Effective Date
- 01-Dec-2015
- Effective Date
- 01-Sep-2015
- Effective Date
- 01-Jun-2014
- Effective Date
- 01-Jun-2014
- Effective Date
- 01-Dec-2013
- Effective Date
- 15-Jun-2013
Overview
ASTM E1629-12(2020), Standard Practice for Determining the Impedance of Absolute Eddy-Current Probes, is a critical international standard published by ASTM International. This standard defines a consistent methodology for measuring the impedance of absolute eddy-current probes-devices widely used for nondestructive testing (NDT) of parts and structures made from electrically conducting materials. By ensuring that eddy-current probes meet established performance levels before use, this standard promotes the reliable detection of material defects such as cracks, which may compromise safety or serviceability.
This standard is intended to be applied before probes are delivered to purchasers or users, creating a reliable baseline for probe performance. It does not cover differential, a-c coupled, transmit/receive types, or probes containing magnetic materials, and is not for selecting, calibrating, or standardizing probes for particular NDT applications.
Key Topics
- Impedance Determination: Outlines procedures to accurately measure probe impedance using a reference standard, typically a specifically fabricated aluminum block.
- Types of Probes Covered: Applies to bridge-type, air or ferrite core, wire-wound, shielded, and unshielded absolute eddy-current probes.
- Uniform Methodology: Ensures all measurements are performed under standardized conditions, which mitigates variability and enhances the reliability of test results.
- Acceptance Criteria: Specifies minimum and maximum impedance values in air, permissible measurement scatter, and the process for evaluating impedance change due to reference standard slots or holes.
- Safety and Compliance: Emphasizes user responsibility for safety, health, environmental practices, and regulatory compliance during probe use.
- International Alignment: Developed in accordance with international standardization principles, especially concerning technical barriers to trade as set by the WTO TBT Committee.
Applications
ASTM E1629-12(2020) offers practical value for a wide range of industries engaged in quality control and asset integrity management, including:
- Aerospace Manufacturing and Maintenance: Used for non-destructive testing of aircraft components, ensuring structural integrity and service safety.
- Automotive Industry: Supports the inspection of critical engine and suspension components for fatigue cracks or inclusions.
- Power Generation: Monitors and evaluates turbine blades, generator rotors, and other conductive parts for in-service degradation.
- Metals Production and Processing: Checks for flaws or inconsistencies in rolled products or welds that could affect product performance.
- Procurement and Quality Assurance: Assists manufacturers, suppliers, and end-users in verifying probe performance before purchase or deployment in field inspections.
By following the practice described in ASTM E1629-12(2020), organizations can ensure consistency in probe acceptance and enhance the reliability of eddy current NDT inspection processes.
Related Standards
Organizations using ASTM E1629-12(2020) may also consider the following related standards:
- ASTM E1316, Terminology for Nondestructive Examinations - Defines key terms relevant to electromagnetic and other NDT methods.
- Other ASTM E07 Standards, covering various aspects of nondestructive testing, including probe calibration, testing procedures, and performance verification.
By implementing ASTM E1629-12(2020) alongside these related standards, users can establish a comprehensive NDT protocol for effective defect detection in electrically conducting materials.
Keywords: ASTM E1629, eddy-current probe impedance, absolute eddy-current probes, nondestructive examination, NDT, probe performance, quality assurance, material testing standards, ASTM International.
Buy Documents
ASTM E1629-12(2020) - Standard Practice for Determining the Impedance of Absolute Eddy-Current Probes
Get Certified
Connect with accredited certification bodies for this standard

Element Materials Technology
Materials testing and product certification.

Inštitut za kovinske materiale in tehnologije
Institute of Metals and Technology. Materials testing, metallurgical analysis, NDT.

IMP NDT d.o.o.
Non-destructive testing services. Radiography, ultrasonic, magnetic particle, penetrant, visual inspection.
Sponsored listings
Frequently Asked Questions
ASTM E1629-12(2020) is a standard published by ASTM International. Its full title is "Standard Practice for Determining the Impedance of Absolute Eddy-Current Probes". This standard covers: SIGNIFICANCE AND USE 4.1 Eddy-current probes may be used for the nondestructive examination of parts or structures made of electrically conducting materials. Many of these examinations are intended to discover material defects, such as cracks, that may cause the part or structure to be unsafe or unfit for service. Eddy-current probes that fail to meet the performance level requirements of this practice shall not be used for the examination of material or hardware unless the probe is qualified by some other system or an agreement has been reached by the probe manufacturer and the purchaser, or both. SCOPE 1.1 This practice covers a procedure for determining the impedance of absolute eddy-current probes (bridge-type, air or ferrite core, wire wound, shielded, or unshielded) used for finding material defects in electrically conducting material. This practice is intended to establish a uniform methodology to measure the impedance of eddy-current probes prior to receipt of these probes by the purchaser or the specifier. 1.2 Limitations—This practice does not address the characterization or measurement of the impedance of differential, a-c coupled, or transmit/receive types of probes. This practice does not address the use of magnetic materials in examination probes. This practice shall not be used as a basis for selection of the best probe for a particular application or as a means by which to calibrate or standardize a probe for a specific examination. This practice does not address differences in the impedance values that can be obtained when the probe and material are in relative motion, as in a rotating probe, since the procedure described here requires the probe and material to be stationary. 1.3 Units—The values stated in SI units are to be regarded as the standard. The values given in parentheses are mathematical conversions to inch-pound units that are provided for information only and are not considered standard. 1.4 This standard does not purport to address all of the safety concerns, if any, associated with its use. It is the responsibility of the user of this standard to establish appropriate safety, health, and environmental practices and determine the applicability of regulatory limitations prior to use. 1.5 This international standard was developed in accordance with internationally recognized principles on standardization established in the Decision on Principles for the Development of International Standards, Guides and Recommendations issued by the World Trade Organization Technical Barriers to Trade (TBT) Committee.
SIGNIFICANCE AND USE 4.1 Eddy-current probes may be used for the nondestructive examination of parts or structures made of electrically conducting materials. Many of these examinations are intended to discover material defects, such as cracks, that may cause the part or structure to be unsafe or unfit for service. Eddy-current probes that fail to meet the performance level requirements of this practice shall not be used for the examination of material or hardware unless the probe is qualified by some other system or an agreement has been reached by the probe manufacturer and the purchaser, or both. SCOPE 1.1 This practice covers a procedure for determining the impedance of absolute eddy-current probes (bridge-type, air or ferrite core, wire wound, shielded, or unshielded) used for finding material defects in electrically conducting material. This practice is intended to establish a uniform methodology to measure the impedance of eddy-current probes prior to receipt of these probes by the purchaser or the specifier. 1.2 Limitations—This practice does not address the characterization or measurement of the impedance of differential, a-c coupled, or transmit/receive types of probes. This practice does not address the use of magnetic materials in examination probes. This practice shall not be used as a basis for selection of the best probe for a particular application or as a means by which to calibrate or standardize a probe for a specific examination. This practice does not address differences in the impedance values that can be obtained when the probe and material are in relative motion, as in a rotating probe, since the procedure described here requires the probe and material to be stationary. 1.3 Units—The values stated in SI units are to be regarded as the standard. The values given in parentheses are mathematical conversions to inch-pound units that are provided for information only and are not considered standard. 1.4 This standard does not purport to address all of the safety concerns, if any, associated with its use. It is the responsibility of the user of this standard to establish appropriate safety, health, and environmental practices and determine the applicability of regulatory limitations prior to use. 1.5 This international standard was developed in accordance with internationally recognized principles on standardization established in the Decision on Principles for the Development of International Standards, Guides and Recommendations issued by the World Trade Organization Technical Barriers to Trade (TBT) Committee.
ASTM E1629-12(2020) is classified under the following ICS (International Classification for Standards) categories: 19.100 - Non-destructive testing; 77.040.20 - Non-destructive testing of metals. The ICS classification helps identify the subject area and facilitates finding related standards.
ASTM E1629-12(2020) has the following relationships with other standards: It is inter standard links to ASTM E1629-12, ASTM E1316-24, ASTM E1316-19b, ASTM E1316-19, ASTM E1316-18, ASTM E1316-17a, ASTM E1316-17, ASTM E1316-16a, ASTM E1316-16, ASTM E1316-15a, ASTM E1316-15, ASTM E1316-14e1, ASTM E1316-14, ASTM E1316-13d, ASTM E1316-13c. Understanding these relationships helps ensure you are using the most current and applicable version of the standard.
ASTM E1629-12(2020) is available in PDF format for immediate download after purchase. The document can be added to your cart and obtained through the secure checkout process. Digital delivery ensures instant access to the complete standard document.
Standards Content (Sample)
This international standard was developed in accordance with internationally recognized principles on standardization established in the Decision on Principles for the
Development of International Standards, Guides and Recommendations issued by the World Trade Organization Technical Barriers to Trade (TBT) Committee.
Designation: E1629 − 12 (Reapproved 2020)
Standard Practice for
Determining the Impedance of Absolute Eddy-Current
Probes
This standard is issued under the fixed designation E1629; the number immediately following the designation indicates the year of
original adoption or, in the case of revision, the year of last revision.Anumber in parentheses indicates the year of last reapproval.A
superscript epsilon (´) indicates an editorial change since the last revision or reapproval.
1. Scope* 2. Referenced Documents
1.1 This practice covers a procedure for determining the 2.1 The following document forms a part of this practice to
impedance of absolute eddy-current probes (bridge-type, air or the extent specified herein:
ferrite core, wire wound, shielded, or unshielded) used for 2
2.2 ASTM Standards:
finding material defects in electrically conducting material.
E1316Terminology for Nondestructive Examinations
Thispracticeisintendedtoestablishauniformmethodologyto
measure the impedance of eddy-current probes prior to receipt
3. Terminology
of these probes by the purchaser or the specifier.
3.1 Definitions—Definitionsoftermsrelatingtoelectromag-
1.2 Limitations—This practice does not address the charac-
netic examination are given in Terminology E1316.
terization or measurement of the impedance of differential, a-c
3.2 Definitions of Terms Specific to This Standard:
coupled,ortransmit/receivetypesofprobes.Thispracticedoes
3.2.1 eddy-current reference standard—for the purposes of
not address the use of magnetic materials in examination
the method described in this practice,arectangularblockmade
probes. This practice shall not be used as a basis for selection
of an aluminum alloy (see 6.1.2) to which an active eddy-
of the best probe for a particular application or as a means by
current probe is applied. The eddy-current reference standard
which to calibrate or standardize a probe for a specific
can also be referred to as an eddy-current test block.
examination. This practice does not address differences in the
3.3 Mathematical Symbols:
impedance values that can be obtained when the probe and
3.3.1 j—asymbolusedinelectricalengineeringtorepresent
material are in relative motion, as in a rotating probe, since the
=21 . It is associated with the restriction to the flow of
procedure described here requires the probe and material to be
electrical current caused by capacitors and coils.
stationary.
1.3 Units—The values stated in SI units are to be regarded 3.3.2 N—any number.
3.3.3 | –N|—the magnitude of N, regardless whether N is
asthestandard.Thevaluesgiveninparenthesesaremathemati-
cal conversions to inch-pound units that are provided for positive, negative, or a vector quantity.
information only and are not considered standard.
3.3.4 =N—the square root of N.
1.4 This standard does not purport to address all of the
3.3.5 (–N) —N squared, that is, N× N.
safety concerns, if any, associated with its use. It is the
3.3.6 ∆N—delta N, the change or difference in N.
responsibility of the user of this standard to establish appro-
3.4 Abbreviations:
−1
priate safety, health, and environmental practices and deter-
3.4.1 tan—used for the tangent function. The tan , arc
mine the applicability of regulatory limitations prior to use.
tangent or inverse tangent function, returns a value that is a
1.5 This international standard was developed in accor-
measure of an angle and can be in either degrees or radians.
−1
dance with internationally recognized principles on standard-
When using a calculator to determine the tan , care should be
ization established in the Decision on Principles for the
taken to determine whether the answer is in degrees or radians
Development of International Standards, Guides and Recom-
since the numerical values that represent the same angle are
mendations issued by the World Trade Organization Technical
different.
Barriers to Trade (TBT) Committee.
3.4.2 cos—used for the cosine function.
3.4.3 sin—used for the sine function.
This practice is under the jurisdiction of ASTM Committee E07 on Nonde-
structive Testing and is the direct responsibility of Subcommittee E07.07 on
Electromagnetic Method. For referenced ASTM standards, visit the ASTM website, www.astm.org, or
Current edition approved Jan. 15, 2020. Published January 2020. Originally contact ASTM Customer Service at service@astm.org. For Annual Book of ASTM
approved in 1994. Last previous edition approved in 2012 as E1629–12. DOI: Standards volume information, refer to the standard’s Document Summary page on
10.1520/E1629-12R20. the ASTM website.
*A Summary of Changes section appears at the end of this standard
Copyright © ASTM International, 100 Barr Harbor Drive, PO Box C700, West Conshohocken, PA 19428-2959. United States
E1629 − 12 (2020)
4. Significance and Use on the worksheet (Appendix X1) to calculate the probe
impedance. The calculated values shall be compared to the
4.1 Eddy-currentprobesmaybeusedforthenondestructive
acceptable criteria (6.3) to determine probe acceptability.
examinationofpartsorstructuresmadeofelectricallyconduct-
6.1.1 Equipment—The instrument shall be either a commer-
ing materials. Many of these examinations are intended to
cialimpedancemeasuringinstrumentoranLCRmeterwithan
discover material defects, such as cracks, that may cause the
oscillator capable of driving a current in the probe at the
part or structure to be unsafe or unfit for service. Eddy-current
probe’soperatingfrequency.Theoutputshalldisplaytheprobe
probes that fail to meet the performance level requirements of
impedance in either polar coordinates, providing a magnitude
this practice shall not be used for the examination of material
and a phase angle, or rectangular coordinates, providing
orhardwareunlesstheprobeisqualifiedbysomeothersystem
resistive and reactive components of the impedance, or both
or an agreement has been reached by the probe manufacturer
formats, that is, in polar and rectangular coordinates. This
and the purchaser, or both.
instrument shall be certified as having been calibrated in
5. General Practice
accordance with the manufacturer’s specifications, with the
calibration sticker indicating the calibration date and the
5.1 Use of Eddy-Current Reference Standards—The eddy-
required interval or next calibration date.
current reference standards described in this practice shall not
6.1.2 Reference Standards—The reference standard shall be
be used for purposes other than measuring the impedance of
eddy-currentprobesasspecifiedinthispractice.Theyshallnot fabricated from 7075-T6 aluminum alloy 1.9-cm (0.75-in.)
thick, with slotted holes for testing bolt hole probes and a
be used for standardizing an examination or for determining
slottedflatsectionfortestingsurfaceprobes.Allsurfacesofthe
sensitivity to flaws.
reference standard shall be polished to an average finish
5.2 Responsibility—Initial determination of the impedance
≤15µm (591µin.). The conductivity of the aluminum alloy
values of eddy-current probes shall be performed by the probe
should be between 30 and 35% IACS.
manufacturerinaccordancewiththispractice.Theresultsshall
6.1.2.1 Theslottedflatsectionshallhavesidemeasurements
bedeliveredwiththeprobeandmaintainedbytheorganization
of at least six times the coil diameter or 5.1 by 5.1 cm (2 by
using the probe.The results should include a description of the
2in.), whichever is larger. The slot shall be machined across
measurement configuration and impedance values as listed in
the block’s surface and shall measure at least 5.0 cm (2-in.)
X1.4. While the retesting of probes may be performed using
long. The slot cross section shall measure 0.1 6 0.01 mm
thispractice,onlytheresultsobtainedbeforetheprobeisinuse
(0.004 6 0.0004 in.) wide and 0.5 6 0.025 mm (0.02 6 0.001
should be compared to the initial impedance values. The
in.) deep.
impedance results should not be compared to the initial values
6.1.2.2 The holes shall be made for all of the nominal sizes
after a probe has been used.
ofboltholeprobestobeexamined.Theedgesoftheholesshall
6. Specific Practice
bespaced1.9-cm(0.75-in.)apartfromeachotherandfromthe
referencestandardedges.Theslotshallruntheentirelengthof
6.1 Method—Impedancemeasurementsshallbemadeonan
theholeandwillbe0.1 60.01-mm(0.004 60.0004-in.)wide
aluminum alloy reference block with a machined slot that
and 0.5 6 0.025-mm (0.02 6 0.001-in.) deep.
conforms to the requirements of this practice. The operating
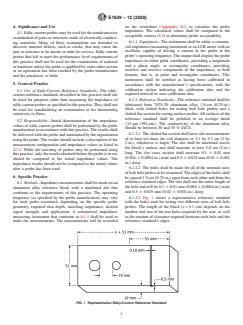
frequency (as specified by the probe manufacturer) may vary 6.1.2.3 Fig. 1 shows a representative reference standard
for each probe examined, depending on the specific probe with the holes used for testing two different sizes of bolt hole
geometry, required skin depth, matching impedance, desired probes. The length of the block (x+5.1 cm) depends on the
signal strength, and application. A commercial impedance number and size of the test holes required by the user, as well
measuring instrument that conforms to 6.1.1 shall be used to as the amount of clearance required between each hole and the
make the measurements. The measurements will be recorded reference standard’s edges.
FIG. 1 Representative Eddy-Current Reference Standard
E1629 − 12 (2020)
6.2 Measurement Procedure: necessary, convert the polar values to R and X (resistive
off off
6.2.1 Measurements—Impedance values can be expressed and reactive components). Calculate the magnitude of each of
in different ways. Impedances are most commonly given in the measurements and record them on the worksheet. Deter-
either rectangular or polar coordinates. In polar form, the mine the variation (scatter) in the magnitudes of the measure-
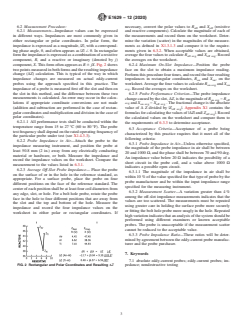
impedanceisexpressedasamagnitude,|Z|,withacorrespond- ments as defined in X1.3.1.3 and compare it to the require-
ing phase angle,θ, and often appears as |Z|/θ. In rectangular ments given in 6.3.2. When acceptable values are obtained,
formtheimpedanceisexpressedasacombinationofaresistive averagethefourvaluestocalculate R and X .Record
off avg off avg
component, R, and a reactive or imaginary (denoted by j) the averages on the worksheet.
component, X.Thisformoftenappearsas R 6 jX.Fig.2shows
6.2.4 Maximum On-Slot Impedance—Position the probe
twopointsmeasuredinbothformsandtheresultingimpedance face on the slot to obtain a maximum impedance reading.
change (∆Z) calculation. This is typical of the way in which Performthisprocedurefourtimes,andrecordthefourresulting
impedance changes are measured on actual eddy-current impedances in rectangular coordinates, R and X , on the
on on
probes using the approach specified in this practice. The worksheet.Averagethefourvaluestocalculate R and X
on avg on
impedance of a probe is measured first off the slot and then on avg. Record the averages on the worksheet.
the slot in this method, and the difference between these two
6.2.5 Probe Performance Criterion—The probe impedance
measurements is calculated. An error may occur in the calcu-
changecausedbytheslot,∆Z,isthemagnitudeof R − R
on avg off
lations if appropriate coordinate conversions are not made
avg and X − X .The fractional change is the absolute
on avg off avg
(addition and subtraction are performed in the case of rectan-
value of ∆ Z divided by |Z |. Appendix X1 contains the
off avg
gularcoordinatesandmultiplicationanddivisioninthecaseof
formulasforcalculatingthevaluesof|∆Z|and| Z |.Record
off avg
polar coordinates).
the calculated values on the worksheet and compare them to
6.2.1.1 All performance tests shall be conducted within the
the requirements of 6.3.3 to determine acceptance.
temperature range from 15 to 27°C (60 to 80°F). The probe
6.3 Acceptance Criteria—Acceptance of a probe being
testfrequencyshalldependontheratedoperatingfrequencyof
characterized by this practice requires that it meet all of the
the particular probe under test (see X1.4.3.3).
following criteria:
6.2.2 Probe Impedance in Air—Attach the probe to the
6.3.1 Probe Impedance in Air—Unless otherwise specified,
impedance measuring instrument, and position the probe at
the magnitude of the probe impedance in air shall be between
least 50.8 mm (2 in.) away from any electrically conducting
20 and 1000Ω, and the phase shall be between 70 and 90 deg.
material or hardware, or both. Measure the impedance and
An impedance value below 20 Ω indicates the possibility of a
record the impedance values on the worksheet. Compare the
short circuit in the probe coil, and a value above 1000 Ω
measurement to the values listed in 6.3.1.
indicates a possible open circuit.
6.2.3 Average Off-Slot Probe Impedance— Place the probe
6.3.1.1 The magnitude of the impedance in air shall be
on the surface of or in the hole in the reference standard, as
within10%ofthevaluespecifiedforthattypeofprobebythe
appropriate. For a surface probe, place the probe on four
probe manufacturer and be within the input impedance range
different positions on the face of the reference standard. The
specified for the measuring instrument.
centerofeachpositionshallbeatleastfourcoildiametersfrom
6.3.2 Measurement Scatter—A variation greater than 4%
any edge, slot, or hole. For a bolt hole probe, rotate the
...


Questions, Comments and Discussion
Ask us and Technical Secretary will try to provide an answer. You can facilitate discussion about the standard in here.
Loading comments...