ASTM F218-12
(Test Method)Standard Test Method for Measuring Optical Retardation and Analyzing Stress in Glass
Standard Test Method for Measuring Optical Retardation and Analyzing Stress in Glass
SIGNIFICANCE AND USE
The performance of glass products may be affected by presence of residual stresses due to process, differential thermal expansion between fused components, and by inclusions. This test method provides means of quantitative evaluation of stresses.
SCOPE
1.1 This test method covers the analysis of stress in glass by means of a polarimeter based on the principles developed by Jessop and Friedel (1, 2). Stress is evaluated as a function of optical retardation, that is expressed as the angle of rotation of an analyzing polarizer that causes extinction in the glass.
1.2 There is no known ISO equivalent to this standard.
1.3 This standard does not purport to address all of the safety concerns, if any, associated with its use. It is the responsibility of the user of this standard to establish appropriate safety and health practices and determine the applicability of regulatory limitations prior to use.
General Information
Relations
Buy Standard
Standards Content (Sample)
NOTICE: This standard has either been superseded and replaced by a new version or withdrawn.
Contact ASTM International (www.astm.org) for the latest information
Designation: F218 − 12
StandardTest Method for
Measuring Optical Retardation and Analyzing Stress in
1
Glass
ThisstandardisissuedunderthefixeddesignationF218;thenumberimmediatelyfollowingthedesignationindicatestheyearoforiginal
adoptionor,inthecaseofrevision,theyearoflastrevision.Anumberinparenthesesindicatestheyearoflastreapproval.Asuperscript
epsilon (´) indicates an editorial change since the last revision or reapproval.
1. Scope 4. Significance and Use
1.1 Thistestmethodcoverstheanalysisofstressinglassby 4.1 The performance of glass products may be affected by
means of a polarimeter based on the principles developed by presence of residual stresses due to process, differential ther-
2
Jessop and Friedel (1, 2). Stress is evaluated as a function of mal expansion between fused components, and by inclusions.
optical retardation, that is expressed as the angle of rotation of This test method provides means of quantitative evaluation of
an analyzing polarizer that causes extinction in the glass. stresses.
1.2 There is no known ISO equivalent to this standard.
5. Calibration and Standardization
1.3 This standard does not purport to address all of the
5.1 Whenever calibration of the polarimeter is required by
safety concerns, if any, associated with its use. It is the
product specification, Practices C1426 for verification and
responsibility of the user of this standard to establish appro-
calibration should be used.
priate safety and health practices and determine the applica-
6. Polarimeter
bility of regulatory limitations prior to use.
6.1 The polarimeter shall consist of an arrangement similar
2. Referenced Documents
to that shown in Fig. 1. A description of each component
3
2.1 ASTM Standards:
follows:
C162Terminology of Glass and Glass Products
6.1.1 Source of Light—Either a white light or a monochro-
C770Test Method for Measurement of Glass Stress—
matic source such as sodium light (λ 589 nm) or a white light
Optical Coefficient
covered with a narrow-band interferential filter B, (see Fig. 1,)
C978Test Method for Photoelastic Determination of Re-
transmitting the desired monochromatic wavelength.
sidual Stress in a Transparent Glass Matrix Using a
NOTE 1—The white light should provide a source of illumination with
Polarizing Microscope and Optical Retardation Compen-
solar temperature of at least that of Illuminant A.
sation Procedures
6.1.2 Filter—The filter should be placed between the light
C1426Practices forVerification and Calibration of Polarim-
source and the polarizer, or between the analyzer and the
eters
viewer (see Fig. 1).
3. Terminology
6.1.3 Diffuser—A piece of opal glass or a ground glass of
photographic quality.
3.1 For definitions of terms used in this standard, refer to
6.1.4 Polarizer—Apolarizing element housed in a rotatable
Terminology C162.
mount capable of being locked in a fixed position shown in
Fig. 2 and Fig. 4.
1
This test method is under the jurisdiction of ASTM Committee C14 on Glass
6.1.5 Immersion Cell—Rectangular glass jar with strain-
and Glass Products and is the direct responsibility of Subcommittee C14.04 on
free, retardation-free viewing sides filled with a liquid having
Physical and Mechanical Properties.
Current edition approved March 1, 2012. Published March 2012. Originally
the same index of refraction as the glass specimen to be
approved in 1950. Last previous edition approved in 2005 as F218–05. DOI:
measured. It may be surmounted with a suitable device for
10.1520/F0218-12.
2
holding and rotating the specimen, such that it does not stress
The boldface numbers in parentheses refer to the reports and papers appearing
in the list of references at the end of this test method.
the specimen.
3
For referenced ASTM standards, visit the ASTM website, www.astm.org, or
NOTE2—Suitableindexliquidsmaybepurchasedormixedasrequired.
contact ASTM Customer Service at service@astm.org. For Annual Book of ASTM
Standards volume information, refer to the standard’s Document Summary page on Dibutyl phthalate (refractive index 1.489), and tricresyl phosphate (index
the ASTM website. 1.555) may be mixed to produce any desired refractive index between the
Copyright © ASTM International, 100 Barr Harbor Drive, PO Box C700, West Conshohocken, PA 19428-2959. United States
1
---------------------- Page: 1 ----------------------
F218 − 12
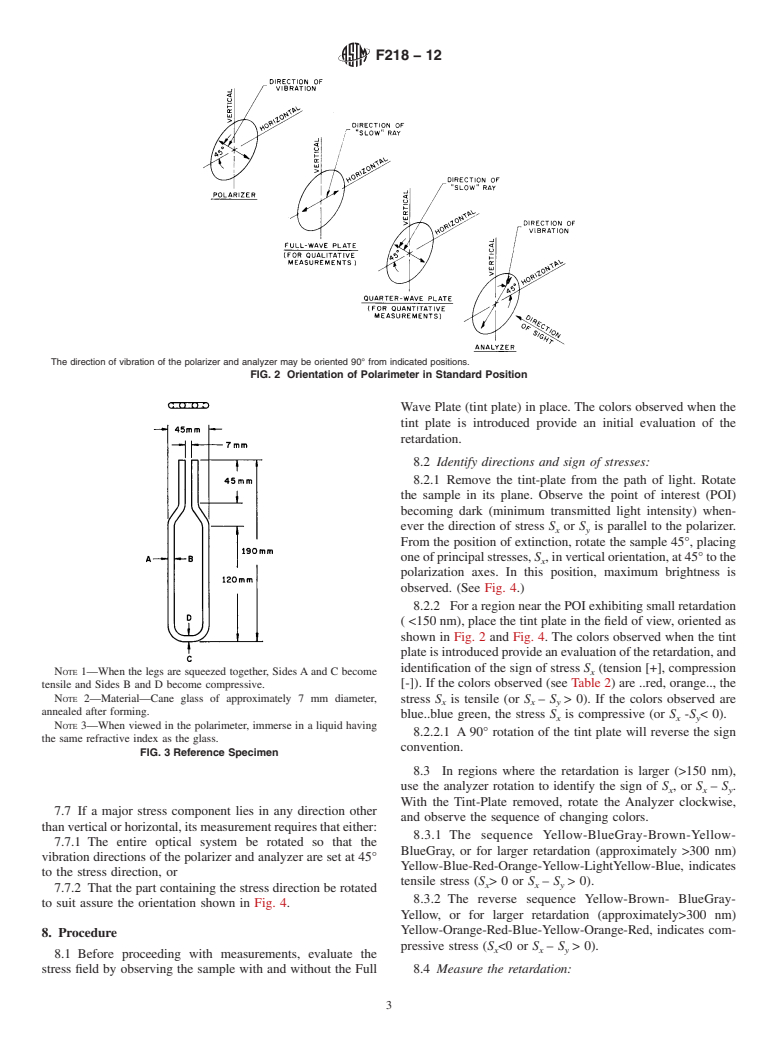
totheverticalandclockwisetothehorizontal(asshowninFig.
2 and Fig. 4). The vibration direction of the analyzer must be
“crossed” with respect to that of the polarizer; that is, the two
directions must be at right angles to each other. In this
relationship a minimum amount of light will pass through the
A—Light source (white, sodium vapor, or mercury vapor arc) combination.To check the 45° angle at which the directions of
B—Filter (used only with mercury arc light) (used with white light)
the polarizer a
...
This document is not an ASTM standard and is intended only to provide the user of an ASTM standard an indication of what changes have been made to the previous version. Because
it may not be technically possible to adequately depict all changes accurately, ASTM recommends that users consult prior editions as appropriate. In all cases only the current version
of the standard as published by ASTM is to be considered the official document.
Designation:F218–05 Designation:F218–12
Standard Test Method for
Measuring Optical Retardation and Analyzing Stress in
1
Glass
ThisstandardisissuedunderthefixeddesignationF218;thenumberimmediatelyfollowingthedesignationindicatestheyearoforiginal
adoption or, in the case of revision, the year of last revision.Anumber in parentheses indicates the year of last reapproval.Asuperscript
epsilon (´) indicates an editorial change since the last revision or reapproval.
1. Scope
1.1 ThistestmethodcoverstheanalysisofstressinglassbymeansofapolarimeterbasedontheprinciplesdevelopedbyJessop
2
and Friedel (1, 2). Stress is evaluated as a function of optical retardation, that is expressed as the angle of rotation of an analyzing
polarizer that causes extinction in the glass.
1.2 There is no known ISO equivalent to this standard.
1.3 This standard does not purport to address all of the safety concerns, if any, associated with its use. It is the responsibility
of the user of this standard to establish appropriate safety and health practices and determine the applicability of regulatory
limitations prior to use.
2. Referenced Documents
3
2.1 ASTM Standards:
C162 Terminology of Glass and Glass Products
C770 Test Method for Measurement of Glass StressOptical Coefficient
C978 Test Method for Photoelastic Determination of Residual Stress in a Transparent Glass Matrix Using a Polarizing
Microscope and Optical Retardation Compensation Procedures
C1426 Practices for Verification and Calibration of Polarimeters
3. Terminology
3.1 For definitions of terms used in this standard, refer to Terminology C162.
4. Significance and Use
4.1 The performance of glass products may be affected by presence of residual stresses due to process, differential thermal
expansion between fused components, and by inclusions. This test method provides means of quantitative evaluation of stresses.
5. Calibration and Standardization
5.1 Whenevercalibrationofthepolarimeterisrequiredbyproductspecification,PracticesC1426forverificationandcalibration
should be used.
6. Polarimeter
6.1 The polarimeter shall consist of an arrangement similar to that shown in Fig. 1. A description of each component follows:
6.1.1 SourceofLight—Either a white light or a monochromatic source such as sodium light (l 589 nm) or a white light covered
with a narrow-band interferential filter B, (see Fig. 1,) transmitting the desired monochromatic wavelength.
NOTE 1—The white light should provide a source of illumination with solar temperature of at least that of Illuminant A.
6.1.2 Filter—The filter should be placed between the light source and the polarizer, or between the analyzer and the viewer (see
Fig. 1).
1
This test method is under the jurisdiction of ASTM Committee C14 on Glass and Glass Products and is the direct responsibility of Subcommittee C14.04 on Physical
and Mechanical Properties.
Current edition approved Sept. 15, 2005. Published November 2005. Originally approved in 1950. Last previous edition approved in 2000 as F218–95(2000). DOI:
10.1520/F0218-05.
Current edition approved March 1, 2012. Published March 2012. Originally approved in 1950. Last previous edition approved in 2005 as F218 – 05. DOI:
10.1520/F0218-12.
2
The boldface numbers in parentheses refer to the reports and papers appearing in the list of references at the end of this test method.
3
For referencedASTM standards, visit theASTM website, www.astm.org, or contactASTM Customer Service at service@astm.org. ForAnnualBookofASTMStandards
volume information, refer to the standard’s Document Summary page on the ASTM website.
Copyright © ASTM International, 100 Barr Harbor Drive, PO Box C700, West Conshohocken, PA 19428-2959, United States.
1
---------------------- Page: 1 ----------------------
F218–12
A—Light source (white, sodium vapor, or mercury vapor arc)
B—Filter (used only with mercury arc light) (used with white light)
C—Diffuser
D—Polarizer
E—Immersion cell
F—Full-wave plate (used only with white light)
G—Quarter-wave plate
H—Analyzer
I—Telescope
FIG. 1 Polarimeter
6.1.3 Diffuser—A piece of opal glass or a ground glass of photographic quality.
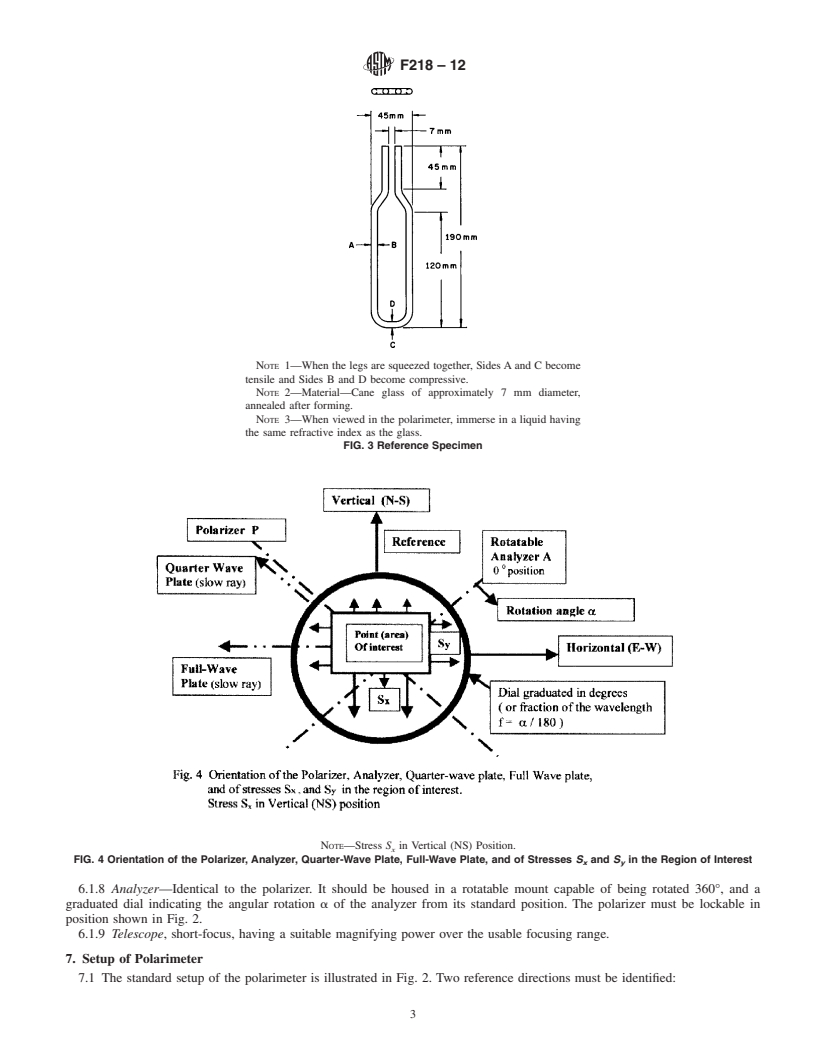
6.1.4 Polarizer—A polarizing element housed in a rotatable mount capable of being locked in a fixed position shown in
Fig. 2 and Fig. 4.
6.1.5 ImmersionCell—Rectangular glass jar with strain-free, retardation-free viewing sides filled with a liquid having the same
index of refraction as the glass specimen to be measured. It may be surmounted with a suitable device for holding and rotating
the specimen, such that it does not stress the sp
...


Questions, Comments and Discussion
Ask us and Technical Secretary will try to provide an answer. You can facilitate discussion about the standard in here.