ASTM C803/C803M-23
(Test Method)Standard Test Method for Penetration Resistance of Hardened Concrete
Standard Test Method for Penetration Resistance of Hardened Concrete
SIGNIFICANCE AND USE
5.1 This test method is applicable to assess the uniformity of concrete and to delineate zones of poor quality or deteriorated concrete in structures.
5.2 This test method is applicable to estimate in-place strength, provided that a relationship has been experimentally established between penetration resistance and concrete strength. Such a relationship must be established for a given test apparatus (see also 9.1.5), using similar concrete materials and mixture proportions as in the structure. Use the procedures and statistical methods in ACI 228.1R for developing and using the strength relationship.4
Note 1: Since penetration results may be affected by the nature of the formed surfaces (for example, wooden forms versus steel forms), correlation testing should be performed on specimens with formed surfaces similar to those to be used during construction. Additional information on the factors affecting penetration test results and summaries of past research are available.4,5
5.3 Steel probes are driven with a high-energy, powder-actuated driver, and probes may penetrate some aggregate particles. Probe penetration resistance is affected by concrete strength as well as the nature of the coarse aggregate. Steel pins are smaller in size than probes and are driven by a low-energy, spring-actuated driver. Pins are intended to penetrate the mortar fraction only; therefore, a test in which a pin strikes a coarse aggregate particle is disregarded.
5.4 This test method results in surface damage to the concrete, which may require repair in exposed architectural finishes.
SCOPE
1.1 This test method covers the determination of the resistance of hardened concrete to penetration by either a steel probe or pin.
1.2 The values stated in either SI units or inch-pound units are to be regarded separately as standard. The values stated in each system are not necessarily exact equivalents; therefore, to ensure conformance with the standard, each system shall be used independently of the other, and values from the two systems shall not be combined.
1.3 This standard does not purport to address all of the safety concerns, if any, associated with its use. It is the responsibility of the user of this standard to establish appropriate safety, health, and environmental practices and determine the applicability of regulatory limitations prior to use. For specific hazard statements, see Section 7.
1.4 This international standard was developed in accordance with internationally recognized principles on standardization established in the Decision on Principles for the Development of International Standards, Guides and Recommendations issued by the World Trade Organization Technical Barriers to Trade (TBT) Committee.
General Information
- Status
- Published
- Publication Date
- 30-Nov-2023
- Technical Committee
- C09 - Concrete and Concrete Aggregates
- Drafting Committee
- C09.64 - Nondestructive and In-Place Testing
Relations
- Effective Date
- 01-Dec-2023
- Effective Date
- 01-Feb-2024
- Effective Date
- 01-Jan-2024
- Effective Date
- 15-Jun-2015
- Referred By
ASTM C1074-19e1 - Standard Practice for Estimating Concrete Strength by the Maturity Method - Effective Date
- 01-Dec-2023
- Effective Date
- 01-Dec-2023
Overview
ASTM C803/C803M-23 is the internationally recognized standard test method for determining the penetration resistance of hardened concrete using steel probes or pins. Developed by ASTM Committee C09, this method is essential for assessing the uniformity and identifying areas of potential deterioration in concrete structures. The test provides valuable, nondestructive insights into the in-place strength and quality of concrete, making it highly relevant for construction, maintenance, and structural evaluation.
Penetration resistance testing is widely used to estimate in-place concrete strength when an appropriate correlation has been established between the penetration measurements and concrete strength for the specific materials and mix designs involved. This test is conducted using calibrated mechanical drivers and standardized steel probes or pins, following strict procedures to ensure accuracy.
Key Topics
- Penetration Resistance Testing: Involves driving steel probes (with a powder-actuated device) or pins (with a spring-actuated mechanism) into the concrete. Probe measurements are typically used for assessing both mortar and aggregate, while pins target the mortar fraction only.
- Assessment of Uniformity: Pinpointing areas of poor quality or deteriorated concrete by comparing penetration resistance across a structure.
- In-Place Strength Estimation: The method enables estimation of concrete strength in situ, provided a strength correlation is developed according to guidelines (such as ACI 228.1R).
- Surface Conditions: The nature of concrete surfaces (e.g., type of formwork) can affect results. Testing on representative surfaces is recommended.
- Safety Considerations: Use of protective equipment is required, and testing devices must meet safety standards (such as ANSI/ASSE A10.3 for powder-actuated systems).
- Reporting and Precision: The standard describes detailed reporting requirements and includes precision indexes for results reproducibility.
Applications
ASTM C803/C803M-23 is routinely applied in a variety of civil engineering and construction scenarios, including:
- Quality Control in New Construction: Evaluating the uniformity of recently placed concrete to ensure specification compliance.
- Structural Assessment and Maintenance: Identifying zones of weakness or deterioration in existing concrete structures for maintenance planning and safety assessment.
- Strength Estimation for Load Capacity: Providing valuable data for structural analysis by estimating in-place concrete compressive strength.
- Rehabilitation Projects: Guiding repair or upgrade strategies by distinguishing between sound and unsound concrete regions.
The test method is particularly valuable for large infrastructure projects, such as bridges, tunnels, dams, and buildings, where non-destructive or minimally-destructive testing methods are preferred.
Related Standards
For comprehensive evaluation and correct implementation, consider referencing these related standards and guidelines:
- ASTM C125: Terminology Relating to Concrete and Concrete Aggregates.
- ASTM C670: Practice for Preparing Precision and Bias Statements for Test Methods for Construction Materials.
- ACI 228.1R: In-Place Methods to Estimate Concrete Strength (provides statistical methods for correlation).
- ANSI/ASSE A10.3: Safety Requirements for Powder Actuated Fastening Systems.
Practical Value
By following ASTM C803/C803M-23, professionals gain a reliable tool for nondestructive evaluation of concrete, supporting better decision-making in quality control, structural assessment, and maintenance planning. Its use not only increases the safety and longevity of concrete structures but also ensures adherence to international construction quality and safety requirements.
Keywords: concrete strength, penetration resistance, in-place concrete testing, nondestructive evaluation, concrete uniformity, ASTM C803, structural assessment.
Buy Documents
ASTM C803/C803M-23 - Standard Test Method for Penetration Resistance of Hardened Concrete
REDLINE ASTM C803/C803M-23 - Standard Test Method for Penetration Resistance of Hardened Concrete
Get Certified
Connect with accredited certification bodies for this standard

ICC Evaluation Service
Building products evaluation and certification.

QAI Laboratories
Building and construction product testing and certification.

Aboma Certification B.V.
Specialized in construction, metal, and transport sectors.
Sponsored listings
Frequently Asked Questions
ASTM C803/C803M-23 is a standard published by ASTM International. Its full title is "Standard Test Method for Penetration Resistance of Hardened Concrete". This standard covers: SIGNIFICANCE AND USE 5.1 This test method is applicable to assess the uniformity of concrete and to delineate zones of poor quality or deteriorated concrete in structures. 5.2 This test method is applicable to estimate in-place strength, provided that a relationship has been experimentally established between penetration resistance and concrete strength. Such a relationship must be established for a given test apparatus (see also 9.1.5), using similar concrete materials and mixture proportions as in the structure. Use the procedures and statistical methods in ACI 228.1R for developing and using the strength relationship.4 Note 1: Since penetration results may be affected by the nature of the formed surfaces (for example, wooden forms versus steel forms), correlation testing should be performed on specimens with formed surfaces similar to those to be used during construction. Additional information on the factors affecting penetration test results and summaries of past research are available.4,5 5.3 Steel probes are driven with a high-energy, powder-actuated driver, and probes may penetrate some aggregate particles. Probe penetration resistance is affected by concrete strength as well as the nature of the coarse aggregate. Steel pins are smaller in size than probes and are driven by a low-energy, spring-actuated driver. Pins are intended to penetrate the mortar fraction only; therefore, a test in which a pin strikes a coarse aggregate particle is disregarded. 5.4 This test method results in surface damage to the concrete, which may require repair in exposed architectural finishes. SCOPE 1.1 This test method covers the determination of the resistance of hardened concrete to penetration by either a steel probe or pin. 1.2 The values stated in either SI units or inch-pound units are to be regarded separately as standard. The values stated in each system are not necessarily exact equivalents; therefore, to ensure conformance with the standard, each system shall be used independently of the other, and values from the two systems shall not be combined. 1.3 This standard does not purport to address all of the safety concerns, if any, associated with its use. It is the responsibility of the user of this standard to establish appropriate safety, health, and environmental practices and determine the applicability of regulatory limitations prior to use. For specific hazard statements, see Section 7. 1.4 This international standard was developed in accordance with internationally recognized principles on standardization established in the Decision on Principles for the Development of International Standards, Guides and Recommendations issued by the World Trade Organization Technical Barriers to Trade (TBT) Committee.
SIGNIFICANCE AND USE 5.1 This test method is applicable to assess the uniformity of concrete and to delineate zones of poor quality or deteriorated concrete in structures. 5.2 This test method is applicable to estimate in-place strength, provided that a relationship has been experimentally established between penetration resistance and concrete strength. Such a relationship must be established for a given test apparatus (see also 9.1.5), using similar concrete materials and mixture proportions as in the structure. Use the procedures and statistical methods in ACI 228.1R for developing and using the strength relationship.4 Note 1: Since penetration results may be affected by the nature of the formed surfaces (for example, wooden forms versus steel forms), correlation testing should be performed on specimens with formed surfaces similar to those to be used during construction. Additional information on the factors affecting penetration test results and summaries of past research are available.4,5 5.3 Steel probes are driven with a high-energy, powder-actuated driver, and probes may penetrate some aggregate particles. Probe penetration resistance is affected by concrete strength as well as the nature of the coarse aggregate. Steel pins are smaller in size than probes and are driven by a low-energy, spring-actuated driver. Pins are intended to penetrate the mortar fraction only; therefore, a test in which a pin strikes a coarse aggregate particle is disregarded. 5.4 This test method results in surface damage to the concrete, which may require repair in exposed architectural finishes. SCOPE 1.1 This test method covers the determination of the resistance of hardened concrete to penetration by either a steel probe or pin. 1.2 The values stated in either SI units or inch-pound units are to be regarded separately as standard. The values stated in each system are not necessarily exact equivalents; therefore, to ensure conformance with the standard, each system shall be used independently of the other, and values from the two systems shall not be combined. 1.3 This standard does not purport to address all of the safety concerns, if any, associated with its use. It is the responsibility of the user of this standard to establish appropriate safety, health, and environmental practices and determine the applicability of regulatory limitations prior to use. For specific hazard statements, see Section 7. 1.4 This international standard was developed in accordance with internationally recognized principles on standardization established in the Decision on Principles for the Development of International Standards, Guides and Recommendations issued by the World Trade Organization Technical Barriers to Trade (TBT) Committee.
ASTM C803/C803M-23 is classified under the following ICS (International Classification for Standards) categories: 91.100.30 - Concrete and concrete products. The ICS classification helps identify the subject area and facilitates finding related standards.
ASTM C803/C803M-23 has the following relationships with other standards: It is inter standard links to ASTM C803/C803M-18, ASTM C670-24a, ASTM C670-24, ASTM C670-15, ASTM C1074-19e1, ASTM C856/C856M-20. Understanding these relationships helps ensure you are using the most current and applicable version of the standard.
ASTM C803/C803M-23 is available in PDF format for immediate download after purchase. The document can be added to your cart and obtained through the secure checkout process. Digital delivery ensures instant access to the complete standard document.
Standards Content (Sample)
This international standard was developed in accordance with internationally recognized principles on standardization established in the Decision on Principles for the
Development of International Standards, Guides and Recommendations issued by the World Trade Organization Technical Barriers to Trade (TBT) Committee.
Designation: C803/C803M − 23
Standard Test Method for
Penetration Resistance of Hardened Concrete
This standard is issued under the fixed designation C803/C803M; the number immediately following the designation indicates the year
of original adoption or, in the case of revision, the year of last revision. A number in parentheses indicates the year of last reapproval.
A superscript epsilon (´) indicates an editorial change since the last revision or reapproval.
1. Scope* 3. Terminology
1.1 This test method covers the determination of the resis- 3.1 Definitions:
tance of hardened concrete to penetration by either a steel
3.2 For definitions of terms used in this test method, refer to
probe or pin.
Terminology C125.
1.2 The values stated in either SI units or inch-pound units
4. Summary of Test Method
are to be regarded separately as standard. The values stated in
each system are not necessarily exact equivalents; therefore, to
4.1 A driver delivers a known amount of energy to either a
ensure conformance with the standard, each system shall be
steel probe or pin. The penetration resistance of the concrete is
used independently of the other, and values from the two
determined by measuring either the exposed lengths of probes
systems shall not be combined.
that have been driven into the concrete or by measuring the
depth of the holes created by the penetration of the pins into the
1.3 This standard does not purport to address all of the
concrete.
safety concerns, if any, associated with its use. It is the
responsibility of the user of this standard to establish appro-
5. Significance and Use
priate safety, health, and environmental practices and deter-
5.1 This test method is applicable to assess the uniformity of
mine the applicability of regulatory limitations prior to use.
concrete and to delineate zones of poor quality or deteriorated
For specific hazard statements, see Section 7.
concrete in structures.
1.4 This international standard was developed in accor-
dance with internationally recognized principles on standard-
5.2 This test method is applicable to estimate in-place
ization established in the Decision on Principles for the
strength, provided that a relationship has been experimentally
Development of International Standards, Guides and Recom-
established between penetration resistance and concrete
mendations issued by the World Trade Organization Technical
strength. Such a relationship must be established for a given
Barriers to Trade (TBT) Committee.
test apparatus (see also 9.1.5), using similar concrete materials
and mixture proportions as in the structure. Use the procedures
2. Referenced Documents
and statistical methods in ACI 228.1R for developing and using
2.1 ASTM Standards:
the strength relationship.
C125 Terminology Relating to Concrete and Concrete Ag-
NOTE 1— Since penetration results may be affected by the nature of the
gregates
formed surfaces (for example, wooden forms versus steel forms), corre-
C670 Practice for Preparing Precision and Bias Statements
lation testing should be performed on specimens with formed surfaces
for Test Methods for Construction Materials similar to those to be used during construction. Additional information on
the factors affecting penetration test results and summaries of past
2.2 ANSI/ASSE Standard:
4,5
research are available.
A10.3 Safety Requirements for Powder Actuated Fastening
5.3 Steel probes are driven with a high-energy, powder-
Systems
actuated driver, and probes may penetrate some aggregate
particles. Probe penetration resistance is affected by concrete
This test method is under the jurisdiction of ASTM Committee C09 on
strength as well as the nature of the coarse aggregate. Steel pins
Concrete and Concrete Aggregates and is the direct responsibility of Subcommittee
are smaller in size than probes and are driven by a low-energy,
C09.64 on Nondestructive and In-Place Testing.
Current edition approved Dec. 1, 2023. Published December 2023. Originally spring-actuated driver. Pins are intended to penetrate the
approved in 1975. Last previous edition approved in 2018 as C803/C803M – 18.
DOI: 10.1520/C0803_C0803M-23.
2 4
For referenced ASTM standards, visit the ASTM website, www.astm.org, or ACI 228.1R-95, “In-Place Methods to Estimate Concrete Strength,” Report of
contact ASTM Customer Service at service@astm.org. For Annual Book of ASTM ACI Committee 228 on Nondestructive Testing, American Concrete Institute,
Standards volume information, refer to the standard’s Document Summary page on Farmington Hills, MI.
the ASTM website. Malhotra, V. M., and Carette, G. G., “Penetration Resistance Methods,”
Available from American National Standards Institute (ANSI), 25 W. 43rd St., Chapter 2 in Handbook on Nondestructive Testing of Concrete, Malhotra, V. M., and
4th Floor, New York, NY 10036, http://www.ansi.org. Carino, N. J., eds., CRC Press, Boca Raton, FL, 1991, pp. 19–38.
*A Summary of Changes section appears at the end of this standard
Copyright © ASTM International, 100 Barr Harbor Drive, PO Box C700, West Conshohocken, PA 19428-2959. United States
C803/C803M − 23
mortar fraction only; therefore, a test in which a pin strikes a
coarse aggregate particle is disregarded.
5.4 This test method results in surface damage to the
concrete, which may require repair in exposed architectural
finishes.
6. Apparatus
6.1 Resistance Testing With Probes:
6.1.1 Driver Unit—The driver unit shall be capable of
driving the probe into the concrete with an accurately con-
trolled amount of energy so that the probe shall remain firmly
embedded. The driver unit shall incorporate features to prevent
firing when not properly placed in the positioning device on the
concrete surface.
NOTE 2—A powder-actuated device conforming to ANSI/ASSE A10.3
has been used successfully.
6.1.1.1 For a specified energy loading, the variation of the
velocity of standard probes propelled by the standard driving
unit shall not have a coefficient of variation greater than 3 %
for any ten tests made by accepted ballistic methods.
NOTE 3—A conventional counter chronograph and appropriate ballistic
screens may be used to measure velocity at 2 m [6.5 ft] from the end of
the driving unit.
6.1.2 Probe—The probe shall be a hardened alloy-steel rod
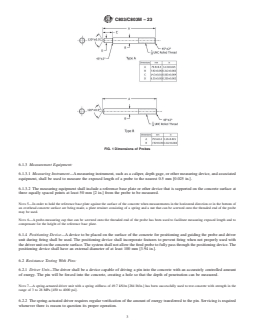
FIG. 1 Dimensions of Probes
plated for corrosion protection, with a blunt conical end that
can be inserted into the driver unit and driven into the concrete
surface so that it remains firmly embedded and the length of the
to compensate for the height of the reference base plate.
projecting portion can be measured. The hardness shall be
6.1.4 Positioning Device—A device to be placed on the
between Rockwell 44 HRC and 48 HRC. The exposed end of
surface of the concrete for positioning and guiding the probe
the probe shall be threaded to accommodate accessories
and driver unit during firing shall be used. The positioning
designed to facilitate measurement and withdrawal.
device shall incorporate features to prevent firing when not
NOTE 4—If probes are to be removed from the concrete, a device,
properly used with the driver unit on the concrete surface. The
consisting of a nut that can be screwed onto the end of the probe by a
system shall not allow the fired probe to fully pass through the
wrench and spacers that can be slipped over the probe for the nut to bear
positioning device. The positioning device shall have an
against, will serve to withdraw the probes.
external diameter of at least 100 mm [3.94 in.].
6.1.2.1 Probe dimensions are given in Fig. 1. Type A probes
6.2 Resistance Testing With Pins:
shall be used for testing concrete with a density of 2000 kg/m
6.2.1 Driver Unit—The driver shall be a device capable of
[125 lb/ft ] or greater. Type B probes shall be used for testing
3 3
driving a pin into the concrete with an accurately controlled
concrete with a density less than 2000 kg/m [125 lb/ft ].
amount of energy. The pin will be forced into the concrete,
6.1.3 Measurement Equipment:
creating a hole so that the depth of penetration can be
6.1.3.1 Measuring Instrument—A measuring instrument,
measured.
such as a caliper, depth gage, or other measuring device, and
associated equipment, shall be used to measure the exposed
NOTE 7—A spring-actuated driver unit with a spring stiffness of 49.7
length of a probe to the nearest 0.5 mm [0.025 in.].
kN/m [284 lb/in.] has been successfully used to test concrete with strength
in the range of 3 to 28 MPa [450 to 4000 psi].
6.1.3.2 The measuring equipment shall include a reference
base plate or other device that is supported on the concrete
6.2.2 The spring-actuated driver requires regular verifica-
surface at three equally spaced points at least 50 mm [2 in.]
tion of the amount of energy transferred to the pin. Servicing is
from the probe to be measured.
required whenever there is reason to question its proper
operation.
NOTE 5—In order to hold the reference base plate against the surface of
the concrete when measurements in the horizontal direction or in the
NOTE 8—The amount of energy transferred to the pin can be verified
bottom of an overhead concrete surface are being made, a plate retainer
using calibration blocks supplied by the manufacturer. Pins are driven into
consisting of a spring and a nut that can be screwed onto the threaded end
the blocks using the spring-actuated driver, and the measured penetration
of the probe may be used.
is compared to manufacturer’s specifications. If the penetration does not
NOTE 6—A probe-measuring cap that can be screwed onto the threaded
meet the manufacturer’s specification, the driver unit should be serviced.
end of the probe has been used to facilitate measuring exposed length and
6.2.3 Pin—The pin shall be a hardened alloy-steel drill rod,
heat treated to Rockwell hardness 62 HRC to 66 HRC, with
Apparatus to conduct these tests is available commercially. one end sharpened and the other end blunt. The dimensions of
C803/C803M − 23
A
TABLE 1 Precision for Resistance Testing With Probes
the pins shall be uniform within 62.0 %. Each pin shall be
D
(d2s) Limit
used only once and then discarded.
Maximum
Maximum
Difference Between
Range
NOTE 9—A pin with approximate length of 30 mm [1.2 in.], a diameter
Two Tests (Each
B
Maximum Size
(1s) Limit,
of Three
of 3.6 mm [0.14 in.], and a tip machined at an angle of 22.5 degrees with test calculated as
C
of Aggregate mm [in.]
Individual
the average of
its longitudinal axis, has been used successfully in the driver unit
Measurements,
three
described in Note 7.
mm [in.]
measurements),
mm [in.]
6.2.4 Measuring Equipment:
No. 4 (Mortar) 2.0 [0.08] 6.6 [0.26] 3.3 [0.13]
6.2.4.1 Measuring Instrument—A depth gage with a refer-
25 mm [1-in.] 2.5 [0.10] 8.4 [0.33] 4.1 [0.16]
ence plate shall be used to measure the depth of penetration of
50 mm [2 in.] 3.6 [0.14] 11.7 [0.46] 5.6 [0.22]
A
the pin tip into the concrete to the nearest 0.001 in. [0.025 mm].
These values represent indexes of precision as described in Practice C670.
B
These values are the single-operator standard deviations for tests made on
6.2.4.2 The measuring rod of the depth gage shall have a
concrete with the maximum size aggregate shown in Column 1.
diameter and a tip angle that are less than that of the pin.
C
These values are the maximum allowable ranges for groups of three individual
6.2.4.3 The test equipment shall include an air blower to
measurements made close together, either as individual measurements or by
using the triangular positioning device.
clean the s
...
This document is not an ASTM standard and is intended only to provide the user of an ASTM standard an indication of what changes have been made to the previous version. Because
it may not be technically possible to adequately depict all changes accurately, ASTM recommends that users consult prior editions as appropriate. In all cases only the current version
of the standard as published by ASTM is to be considered the official document.
Designation: C803/C803M − 18 C803/C803M − 23
Standard Test Method for
Penetration Resistance of Hardened Concrete
This standard is issued under the fixed designation C803/C803M; the number immediately following the designation indicates the year
of original adoption or, in the case of revision, the year of last revision. A number in parentheses indicates the year of last reapproval.
A superscript epsilon (´) indicates an editorial change since the last revision or reapproval.
1. Scope*
1.1 This test method covers the determination of the resistance of hardened concrete to penetration by either a steel probe or pin.
1.2 The values stated in either SI units or inch-pound units are to be regarded separately as standard. The values stated in each
system may not beare not necessarily exact equivalents; therefore, to ensure conformance with the standard, each system shall be
used independently of the other. Combiningother, and values from the two systems may result in nonconformance with the
standard.shall not be combined.
1.3 This standard does not purport to address all of the safety concerns, if any, associated with its use. It is the responsibility
of the user of this standard to establish appropriate safety, health, and environmental practices and determine the applicability of
regulatory limitations prior to use. For specific hazard statements, see Section 7.
1.4 This international standard was developed in accordance with internationally recognized principles on standardization
established in the Decision on Principles for the Development of International Standards, Guides and Recommendations issued
by the World Trade Organization Technical Barriers to Trade (TBT) Committee.
2. Referenced Documents
2.1 ASTM Standards:
C125 Terminology Relating to Concrete and Concrete Aggregates
C670 Practice for Preparing Precision and Bias Statements for Test Methods for Construction Materials
2.2 ANSI/ASSE Standard:
A10.3 Safety Requirements for Powder Actuated Fastening Systems
3. Terminology
3.1 Definitions:
3.2 For definitions of terms used in this test method, refer to Terminology C125.
4. Summary of Test Method
4.1 A driver delivers a known amount of energy to either a steel probe or pin. The penetration resistance of the concrete is
This test method is under the jurisdiction of ASTM Committee C09 on Concrete and Concrete Aggregates and is the direct responsibility of Subcommittee C09.64 on
Nondestructive and In-Place Testing.
Current edition approved Dec. 15, 2018Dec. 1, 2023. Published February 2019December 2023. Originally approved in 1975. Last previous edition approved in 20172018
as C803/C803M – 17.C803/C803M – 18. DOI: 10.1520/C0803_C0803M-18.10.1520/C0803_C0803M-23.
For referenced ASTM standards, visit the ASTM website, www.astm.org, or contact ASTM Customer Service at service@astm.org. For Annual Book of ASTM Standards
volume information, refer to the standard’s Document Summary page on the ASTM website.
Available from American National Standards Institute (ANSI), 25 W. 43rd St., 4th Floor, New York, NY 10036, http://www.ansi.org.
*A Summary of Changes section appears at the end of this standard
Copyright © ASTM International, 100 Barr Harbor Drive, PO Box C700, West Conshohocken, PA 19428-2959. United States
C803/C803M − 23
determined by measuring either the exposed lengths of probes that have been driven into the concrete or by measuring the depth
of the holes created by the penetration of the pins into the concrete.
5. Significance and Use
5.1 This test method is applicable to assess the uniformity of concrete and to delineate zones of poor quality or deteriorated
concrete in structures.
5.2 This test method is applicable to estimate in-place strength, provided that a relationship has been experimentally established
between penetration resistance and concrete strength. Such a relationship must be established for a given test apparatus (see also
9.1.5), using similar concrete materials and mixture proportions as in the structure. Use the procedures and statistical methods in
ACI 228.1R for developing and using the strength relationship.
NOTE 1— Since penetration results may be affected by the nature of the formed surfaces (for example, wooden forms versus steel forms), correlation
testing should be performed on specimens with formed surfaces similar to those to be used during construction. Additional information on the factors
4,5
affecting penetration test results and summaries of past research are available.
5.3 Steel probes are driven with a high-energy, powder-actuated driver, and probes may penetrate some aggregate particles. Probe
penetration resistance is affected by concrete strength as well as the nature of the coarse aggregate. Steel pins are smaller in size
than probes and are driven by a low-energy, spring-actuated driver. Pins are intended to penetrate the mortar fraction only;
therefore, a test in which a pin strikes a coarse aggregate particle is disregarded.
5.4 This test method results in surface damage to the concrete, which may require repair in exposed architectural finishes.
6. Apparatus
6.1 Resistance Testing With Probes:
6.1.1 Driver Unit—The driver unit shall be capable of driving the probe into the concrete with an accurately controlled amount
of energy so that the probe shall remain firmly embedded. The driver unit shall incorporate features to prevent firing when not
properly placed in the positioning device on the concrete surface.
NOTE 2—A powder-actuated device conforming to ANSI/ASSE A10.3 has been used successfully.
6.1.1.1 For a specified energy loading, the variation of the velocity of standard probes propelled by the standard driving unit shall
not have a coefficient of variation greater than 3 % for any ten tests made by accepted ballistic methods.
NOTE 3—A conventional counter chronograph and appropriate ballistic screens may be used to measure velocity at 2 m [6.5 ft] from the end of the driving
unit.
6.1.2 Probe—The probe shall be a hardened alloy-steel rod plated for corrosion protection, with a blunt conical end that can be
inserted into the driver unit and driven into the concrete surface so that it remains firmly embedded and the length of the projecting
portion can be measured. The hardness shall be between Rockwell 44 HRC and 48 HRC. The exposed end of the probe shall be
threaded to accommodate accessories designed to facilitate measurement and withdrawal.
NOTE 4—If probes are to be removed from the concrete, a device, consisting of a nut that can be screwed onto the end of the probe by a wrench and spacers
that can be slipped over the probe for the nut to bear against, will serve to withdraw the probes.
6.1.2.1 Probe dimensions are given in Fig. 1. Type A probes shall be used for testing concrete with a density of 2000 kg/m [125
3 3 3
lb/ft ] or greater. Type B probes shall be used for testing concrete with a density less than 2000 kg/m [125 lb/ft ].
ACI 228.1R-95, “In-Place Methods to Estimate Concrete Strength,” Report of ACI Committee 228 on Nondestructive Testing, American Concrete Institute, Farmington
Hills, MI.
Malhotra, V. M., and Carette, G. G., “Penetration Resistance Methods,” Chapter 2 in Handbook on Nondestructive Testing of Concrete, Malhotra, V. M., and Carino,
N. J., eds., CRC Press, Boca Raton, FL, 1991, pp. 19–38.
Apparatus to conduct these tests is available commercially.
C803/C803M − 23
FIG. 1 Dimensions of Probes
6.1.3 Measurement Equipment:
6.1.3.1 Measuring Instrument—A measuring instrument, such as a caliper, depth gage, or other measuring device, and associated
equipment, shall be used to measure the exposed length of a probe to the nearest 0.5 mm [0.025 in.].
6.1.3.2 The measuring equipment shall include a reference base plate or other device that is supported on the concrete surface at
three equally spaced points at least 50 mm [2 in.] from the probe to be measured.
NOTE 5—In order to hold the reference base plate against the surface of the concrete when measurements in the horizontal direction or in the bottom of
an overhead concrete surface are being made, a plate retainer consisting of a spring and a nut that can be screwed onto the threaded end of the probe
may be used.
NOTE 6—A probe-measuring cap that can be screwed onto the threaded end of the probe has been used to facilitate measuring exposed length and to
compensate for the height of the reference base plate.
6.1.4 Positioning Device—A device to be placed on the surface of the concrete for positioning and guiding the probe and driver
unit during firing shall be used. The positioning device shall incorporate features to prevent firing when not properly used with
the driver unit on the concrete surface. The system shall not allow the fired probe to fully pass through the positioning device. The
positioning device shall have an external diameter of at least 100 mm [3.94 in.].
6.2 Resistance Testing With Pins:
6.2.1 Driver Unit—The driver shall be a device capable of driving a pin into the concrete with an accurately controlled amount
of energy. The pin will be forced into the concrete, creating a hole so that the depth of penetration can be measured.
NOTE 7—A spring-actuated driver unit with a spring stiffness of 49.7 kN/m [284 lb/in.] has been successfully used to test concrete with strength in the
range of 3 to 28 MPa [450 to 4000 psi].
6.2.2 The spring-actuated driver requires regular verification of the amount of energy transferred to the pin. Servicing is required
whenever there is reason to question its proper operation.
C803/C803M − 23
NOTE 8—The amount of energy transferred to the pin can be verified using calibration blocks supplied by the manufacturer. Pins are driven into the blocks
using the spring-actuated driver, and the measured penetration is compared to manufacturer’s specifications. If the penetration does not meet the
manufacturer’s specification, the driver unit should be serviced.
6.2.3 Pin—The pin shall be a hardened alloy-steel drill rod, heat treated to Rockwell hardness 62 HRC to 66 HRC, with one end
sharpened and the other end blunt. The dimensions of the pins shall be uniform within 62.0 %. Each pin shall be used only once
and then discarded.
NOTE 9—A pin with approximate length of 30 mm [1.2 in.], a diameter of 3.6 mm [0.14 in.], and a tip machined at an angle of 22.5 degrees with its
longitudinal axis, has been used successfully in the driver unit described in Note 7.
6.2.4 Measuring Equipment:
6.2.4.1 Measuring Instrument—A depth gage with a reference plate shall be used to measure the depth of penetration of the pin
tip into the concrete to the nearest 0.001 in. [0.025 mm].
6.2.4.2 The measuring rod of the depth gage shall have a diameter and a tip angle that are less than that of the pin.
6.2.4.3 The test equipment shall include an air blower to clean the small hole created by a pin before measurement of the depth
of penetration.
7. Hazards
7.1 Resistance Testing With Probes:
7.1.1 Exercise care in the operation of the driver unit to prevent unexpected or inadvertent discharge of a probe.
7.1.2 Wear safety goggles, hearing protection, and other appropriate protective equipment when driving probes into concrete.
7.1.3 The driving unit, if powder actuated, shall conform to the applicable requirements of ANSI/ASSE A10.3.
7.1.4 If reinforcing bars or other metal embedments in the concrete are suspected to have cover depths shallower than the
anticipated probe penetration, select test positions so that probes will not strike such embedded items (Note 10).
NOTE 10—The location of reinforcement may be established using reinforcement locators or metal detectors. Follow the manufacturer’s instructions for
proper operation of such devices.
7.2 Resistance Testing With Pins:
7.2.1 Use care in the operation of the spring-actuated driver to prev
...
Questions, Comments and Discussion
Ask us and Technical Secretary will try to provide an answer. You can facilitate discussion about the standard in here.
Loading comments...