ASTM E1345-98(2019)
(Practice)Standard Practice for Reducing the Effect of Variability of Color Measurement by Use of Multiple Measurements
Standard Practice for Reducing the Effect of Variability of Color Measurement by Use of Multiple Measurements
SIGNIFICANCE AND USE
5.1 This practice should be used whenever measured color-scale or color-difference-scale values are to be compared to an established tolerance. In this way it can be demonstrated quantitatively that the sampling and measurement procedures are adequate to allow an unambiguous decision as to whether or not the mean results are within tolerance.
5.2 This practice is based on portions of SAE J 1545, as it applies to painted or plastic automotive parts. It is generally applicable to object colors in various materials. Textured materials, such as textiles, may require special consideration (see SAE J 1545 and STP 15D Manual on Presentation of Data and Control Chart Analysis5).
5.3 While Practice E178 deals with outliers, it does not include definitions relating to the box and whisker technique. The definition of an outlier is operational and a little vague because there is still considerable disagreement about what constitutes an outlier. In any normally distributed population, there will be members that range from minus to plus infinity. Theoretically, one should include any member of the population in any sample based on estimates of the population parameters. Practically, including a member that is found far from the mean within a small sample, most members of which are found near the mean, will introduce a systematic bias into the estimate of the population parameters (mean, standard deviation, standard error). Such a bias is in direct contrast with the goal of this practice, namely, to reduce the effects of variability of measurement. For the purposes of this practice, no distinction is made between errors of sampling and members of the tails of the distribution. Practice E178 has several methods and significance tables to attempt to differentiate between these two types of extreme values.
SCOPE
1.1 Reduction of the variability associated with average color or color-difference measurements of object-color specimens is achieved by statistical analysis of the results of multiple measurements on a single specimen, or by measurement of multiple specimens, whichever is appropriate.
1.2 This practice provides a means for the determination of the number of measurements required to reduce the variability to a predetermined fraction of the relevant color or color-difference tolerances.
1.3 This practice is general in scope rather than specific as to instrument or material.
1.4 This international standard was developed in accordance with internationally recognized principles on standardization established in the Decision on Principles for the Development of International Standards, Guides and Recommendations issued by the World Trade Organization Technical Barriers to Trade (TBT) Committee.
General Information
- Status
- Published
- Publication Date
- 30-Apr-2019
- Technical Committee
- E12 - Color and Appearance
- Drafting Committee
- E12.04 - Color and Appearance Analysis
Relations
- Effective Date
- 01-May-2019
- Effective Date
- 01-Apr-2022
- Effective Date
- 01-Oct-2017
- Effective Date
- 01-Oct-2017
- Effective Date
- 01-May-2017
- Effective Date
- 01-Jun-2016
- Effective Date
- 01-Aug-2015
- Effective Date
- 01-Apr-2015
- Effective Date
- 01-Jan-2015
- Effective Date
- 01-Jan-2015
- Effective Date
- 01-Jan-2015
- Effective Date
- 01-May-2014
- Effective Date
- 15-Nov-2013
- Effective Date
- 15-Nov-2013
- Effective Date
- 15-Nov-2013
Overview
ASTM E1345-98(2019), Standard Practice for Reducing the Effect of Variability of Color Measurement by Use of Multiple Measurements, is an internationally recognized guideline for minimizing variability in color measurement results. This practice is essential whenever measured color-scale or color-difference-scale values are compared to established color tolerances. By detailing statistical approaches and protocols, this standard helps ensure that sampling and measurement techniques in color quality control yield reliable, repeatable, and actionable results for object-color specimens. This practice supports the technical accuracy and confidence needed for industries where precise color measurement is critical, such as automotive, plastics, coatings, and textiles.
Key Topics
Statistical Analysis of Multiple Measurements
By using multiple measurements-either on a single specimen or across multiple specimens-the standard enables the quantification and control of variability in average color or color-difference values.Determining Required Number of Measurements
ASTM E1345 provides a systematic method for determining how many measurements are necessary to reduce variability to a desired proportion of a given tolerance, supporting robust decision-making.Screening for Outliers and Extreme Values
The standard incorporates statistical tools, including box-and-whisker plots and reference to ASTM E178, to identify and appropriately handle outliers and extreme values in color measurement data.Applicability Across Industries and Materials
Based in part on SAE J 1545 for automotive finishes, ASTM E1345 is broadly applicable to a wide variety of object-color materials, including painted, plastic, and textile products.Tolerance Compliance
This practice assures that comparison of color measurement data to established tolerances is performed with quantitative justification, reducing the risk of ambiguous or biased acceptance decisions.
Applications
Color Quality Control in Manufacturing
This standard is crucial for manufacturers who must meet strict color tolerances in production, such as automotive body panels, consumer goods, and packaging materials. Repeated measurements help document consistency and compliance.Instrumental Color Measurement Calibration
Laboratories and production lines benefit from E1345 by utilizing specified protocols to validate the adequacy and repeatability of their color measuring instruments, reducing systematic measurement errors.Statistical Validity in Product Acceptance
Organizations use this practice to quantitatively demonstrate that sampling and measurement processes are sound, supporting reliable go/no-go decisions when evaluating batch or lot color compliance.Control of Sampling Errors
The methods outlined ensure that both random and systematic errors (including those at the extremes of data distributions) are accounted for and minimized.Comparative Color Studies
In research and development, ASTM E1345 supports statistically valid comparison between materials, formulations, or processes through consistent, repeatable color measurement techniques.
Related Standards
- ASTM D2244: Practice for Calculation of Color Tolerances and Color Differences from Instrumentally Measured Color Coordinates.
- ASTM D3134: Practice for Establishing Color and Gloss Tolerances.
- ASTM E178: Practice for Dealing With Outlying Observations.
- ASTM E284: Terminology of Appearance.
- ASTM E308: Practice for Computing the Colors of Objects by Using the CIE System.
- ASTM E456: Terminology Relating to Quality and Statistics.
- SAE J 1545: Recommended Practice for Instrumental Color Difference Measurement for Exterior Finishes, Textiles, and Colored Trim.
By following ASTM E1345-98(2019), organizations can achieve higher confidence in their color measurement data, better ensure compliance with color tolerances, and maintain quality consistency across diverse applications. For optimal results, ASTM E1345 should be combined with related standards and best practices for color and statistical measurement.
Buy Documents
ASTM E1345-98(2019) - Standard Practice for Reducing the Effect of Variability of Color Measurement by Use of Multiple Measurements
Get Certified
Connect with accredited certification bodies for this standard

BSMI (Bureau of Standards, Metrology and Inspection)
Taiwan's standards and inspection authority.
Sponsored listings
Frequently Asked Questions
ASTM E1345-98(2019) is a standard published by ASTM International. Its full title is "Standard Practice for Reducing the Effect of Variability of Color Measurement by Use of Multiple Measurements". This standard covers: SIGNIFICANCE AND USE 5.1 This practice should be used whenever measured color-scale or color-difference-scale values are to be compared to an established tolerance. In this way it can be demonstrated quantitatively that the sampling and measurement procedures are adequate to allow an unambiguous decision as to whether or not the mean results are within tolerance. 5.2 This practice is based on portions of SAE J 1545, as it applies to painted or plastic automotive parts. It is generally applicable to object colors in various materials. Textured materials, such as textiles, may require special consideration (see SAE J 1545 and STP 15D Manual on Presentation of Data and Control Chart Analysis5). 5.3 While Practice E178 deals with outliers, it does not include definitions relating to the box and whisker technique. The definition of an outlier is operational and a little vague because there is still considerable disagreement about what constitutes an outlier. In any normally distributed population, there will be members that range from minus to plus infinity. Theoretically, one should include any member of the population in any sample based on estimates of the population parameters. Practically, including a member that is found far from the mean within a small sample, most members of which are found near the mean, will introduce a systematic bias into the estimate of the population parameters (mean, standard deviation, standard error). Such a bias is in direct contrast with the goal of this practice, namely, to reduce the effects of variability of measurement. For the purposes of this practice, no distinction is made between errors of sampling and members of the tails of the distribution. Practice E178 has several methods and significance tables to attempt to differentiate between these two types of extreme values. SCOPE 1.1 Reduction of the variability associated with average color or color-difference measurements of object-color specimens is achieved by statistical analysis of the results of multiple measurements on a single specimen, or by measurement of multiple specimens, whichever is appropriate. 1.2 This practice provides a means for the determination of the number of measurements required to reduce the variability to a predetermined fraction of the relevant color or color-difference tolerances. 1.3 This practice is general in scope rather than specific as to instrument or material. 1.4 This international standard was developed in accordance with internationally recognized principles on standardization established in the Decision on Principles for the Development of International Standards, Guides and Recommendations issued by the World Trade Organization Technical Barriers to Trade (TBT) Committee.
SIGNIFICANCE AND USE 5.1 This practice should be used whenever measured color-scale or color-difference-scale values are to be compared to an established tolerance. In this way it can be demonstrated quantitatively that the sampling and measurement procedures are adequate to allow an unambiguous decision as to whether or not the mean results are within tolerance. 5.2 This practice is based on portions of SAE J 1545, as it applies to painted or plastic automotive parts. It is generally applicable to object colors in various materials. Textured materials, such as textiles, may require special consideration (see SAE J 1545 and STP 15D Manual on Presentation of Data and Control Chart Analysis5). 5.3 While Practice E178 deals with outliers, it does not include definitions relating to the box and whisker technique. The definition of an outlier is operational and a little vague because there is still considerable disagreement about what constitutes an outlier. In any normally distributed population, there will be members that range from minus to plus infinity. Theoretically, one should include any member of the population in any sample based on estimates of the population parameters. Practically, including a member that is found far from the mean within a small sample, most members of which are found near the mean, will introduce a systematic bias into the estimate of the population parameters (mean, standard deviation, standard error). Such a bias is in direct contrast with the goal of this practice, namely, to reduce the effects of variability of measurement. For the purposes of this practice, no distinction is made between errors of sampling and members of the tails of the distribution. Practice E178 has several methods and significance tables to attempt to differentiate between these two types of extreme values. SCOPE 1.1 Reduction of the variability associated with average color or color-difference measurements of object-color specimens is achieved by statistical analysis of the results of multiple measurements on a single specimen, or by measurement of multiple specimens, whichever is appropriate. 1.2 This practice provides a means for the determination of the number of measurements required to reduce the variability to a predetermined fraction of the relevant color or color-difference tolerances. 1.3 This practice is general in scope rather than specific as to instrument or material. 1.4 This international standard was developed in accordance with internationally recognized principles on standardization established in the Decision on Principles for the Development of International Standards, Guides and Recommendations issued by the World Trade Organization Technical Barriers to Trade (TBT) Committee.
ASTM E1345-98(2019) is classified under the following ICS (International Classification for Standards) categories: 17.180.20 - Colours and measurement of light. The ICS classification helps identify the subject area and facilitates finding related standards.
ASTM E1345-98(2019) has the following relationships with other standards: It is inter standard links to ASTM E1345-98(2014), ASTM E456-13a(2022)e1, ASTM E456-13A(2017)e1, ASTM E456-13A(2017)e3, ASTM E308-17, ASTM E178-16, ASTM D2244-15a, ASTM E308-15, ASTM D2244-15e1, ASTM D3134-15, ASTM D2244-15, ASTM D2244-14, ASTM E456-13ae3, ASTM E456-13ae1, ASTM E456-13a. Understanding these relationships helps ensure you are using the most current and applicable version of the standard.
ASTM E1345-98(2019) is available in PDF format for immediate download after purchase. The document can be added to your cart and obtained through the secure checkout process. Digital delivery ensures instant access to the complete standard document.
Standards Content (Sample)
This international standard was developed in accordance with internationally recognized principles on standardization established in the Decision on Principles for the
Development of International Standards, Guides and Recommendations issued by the World Trade Organization Technical Barriers to Trade (TBT) Committee.
Designation: E1345 − 98 (Reapproved 2019)
Standard Practice for
Reducing the Effect of Variability of Color Measurement by
Use of Multiple Measurements
This standard is issued under the fixed designation E1345; the number immediately following the designation indicates the year of
original adoption or, in the case of revision, the year of last revision. A number in parentheses indicates the year of last reapproval. A
superscript epsilon (´) indicates an editorial change since the last revision or reapproval.
INTRODUCTION
Recent improvements in the precision and bias of color-measuring instruments have been
accompanied by more widespread use of numerical color tolerances based on instrumental measure-
ments. As tighter tolerances are specified, they begin to approach the limits of visual perception. In
many cases, the instrument user has found it difficult to prepare and measure specimens with adequate
repeatability. This practice provides procedures for reducing variability in the mean results of color
measurement by the use of multiple measurements, and it indicates how many measurements are
required for a specific reduction.
1. Scope D2244 Practice for Calculation of Color Tolerances and
Color Differences from Instrumentally Measured Color
1.1 Reduction of the variability associated with average
Coordinates
color or color-difference measurements of object-color speci-
D3134 Practice for Establishing Color and Gloss Tolerances
mens is achieved by statistical analysis of the results of
E178 Practice for Dealing With Outlying Observations
multiple measurements on a single specimen, or by measure-
E284 Terminology of Appearance
ment of multiple specimens, whichever is appropriate.
E308 PracticeforComputingtheColorsofObjectsbyUsing
1.2 This practice provides a means for the determination of
the CIE System
the number of measurements required to reduce the variability
E456 Terminology Relating to Quality and Statistics
to a predetermined fraction of the relevant color or color-
2.2 Other Standard:
difference tolerances.
SAE J 1545 Recommended Practice for Instrumental Color
1.3 This practice is general in scope rather than specific as Difference Measurement for Exterior Finishes, Textiles
to instrument or material. and Colored Trim
1.4 This international standard was developed in accor-
3. Terminology
dance with internationally recognized principles on standard-
3.1 DefinitionsofappearancetermsinTerminologyE284or
ization established in the Decision on Principles for the
statistical terms in Terminology E456 are applicable to this
Development of International Standards, Guides and Recom-
practice.
mendations issued by the World Trade Organization Technical
Barriers to Trade (TBT) Committee.
3.2 Definitions of Terms Specific to This Standard:
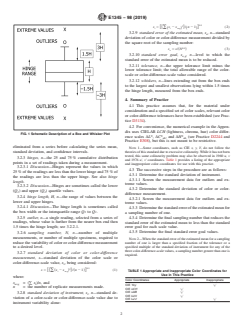
3.2.1 box and whisker plot, n—a nonparmetric data analysis
2. Referenced Documents
diagram that illustrates the 25, 50, and 75 % cumulative
distribution of values in a data set (the box) and the expected
2.1 ASTM Standards:
range of values, defined by distance outside the box ends; see
whiskers, see Fig. 1.
1 3.2.2 extreme value, n—a single reading, selected from a
This practice is under the jurisdiction of ASTM Committee E12 on Color and
Appearance and is the direct responsibility of Subcommittee E12.04 on Color and series of readings, whose value is farther from the nearer box
Appearance Analysis.
end than 3.0 times the hinge length.
Current edition approved May 1, 2019. Published May 2019. Originally
3.2.2.1 Discussion—A box and whiskers plot is normally
approved in 1990. Last previous edition approved in 2014 as E1345 – 98 (2014).
usedtofindoutliersandextremevalues.Suchvaluesshouldbe
DOI: 10.1520/E1345-98R19.
For referenced ASTM standards, visit the ASTM website, www.astm.org, or
contact ASTM Customer Service at service@astm.org. For Annual Book of ASTM
Standards volume information, refer to the standard’s Document Summary page on Available from Society of Automotive Engineers (SAE), 400 Commonwealth
the ASTM website. Dr., Warrendale, PA 15096-0001, http://www.sae.org.
Copyright ©ASTM International, 100 Barr Harbor Drive, PO Box C700, West Conshohocken, PA19428-2959. United States
E1345 − 98 (2019)
0.5
s 5 @$ ~x 2 x ! %/~n 2 1!# (2)
i ( i avg
3.2.9 standard error of the estimated mean, s,n—standard
e
deviation of color or color-difference measurement divided by
the square root of the sampling number:
0.5
s 5 s/~N ! (3)
e
3.2.10 standard error goal, s ,n—level to which the
e,g
standard error of the estimated mean is to be reduced.
3.2.11 tolerance, n—the upper tolerance limit minus the
lower tolerance limit; the total allowable range of the color-
scale or color-difference-scale value considered.
3.2.12 whiskers, n—lines extending out from the box ends
to the largest and smallest observations lying within 1.5 times
the hinge length, measured from the box ends.
4. Summary of Practice
4.1 This practice assumes that, for the material under
consideration and a specified set of color scales, relevant color
or color-difference tolerances have been established (see Prac-
tice D3134).
4.2 For convenience, the numerical example in the Appen-
dix uses CIELAB LCH (lightness, chroma, hue) color differ-
FIG. 1 Schematic Description of a Box and Whisker Plot
ence scales ∆L*, ∆C* , and ∆H* (see Practice D2244 and
ab ab
Practice E308), but this is not meant to be restrictive.
eliminated from a series before calculating the series mean,
NOTE 1—Some coordinates, such as CIE x, y, Y, do not follow the
standard deviation, and confidence intervals.
theoriesofthisstandardduetoexcessivecolinearity.Whileithasnotbeen
tested, this same colinearity problem may also be observed in 1960 u, v
3.2.3 hinges, n—the 25 and 75 % cumulative distribution
and 1976 u', v' coordinates. Table 1 provides a listing of the appropriate
points in a set of readings taken during a measurement.
and inappropriate color coordinates for use with this practice.
3.2.3.1 Discussion—Hinges represent the values in which
4.3 The successive steps in the procedure are as follows:
25 % of the readings are less than the lower hinge and 75 % of
4.3.1 Determine the standard deviation of instrument.
the readings are less than the upper hinge. See also hinge
4.3.1.1 Screen the measurement data for outliers and ex-
length.
treme values.
3.2.3.2 Discussion—Hinges are sometimes called the lower
4.3.2 Determine the standard deviation of color or color-
(Q ) and upper (Q ) quartile values.
1 1
difference measurement.
3.2.4 hinge length, H, n—the range of values between the
4.3.2.1 Screen the measurement data for outliers and ex-
lower and upper hinges.
treme values.
3.2.4.1 Discussion—The hinge length is sometimes called
4.3.3 Determinethestandarderroroftheestimatedmeanfor
the box width or the interquartile range Q to Q .
3 1
a sampling number of one.
3.2.5 outlier, n—a single reading, selected from a series of
4.3.4 Determine the final sampling number that reduces the
readings, whose value is further from the nearer box end then standard error of the estimated mean to less than the standard
1.5 times the hinge length; see 3.2.2.1.
error goal for each scale value.
4.3.5 Determine the final standard error goal values.
3.2.6 sampling number, N, n—number of multiple
measurements, or number of multiple specimens, required to
NOTE 2—When the standard error of the estimated mean for a sampling
reduce the variability of color or color-difference measurement
number of one is larger than a specified fraction of the tolerance or a
specified multiple of the standard deviation of instrument for any of the
to a desired level.
three color-difference-scale values, a sampling number greater than one is
3.2.7 standard deviation of color or color-difference
required.
measurement, s—standard deviation of the color scale or
color-difference-scale value, x, being considered:
i
0.5
s 5 @$ x 2 x %/ n 2 1 # (1)
~ ! ~ !
i avg TABLE 1 Appropriate and Inappropriate Color Coordinates for
(
Use in This Practice
where:
Color Coordinates Appropriate Inappropriate
x =(∑ x)/n, and
avg i
CIE Yxy =
n = the number of replicate measurements made.
CIE LCH =
CIE LAB =
3.2.8 standard deviation of instrument, s,n—standard de-
i
CIE LUV =
viation of a color-scale or color-difference-scale value due to
CIE Lu'v' =
instrument variability alone:
E1345 − 98 (2019)
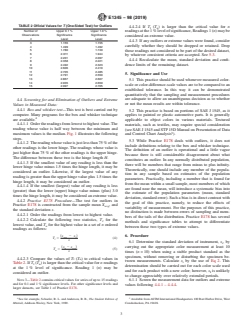
TABLE 2 Official Values for T (One-Sided Test) for Outliers
4.4.2.4 If T (T ) is larger than the critical value for n
l n
Number of Upper 0.1% Upper 1.0% readingsatthe1 %levelofsignificance,Readings1(n)maybe
Observations Significance Significance
considered an extreme value.
n Level Level
4.4.3 If any outliers or extreme values were found, consider
3 1.155 1.155
carefully whether they should be dropped or retained. Drop
4 1.499 1.492
5 1.780 1.749
those readings not considered to be part of the desired dataset,
6 2.011 1.944
by whatever consistent criteria are accepted. See 5.3.
7 2.201 2.097
4.4.4 Recalculate the mean, standard deviation and confi-
8 2.358 2.221
9 2.492 2.323 dence limits of the remaining dataset.
10 2.606 2.410
11 2.705 2.485
5. Significance and Use
12 2.791 2.550
13 2.867 2.607
5.1 This practice should be used whenever measured color-
14 2.935 2.659
scale or color-difference-scale values are to be compared to an
15 2.997 2.705
established tolerance. In this way it can be demonstrated
quantitatively that the sampling and measurement procedures
are adequate to allow an unambiguous decision as to whether
4.4 Screening for and Elimination of Outliers and Extreme
or not the mean results are within tolerance.
Values in Measured Data:
4.4.1 Box and whisker test—This test is best carried out by
5.2 This practice is based on portions of SAE J 1545, as it
computer. Many programs for the box and whisker technique
applies to painted or plastic automotive parts. It is generally
are available.
applicable to
...


Questions, Comments and Discussion
Ask us and Technical Secretary will try to provide an answer. You can facilitate discussion about the standard in here.
Loading comments...