ASTM E672-87(2019)e1
(Specification)Standard Specification for Disposable Glass Micropipets
Standard Specification for Disposable Glass Micropipets
ABSTRACT
This specification covers two different types of disposable glass micropipets, calibrated “to contain,” used in measuring microlitre volumes of liquids. The pipets made to these specifications shall be fabricated from borosilicate glass (Type I, Class A or B) or soda lime glass (Type II). Pipets shall be of one piece construction and shall meet the specified requirements for shape, dimensions, and capacity. The calibration line and identification markings such as color code marking are illustrated. The methods of reading and setting a liquid meniscus and a mercury meniscus are detailed. Capacity test shall be performed and calculation of micropipet volume shall be taken using the given formula.
SCOPE
1.1 This specification covers two different types of disposable micropipets, calibrated “to contain,” used in measuring microlitre volumes of liquids.
1.2 The values stated in SI units are to be regarded as the standard.
1.3 The following precautionary caveat pertains only to paragraph 9.1.1 of this specification. This standard does not purport to address all of the safety concerns, if any, associated with its use. It is the responsibility of the user of this standard to establish appropriate safety, health, and environmental practices and determine the applicability of regulatory limitations prior to use.
1.4 This international standard was developed in accordance with internationally recognized principles on standardization established in the Decision on Principles for the Development of International Standards, Guides and Recommendations issued by the World Trade Organization Technical Barriers to Trade (TBT) Committee.
General Information
- Status
- Published
- Publication Date
- 30-Nov-2011
- Technical Committee
- E41 - Laboratory Apparatus
- Drafting Committee
- E41.01 - Laboratory Ware and Supplies
Relations
- Effective Date
- 01-Dec-2011
- Effective Date
- 01-Feb-2024
- Effective Date
- 01-Jan-2018
- Effective Date
- 01-Dec-2011
- Effective Date
- 01-Nov-2006
- Effective Date
- 15-Aug-1993
- Effective Date
- 15-Aug-1993
Overview
ASTM E672-87(2019)e1: Standard Specification for Disposable Glass Micropipets establishes requirements for two types of disposable glass micropipets, designed for measuring microlitre volumes of liquids with high precision. These micropipets are calibrated "to contain" a specified volume and are intended for single-use in laboratory environments. The standard details fabrication from borosilicate glass (Type I, Class A or B) or soda lime glass (Type II), as well as requirements for dimensions, accuracy, labeling, and testing procedures.
Adherence to ASTM E672 ensures consistency, reliability, and traceability in laboratory measurements involving micro-volumes, supporting critical operations in medical, pharmaceutical, research, and industrial laboratories.
Key Topics
- Types of Micropipets
- Type I: Features calibration and color-coded markings for identification.
- Type II: Lacks markings; capacity is identified only on packaging.
- Material Specifications
- Borosilicate glass (Type I, Class A or B) provides chemical resistance and thermal stability.
- Soda lime glass (Type II) offers cost-effective alternatives.
- Design and Dimensional Criteria
- One-piece construction to reduce contamination risk.
- Strict limits on volumetric accuracy and allowable variations ensure measurement confidence.
- Calibration and Markings
- Calibration lines and color coding (per ISO R-1769) for quick visual identification of capacity.
- Clear instructions for setting and reading the meniscus (liquid or mercury) to maximize reproducibility.
- Testing and Quality Assurance
- Defined test methods for verifying pipet accuracy and coefficient of variation.
- Capacity determination at 20°C, with clear calculations for adjusting observed volume.
Applications
- Clinical Diagnostics
- Accurate handling of blood, serum, or reagent micro-volumes in medical labs.
- Pharmaceutical Research
- Essential for precise compounding and quality control processes requiring trace-amount measurements.
- Biological and Chemical Research
- Supports microscale assays, sample preparation, and experimental replicability.
- Quality Assurance and Manufacturing
- Used in production settings where stringent liquid handling and volume control are vital for product consistency.
Using ASTM E672-compliant disposable glass micropipets minimizes cross-contamination, provides traceable measurement accuracy, and streamlines identification and workflow in high-throughput settings.
Related Standards
- ASTM E438 – Specification for Glasses in Laboratory Apparatus
- Specifies material requirements for laboratory glassware, ensuring chemical and thermal durability.
- ISO R-1769 – Color Coding for Pipets
- Governs color coding used for micropipet capacity identification.
- Other Relevant ASTM Standards
- Various ASTM standards for laboratory equipment, calibration, and volumetric measurement support comprehensive laboratory quality systems.
Keywords: ASTM E672, disposable glass micropipets, laboratory pipets, micro-volume measurement, borosilicate glass pipets, medical laboratory standards, color-coded micropipets, calibrated pipets, single-use labware.
By following ASTM E672-87(2019)e1, laboratories ensure accuracy, reproducibility, and compliance with international best practices for micro-volume liquid measurement using disposable glass micropipets.
Buy Documents
ASTM E672-87(2019)e1 - Standard Specification for Disposable Glass Micropipets
Get Certified
Connect with accredited certification bodies for this standard

ECOCERT
Organic and sustainability certification.

Eurofins Food Testing Global
Global leader in food, environment, and pharmaceutical product testing.

Intertek Bangladesh
Intertek certification and testing services in Bangladesh.
Sponsored listings
Frequently Asked Questions
ASTM E672-87(2019)e1 is a technical specification published by ASTM International. Its full title is "Standard Specification for Disposable Glass Micropipets". This standard covers: ABSTRACT This specification covers two different types of disposable glass micropipets, calibrated “to contain,” used in measuring microlitre volumes of liquids. The pipets made to these specifications shall be fabricated from borosilicate glass (Type I, Class A or B) or soda lime glass (Type II). Pipets shall be of one piece construction and shall meet the specified requirements for shape, dimensions, and capacity. The calibration line and identification markings such as color code marking are illustrated. The methods of reading and setting a liquid meniscus and a mercury meniscus are detailed. Capacity test shall be performed and calculation of micropipet volume shall be taken using the given formula. SCOPE 1.1 This specification covers two different types of disposable micropipets, calibrated “to contain,” used in measuring microlitre volumes of liquids. 1.2 The values stated in SI units are to be regarded as the standard. 1.3 The following precautionary caveat pertains only to paragraph 9.1.1 of this specification. This standard does not purport to address all of the safety concerns, if any, associated with its use. It is the responsibility of the user of this standard to establish appropriate safety, health, and environmental practices and determine the applicability of regulatory limitations prior to use. 1.4 This international standard was developed in accordance with internationally recognized principles on standardization established in the Decision on Principles for the Development of International Standards, Guides and Recommendations issued by the World Trade Organization Technical Barriers to Trade (TBT) Committee.
ABSTRACT This specification covers two different types of disposable glass micropipets, calibrated “to contain,” used in measuring microlitre volumes of liquids. The pipets made to these specifications shall be fabricated from borosilicate glass (Type I, Class A or B) or soda lime glass (Type II). Pipets shall be of one piece construction and shall meet the specified requirements for shape, dimensions, and capacity. The calibration line and identification markings such as color code marking are illustrated. The methods of reading and setting a liquid meniscus and a mercury meniscus are detailed. Capacity test shall be performed and calculation of micropipet volume shall be taken using the given formula. SCOPE 1.1 This specification covers two different types of disposable micropipets, calibrated “to contain,” used in measuring microlitre volumes of liquids. 1.2 The values stated in SI units are to be regarded as the standard. 1.3 The following precautionary caveat pertains only to paragraph 9.1.1 of this specification. This standard does not purport to address all of the safety concerns, if any, associated with its use. It is the responsibility of the user of this standard to establish appropriate safety, health, and environmental practices and determine the applicability of regulatory limitations prior to use. 1.4 This international standard was developed in accordance with internationally recognized principles on standardization established in the Decision on Principles for the Development of International Standards, Guides and Recommendations issued by the World Trade Organization Technical Barriers to Trade (TBT) Committee.
ASTM E672-87(2019)e1 is classified under the following ICS (International Classification for Standards) categories: 71.040.20 - Laboratory ware and related apparatus. The ICS classification helps identify the subject area and facilitates finding related standards.
ASTM E672-87(2019)e1 has the following relationships with other standards: It is inter standard links to ASTM E672-87(2011), ASTM E438-92(2024), ASTM E438-92(2018), ASTM E438-92(2011), ASTM E438-92(2006), ASTM E438-92(1996), ASTM E438-92(2001)e1. Understanding these relationships helps ensure you are using the most current and applicable version of the standard.
ASTM E672-87(2019)e1 is available in PDF format for immediate download after purchase. The document can be added to your cart and obtained through the secure checkout process. Digital delivery ensures instant access to the complete standard document.
Standards Content (Sample)
This international standard was developed in accordance with internationally recognized principles on standardization established in the Decision on Principles for the
Development of International Standards, Guides and Recommendations issued by the World Trade Organization Technical Barriers to Trade (TBT) Committee.
ϵ1
Designation:E672 −87 (Reapproved 2019)
Standard Specification for
Disposable Glass Micropipets
This standard is issued under the fixed designation E672; the number immediately following the designation indicates the year of
original adoption or, in the case of revision, the year of last revision. A number in parentheses indicates the year of last reapproval. A
superscript epsilon (´) indicates an editorial change since the last revision or reapproval.
ε NOTE—Text in 6.2.2, 9.1.2,and 9.2 was corrected editorially in February 2019.
1. Scope test procedure specified in 9.4.1. It is quantified by the
inaccuracy of the mean (bias).
1.1 This specification covers two different types of dispos-
able micropipets, calibrated “to contain,” used in measuring 3.1.2 disposable micropipet—such micropipets will only be
microlitre volumes of liquids.
expected to provide their specified performance during their
original use or operation.
1.2 The values stated in SI units are to be regarded as the
standard.
NOTE 1—The descriptions of “accuracy” and “repeatability” apply only
in cases where the distributions are Gaussian.
1.3 The following precautionary caveat pertains only to
paragraph 9.1.1 of this specification. This standard does not
3.1.3 repeatability—the closeness of agreement between the
purport to address all of the safety concerns, if any, associated
individual volumes obtained by applying the test procedure
with its use. It is the responsibility of the user of this standard
specified in 9.4.2. It is quantified by the imprecision.
to establish appropriate safety, health, and environmental
practices and determine the applicability of regulatory limita-
4. Classification
tions prior to use.
4.1 This specification covers two different pipet designs as
1.4 This international standard was developed in accor-
follows:
dance with internationally recognized principles on standard-
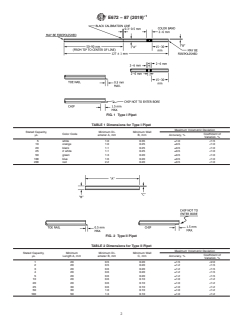
4.1.1 Type I—Disposable micropipets with calibration line
ization established in the Decision on Principles for the
and color coding (see Fig. 1 and Table 1).
Development of International Standards, Guides and Recom-
4.1.2 Type II—Disposable micropipets void of markings
mendations issued by the World Trade Organization Technical
(see Fig. 2 and Table 2).
Barriers to Trade (TBT) Committee.
NOTE 2—Type I pipets were originally specified by the Department of
2. Referenced Documents
Defense under MIL-P-36722.
2.1 ASTM Standards:
E438 Specification for Glasses in Laboratory Apparatus 5. Materials and Manufacture
2.2 ISO Standard:
5.1 The pipets made to these specifications shall be fabri-
R-1769 Color Coding for Pipets
cated from borosilicate glass,Type I, ClassAor B or soda lime
glass, Type II, in accordance with Specification E438.
3. Terminology
3.1 Definitions of Terms Specific to This Standard:
6. Dimensions and Permissible Variations
3.1.1 accuracy—the closeness of agreement between the
6.1 Design—Pipets shall be of one piece construction in
nominal value and the mean volume, obtained by applying the
accordance with Table 1 and Table 2 for shape, dimensions,
and permissible variations. Any cross-section of the pipet,
This specification is under the jurisdiction of ASTM Committee E41 on
taken in a plane perpendicular to the longitudinal axis, shall be
Laboratory Apparatus and is the direct responsibility of Subcommittee E41.01 on
circular.
Laboratory Ware and Supplies.
Current edition approved Jan. 1, 2019. Published February 2019. Originally
6.2 Capacity—The pipet capacity shall be stated on the
approvedin1978.Lastpreviouseditionapprovedin2011asE672 – 87(2011).DOI:
packagelabel,expressedasµL(microlitre);thisshallbeknown
10.1520/E0672-87R19E01.
as the stated capacity, V , in making subsequent calculations.
For referenced ASTM standards, visit the ASTM website, www.astm.org, or
contact ASTM Customer Service at service@astm.org. For Annual Book of ASTM
The expected deviation from the stated capacity shall be
Standards volume information, refer to the standard’s Document Summary page on
expressed as accuracy and coefficient of variation and shall be
the ASTM website.
tested for capacity as specified in 9.1. The unit, microlitre, µL,
Available from American National Standards Institute (ANSI), 25 W. 43rd St.,
4th Floor, New York, NY 10036, http://www.ansi.org. may be considered as equivalent to 0.001 cm .
Copyright © ASTM International, 100 Barr Harbor Drive, PO Box C700, West Conshohocken, PA 19428-2959. United States
ϵ1
E672−87 (2019)
FIG. 1 Type I Pipet
TABLE 1 Dimensions for Type I Pipet
Maximum Volumetric Deviation
Stated Capacity, Minimum Di- Minimum Wall
Color Code Coefficient of
µL ameter A, mm B, mm Accuracy, %
Variation, %
5 white 1.0 0.35 ±1.0 <1.5
10 orange 1.0 0.25 ±0.5 <1.0
20 black 1.1 0.25 ±0.5 <1.0
25 2 white 1.1 0.25 ±0.5 <1.0
50 green 1.3 0.20 ±0.5 <1.0
100 blue 1.6 0.20 ±0.5 <1.0
200 red 2.2 0.20 ±0.5 <1.0
FIG. 2 Type II Pipet
TABLE 2 Dimensions for Type II Pipet
Maximum Volumetric Deviation
Stated Capacity, Minimum Minimum Di- Minimum Wall
Coefficient of
µL Length A, mm ameter B, mm C, mm Accuracy, %
Variation, %
1 20 0.5 0.20 ±1.5 <2.0
2 20 0.5 0.20 ±1.2 <1.5
3 20 0.6 0.20 ±1.2 <1.5
4 20 0.6 0.20 ±1.2 <1.5
5 20 0.6 0.20 ±1.2 <1.5
10 20 0.6 0.10 ±1.0 <1.2
20 20 0.6 0.10 ±1.0 <1.2
25 30 0.6 0.10 ±1.0 <1.2
50 30 1.0 0.10 ±1.0 <1.2
100 50 1.3 0.10 ±1.0 <1.2
ϵ1
E672−87 (2019)
6.2.1 Accuracy (see 4.1)—The accuracy shall be determined of the meniscus is obtained by making the setting in the center
as specified in 9.4 and shall be within the limits given in Table oftheellipseformedbythegraduationlineonthefrontandthe
1 and Table 2. back of the tube as observed by having the eye slightly below
6.2.2 Coeffıcient of Variation (see 9.4.2)—The coefficient of the plane of the graduation line. The setting is accurate if, as
variation shall be determined as specified in 9.4 and shall be the eye is raised and the ellipse narrows, the lowest point of the
within the limits given in Table 1 and Table 2. meniscus remains midway between the front and rear portions
of the graduation line. By this method it is possible to observe
6.3 Capacity Mark—Pipets in Fig. 1 shall have a capacity
the approach of the meniscus from either above or below the
line that is calibrated “to contain” a volume of liquid at 20 °C.
line to its proper setting.
The capacity line shall be 0.3 to 0.5 mm wide and shall
completely encircle the pipet in a plane perpendicular to its 8.2 Reading a Mercury Meniscus (Type I only)—For all
longitudinal axis. pipets,thereadingismadeatthehighestpointofthemeniscus.
In order that the highest point may be observed, it is necessary
6.4 Identification Markings:
to place a shade of some light material immediately above and
6.4.1 Type I—The pipets in Fig. 1 shall be identified for
behind the meniscus, which renders the profile of the meniscus
capacity by a color code marking on each pipet consisting of
dark and clearly visible against a light background.
one or two color bands (see Table 1). For a code consisting of
8.2.1 Setting a Mercury Meniscus—Setting of the meniscus
one band, the band shall be from 2 to 6 mm wide; for a code
shall be performed by one of the following methods.Wherever
consistingoftwobands,eachbandshallbe2to6mmwideand
practical, the meniscus should descend to the position of
separated with a space of 2 to 6 mm. The color code band, or
setting.
bands, shall completely encircle the pipet in a plane perpen-
8.2.1.1 Method A—The position of the highest point of the
dicular to its longitudinal axis. The location of color band, or
meniscus with reference to the graduation line is horizontally
bands, shall be as specified in Fig. 1 with the selection of color,
tangent to the plane of the lower edge of the graduation line.
to designate capacity, according to ISO Recommendation
The position of the meniscus is obtained by having the eye in
R-1769.
the same plane of the lower edge of the graduation line.
6.4.2 Type II—Pipets in Fig. 2 are devoid of any markings
8.2.1.2 Method B—The position of the highest point of the
and shall be identified for capacity on the package label.
meniscus with reference to the graduation line is such that it is
7. Workmanship, Finish, and Appearance
in the plane of the middle of the graduation line. This position
of the meniscus is obtained by making the setting in the center
7.1 The
...


Questions, Comments and Discussion
Ask us and Technical Secretary will try to provide an answer. You can facilitate discussion about the standard in here.
Loading comments...