ASTM D1621-16(2023)
(Test Method)Standard Test Method for Compressive Properties of Rigid Cellular Plastics
Standard Test Method for Compressive Properties of Rigid Cellular Plastics
SIGNIFICANCE AND USE
4.1 This test method provides information regarding the behavior of cellular materials under compressive loads. Test data is obtained, and from a complete load-deformation curve it is possible to compute the compressive stress at any load (such as compressive stress at proportional-limit load or compressive strength at maximum load) and to compute the effective modulus of elasticity.
4.2 Compression tests provide a standard method of obtaining data for research and development, quality control, acceptance or rejection under specifications, and special purposes. The tests cannot be considered significant for engineering design in applications differing widely from the load - time scale of the standard test. Such applications require additional tests such as impact, creep, and fatigue.
4.3 Before proceeding with this test method, reference shall be made to the specification of the material being tested. Any test specimen preparation, conditioning, dimensions, or testing parameters, or a combination thereof, covered in the materials specification shall take precedence over those mentioned in this test method. If there are no material specifications, then the default conditions apply.
SCOPE
1.1 This test method describes a procedure for determining the compressive properties of rigid cellular materials, particularly expanded plastics.
1.2 The values stated in SI units are to be regarded as the standard. The values in parentheses are for information only.
1.3 This standard does not purport to address all of the safety concerns, if any, associated with its use. It is the responsibility of the user of this standard to establish appropriate safety, health, and environmental practices and determine the applicability of regulatory limitations prior to use.
Note 1: This test method and ISO 844 are technically equivalent.
1.4 This international standard was developed in accordance with internationally recognized principles on standardization established in the Decision on Principles for the Development of International Standards, Guides and Recommendations issued by the World Trade Organization Technical Barriers to Trade (TBT) Committee.
General Information
- Status
- Published
- Publication Date
- 30-Apr-2023
- Technical Committee
- D20 - Plastics
- Drafting Committee
- D20.22 - Cellular Materials - Plastics and Elastomers
Relations
- Effective Date
- 01-Jun-2014
- Effective Date
- 01-May-2013
- Effective Date
- 01-Nov-2011
- Effective Date
- 01-Jun-2010
- Effective Date
- 01-Jun-2010
- Effective Date
- 01-Jan-2010
- Effective Date
- 01-Nov-2009
- Effective Date
- 01-Apr-2009
- Effective Date
- 01-Dec-2008
- Effective Date
- 01-Nov-2008
- Effective Date
- 01-Oct-2008
- Effective Date
- 01-Jan-2007
- Effective Date
- 01-May-2006
- Effective Date
- 01-Nov-2005
- Effective Date
- 01-Nov-2005
Overview
ASTM D1621-16(2023) is the internationally recognized standard test method for determining the compressive properties of rigid cellular plastics, including expanded plastics. Developed by ASTM International, this method specifies a detailed procedure for obtaining critical data such as compressive strength, compressive stress at various loads, and the modulus of elasticity for cellular plastic materials. The results from this standard are essential for research, product development, and quality assurance in industries where rigid cellular plastics are commonly used.
Key Topics
- Compressive Properties: The standard outlines how to determine compressive stress, compressive strength, compressive deformation and strain, and modulus of elasticity for rigid cellular plastics.
- Test Procedure: It includes specimen preparation, conditioning, measurement of specimen dimensions, and step-by-step instructions for properly conducting compression tests.
- Significance and Limitations: Results provide crucial data for research, development, quality control, and specification compliance. However, this test is not wholly predictive of performance in end-use applications where the load-time conditions differ significantly; additional testing such as impact or fatigue may be required.
- Data Reporting: A full load-deformation curve is obtained, which allows users to compute compressive stress at any specified load and calculate material moduli.
- Compliance and Safety: The standard emphasizes reference to material specifications and adherence to appropriate safety, health, and environmental practices.
Applications
The compressive testing procedures defined in ASTM D1621-16(2023) are widely applied in multiple sectors, including:
- Construction and Building Materials: Verifying the strength and stiffness of insulation boards, foam panels, and structural core materials.
- Automotive and Aerospace: Evaluating lightweight cellular plastics used in energy-absorbing applications and structural components.
- Packaging: Ensuring foam packaging meets requirements for load-bearing and cushioning.
- Research and Development: Supporting material development by providing standardized compressive property data for new formulations or product iterations.
- Quality Control: Routine testing during manufacturing to ensure consistency with material specifications and compliance with contracted requirements.
- Regulatory and Certification: Documentation for product certification, specification acceptance, or rejection based on quantitative compressive property measurements.
Related Standards
Several other standards complement or are referenced by ASTM D1621-16(2023):
- ISO 844 - The international standard for compression testing of rigid cellular plastics, technically equivalent to ASTM D1621.
- ASTM D618 - Standard Practice for Conditioning Plastics for Testing, ensuring consistent specimen preparation and conditioning.
- ASTM E4 - Standard Practices for Force Calibration and Verification of Testing Machines, for precise load measurement.
- ASTM E83 - Standard Practice for Verification and Classification of Extensometer Systems, relevant for compliance correction and strain measurements.
- ASTM E691 - Guide for Conducting Interlaboratory Studies to Determine the Precision of a Test Method, supporting quality and reproducibility assurance.
Practical Value
Adhering to ASTM D1621-16(2023) ensures that the compressive properties of rigid cellular plastics are measured in a consistent, reproducible, and internationally recognized manner. This standard helps material manufacturers, product designers, quality assurance professionals, and testing laboratories to:
- Meet Market and Regulatory Requirements: Provides a reliable basis for compliance with contractual, governmental, and industry standard requirements.
- Improve Product Performance: Identifies material behaviors under load, supporting informed material selection and product innovation.
- Ensure Consistency and Reliability: Facilitates benchmarking and quality monitoring across production lots and suppliers.
For organizations involved in the manufacture, selection, or use of rigid cellular plastics, ASTM D1621-16(2023) is an essential reference for compressive property testing and reporting.
Buy Documents
ASTM D1621-16(2023) - Standard Test Method for Compressive Properties of Rigid Cellular Plastics
Get Certified
Connect with accredited certification bodies for this standard

Smithers Quality Assessments
US management systems and product certification.

DIN CERTCO
DIN Group product certification.
Sponsored listings
Frequently Asked Questions
ASTM D1621-16(2023) is a standard published by ASTM International. Its full title is "Standard Test Method for Compressive Properties of Rigid Cellular Plastics". This standard covers: SIGNIFICANCE AND USE 4.1 This test method provides information regarding the behavior of cellular materials under compressive loads. Test data is obtained, and from a complete load-deformation curve it is possible to compute the compressive stress at any load (such as compressive stress at proportional-limit load or compressive strength at maximum load) and to compute the effective modulus of elasticity. 4.2 Compression tests provide a standard method of obtaining data for research and development, quality control, acceptance or rejection under specifications, and special purposes. The tests cannot be considered significant for engineering design in applications differing widely from the load - time scale of the standard test. Such applications require additional tests such as impact, creep, and fatigue. 4.3 Before proceeding with this test method, reference shall be made to the specification of the material being tested. Any test specimen preparation, conditioning, dimensions, or testing parameters, or a combination thereof, covered in the materials specification shall take precedence over those mentioned in this test method. If there are no material specifications, then the default conditions apply. SCOPE 1.1 This test method describes a procedure for determining the compressive properties of rigid cellular materials, particularly expanded plastics. 1.2 The values stated in SI units are to be regarded as the standard. The values in parentheses are for information only. 1.3 This standard does not purport to address all of the safety concerns, if any, associated with its use. It is the responsibility of the user of this standard to establish appropriate safety, health, and environmental practices and determine the applicability of regulatory limitations prior to use. Note 1: This test method and ISO 844 are technically equivalent. 1.4 This international standard was developed in accordance with internationally recognized principles on standardization established in the Decision on Principles for the Development of International Standards, Guides and Recommendations issued by the World Trade Organization Technical Barriers to Trade (TBT) Committee.
SIGNIFICANCE AND USE 4.1 This test method provides information regarding the behavior of cellular materials under compressive loads. Test data is obtained, and from a complete load-deformation curve it is possible to compute the compressive stress at any load (such as compressive stress at proportional-limit load or compressive strength at maximum load) and to compute the effective modulus of elasticity. 4.2 Compression tests provide a standard method of obtaining data for research and development, quality control, acceptance or rejection under specifications, and special purposes. The tests cannot be considered significant for engineering design in applications differing widely from the load - time scale of the standard test. Such applications require additional tests such as impact, creep, and fatigue. 4.3 Before proceeding with this test method, reference shall be made to the specification of the material being tested. Any test specimen preparation, conditioning, dimensions, or testing parameters, or a combination thereof, covered in the materials specification shall take precedence over those mentioned in this test method. If there are no material specifications, then the default conditions apply. SCOPE 1.1 This test method describes a procedure for determining the compressive properties of rigid cellular materials, particularly expanded plastics. 1.2 The values stated in SI units are to be regarded as the standard. The values in parentheses are for information only. 1.3 This standard does not purport to address all of the safety concerns, if any, associated with its use. It is the responsibility of the user of this standard to establish appropriate safety, health, and environmental practices and determine the applicability of regulatory limitations prior to use. Note 1: This test method and ISO 844 are technically equivalent. 1.4 This international standard was developed in accordance with internationally recognized principles on standardization established in the Decision on Principles for the Development of International Standards, Guides and Recommendations issued by the World Trade Organization Technical Barriers to Trade (TBT) Committee.
ASTM D1621-16(2023) is classified under the following ICS (International Classification for Standards) categories: 83.100 - Cellular materials. The ICS classification helps identify the subject area and facilitates finding related standards.
ASTM D1621-16(2023) has the following relationships with other standards: It is inter standard links to ASTM E4-14, ASTM E691-13, ASTM E691-11, ASTM E4-10, ASTM E83-10a, ASTM E83-10, ASTM E4-09a, ASTM E4-09, ASTM E4-08, ASTM D618-08, ASTM E691-08, ASTM E4-07, ASTM E83-06, ASTM E691-05, ASTM D618-05. Understanding these relationships helps ensure you are using the most current and applicable version of the standard.
ASTM D1621-16(2023) is available in PDF format for immediate download after purchase. The document can be added to your cart and obtained through the secure checkout process. Digital delivery ensures instant access to the complete standard document.
Standards Content (Sample)
This international standard was developed in accordance with internationally recognized principles on standardization established in the Decision on Principles for the
Development of International Standards, Guides and Recommendations issued by the World Trade Organization Technical Barriers to Trade (TBT) Committee.
Designation: D1621 − 16 (Reapproved 2023)
Standard Test Method for
Compressive Properties of Rigid Cellular Plastics
This standard is issued under the fixed designation D1621; the number immediately following the designation indicates the year of
original adoption or, in the case of revision, the year of last revision. A number in parentheses indicates the year of last reapproval. A
superscript epsilon (´) indicates an editorial change since the last revision or reapproval.
This standard has been approved for use by agencies of the U.S. Department of Defense.
1. Scope 2.2 ISO Standard:
ISO 844 Cellular Plastics—Compression Test of Rigid Ma-
1.1 This test method describes a procedure for determining
terials
the compressive properties of rigid cellular materials, particu-
larly expanded plastics.
3. Terminology
1.2 The values stated in SI units are to be regarded as the
3.1 Definitions:
standard. The values in parentheses are for information only.
3.1.1 compliance—the displacement difference between test
1.3 This standard does not purport to address all of the
machine drive system displacement values and actual specimen
safety concerns, if any, associated with its use. It is the
displacement.
responsibility of the user of this standard to establish appro-
3.1.2 compliance correction—an analytical method of
priate safety, health, and environmental practices and deter-
modifying test instrument displacement values to eliminate the
mine the applicability of regulatory limitations prior to use.
amount of that measurement attributed to test instrument
compliance.
NOTE 1—This test method and ISO 844 are technically equivalent.
1.4 This international standard was developed in accor- 3.1.3 compressive deformation—the decrease in length pro-
dance with internationally recognized principles on standard- duced in the gage length of the test specimen by a compressive
ization established in the Decision on Principles for the load expressed in units of length.
Development of International Standards, Guides and Recom-
3.1.4 compressive strain—the dimensionless ratio of com-
mendations issued by the World Trade Organization Technical
pressive deformation to the gage length of the test specimen or
Barriers to Trade (TBT) Committee.
the change in length per unit of original length along the
longitudinal axis.
2. Referenced Documents
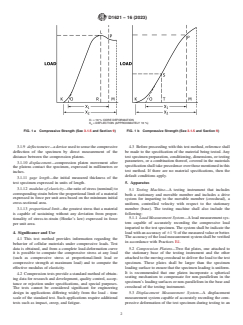
3.1.5 compressive strength—the stress at the yield point if a
2.1 ASTM Standards:
yield point occurs before 10 % deformation (as in Fig. 1a) or,
D618 Practice for Conditioning Plastics for Testing
in the absence of such a yield point, the stress at 10 %
E4 Practices for Force Calibration and Verification of Test-
deformation (as in Fig. 1b).
ing Machines
3.1.6 compressive stress (nominal)—the compressive load
E83 Practice for Verification and Classification of Exten-
per unit area of minimum original cross section within the gage
someter Systems
boundaries, carried by the test specimen at any given moment,
E691 Practice for Conducting an Interlaboratory Study to
expressed in force per unit area.
Determine the Precision of a Test Method
3.1.7 compressive stress-strain diagram—a diagram in
which values of compressive stress are plotted as ordinates
against corresponding values of compressive strain as abscis-
This test method is under the jurisdiction of ASTM Committee D20 on Plastics
sas.
and is the direct responsibility of Subcommittee D20.22 on Cellular Materials -
Plastics and Elastomers.
3.1.8 compressive yield point—the first point on the stress-
Current edition approved May 1, 2023. Published May 2023. Originally
strain diagram at which an increase in strain occurs without an
approved in 1959. Last previous edition approved in 2016 as D1621 - 16. DOI:
10.1520/D1621-16R23. increase in stress.
For referenced ASTM standards, visit the ASTM website, www.astm.org, or
contact ASTM Customer Service at service@astm.org. For Annual Book of ASTM
Standards volume information, refer to the standard’s Document Summary page on Available from American National Standards Institute (ANSI), 25 W. 43rd St.,
the ASTM website. 4th Floor, New York, NY 10036, http://www.ansi.org.
*A Summary of Changes section appears at the end of this standard
Copyright © ASTM International, 100 Barr Harbor Drive, PO Box C700, West Conshohocken, PA 19428-2959. United States
D1621 − 16 (2023)
X = 10 % CORE DEFORMATION
X = DEFLECTION (APPROXIMATELY 13 %)
FIG. 1 a Compressive Strength (See 3.1.5 and Section 9) FIG. 1 b Compressive Strength (See 3.1.5 and Section 9)
3.1.9 deflectometer—a device used to sense the compressive 4.3 Before proceeding with this test method, reference shall
deflection of the specimen by direct measurement of the be made to the specification of the material being tested. Any
distance between the compression platens. test specimen preparation, conditioning, dimensions, or testing
parameters, or a combination thereof, covered in the materials
3.1.10 displacement—compression platen movement after
specification shall take precedence over those mentioned in this
the platens contact the specimen, expressed in millimetres or
test method. If there are no material specifications, then the
inches.
default conditions apply.
3.1.11 gage length—the initial measured thickness of the
test specimen expressed in units of length.
5. Apparatus
3.1.12 modulus of elasticity—the ratio of stress (nominal) to
5.1 Testing Machine—A testing instrument that includes
corresponding strain below the proportional limit of a material
both a stationary and movable member and includes a drive
expressed in force per unit area based on the minimum initial
system for imparting to the movable member (crosshead), a
cross-sectional area.
uniform, controlled velocity with respect to the stationary
member (base). The testing machine shall also include the
3.1.13 proportional limit—the greatest stress that a material
following:
is capable of sustaining without any deviation from propor-
5.1.1 Load Measurement System—A load measurement sys-
tionality of stress-to-strain (Hooke’s law) expressed in force
tem capable of accurately recording the compressive load
per unit area.
imparted to the test specimen. The system shall be indicate the
4. Significance and Use
load with an accuracy of 61 % of the measured value or better.
The accuracy of the load measurement system shall be verified
4.1 This test method provides information regarding the
in accordance with Practices E4.
behavior of cellular materials under compressive loads. Test
data is obtained, and from a complete load-deformation curve 5.2 Compression Platens—Two flat plates, one attached to
it is possible to compute the compressive stress at any load the stationary base of the testing instrument and the other
(such as compressive stress at proportional-limit load or attached to the moving crosshead to deliver the load to the test
compressive strength at maximum load) and to compute the specimen. These plates shall be larger than the specimen
effective modulus of elasticity. loading surface to ensure that the specimen loading is uniform.
It is recommended that one platen incorporate a spherical
4.2 Compression tests provide a standard method of obtain-
seating mechanism to compensate for non-parallelism in the
ing data for research and development, quality control, accep-
specimen’s loading surfaces or non-parallelism in the base and
tance or rejection under specifications, and special purposes.
crosshead of the testing instrument.
The tests cannot be considered significant for engineering
design in applications differing widely from the load - time 5.3 Displacement Measurement System—A displacement
scale of the standard test. Such applications require additional measurement system capable of accurately recording the com-
tests such as impact, creep, and fatigue. pressive deformation of the test specimen during testing to an
D1621 − 16 (2023)
accuracy of 61 % of the measured value or better. This the loaded ends of the specimen are parallel to each other and
measurement is made through use of the test machine cross- perpendicular to the sides.
head drive system or using a direct measurement of compres-
NOTE 2—Cellular plastics are not ideal materials, and the compressive
sion platen displacement.
modulus may appear significantly different, depending on the test
5.3.1 Direct Compression Platen Displacement—This sys-
conditions, particularly the test thickness. All data that are to be compared
should be obtained using common test conditions.
tem shall employ a deflectometer that directly reads the distant
between the upper and lower compression platens. The accu-
6.2 All surfaces of the specimen shall be free from large
racy of the displacement measurement transducer shall be
visible flaws or imperfections.
verified in accordance with Practices E83 and shall be classi-
6.3 If the material is suspected to be anisotropic, the
fied as a Class C or better.
direction of the compressive loading must be specified relative
5.3.2 Test Machine Crosshead Drive System—This system
to the suspected direction of anisotropy.
shall employ the position output from the crosshead drive
6.4 A minimum of five specimens shall be tested for each
system as a indicator of compression platen displacement. This
sample. Specimens that fail at some obvious flaw should be
method is only appropriate when it is demonstrated that the
discarded and retests made, unless such flaws constitute a
effects of drive system compliance result in displacement
variable the effect of which it is desired to study.
errors of less than 1 % of the measurement or if appropriate
compliance correction methods are employed to reduce the
7. Conditioning
measurement error to less than 1 %.
7.1 Conditioning—Condition the test specimens at 23 6
5.3.2.1 Determining Drive System Compliance—Testing in-
2°C (73.4 6 3.6°F) and 50 6 10 % relative humidity for not
strument drive systems always exhibit a certain level of
less than 40 h prior to test in accordance with Procedure A of
compliance that is characterized by a variance between the
Practice D618, unless otherwise specified in the contract or
reported crosshead displaceme
...


Questions, Comments and Discussion
Ask us and Technical Secretary will try to provide an answer. You can facilitate discussion about the standard in here.
Loading comments...