ASTM A716-18(2022)
(Specification)Standard Specification for Ductile Iron Culvert Pipe
Standard Specification for Ductile Iron Culvert Pipe
ABSTRACT
This specification covers ductile-iron culvert pipe centrifugally cast. The pipe shall be manufactured of ductile iron that meets the mechanical requirements such as tensile strength, yield strength, elongation, and impact value. The pipe shall be provided with suitable joints, such as push-on or other types of joints that prevent lateral displacement, but plain-end pipe for use with suitable couplings may be furnished. Standard wall thickness and weight values of push-on joint pipe are given. Pressure Class ductile iron pipe in Type 5 trench is illustrated. All pipe shall be coated inside and outside with an asphaltic material. Acceptance tests by tension and Charpy impact testing shall be performed. The standard test specimens for these testing methods are detailed.
SCOPE
1.1 This specification covers 14 to 64 in. ductile iron culvert pipe, centrifugally cast.
1.2 The values stated in inch-pound units are to be regarded as standard. The values given in parentheses are mathematical conversions to SI units that are provided for information only and are not considered standard.
1.3 The following safety hazards caveat pertains only to the test methods portions, Sections 6 and 7, of this specification: This standard does not purport to address all of the safety concerns, if any, associated with its use. It is the responsibility of the user of this standard to establish appropriate safety, health, and environmental practices and determine the applicability of regulatory limitations prior to use.
1.4 This international standard was developed in accordance with internationally recognized principles on standardization established in the Decision on Principles for the Development of International Standards, Guides and Recommendations issued by the World Trade Organization Technical Barriers to Trade (TBT) Committee.
General Information
- Status
- Published
- Publication Date
- 30-Sep-2022
- Technical Committee
- A04 - Iron Castings
- Drafting Committee
- A04.12 - Pipes and Tubes
Relations
- Effective Date
- 01-Apr-2024
- Effective Date
- 01-Jan-2024
- Effective Date
- 15-Jul-2016
- Effective Date
- 01-Apr-2016
- Effective Date
- 01-Jan-2016
- Effective Date
- 01-Feb-2015
- Effective Date
- 01-Jun-2013
- Effective Date
- 15-Nov-2012
- Effective Date
- 01-Jul-2012
- Effective Date
- 01-Jun-2012
- Effective Date
- 15-May-2012
- Effective Date
- 01-Dec-2011
- Effective Date
- 01-Jun-2007
- Effective Date
- 01-Mar-2007
- Effective Date
- 01-Apr-2006
Overview
ASTM A716-18(2022), Standard Specification for Ductile Iron Culvert Pipe, establishes requirements for centrifugally cast ductile iron culvert pipe used in construction and infrastructure projects. Issued by ASTM International, this standard ensures that ductile iron culvert pipes possess the necessary mechanical properties, joint integrity, dimensions, and protective coatings to meet demanding service conditions. The specification covers pipes with nominal diameters from 14 to 64 inches and describes manufacturing, testing, and quality control practices for high-performance and long-lasting culvert solutions.
Key Topics
- Material Requirements: Pipes must be made from ductile iron, meeting defined tensile strength, yield strength, elongation, and impact resistance criteria.
- Dimensional Standards & Tolerances: Specifies wall thickness, weight, and dimensional tolerances to guarantee mechanical integrity and uniformity.
- Joint Types: Acceptable joints include push-on or other designs that prevent lateral displacement. Pipes can also be supplied with plain ends for use with compatible couplings.
- Coating: The interior and exterior of every pipe must be coated with an asphaltic material to ensure long-term corrosion protection and product durability.
- Mechanical Testing: Includes tension tests (ASTM E8/E8M) and Charpy impact tests (ASTM E23), with clear acceptance criteria for tensile, yield, elongation, and impact values.
- Inspection and Certification: Details quality control processes, inspection, marking, and recordkeeping responsibilities for manufacturers, as well as purchaser inspection rights.
Applications
Ductile iron culvert pipe manufactured to ASTM A716-18(2022) is widely used in:
- Highway and transportation infrastructure, including culverts under roadways and railways
- Stormwater drainage and management systems
- Agricultural and irrigation projects requiring robust drainage solutions
- Municipal and utility installations where corrosion resistance, strength, and a long service life are crucial
The specification is particularly valued for projects demanding pipes with high strength-to-weight ratios, resistance to soil and environmental corrosion, reliable joint integrity, and compliance with government or transportation agency requirements.
Related Standards
- ASTM E8/E8M: Test Methods for Tension Testing of Metallic Materials
- ASTM E23: Test Methods for Notched Bar Impact Testing of Metallic Materials
- ANSI/AWWA C150/A21.50: Thickness Design of Ductile-Iron Pipe
- ANSI/AWWA C151/A21.51: Ductile-Iron Pipe Centrifugally Cast
- AASHTO T 99: Moisture-Density Relations of Soils Using a 5.5-lb Rammer and 12-in. Drop
These referenced standards define the required testing methodologies, dimensional calculations, and quality assurance processes necessary for compliance with ASTM A716-18(2022).
Keywords: ASTM A716, ductile iron culvert pipe, culvert pipe specification, ductile iron pipe standards, mechanical properties, culvert infrastructure, pipe coating, pressure class pipe, stormwater drainage, infrastructure pipe standards.
Buy Documents
ASTM A716-18(2022) - Standard Specification for Ductile Iron Culvert Pipe
Get Certified
Connect with accredited certification bodies for this standard

Institut za varilstvo d.o.o. (Welding Institute)
Slovenia's leading welding institute since 1952. ISO 3834, EN 1090, pressure equipment certification, NDT personnel, welder qualification. Only IIW Au
Sponsored listings
Frequently Asked Questions
ASTM A716-18(2022) is a technical specification published by ASTM International. Its full title is "Standard Specification for Ductile Iron Culvert Pipe". This standard covers: ABSTRACT This specification covers ductile-iron culvert pipe centrifugally cast. The pipe shall be manufactured of ductile iron that meets the mechanical requirements such as tensile strength, yield strength, elongation, and impact value. The pipe shall be provided with suitable joints, such as push-on or other types of joints that prevent lateral displacement, but plain-end pipe for use with suitable couplings may be furnished. Standard wall thickness and weight values of push-on joint pipe are given. Pressure Class ductile iron pipe in Type 5 trench is illustrated. All pipe shall be coated inside and outside with an asphaltic material. Acceptance tests by tension and Charpy impact testing shall be performed. The standard test specimens for these testing methods are detailed. SCOPE 1.1 This specification covers 14 to 64 in. ductile iron culvert pipe, centrifugally cast. 1.2 The values stated in inch-pound units are to be regarded as standard. The values given in parentheses are mathematical conversions to SI units that are provided for information only and are not considered standard. 1.3 The following safety hazards caveat pertains only to the test methods portions, Sections 6 and 7, of this specification: This standard does not purport to address all of the safety concerns, if any, associated with its use. It is the responsibility of the user of this standard to establish appropriate safety, health, and environmental practices and determine the applicability of regulatory limitations prior to use. 1.4 This international standard was developed in accordance with internationally recognized principles on standardization established in the Decision on Principles for the Development of International Standards, Guides and Recommendations issued by the World Trade Organization Technical Barriers to Trade (TBT) Committee.
ABSTRACT This specification covers ductile-iron culvert pipe centrifugally cast. The pipe shall be manufactured of ductile iron that meets the mechanical requirements such as tensile strength, yield strength, elongation, and impact value. The pipe shall be provided with suitable joints, such as push-on or other types of joints that prevent lateral displacement, but plain-end pipe for use with suitable couplings may be furnished. Standard wall thickness and weight values of push-on joint pipe are given. Pressure Class ductile iron pipe in Type 5 trench is illustrated. All pipe shall be coated inside and outside with an asphaltic material. Acceptance tests by tension and Charpy impact testing shall be performed. The standard test specimens for these testing methods are detailed. SCOPE 1.1 This specification covers 14 to 64 in. ductile iron culvert pipe, centrifugally cast. 1.2 The values stated in inch-pound units are to be regarded as standard. The values given in parentheses are mathematical conversions to SI units that are provided for information only and are not considered standard. 1.3 The following safety hazards caveat pertains only to the test methods portions, Sections 6 and 7, of this specification: This standard does not purport to address all of the safety concerns, if any, associated with its use. It is the responsibility of the user of this standard to establish appropriate safety, health, and environmental practices and determine the applicability of regulatory limitations prior to use. 1.4 This international standard was developed in accordance with internationally recognized principles on standardization established in the Decision on Principles for the Development of International Standards, Guides and Recommendations issued by the World Trade Organization Technical Barriers to Trade (TBT) Committee.
ASTM A716-18(2022) is classified under the following ICS (International Classification for Standards) categories: 23.040.10 - Iron and steel pipes. The ICS classification helps identify the subject area and facilitates finding related standards.
ASTM A716-18(2022) has the following relationships with other standards: It is inter standard links to ASTM E23-24, ASTM E8/E8M-24, ASTM E8/E8M-16, ASTM E23-16a, ASTM E23-16, ASTM E8/E8M-15, ASTM E8/E8M-13, ASTM E23-12c, ASTM E23-12b, ASTM E23-12a, ASTM E23-12, ASTM E8/E8M-11, ASTM E23-07a, ASTM E23-07, ASTM E23-06. Understanding these relationships helps ensure you are using the most current and applicable version of the standard.
ASTM A716-18(2022) is available in PDF format for immediate download after purchase. The document can be added to your cart and obtained through the secure checkout process. Digital delivery ensures instant access to the complete standard document.
Standards Content (Sample)
This international standard was developed in accordance with internationally recognized principles on standardization established in the Decision on Principles for the
Development of International Standards, Guides and Recommendations issued by the World Trade Organization Technical Barriers to Trade (TBT) Committee.
Designation:A716 −18 (Reapproved 2022)
Standard Specification for
Ductile Iron Culvert Pipe
This standard is issued under the fixed designation A716; the number immediately following the designation indicates the year of
original adoption or, in the case of revision, the year of last revision.Anumber in parentheses indicates the year of last reapproval.A
superscript epsilon (´) indicates an editorial change since the last revision or reapproval.
1. Scope 2.3 AASHTO Standard:
AASHTO T 99Moisture Density Relations of Soils Using a
1.1 Thisspecificationcovers14to64in.ductileironculvert
5.5-lb (2.5-kg) Rammer 12-in. (305-mm) Drop
pipe, centrifugally cast.
1.2 The values stated in inch-pound units are to be regarded
3. General Requirements
as standard. The values given in parentheses are mathematical
3.1 The pipe shall be manufactured of ductile iron that
conversions to SI units that are provided for information only
meets the requirements of Sections 6 and 7. See Table 1 for
and are not considered standard.
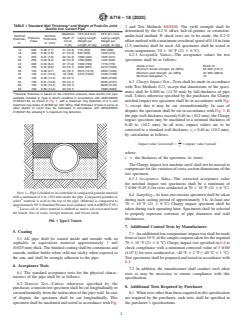
pipe thicknesses and weights; see also Fig. 1.
1.3 The following safety hazards caveat pertains only to the
3.2 The pipe shall be provided with suitable joints, such as
test methods portions, Sections 6 and 7, of this specification:
push-on or other types of joints that prevent lateral displace-
This standard does not purport to address all of the safety
ment. Plain-end pipe for use with suitable couplings may be
concerns, if any, associated with its use. It is the responsibility
furnished.
of the user of this standard to establish appropriate safety,
health, and environmental practices and determine the appli-
3.3 Unless otherwise specified, pipe shall have a nominal
cability of regulatory limitations prior to use.
lengthof18or20ft(5.5or6.1m).Amaximumof20%ofthe
1.4 This international standard was developed in accor-
total number of pipe of each size specified in an order may be
dance with internationally recognized principles on standard-
furnishedasmuchas24in.(610mm)shorterthanthenominal
ization established in the Decision on Principles for the
laying length, and an additional 10% may be furnished as
Development of International Standards, Guides and Recom-
much as in 6 in. (152 mm) shorter than the nominal laying
mendations issued by the World Trade Organization Technical
length.
Barriers to Trade (TBT) Committee.
4. Tolerances or Permitted Variations
2. Referenced Documents
4.1 Dimensions—The spigot end, bell, and socket of the
2.1 ASTM Standards:
pipe and the accessories shall be gaged with suitable gages at
E8/E8MTest Methods for Tension Testing of Metallic Ma-
sufficiently frequent intervals to ensure that the dimensions
terials
comply with the requirements of this specification. The small-
E23Test Methods for Notched Bar Impact Testing of Me-
estinsidediameter(ID)ofthesocketsandtheoutsidediameter
tallic Materials
(OD) of the spigot ends shall be tested with circular gages.
3,4
2.2 ANSI/AWWA Standards:
Other socket dimensions shall be gauged as may be appropri-
C150/A21.50Thickness Design of Ductile-Iron Pipe
ate.
C151/A21.51Ductile-Iron Pipe Centrifugally Cast
4.2 Thickness—Minus thickness tolerances of pipe shall not
exceed those shown below:
This specification is under the jurisdiction of ASTM Committee A04 on Iron
Nominal Size, in. Minus Tolerance, in. (mm)
Castings and is the direct responsibility of Subcommittee A04.12 on Pipes and 14 to 42 0.07 (1.8)
Tubes. 48 0.08 (2.0)
54 to 64 0.09 (2.3)
Current edition approved Oct. 1, 2022. Published October 2022. Originally
approved in 1975. Last previous edition approved in 2018 as A716–18. DOI:
NOTE 1—An additional minus tolerance of 0.02 in. (0.05 mm) shall be
10.1520/A0716-18R22.
permitted along the barrel of the pipe for a distance not to exceed 12 in.
For referenced ASTM standards, visit the ASTM website, www.astm.org, or
(305 mm).
contact ASTM Customer Service at service@astm.org. For Annual Book of ASTM
Standards volume information, refer to the standard’s Document Summary page on
the ASTM website.
Available fromAmerican National Standards Institute (ANSI), 25 W. 43rd St.,
4th Floor, New York, NY 10036, http://www.ansi.org. Available from American Association of State Highway and Transportation
Available fromAmericanWaterWorksAssociation (AWWA), 6666W. Quincy Officials (AASHTO), 444 N. Capitol St., NW, Suite 249, Washington, DC 20001,
Ave., Denver, CO 80235, http://www.awwa.org. http://www.transportation.org.
Copyright © ASTM International, 100 Barr Harbor Drive, PO Box C700, West Conshohocken, PA 19428-2959. United States
A716−18 (2022)
A
TABLE 1 Standard Wall Thickness and Weight of Push-On Joint
2 and Test Methods E8/E8M. The yield strength shall be
Ductile Iron Culvert Pipe
determined by the 0.2% offset, halt-of-pointer, or extension-
Maximum 18 ft (5.5 mm) 20 ft (6.1 mm)
Nominal Nominal under-load method. If check tests are to be made, the 0.2%
Pressure Depth of Laying Length, Laying Length,
Diameter, Thickness,
Class Cover, Weight per Weight per offsetmethodwithamaximumcrossheadspeedof0.10in./min
in. in. (mm)
ft (m) Length, lb (kg) Length, lb (kg)
(2.5 mm/min) shall be used. All specimens shall be tested at
14 250 0.28 (7.1) 41 (12.5) 770 (349) 855 (388)
room temperature, 70 6 10°F (21 6 6°C).
16 250 0.30 (7.6) 41 (12.5) 940 (426) 1040 (472)
6.2.1 Acceptable Values—The acceptance values for test
18 250 0.31 (7.9) 40 (12.2) 1090 (494) 1205 (547)
20 250 0.33 (8.4) 40 (12.2) 1290 (585) 1425 (646) specimens shall be as follows:
24 200 0.33 (8.4) 37 (11.3) 1550 (703) 1710 (776)
Grade of iron 60-42-10
30 150 0.34 (8.6) 33 (10.1) 2000 (907) 2210 (1002)
Minimum tensile strength, psi (MPa) 60 000 (413.7)
36 150 0.38 (9.7) 33 (10.1) 2675 (1213) 2955 (1340)
Minimum yield strength, psi (MPa) 42 000 (289.6)
42 150 0.41 (10.4) 32 (9.8) 3415 (1549) 3765 (1708)
Minimum elongation, % 10
48 150 0.46 (12.4) 33 (10.1) 4805 (2180)
54 150 0.51 (13.0) 33 (10.1) 6035 (2737)
6.3 Charpy Impact Test—Tests shall be made in accordance
60 150 0.54 (13.7) 33 (10.1) 6930 (3143)
with Test Methods E23, except that dimensions of the speci-
64 150 0.56 (14.2) 33 (10.1) 7680 (3484)
mens shall be 0.500 in. (12.70 mm) by full thickness of pipe
A
Nominal thickness is based on the minimum pressure class ductile iron pipe
wall. Unless otherwise specified by the purchaser, the Charpy
available installed in Type 5 trench condition in accordance with ANSI/AWWA
C150/A21.50, as shown in Fig. 1, with a maximum ring deflection of 5 % and notched impact test specimen shall be in accordance with Fig.
maximum ring stress of 48 000 psi (331 MPa). Wall thickness of pipe to serve at
3, except that it may be cut circumferentially. In case of
other depths of cover may be calculated in accordance with ANSI/AWWA
dispute, the specimen shall be cut in accordance with Fig. 3.If
C150/A21.50, allowing 5 % maximum ring deflection.
thepipewallthicknessexceeds0.40in.(10.2mm),theCharpy
impact specimen may be machined to a nominal thickness of
0.40 in. (10.2 mm). In all tests, impact values are to be
corrected to a standard wall thickness, t = 0.40 in. (10.2 mm),
s
by calculation as follows:
t
s
Impactvalue ~corrected! 5 3impact value ~actual!
t
where:
t = the thickness of the specimen, in. (mm).
The Charpy impact test machine anvil shall not be moved to
compensateforthevariationofcross-sectiondimensionsofthe
test specimen.
6.3.1 Acceptance Value—The corrected acceptance value
for notched impact test specimens shall be a minimum of
7ft·lbf (9.49 J) for tests conducted at 70 6 10°F (21 6 6°C).
NOTE1—Pipeisbeddedtoitscenterlineincompactedgranularmaterial
6.4 Sampling—At least one tension specimen shall be taken
withaminimumof4in.(102mm)underthepipe.Compactedgranularor
A during each casting period of approximately 3 h. At least one
select material is used to the top of the pipe. (Material is compacted to
70 6 10°F (21 6 6°C) Charpy impact specimen shall be
approximately90%StandardProctorinaccordancewithAASHTOT99.)
A
Loose soil or select material is defined as native soil excavated from
taken during each operating hour. Specimens shall be selected
the trench, free of rocks, foreign material, and frozen earth.
to properly represent extremes of pipe diameters and wall
thicknesses.
FIG. 1Type 5 Trench
7. Additional Control Tests by Manufacturer
5. Coating
7.1 Anadditionallow-temperatureimpacttestshallbemade
fromatleast10%ofthesamplecouponstakenfortherequired
5.1 All pipe shall be coated inside and outside with an
asphaltic or equivalent material approximately 1 mil 70 6 10°F (21 6 6°C) Charpy impact test specified in 6.4 to
check compliance with a minimum cor
...


Questions, Comments and Discussion
Ask us and Technical Secretary will try to provide an answer. You can facilitate discussion about the standard in here.
Loading comments...