ASTM B160-24
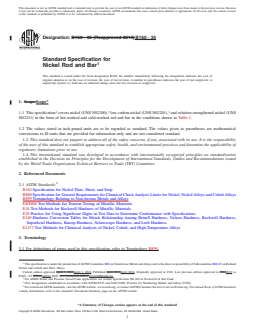
(Specification)Standard Specification for Nickel Rod and Bar
Standard Specification for Nickel Rod and Bar
ABSTRACT
This specification covers nickel (UNS N02200), low carbon nickel (UNS N02201), and solution strengthened nickel (UNS N02211) in the form of hot-worked, cold-worked, or annealed rods and bars of round, square, hexagonal, or rectangular solid section. The material shall conform to the chemical composition limits specified for nickel, copper, iron, manganese, carbon, silicon, and sulfur. Mechanical requirements including tensile strength, yield strength, and elongation are given for specific conditions and diameter or distance between parallel surfaces. Chemical analysis, tension test, and hardness test shall be performed.
SCOPE
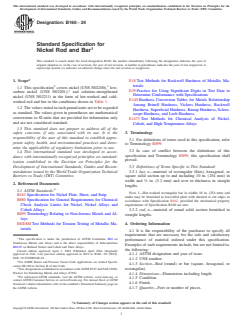
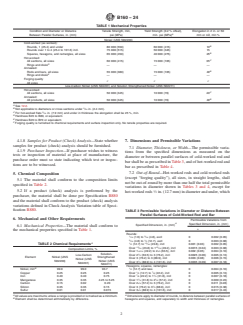
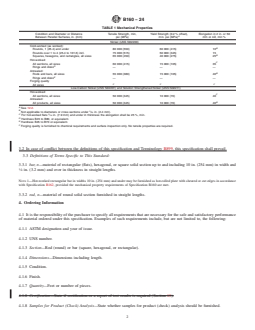
1.1 This specification2 covers nickel (UNS N02200),3 low-carbon nickel (UNS N02201),3 and solution-strengthened nickel (UNS N02211) in the form of hot-worked and cold-worked rod and bar in the conditions shown in Table 1.
1.2 The values stated in inch-pound units are to be regarded as standard. The values given in parentheses are mathematical conversions to SI units that are provided for information only and are not considered standard.
1.3 This standard does not purport to address all of the safety concerns, if any, associated with its use. It is the responsibility of the user of this standard to establish appropriate safety, health, and environmental practices and determine the applicability of regulatory limitations prior to use.
1.4 This international standard was developed in accordance with internationally recognized principles on standardization established in the Decision on Principles for the Development of International Standards, Guides and Recommendations issued by the World Trade Organization Technical Barriers to Trade (TBT) Committee.
General Information
- Status
- Published
- Publication Date
- 31-Mar-2024
- Technical Committee
- B02 - Nonferrous Metals and Alloys
- Drafting Committee
- B02.07 - Refined Nickel and Cobalt and Their Alloys
Relations
- Effective Date
- 01-Apr-2024
- Effective Date
- 01-Apr-2024
- Referred By
ASTM G134-17(2023) - Standard Test Method for Erosion of Solid Materials by Cavitating Liquid Jet - Effective Date
- 01-Apr-2024
- Effective Date
- 01-Apr-2024
- Referred By
ASTM G32-16(2021)e1 - Standard Test Method for Cavitation Erosion Using Vibratory Apparatus - Effective Date
- 01-Apr-2024
Overview
ASTM B160-24: Standard Specification for Nickel Rod and Bar provides detailed requirements for the manufacture and supply of solid nickel products used in various industrial applications. This ASTM standard covers nickel (UNS N02200), low-carbon nickel (UNS N02201), and solution-strengthened nickel (UNS N02211) in the form of rods and bars, manufactured by hot-working, cold-working, or annealing processes. These products can have round, square, hexagonal, or rectangular cross-sections.
The standard establishes strict limits for chemical composition, mechanical properties, permissible dimensional variations, and product marking to ensure consistent quality and suitability for demanding environments.
Key Topics
- Material Types: Covers pure nickel and specific alloys, identifying them by UNS numbers (N02200, N02201, N02211).
- Forms and Conditions: Specifies requirements for hot-worked, cold-worked, and annealed rods and bars, with options for various finishes and conditions.
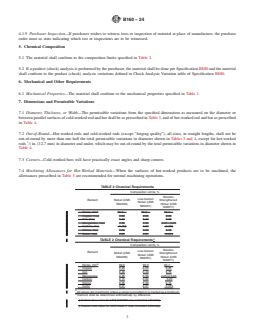
- Chemical Composition: Provides maximum and minimum limits for elements such as nickel, copper, iron, manganese, carbon, silicon, and sulfur.
- Mechanical Properties: Details minimum tensile strength, yield strength, and elongation for each material type and process condition.
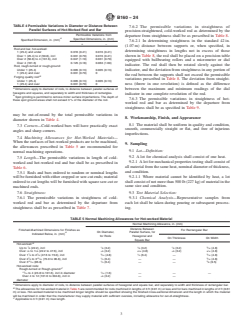
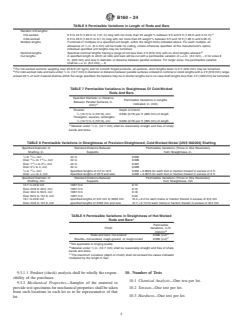
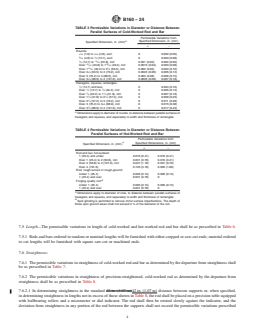
- Dimensional Tolerances: Defines permissible variations in diameter, thickness, width, length, and straightness, tailored to cold-worked and hot-worked products.
- Testing and Inspection: Requires chemical analysis, tension (tensile) tests, and hardness testing on representative samples from each production lot.
- Ordering Information: Outlines details that purchasers must specify, including alloy, size, condition, quantity, and certification requirements.
- Product Marking: Describes standardized marking to ensure traceability and compliance throughout the supply chain.
Applications
ASTM B160-24 nickel rod and bar products are widely used in industry owing to their corrosion resistance, mechanical strength, and ductility, even at elevated temperatures. Common application sectors include:
- Chemical processing: Equipment such as reactors, heat exchangers, and piping that require high corrosion resistance to acids, alkalies, and salts.
- Electrical and electronics: Components and conductors that benefit from nickel’s electrical conductivity and stability.
- Aerospace and defense: Structural components, fasteners, and precision parts where strength and longevity are critical.
- Petrochemical and power generation: Components exposed to extreme environments, such as turbine blades, valves, and fuel handling systems.
- General engineering: Shafts, rods, fittings, and machined parts requiring reliable performance and resistance to aggressive media.
Nickel rods and bars specified by ASTM B160-24 can be tailored for specific uses through specified conditions and finishes, including options for hot-worked, annealed, or cold-worked surfaces.
Related Standards
Those utilizing ASTM B160-24 may also reference these important standards for comprehensive nickel and nickel alloy application:
- ASTM B162 - Specifications for Nickel Plate, Sheet, and Strip
- ASTM B880 - General Requirements for Chemical Check Analysis Limits for Nickel, Nickel Alloys, and Cobalt Alloys
- ASTM E8/E8M - Test Methods for Tension Testing of Metallic Materials
- ASTM E18 - Test Methods for Rockwell Hardness of Metallic Materials
- ASTM B899 - Terminology Relating to Non-ferrous Metals and Alloys
For applications involving boiler and pressure vessels, consult the related ASME specification SB-160.
Keywords: ASTM B160, nickel rod, nickel bar, UNS N02200, UNS N02201, UNS N02211, chemical composition, mechanical properties, industry standards.
Buy Documents
ASTM B160-24 - Standard Specification for Nickel Rod and Bar
REDLINE ASTM B160-24 - Standard Specification for Nickel Rod and Bar
Get Certified
Connect with accredited certification bodies for this standard

Element Materials Technology
Materials testing and product certification.

Inštitut za kovinske materiale in tehnologije
Institute of Metals and Technology. Materials testing, metallurgical analysis, NDT.
Sponsored listings
Frequently Asked Questions
ASTM B160-24 is a technical specification published by ASTM International. Its full title is "Standard Specification for Nickel Rod and Bar". This standard covers: ABSTRACT This specification covers nickel (UNS N02200), low carbon nickel (UNS N02201), and solution strengthened nickel (UNS N02211) in the form of hot-worked, cold-worked, or annealed rods and bars of round, square, hexagonal, or rectangular solid section. The material shall conform to the chemical composition limits specified for nickel, copper, iron, manganese, carbon, silicon, and sulfur. Mechanical requirements including tensile strength, yield strength, and elongation are given for specific conditions and diameter or distance between parallel surfaces. Chemical analysis, tension test, and hardness test shall be performed. SCOPE 1.1 This specification2 covers nickel (UNS N02200),3 low-carbon nickel (UNS N02201),3 and solution-strengthened nickel (UNS N02211) in the form of hot-worked and cold-worked rod and bar in the conditions shown in Table 1. 1.2 The values stated in inch-pound units are to be regarded as standard. The values given in parentheses are mathematical conversions to SI units that are provided for information only and are not considered standard. 1.3 This standard does not purport to address all of the safety concerns, if any, associated with its use. It is the responsibility of the user of this standard to establish appropriate safety, health, and environmental practices and determine the applicability of regulatory limitations prior to use. 1.4 This international standard was developed in accordance with internationally recognized principles on standardization established in the Decision on Principles for the Development of International Standards, Guides and Recommendations issued by the World Trade Organization Technical Barriers to Trade (TBT) Committee.
ABSTRACT This specification covers nickel (UNS N02200), low carbon nickel (UNS N02201), and solution strengthened nickel (UNS N02211) in the form of hot-worked, cold-worked, or annealed rods and bars of round, square, hexagonal, or rectangular solid section. The material shall conform to the chemical composition limits specified for nickel, copper, iron, manganese, carbon, silicon, and sulfur. Mechanical requirements including tensile strength, yield strength, and elongation are given for specific conditions and diameter or distance between parallel surfaces. Chemical analysis, tension test, and hardness test shall be performed. SCOPE 1.1 This specification2 covers nickel (UNS N02200),3 low-carbon nickel (UNS N02201),3 and solution-strengthened nickel (UNS N02211) in the form of hot-worked and cold-worked rod and bar in the conditions shown in Table 1. 1.2 The values stated in inch-pound units are to be regarded as standard. The values given in parentheses are mathematical conversions to SI units that are provided for information only and are not considered standard. 1.3 This standard does not purport to address all of the safety concerns, if any, associated with its use. It is the responsibility of the user of this standard to establish appropriate safety, health, and environmental practices and determine the applicability of regulatory limitations prior to use. 1.4 This international standard was developed in accordance with internationally recognized principles on standardization established in the Decision on Principles for the Development of International Standards, Guides and Recommendations issued by the World Trade Organization Technical Barriers to Trade (TBT) Committee.
ASTM B160-24 is classified under the following ICS (International Classification for Standards) categories: 77.120.40 - Nickel, chromium and their alloys; 77.150.40 - Nickel and chromium products. The ICS classification helps identify the subject area and facilitates finding related standards.
ASTM B160-24 has the following relationships with other standards: It is inter standard links to ASTM B160-05(2019), ASTM B162-99(2019), ASTM G134-17(2023), ASTM B366/B366M-23, ASTM G32-16(2021)e1. Understanding these relationships helps ensure you are using the most current and applicable version of the standard.
ASTM B160-24 is available in PDF format for immediate download after purchase. The document can be added to your cart and obtained through the secure checkout process. Digital delivery ensures instant access to the complete standard document.
Standards Content (Sample)
This international standard was developed in accordance with internationally recognized principles on standardization established in the Decision on Principles for the
Development of International Standards, Guides and Recommendations issued by the World Trade Organization Technical Barriers to Trade (TBT) Committee.
Designation: B160 − 24
Standard Specification for
Nickel Rod and Bar
This standard is issued under the fixed designation B160; the number immediately following the designation indicates the year of
original adoption or, in the case of revision, the year of last revision. A number in parentheses indicates the year of last reapproval. A
superscript epsilon (´) indicates an editorial change since the last revision or reapproval.
1. Scope* E18 Test Methods for Rockwell Hardness of Metallic Ma-
2 3
terials
1.1 This specification covers nickel (UNS N02200), low-
3 E29 Practice for Using Significant Digits in Test Data to
carbon nickel (UNS N02201), and solution-strengthened
Determine Conformance with Specifications
nickel (UNS N02211) in the form of hot-worked and cold-
E140 Hardness Conversion Tables for Metals Relationship
worked rod and bar in the conditions shown in Table 1.
Among Brinell Hardness, Vickers Hardness, Rockwell
1.2 The values stated in inch-pound units are to be regarded
Hardness, Superficial Hardness, Knoop Hardness, Sclero-
as standard. The values given in parentheses are mathematical
scope Hardness, and Leeb Hardness
conversions to SI units that are provided for information only
E1473 Test Methods for Chemical Analysis of Nickel,
and are not considered standard.
Cobalt, and High-Temperature Alloys
1.3 This standard does not purport to address all of the
3. Terminology
safety concerns, if any, associated with its use. It is the
responsibility of the user of this standard to establish appro-
3.1 For definitions of terms used in this specification, refer
priate safety, health, and environmental practices and deter-
to Terminology B899.
mine the applicability of regulatory limitations prior to use.
3.2 In case of conflict between the definitions of this
1.4 This international standard was developed in accor-
specification and Terminology B899, this specification shall
dance with internationally recognized principles on standard-
prevail.
ization established in the Decision on Principles for the
Development of International Standards, Guides and Recom- 3.3 Definitions of Terms Specific to This Standard:
mendations issued by the World Trade Organization Technical 3.3.1 bar, n—material of rectangular (flats), hexagonal, or
Barriers to Trade (TBT) Committee. square solid section up to and including 10 in. (254 mm) in
width and ⁄8 in. (3.2 mm) and over in thickness in straight
2. Referenced Documents
lengths.
2.1 ASTM Standards:
NOTE 1—Hot-worked rectangular bar in widths 10 in. (254 mm) and
B162 Specification for Nickel Plate, Sheet, and Strip
under may be furnished as hot-rolled plate with sheared or cut edges in
B880 Specification for General Requirements for Chemical
B162, provided the mechanical property
accordance with Specification
requirements of Specification B160 are met.
Check Analysis Limits for Nickel, Nickel Alloys and
Cobalt Alloys
3.3.2 rod, n—material of round solid section furnished in
B899 Terminology Relating to Non-ferrous Metals and Al-
straight lengths.
loys
E8/E8M Test Methods for Tension Testing of Metallic Ma- 4. Ordering Information
terials
4.1 It is the responsibility of the purchaser to specify all
requirements that are necessary for the safe and satisfactory
This specification is under the jurisdiction of ASTM Committee B02 on
performance of material ordered under this specification.
Nonferrous Metals and Alloys and is the direct responsibility of Subcommittee
Examples of such requirements include, but are not limited to,
B02.07 on Refined Nickel and Cobalt and Their Alloys.
the following:
Current edition approved April 1, 2024. Published April 2024. Originally
approved in 1941. Last previous edition approved in 2019 as B160 – 05 (2019).
4.1.1 ASTM designation and year of issue.
DOI: 10.1520/B0160-24.
4.1.2 UNS number.
For ASME Boiler and Pressure Vessel Code applications see related Specifi-
4.1.3 Section—Rod (round) or bar (square, hexagonal, or
cation SB-160 in Section II of that Code.
rectangular).
New designations established in accordance with ASTM E527 and SAE J1086,
Practice for Numbering Metals and Alloys (UNS).
4.1.4 Dimensions—Dimensions including length.
For referenced ASTM standards, visit the ASTM website, www.astm.org, or
4.1.5 Condition.
contact ASTM Customer Service at service@astm.org. For Annual Book of ASTM
4.1.6 Finish.
Standards volume information, refer to the standard’s Document Summary page on
the ASTM website. 4.1.7 Quantity—Feet or number of pieces.
*A Summary of Changes section appears at the end of this standard
Copyright © ASTM International, 100 Barr Harbor Drive, PO Box C700, West Conshohocken, PA 19428-2959. United States
B160 − 24
TABLE 1 Mechanical Properties
Condition and Diameter or Distance Tensile Strength, min, Yield Strength (0.2 % offset), Elongation in 2 in. or 50
A
Between Parallel Surfaces, in. (mm) psi (MPa) min. psi (MPa) mm or 4D, min %
Nickel (UNS N02200)
Cold-worked (as worked):
B
Rounds, 1 (25.4) and under 80 000 (550) 60 000 (415) 10
Rounds over 1 to 4 (25.4 to 101.6) incl. 75 000 (515) 50 000 (345) 15
B
Squares, hexagons, and rectangles, all sizes 65 000 (450) 40 000 (275) 25
Hot-worked:
C
All sections, all sizes 60 000 (415) 15 000 (105) 35
D
Rings and disks — — —
Annealed:
B
Rods and bars, all sizes 55 000 (380) 15 000 (105) 40
E
Rings and disks — — —
Forging quality
F F F
All sizes
Low-Carbon Nickel (UNS N02201) and Solution Strengthened Nickel (UNS N02211)
Hot-worked:
C
All sections, all sizes 50 000 (345) 10 000 (70) 40
Annealed:
B
All products, all sizes 50 000 (345) 10 000 (70) 40
A
See 12.2.
B
Not applicable to diameters or cross sections under ⁄32 in. (2.4 mm).
C
For hot-worked flats ⁄16 in. (7.9 mm) and under in thickness the elongation shall be 25 %, min.
D
Hardness B45 to B80, or equivalent.
E
Hardness B45 to B70 or equivalent.
F
Forging quality is furnished to chemical requirements and surface inspection only. No tensile properties are required.
4.1.8 Samples for Product (Check) Analysis—State whether 7. Dimensions and Permissible Variations
samples for product (check) analysis should be furnished.
7.1 Diameter, Thickness, or Width—The permissible varia-
4.1.9 Purchaser Inspection—If purchaser wishes to witness
tions from the specified dimensions as measured on the
tests or inspection of material at place of manufacture, the
diameter or between parallel surfaces of cold-worked rod and
purchase order must so state indicating which test or inspec-
bar shall be as prescribed in Table 3, and of hot-worked rod and
tions are to be witnessed.
bar as prescribed in Table 4.
7.2 Out-of-Round—Hot-worked rods and cold-worked rods
5. Chemical Composition
(except “forging quality”), all sizes, in straight lengths, shall
5.1 The material shall conform to the composition limits
not be out-of-round by more than one half the total permissible
specified in Table 2.
variations in diameter shown in Tables 3 and 4, except for
5.2 If a product (check) analysis is performed by the
hot-worked rods ⁄2 in. (12.7 mm) in diameter and under, which
purchaser, the material shall be done per Specification B880
and the material shall conform to the product (check) analysis
variations defined in Check Analysis Variation table of Speci-
fication B880.
TABLE 3 Permissible Variations in Diameter or Distance Between
Parallel Surfaces of Cold-Worked Rod and Bar
6. Mechanical and Other Requirements
Permissible Variations from
A
Specified Dimension, in. (mm)
Specified Dimension, in. (mm)
6.1 Mechanical Properties—The material shall conform to
+ −
the mechanical properties specified in Table 1.
Rounds:
1 3
⁄16 (1.6) to ⁄16 (4.8), excl 0 0.002 (0.05)
3 1
⁄16 (4.8) to ⁄2 (12.7), excl 0 0.003 (0.08)
A
1 15
TABLE 2 Chemical Requirements ⁄2 (12.7) to ⁄16 (23.8), incl 0.001 (0.03) 0.002 (0.05)
15 15
Over ⁄16 (23.8) to 1 ⁄16 (49.2), incl 0.0015 (0.04) 0.003 (0.08)
Composition Limits, %
15 1
Over 1 ⁄16 (49.2) to 2 ⁄2 (63.5), incl 0.002 (0.05) 0.004 (0.10)
Solution-
Over 2 ⁄2 (63.5) to 3 (76.2), incl 0.0025 (0.06) 0.005 (0.13)
Low-Carbon
Element
Nickel (UNS Strengthened
Over 3 (76.2) to 3 (88.9), incl 0.003 (0.08) 0.006 (0.15)
Nickel (UNS
N02200) Nickel (UNS
Over 3 ⁄2 (88.9) to 4 (101.6), incl 0.0035 (0.09) 0.007 (0.18)
N02201)
N02211)
Hexagons, squares, rectangles:
B
Nickel, min 99.0 99.0 93.7 ⁄2 (12.7) and less 0 0.004 (0.10)
1 7
Copper 0.25 0.25 0.25 Over ⁄2 (12.7) to ⁄8 (22.2), incl 0 0.005 (0.13)
7 1
Iron 0.40 0.40 0.75 Over ⁄8 (22.2) to 1 ⁄4 (31.8), incl 0 0.007 (0.18)
1 1
Manganese 0.35 0.35 4.25 to 5.25 Over 1 ⁄4 (31.8) to 2 ⁄4 (57.2), incl 0 0.009 (0.23)
Carbon 0.15 0.02 0.20 Over 2 ⁄4 (57.2) to 3 (76.2), incl 0 0.011 (0.28)
Silicon 0.35 0.35 0.15 Over 3 (76.2) to 3 ⁄2 (88.9), incl 0 0.015 (0.38)
Sulfur 0.01 0.01 0.015 Over 3 ⁄2 (88.9) to 4 (101.6), incl 0 0.017 (0.43)
A A
All values are maximums unless a range is provided or is marked as a minimum. Dimensions apply to diameter of rounds, to distance between parallel surfaces of
B
Element shall be determined arithmetically by difference. hexagons and squares, and separately to width and thickness of rectangles.
B160 − 24
TABLE 4 Permissible Variations in Diameter or Distance Between
7.6.2 The permissible variations in straightness of
Parallel Surfaces of Hot-Worked Rod and Bar
precision-straightened, cold-worked rod as determined by the
Permissible Variations from
departure from straightness shall be as prescribed in Table 8.
A
Specified Dimensions, in. (mm)
Specified Dimension, in. (mm)
7.6.2.1 In determining straightness in the standard 42 in.
+ −
(1.07 m) distance between supports or, when specified, in
Rod and bar, hot-worked:
determining straightness in lengths not in excess of those
1 (25.4) and under 0.016 (0.41) 0.016 (0.41)
Over 1 (25.4) to 2 (50.8), incl 0.031 (0.79) 0.016 (0.41) shown in Table 8, the rod shall be placed on a precision table
Over 2 (50.8) to 4 (101.6), incl 0.047 (1.19) 0.031 (0.79)
equipped with ballbearing rollers and a micrometer or dial
Over 4 (101.6) 0.125 (3.18) 0.063 (1.60)
indicator. The rod shall then be rotated slowly against the
Rod, rough-turned or rough-ground:
Under 1 (25.4) 0.005 (0.13) 0.005 (0.13) indicator, and the deviation from straightness in any portion of
1 (25.4) and over 0.031 (0.79) 0
the rod between the supports shall not exceed the permissible
B
Forging quality rod:
variations prescribed in Table 8. The deviation from straight-
Under 1 (25.4) 0.005 (0.13) 0.005 (0.13)
1 (25.4) and over 0.031 (0.79) 0
ness (throw in one revolution) is defined as the difference
A
between the maximum and minimum readings of the dial
Dimensions apply to diameter of rods, to distance between parallel surfaces of
hexagons and squares, and separately to width and thickness of rectangles.
indicator in one complete revolution of the rod.
B
Spot grinding is permitted to remove minor surface imperfections. The depth of
7.6.3 The permissible variations in straightness of hot-
these spot ground areas shall not exceed 3 % of the diameter of the rod.
worked rod and bar as determined by the departure from
straightness shall be as specified in Table 9.
may be out-of-round by the total permissible variations in
8. Workmanship, Finish, and Appearance
diameter shown in Table 4.
8.1 The material shall be uniform in quality and condition,
7.3 Corners—Cold-worked bars will have practically exact
smooth, commercially straight or flat, and free of injurious
angles and sharp corners.
imperfections.
7.4 Machining Allowances for Hot-Worked Materials—
When the surfaces of hot-worked products are to be machined,
9. Sampling
the allowances prescribed in Table 5 are recommended for
9.1 Lot—Definition:
normal machining operations.
9.2 A lot for chemical analysis shall consist of one heat.
7.5 Length—The permissible variations in length of cold-
9.2.1 A lot for mechanical properties testing shall consist of
worked and hot-worked rod and bar shall be as prescribed in
all material from the same heat, nominal diameter of thickness,
Table 6.
and condition.
7.5.1 Rods and bars ordered to random or nominal lengths
9.2.1.1 Where material cannot be identified by heat, a lot
will be furnished with either cropped or saw-cut ends; material
shall consist of not more than 500 lb (227 kg) of material in the
ordered to cut lengths will be furnished with square saw-cut or
same size and condition.
machined ends.
9.3 Test Material Selection:
7.6 Straightness:
7.6.1 The permissible variations in straightness of cold- 9.3.1 Chemical Analysis—Representative samples from
worked rod and bar as determined by the departure from each lot shall be taken during pouring or subsequent process-
straightness shall be as prescribed in Table 7. ing.
TABLE 5 Normal Machining Allowances for Hot-worked Material
Normal Machining Allowance, in. (mm)
Distance Between
Finished-Machined Dimensions for Finishes as
For Rectangular Bar
A On Diameter, Parallel Surface, for
Indi
...
This document is not an ASTM standard and is intended only to provide the user of an ASTM standard an indication of what changes have been made to the previous version. Because
it may not be technically possible to adequately depict all changes accurately, ASTM recommends that users consult prior editions as appropriate. In all cases only the current version
of the standard as published by ASTM is to be considered the official document.
Designation: B160 − 05 (Reapproved 2019) B160 − 24
Standard Specification for
Nickel Rod and Bar
This standard is issued under the fixed designation B160; the number immediately following the designation indicates the year of
original adoption or, in the case of revision, the year of last revision. A number in parentheses indicates the year of last reapproval. A
superscript epsilon (´) indicates an editorial change since the last revision or reapproval.
1. Scope Scope*
2 3 3
1.1 This specification covers nickel (UNS N02200), low-carbon nickel (UNS N02201), and solution-strengthened nickel (UNS
N02211) in the form of hot-worked and cold-worked rod and bar in the conditions shown in Table 1.
1.2 The values stated in inch-pound units are to be regarded as standard. The values given in parentheses are mathematical
conversions to SI units that are provided for information only and are not considered standard.
1.3 This standard does not purport to address all of the safety concerns, if any, associated with its use. It is the responsibility
of the user of this standard to establish appropriate safety, health, and environmental practices and determine the applicability of
regulatory limitations prior to use.
1.4 This international standard was developed in accordance with internationally recognized principles on standardization
established in the Decision on Principles for the Development of International Standards, Guides and Recommendations issued
by the World Trade Organization Technical Barriers to Trade (TBT) Committee.
2. Referenced Documents
2.1 ASTM Standards:
B162 Specification for Nickel Plate, Sheet, and Strip
B880 Specification for General Requirements for Chemical Check Analysis Limits for Nickel, Nickel Alloys and Cobalt Alloys
B899 Terminology Relating to Non-ferrous Metals and Alloys
E8/E8M Test Methods for Tension Testing of Metallic Materials
E18 Test Methods for Rockwell Hardness of Metallic Materials
E29 Practice for Using Significant Digits in Test Data to Determine Conformance with Specifications
E140 Hardness Conversion Tables for Metals Relationship Among Brinell Hardness, Vickers Hardness, Rockwell Hardness,
Superficial Hardness, Knoop Hardness, Scleroscope Hardness, and Leeb Hardness
E1473 Test Methods for Chemical Analysis of Nickel, Cobalt, and High-Temperature Alloys
3. Terminology
3.1 For definitions of terms used in this specification, refer to Terminology B899.
This specification is under the jurisdiction of ASTM Committee B02 on Nonferrous Metals and Alloys and is the direct responsibility of Subcommittee B02.07 on Refined
Nickel and Cobalt and Their Alloys.
Current edition approved April 1, 2019April 1, 2024. Published April 2019April 2024. Originally approved in 1941. Last previous edition approved in 20142019 as
B160 – 05 (2014).(2019). DOI: 10.1520/B0160-05R19.10.1520/B0160-24.
For ASME Boiler and Pressure Vessel Code applications see related Specification SB-160 in Section II of that Code.
New designations established in accordance with ASTM E527 and SAE J1086, Practice for Numbering Metals and Alloys (UNS).
For referenced ASTM standards, visit the ASTM website, www.astm.org, or contact ASTM Customer Service at service@astm.org. For Annual Book of ASTM Standards
volume information, refer to the standard’s Document Summary page on the ASTM website.
*A Summary of Changes section appears at the end of this standard
Copyright © ASTM International, 100 Barr Harbor Drive, PO Box C700, West Conshohocken, PA 19428-2959. United States
B160 − 24
TABLE 1 Mechanical Properties
Condition and Diameter or Distance Tensile Strength, min, Yield Strength (0.2 % offset), Elongation in 2 in. or 50
A
Between Parallel Surfaces, in. (mm) psi (MPa) min. psi (MPa) mm or 4D, min %
Nickel (UNS N02200)
Cold-worked (as worked):
B
Rounds, 1 (25.4) and under 80 000 (550) 60 000 (415) 10
Rounds over 1 to 4 (25.4 to 101.6) incl. 75 000 (515) 50 000 (345) 15
B
Squares, hexagons, and rectangles, all sizes 65 000 (450) 40 000 (275) 25
Hot-worked:
C
All sections, all sizes 60 000 (415) 15 000 (105) 35
D
Rings and disks — — —
Annealed:
B
Rods and bars, all sizes 55 000 (380) 15 000 (105) 40
E
Rings and disks — — —
Forging quality
F F F
All sizes
Low-Carbon Nickel (UNS N02201) and Solution Strengthened Nickel (UNS N02211)
Hot-worked:
C
All sections, all sizes 50 000 (345) 10 000 (70) 40
Annealed:
B
All products, all sizes 50 000 (345) 10 000 (70) 40
A
See 12.2.
B
Not applicable to diameters or cross sections under ⁄32 in. (2.4 mm).
C
For hot-worked flats ⁄16 in. (7.9 mm) and under in thickness the elongation shall be 25 %, min.
D
Hardness B45 to B80, or equivalent.
E
Hardness B45 to B70 or equivalent.
F
Forging quality is furnished to chemical requirements and surface inspection only. No tensile properties are required.
3.2 In case of conflict between the definitions of this specification and Terminology B899, this specification shall prevail.
3.3 Definitions of Terms Specific to This Standard:
3.3.1 bar, n—material of rectangular (flats), hexagonal, or square solid section up to and including 10 in. (254 mm) in width and
⁄8 in. (3.2 mm) and over in thickness in straight lengths.
NOTE 1—Hot-worked rectangular bar in widths 10 in. (254 mm) and under may be furnished as hot-rolled plate with sheared or cut edges in accordance
with Specification B162, provided the mechanical property requirements of Specification B160 are met.
3.3.2 rod, n—material of round solid section furnished in straight lengths.
4. Ordering Information
4.1 It is the responsibility of the purchaser to specify all requirements that are necessary for the safe and satisfactory performance
of material ordered under this specification. Examples of such requirements include, but are not limited to, the following:
4.1.1 ASTM designation and year of issue.
4.1.2 UNS number.
4.1.3 Section—Rod (round) or bar (square, hexagonal, or rectangular).
4.1.4 Dimensions—Dimensions including length.
4.1.5 Condition.
4.1.6 Finish.
4.1.7 Quantity—Feet or number of pieces.
4.1.8 Certification—State if certification or a report of test results is required (Section 15).
4.1.8 Samples for Product (Check) Analysis—State whether samples for product (check) analysis should be furnished.
B160 − 24
4.1.9 Purchaser Inspection—If purchaser wishes to witness tests or inspection of material at place of manufacture, the purchase
order must so state indicating which test or inspections are to be witnessed.
5. Chemical Composition
5.1 The material shall conform to the composition limits specified in Table 2.
5.2 If a product (check) analysis is performed by the purchaser, the material shall be done per Specification B880 and the material
shall conform to the product (check) analysis variations defined in Check Analysis Variation table of Specification B880.
6. Mechanical and Other Requirements
6.1 Mechanical Properties—The material shall conform to the mechanical properties specified in Table 1.
7. Dimensions and Permissible Variations
7.1 Diameter, Thickness, or Width—The permissible variations from the specified dimensions as measured on the diameter or
between parallel surfaces of cold-worked rod and bar shall be as prescribed in Table 3, and of hot-worked rod and bar as prescribed
in Table 4.
7.2 Out-of-Round—Hot-worked rods and cold-worked rods (except “forging quality”), all sizes, in straight lengths, shall not be
out-of-round by more than one half the total permissible variations in diameter shown in Tables 3 and 4, except for hot-worked
rods ⁄2 in. (12.7 mm) in diameter and under, which may be out-of-round by the total permissible variations in diameter shown in
Table 4.
7.3 Corners—Cold-worked bars will have practically exact angles and sharp corners.
7.4 Machining Allowances for Hot-Worked Materials—When the surfaces of hot-worked products are to be machined, the
allowances prescribed in Table 5 are recommended for normal machining operations.
TABLE 2 Chemical Requirements
Composition Limits, %
Solution-
Low-Carbon
Element
Nickel (UNS Strengthened
Nickel (UNS
N02200) Nickel (UNS
N02201)
N02211)
A
Nickel, min 99.0 99.0 93.7
Copper, max 0.25 0.25 0.25
Iron, max 0.40 0.40 0.75
Manganese, max 0.35 0.35 4.25 – 5.25
Carbon, max 0.15† 0.02 0.20†
Silicon, max 0.35 0.35 0.15
Sulfur, max 0.01 0.01 0.015
A
TABLE 2 Chemical Requirements
Composition Limits, %
Solution-
Low-Carbon
Element
Nickel (UNS Strengthened
Nickel (UNS
N02200) Nickel (UNS
N02201)
N02211)
B
Nickel, min 99.0 99.0 93.7
Copper 0.25 0.25 0.25
Iron 0.40 0.40 0.75
Manganese 0.35 0.35 4.25 to 5.25
Carbon 0.15 0.02 0.20
Silicon 0.35 0.35 0.15
Sulfur 0.01 0.01 0.015
A
All values are maximums unless a range is provided or is marked as a minimum.
B
Element shall be determined arithmetically by difference.
† Carbon max value for UNS N02200 was corrected editorially.
† Carbon max value for UNS N02211 was corrected editorially.
B160 − 24
TABLE 3 Permissible Variations in Diameter or Distance Between
Parallel Surfaces of Cold-Worked Rod and Bar
Permissible Variations from
A
Specified Dimension, in. (mm)
Specified Dimension, in. (mm)
+ −
Rounds:
1 3
⁄16 (1.6) to ⁄16 (4.8), excl 0 0.002 (0.05)
3 1
⁄16 (4.8) to ⁄2 (12.7), excl 0 0.003 (0.08)
1 15
⁄2 (12.7) to ⁄16 (23.8), incl 0.001 (0.03) 0.002 (0.05)
15 15
Over ⁄16 (23.8) to 1 ⁄16 (49.2), incl 0.0015 (0.04) 0.003 (0.08)
15 1
Over 1 ⁄16 (49.2) to 2 ⁄2 (63.5), incl 0.002 (0.05) 0.004 (0.10)
Over 2 ⁄2 (63.5) to 3 (76.2), incl 0.0025 (0.06) 0.005 (0.13)
Over 3 (76.2) to 3 (88.9), incl 0.003 (0.08) 0.006 (0.15)
Over 3 ⁄2 (88.9) to 4 (101.6), incl 0.0035 (0.09) 0.007 (0.18)
Hexagons, squares, rectangles:
⁄2 (12.7) and less 0 0.004 (0.10)
1 7
Over ⁄2 (12.7) to ⁄8 (22.2), incl 0 0.005 (0.13)
7 1
Over ⁄8 (22.2) to 1 ⁄4 (31.8), incl 0 0.007 (0.18)
1 1
Over 1 ⁄4 (31.8) to 2 ⁄4 (57.2), incl 0 0.009 (0.23)
Over 2 ⁄4 (57.2) to 3 (76.2), incl 0 0.011 (0.28)
Over 3 (76.2) to 3 ⁄2 (88.9), incl 0 0.015 (0.38)
Over 3 ⁄2 (88.9) to 4 (101.6), incl 0 0.017 (0.43)
A
Dimensions apply to diameter of rounds, to distance between parallel surfaces of
hexagons and squares, and separately to width and thickness of rectangles.
TABLE 4 Permissible Variations in Diameter or Distance Between
Parallel Surfaces of Hot-Worked Rod and Bar
Permissible Variations from
A
Specified Dimensions, in. (mm)
Specified Dimension, in. (mm)
+ −
Rod and bar, hot-worked:
1 (25.4) and under 0.016 (0.41) 0.016 (0.41)
Over 1 (25.4) to 2 (50.8), incl 0.031 (0.79) 0.016 (0.41)
Over 2 (50.8) to 4 (101.6), incl 0.047 (1.19) 0.031 (0.79)
Over 4 (101.6) 0.125 (3.18) 0.063 (1.60)
Rod, rough-turned or rough-ground:
Under 1 (25.4) 0.005 (0.13) 0.005 (0.13)
1 (25.4) and over 0.031 (0.79) 0
B
Forging quality rod:
Under 1 (25.4) 0.005 (0.13) 0.005 (0.13)
1 (25.4) and over 0.031 (0.79) 0
A
Dimensions apply to diameter of rods, to distance between parallel surfaces of
hexagons and squares, and separately to width and thickness of rectangles.
B
Spot grinding is permitted to remove minor surface imperfections. The depth of
these spot ground areas shall not exceed 3 % of the diameter of the rod.
7.5 Length—The permissible variations in length of cold-worked and hot-worked rod and bar shall be as prescribed in Table 6.
7.5.1 Rods and bars ordered to random or nominal lengths will be furnished with either cropped or saw-cut ends; material ordered
to cut lengths will be furnished with square saw-cut or machined ends.
7.6 Straightness:
7.6.1 The permissible variations in straightness of cold-worked rod and bar as determined by the departure from straightness shall
be as prescribed in Table 7.
7.6.2 The permissible variations in straightness of precision-straightened, cold-worked rod as determined by the departure from
straightness shall be as prescribed in Table 8.
7.6.2.1 In determining straightness in the standard 42-in. (1.07-m)42 in. (1.07 m) distance between supports or, when specified,
in determining straightness in lengths not in excess of those shown in Table 8, the rod shall be placed on a precision table equipped
with ballbearing rollers and a micrometer or dial indicator. The rod shall then be rotated slowly against the indicator, and the
deviation from straightness in any portion of the rod between the supports shall not exceed the permissible variations prescribed
B160 − 24
TABLE 5 Normal Machining Allowances for Hot-worked Material
Normal Machining Allowance, in. (mm)
Distance Between
Finished-Machined Dimensions for Finishes as
For Rectangular Bar
A On Diameter, Parallel Surface, for
Indicated Below, in. (mm)
for Rods Hexagonal and
On Thickness On Width
Square Bar
B
Hot-worked:
7 1 1 1 3
Up to ⁄8 (22.2), incl ⁄8 (3.2) ⁄8 (3.2) ⁄8 (3.2) ⁄16 (4.8)
7 7 1 3 1 3
Over ⁄8 to 1 ⁄8 (22.2 to 47.6), incl ⁄8 (3.2) ⁄16 (4.8) ⁄8 (3.2) ⁄16 (4.8)
7 7 3 1 3
Over 1 ⁄8 to 2 ⁄8 (47.6 to 73.0), incl ⁄16 (4.8) ⁄4 (6.4) — ⁄16 (4.8)
7 13 1 3
Over 2 ⁄8 to 3 ⁄16 (73.0 to 96.8), incl ⁄4 (6.4) — — ⁄16 (4.8)
13 1 3
Over 3 ⁄16 (96.8) ⁄4 (6.4) — — ⁄8 (9.5)
Hot-worked rods:
C
Rough-turned or Rough-ground:
15 1
⁄16 to 4 (23.8 to 101.6), incl in diameter ⁄16 (1.6) — — —
Over 4 to 12 (101.6 to 304.8), incl in ⁄8 (3.2) — —
diameter
A
Dimensions apply to diameter of rods, to distance between parallel surfaces of hexagonal and square bar, and separately to width and thickness of rectangular bar.
B
The allowances for hot-worked material in Table 5 are recommended for rods machined in lengths of 3 ft (0.91 m) or less and for bars m
...
Questions, Comments and Discussion
Ask us and Technical Secretary will try to provide an answer. You can facilitate discussion about the standard in here.
Loading comments...