ASTM B443-19
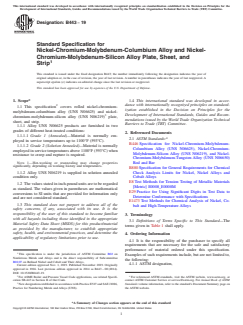
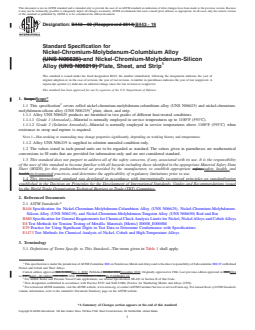
(Specification)Standard Specification for Nickel-Chromium-Molybdenum-Columbium Alloy and Nickel-Chromium-Molybdenum-Silicon Alloy Plate, Sheet, and Strip
Standard Specification for Nickel-Chromium-Molybdenum-Columbium Alloy and Nickel-Chromium-Molybdenum-Silicon Alloy Plate, Sheet, and Strip
ABSTRACT
This specification covers rolled nickel-chromium-molybdenum-columbium alloy (UNS No. N06625) and nickel-chromium-molybdenum-silicon alloy (UNS No. N06219) plates, sheets, and strips. N06625 alloys shall be furnished in two grades of different heat treatment conditions, namely: Grade 1 (annealed); and Grade 2 (solution annealed). N06219 alloys, on the other hand, shall be furnished in solution annealed condition only. Materials shall be sampled prepared, and tested accordingly to examine their conformance to dimensional (thickness, weight, width, diameter, length, straightness, edges, squareness, and flatness), mechanical (tensile and yield strengths, and elongation), and chemical composition requirements.
SCOPE
1.1 This specification2 covers rolled nickel-chromium-molybdenum-columbium alloy (UNS N06625) and nickel-chromium-molybdenum-silicon alloy (UNS N06219)3 plate, sheet, and strip.
1.1.1 Alloy UNS N06625 products are furnished in two grades of different heat-treated conditions:
1.1.1.1 Grade 1 (Annealed)—Material is normally employed in service temperatures up to 1100°F (593°C).
1.1.1.2 Grade 2 (Solution Annealed)—Material is normally employed in service temperatures above 1100°F (593°C) when resistance to creep and rupture is required.
Note 1: Hot-working or reannealing may change properties significantly, depending on working history and temperatures.
1.1.2 Alloy UNS N06219 is supplied in solution annealed condition only.
1.2 The values stated in inch-pound units are to be regarded as standard. The values given in parentheses are mathematical conversions to SI units that are provided for information only and are not considered standard.
1.3 This standard does not purport to address all of the safety concerns, if any, associated with its use. It is the responsibility of the user of this standard to become familiar with all hazards including those identified in the appropriate Material Safety Data Sheet (MSDS) for this product/material as provided by the manufacturer, to establish appropriate safety, health, and environmental practices, and determine the applicability of regulatory limitations prior to use.
1.4 This international standard was developed in accordance with internationally recognized principles on standardization established in the Decision on Principles for the Development of International Standards, Guides and Recommendations issued by the World Trade Organization Technical Barriers to Trade (TBT) Committee.
General Information
- Status
- Published
- Publication Date
- 31-Oct-2019
- Technical Committee
- B02 - Nonferrous Metals and Alloys
- Drafting Committee
- B02.07 - Refined Nickel and Cobalt and Their Alloys
Relations
- Effective Date
- 01-Nov-2019
- Effective Date
- 01-Nov-2023
- Effective Date
- 01-Oct-2008
- Effective Date
- 01-Mar-2008
- Effective Date
- 01-Mar-2008
- Effective Date
- 01-Mar-2008
- Effective Date
- 15-Nov-2006
- Effective Date
- 15-Sep-2006
- Effective Date
- 01-May-2006
- Effective Date
- 01-Dec-2004
- Effective Date
- 01-Apr-2004
- Effective Date
- 01-Dec-2003
- Effective Date
- 01-Oct-2003
- Effective Date
- 10-Jul-2003
- Effective Date
- 10-Jul-2003
Overview
ASTM B443-19 is the standard specification issued by ASTM International for rolled nickel-chromium-molybdenum-columbium alloy (UNS N06625) and nickel-chromium-molybdenum-silicon alloy (UNS N06219) in the form of plate, sheet, and strip. This specification establishes requirements for product dimensions, mechanical properties, and chemical composition, ensuring materials meet the performance demands of critical industries such as chemical processing, power generation, and aerospace.
Key alloys covered:
- UNS N06625: Supplied in Grade 1 (annealed) for service up to 1100°F (593°C), and Grade 2 (solution annealed) for higher temperatures requiring enhanced resistance to creep and rupture.
- UNS N06219: Supplied in solution annealed condition only.
Both metric and inch-pound units are referenced, though inch-pound is considered the primary standard.
Key Topics
Material Grades and Conditions
- N06625 Alloy
- Grade 1 (Annealed): For moderate temperature applications.
- Grade 2 (Solution Annealed): For high-temperature, high-stress environments.
- N06219 Alloy
- Solution annealed only, suitable for applications needing specific corrosion and high-temperature performance.
Dimensional and Mechanical Requirements
- Conformance to rigorous requirements for:
- Thickness, width, length, straightness, edges, squareness, and flatness.
- Mechanical properties, including tensile and yield strength, and elongation.
- Products are available in various forms including hot-rolled and cold-rolled plate, sheet, and strip.
Chemical Composition Standards
- The specification defines maximum/minimum levels for carbon, manganese, silicon, chromium, molybdenum, columbium plus tantalum, iron, aluminum, titanium, cobalt, copper (for N06219), and nickel.
Testing and Certification
- Mandates chemical analysis, tensile testing, and inspection to verify compliance.
- Certified documentation is provided to purchasers.
Applications
Nickel-chromium-molybdenum alloys such as UNS N06625 and UNS N06219 are renowned for their:
- Corrosion resistance in aggressive chemical environments
- High-temperature strength and structural reliability
- Resistance to oxidation and stress-corrosion cracking
Typical uses include:
- Chemical processing equipment: Vessels, heat exchangers, and piping
- Aerospace components: Structural parts, exhaust systems
- Power generation: Boilers and superheater tubes
- Marine applications: Seawater components and offshore structures
The dimensional accuracy and certified mechanical properties required by ASTM B443-19 make these materials especially suited for applications where safety, longevity, and performance are critical.
Related Standards
ASTM B443-19 references and aligns with several related ASTM standards to ensure comprehensive quality control and clarity for manufacturers and purchasers:
- ASTM B446: Specification for Rod and Bar products of related nickel alloys.
- ASTM B880: Chemical check analysis limits for nickel and nickel alloys.
- ASTM E8/E8M: Test methods for tension testing of metallic materials.
- ASTM E29: Use of significant digits in test data.
- ASTM E1473: Methods for chemical analysis of nickel, cobalt, and high-temperature alloys.
Compliance with ASME Boiler and Pressure Vessel Code SB-443 is also acknowledged for pressure equipment applications.
Keywords: ASTM B443, nickel-chromium-molybdenum alloy, UNS N06625, UNS N06219, plate, sheet, strip, high-temperature alloys, corrosion resistant alloys, material standards, mechanical properties, chemical composition.
Buy Documents
ASTM B443-19 - Standard Specification for Nickel-Chromium-Molybdenum-Columbium Alloy and Nickel-Chromium-Molybdenum-Silicon Alloy Plate, Sheet, and Strip
REDLINE ASTM B443-19 - Standard Specification for Nickel-Chromium-Molybdenum-Columbium Alloy and Nickel-Chromium-Molybdenum-Silicon Alloy Plate, Sheet, and Strip
Get Certified
Connect with accredited certification bodies for this standard

Element Materials Technology
Materials testing and product certification.

Inštitut za kovinske materiale in tehnologije
Institute of Metals and Technology. Materials testing, metallurgical analysis, NDT.
Sponsored listings
Frequently Asked Questions
ASTM B443-19 is a technical specification published by ASTM International. Its full title is "Standard Specification for Nickel-Chromium-Molybdenum-Columbium Alloy and Nickel-Chromium-Molybdenum-Silicon Alloy Plate, Sheet, and Strip". This standard covers: ABSTRACT This specification covers rolled nickel-chromium-molybdenum-columbium alloy (UNS No. N06625) and nickel-chromium-molybdenum-silicon alloy (UNS No. N06219) plates, sheets, and strips. N06625 alloys shall be furnished in two grades of different heat treatment conditions, namely: Grade 1 (annealed); and Grade 2 (solution annealed). N06219 alloys, on the other hand, shall be furnished in solution annealed condition only. Materials shall be sampled prepared, and tested accordingly to examine their conformance to dimensional (thickness, weight, width, diameter, length, straightness, edges, squareness, and flatness), mechanical (tensile and yield strengths, and elongation), and chemical composition requirements. SCOPE 1.1 This specification2 covers rolled nickel-chromium-molybdenum-columbium alloy (UNS N06625) and nickel-chromium-molybdenum-silicon alloy (UNS N06219)3 plate, sheet, and strip. 1.1.1 Alloy UNS N06625 products are furnished in two grades of different heat-treated conditions: 1.1.1.1 Grade 1 (Annealed)—Material is normally employed in service temperatures up to 1100°F (593°C). 1.1.1.2 Grade 2 (Solution Annealed)—Material is normally employed in service temperatures above 1100°F (593°C) when resistance to creep and rupture is required. Note 1: Hot-working or reannealing may change properties significantly, depending on working history and temperatures. 1.1.2 Alloy UNS N06219 is supplied in solution annealed condition only. 1.2 The values stated in inch-pound units are to be regarded as standard. The values given in parentheses are mathematical conversions to SI units that are provided for information only and are not considered standard. 1.3 This standard does not purport to address all of the safety concerns, if any, associated with its use. It is the responsibility of the user of this standard to become familiar with all hazards including those identified in the appropriate Material Safety Data Sheet (MSDS) for this product/material as provided by the manufacturer, to establish appropriate safety, health, and environmental practices, and determine the applicability of regulatory limitations prior to use. 1.4 This international standard was developed in accordance with internationally recognized principles on standardization established in the Decision on Principles for the Development of International Standards, Guides and Recommendations issued by the World Trade Organization Technical Barriers to Trade (TBT) Committee.
ABSTRACT This specification covers rolled nickel-chromium-molybdenum-columbium alloy (UNS No. N06625) and nickel-chromium-molybdenum-silicon alloy (UNS No. N06219) plates, sheets, and strips. N06625 alloys shall be furnished in two grades of different heat treatment conditions, namely: Grade 1 (annealed); and Grade 2 (solution annealed). N06219 alloys, on the other hand, shall be furnished in solution annealed condition only. Materials shall be sampled prepared, and tested accordingly to examine their conformance to dimensional (thickness, weight, width, diameter, length, straightness, edges, squareness, and flatness), mechanical (tensile and yield strengths, and elongation), and chemical composition requirements. SCOPE 1.1 This specification2 covers rolled nickel-chromium-molybdenum-columbium alloy (UNS N06625) and nickel-chromium-molybdenum-silicon alloy (UNS N06219)3 plate, sheet, and strip. 1.1.1 Alloy UNS N06625 products are furnished in two grades of different heat-treated conditions: 1.1.1.1 Grade 1 (Annealed)—Material is normally employed in service temperatures up to 1100°F (593°C). 1.1.1.2 Grade 2 (Solution Annealed)—Material is normally employed in service temperatures above 1100°F (593°C) when resistance to creep and rupture is required. Note 1: Hot-working or reannealing may change properties significantly, depending on working history and temperatures. 1.1.2 Alloy UNS N06219 is supplied in solution annealed condition only. 1.2 The values stated in inch-pound units are to be regarded as standard. The values given in parentheses are mathematical conversions to SI units that are provided for information only and are not considered standard. 1.3 This standard does not purport to address all of the safety concerns, if any, associated with its use. It is the responsibility of the user of this standard to become familiar with all hazards including those identified in the appropriate Material Safety Data Sheet (MSDS) for this product/material as provided by the manufacturer, to establish appropriate safety, health, and environmental practices, and determine the applicability of regulatory limitations prior to use. 1.4 This international standard was developed in accordance with internationally recognized principles on standardization established in the Decision on Principles for the Development of International Standards, Guides and Recommendations issued by the World Trade Organization Technical Barriers to Trade (TBT) Committee.
ASTM B443-19 is classified under the following ICS (International Classification for Standards) categories: 77.150.40 - Nickel and chromium products. The ICS classification helps identify the subject area and facilitates finding related standards.
ASTM B443-19 has the following relationships with other standards: It is inter standard links to ASTM B443-00(2014), ASTM B446-23, ASTM E29-08, ASTM B446-03(2008)e1, ASTM B446-03(2008), ASTM B880-03(2008), ASTM E29-06b, ASTM E29-06a, ASTM E29-06, ASTM E29-04, ASTM E8-04, ASTM E1473-03, ASTM E1473-94a(2003), ASTM B880-03, ASTM E8-03. Understanding these relationships helps ensure you are using the most current and applicable version of the standard.
ASTM B443-19 is available in PDF format for immediate download after purchase. The document can be added to your cart and obtained through the secure checkout process. Digital delivery ensures instant access to the complete standard document.
Standards Content (Sample)
This international standard was developed in accordance with internationally recognized principles on standardization established in the Decision on Principles for the
Development of International Standards, Guides and Recommendations issued by the World Trade Organization Technical Barriers to Trade (TBT) Committee.
Designation:B443 −19
Standard Specification for
Nickel-Chromium-Molybdenum-Columbium Alloy and Nickel-
Chromium-Molybdenum-Silicon Alloy Plate, Sheet, and
Strip
This standard is issued under the fixed designation B443; the number immediately following the designation indicates the year of
original adoption or, in the case of revision, the year of last revision. A number in parentheses indicates the year of last reapproval. A
superscript epsilon (´) indicates an editorial change since the last revision or reapproval.
This standard has been approved for use by agencies of the U.S. Department of Defense.
1. Scope* 1.4 This international standard was developed in accor-
dance with internationally recognized principles on standard-
1.1 This specification covers rolled nickel-chromium-
ization established in the Decision on Principles for the
molybdenum-columbium alloy (UNS N06625) and nickel-
Development of International Standards, Guides and Recom-
chromium-molybdenum-silicon alloy (UNS N06219) plate,
mendations issued by the World Trade Organization Technical
sheet, and strip.
Barriers to Trade (TBT) Committee.
1.1.1 Alloy UNS N06625 products are furnished in two
grades of different heat-treated conditions:
2. Referenced Documents
1.1.1.1 Grade 1 (Annealed)—Material is normally em-
2.1 ASTM Standards:
ployed in service temperatures up to 1100°F (593°C).
B446 Specification for Nickel-Chromium-Molybdenum-
1.1.1.2 Grade 2 (Solution Annealed)—Material is normally
Columbium Alloy (UNS N06625), Nickel-Chromium-
employed in service temperatures above 1100°F (593°C) when
Molybdenum-Silicon Alloy (UNS N06219), and Nickel-
resistance to creep and rupture is required.
Chromium-Molybdenum-Tungsten Alloy (UNS N06650)
NOTE 1—Hot-working or reannealing may change properties
Rod and Bar
significantly, depending on working history and temperatures.
B880 Specification for General Requirements for Chemical
1.1.2 Alloy UNS N06219 is supplied in solution annealed Check Analysis Limits for Nickel, Nickel Alloys and
condition only. Cobalt Alloys
E8 Test Methods for Tension Testing of Metallic Materials
1.2 The values stated in inch-pound units are to be regarded
[Metric] E0008_E0008M
as standard. The values given in parentheses are mathematical
E29 Practice for Using Significant Digits in Test Data to
conversions to SI units that are provided for information only
Determine Conformance with Specifications
and are not considered standard.
E1473 Test Methods for Chemical Analysis of Nickel, Co-
1.3 This standard does not purport to address all of the
balt and High-Temperature Alloys
safety concerns, if any, associated with its use. It is the
responsibility of the user of this standard to become familiar
3. Terminology
with all hazards including those identified in the appropriate
3.1 Definitions of Terms Specific to This Standard—The
Material Safety Data Sheet (MSDS) for this product/material
terms given in Table 1 shall apply.
as provided by the manufacturer, to establish appropriate
safety, health, and environmental practices, and determine the
4. Ordering Information
applicability of regulatory limitations prior to use.
4.1 It is the responsibility of the purchaser to specify all
requirements that are necessary for the safe and satisfactory
performance of material ordered under this specification.
This specification is under the jurisdiction of ASTM Committee B02 on
Examples of such requirements include, but are not limited to,
Nonferrous Metals and Alloys and is the direct responsibility of Subcommittee
the following:
B02.07 on Refined Nickel and Cobalt and Their Alloys.
4.1.1 ASTM designation,
Current edition approved Nov. 1, 2019. Published November 2019. Originally
approved in 1966. Last previous edition approved in 2014 as B443 – 00 (2014).
DOI: 10.1520/B0443-19.
2 4
For ASME Boiler and Pressure Vessel Code applications, see related Specifi- For referenced ASTM standards, visit the ASTM website, www.astm.org, or
cation SB-443 in Section II of that Code. contact ASTM Customer Service at service@astm.org. For Annual Book of ASTM
New designation established in accordance with Practice E527 and SAE J1086, Standards volume information, refer to the standard’s Document Summary page on
Practice for Numbering Metals and Alloys (UNS). the ASTM website.
*A Summary of Changes section appears at the end of this standard
Copyright © ASTM International, 100 Barr Harbor Drive, PO Box C700, West Conshohocken, PA 19428-2959. United States
B443−19
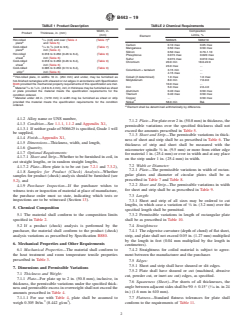
TABLE 1 Product Description TABLE 2 Chemical Requirements
Width, in. Composition
Product Thickness, in. (mm)
(mm) Limits, %
Element
A
Hot-rolled ⁄16 (4.8) and over (Table 4 (Table 7) N06625 N06219
A
plate and Table 5)
Carbon 0.10 max 0.05 max
3 3
Cold-rolled ⁄16 to ⁄8 (4.8 to 9.5), (Table 7)
Manganese 0.50 max 0.50 max
B
plate incl (Table 4)
Silicon 0.50 max 0.70-1.10
Hot-rolled 0.018 to 0.250 (0.46 to 6.4), (Table 9)
Phosphorus 0.015 max 0.020 max
B
sheet incl (Table 6)
Sulfur 0.015 max 0.010 max
Cold-rolled 0.018 to 0.250 (0.46 to 6.4), (Table 9)
Chromium 20.0 min 18.0-22.0
C
sheet incl (Table 6)
23.0 max .
Cold-rolled 0.005 to 0.250 (0.13 to 6.4), (Table 9)
Columbium + tantalum 3.15 min .
C
strip incl (Table 6)
4.15 max .
A
Cobalt (if determined) 1.0 max 1.0 max
Hot-rolled plate, in widths 10 in. (254 mm) and under, may be furnished as
Molybdenum 8.0 min 7.0-9.0
hot-finished rectangles with sheared or cut edges in accordance with Specification
B446 provided the mechanical property requirements of this specification are met. 10.0 max .
B
3 1
Iron 5.0 max 2.0-4.0
Material ⁄16to ⁄4in.(4.8to6.4mm),incl,inthicknessmaybefurnishedassheet
or plate provided the material meets the specification requirements for the Aluminum 0.40 max 0.50 max
Titanium 0.40 max 0.50 max
condition ordered.
C
Material under 48 in. (1219 mm) in width may be furnished as sheet or strip Copper . 0.50 max
A
Nickel 58.0 min Bal.
provided the material meets the specification requirements for the condition
ordered.
A
Element shall be determined arithmetically by difference.
4.1.2 Alloy name or UNS number,
7.1.2 Plate—For plate over 2 in. (50.8 mm) in thickness, the
4.1.3 Condition—See 1.1.1, 1.1.2 and Appendix X1,
permissible variations over the specified thickness shall not
4.1.3.1 If neither grade of N06625 is specified, Grade 1 will
exceed the amounts prescribed in Table 5.
be supplied,
7.1.3 Sheet and Strip—The permissible variations in thick-
4.1.4 Finish—Appendix X1,
ness of sheet and strip shall be as prescribed in Table 6. The
4.1.5 Dimensions—Thickness, width, and length,
thickness of strip and sheet shall be measured with the
4.1.6 Quantity,
micrometer spindle ⁄8 in. (9.5 mm) or more from either edge
4.1.7 Optional Requirements:
for material 1 in. (25.4 mm) or over in width and at any place
4.1.7.1 Sheet and Strip—Whether to be furnished in coil, in
on the strip under 1 in. (25.4 mm) in width.
cut straight lengths, or in random straight lengths,
7.2 Width or Diameter:
4.1.7.2 Plate—How plate is to be cut (see 7.2.1 and 7.3.2),
7.2.1 Plate—The permissible variations in width of rectan-
4.1.8 Samples for Product (Check) Analysis—Whether
gular plates and diameter of circular plates shall be as
samples for product (check) analysis should be furnished (see
prescribed in Table 7 and Table 8.
5.2), and
7.2.2 Sheet and Strip—The permissible variations in width
4.1.9 Purchaser Inspection—If the purchaser wishes to
for sheet and strip shall be as prescribed in Table 9.
witness tests or inspection of material at place of manufacture,
the purchase order must so state, indicating which tests or
7.3 Length:
inspections are to be witnessed (Section 13).
7.3.1 Sheet and strip of all sizes may be ordered to cut
lengths, in which case a variation of ⁄8 in. (3.2 mm) over the
5. Chemical Composition
specified length shall be permitted.
5.1 The material shall conform to the composition limits 7.3.2 Permissible variations in length of rectangular plate
specified in Table 2.
shall be as prescribed in Table 10.
5.2 If a product (check) analysis is performed by the
7.4 Straightness:
purchaser, the material shall conform to the product (check) 7.4.1 The edgewise curvature (depth of chord) of flat sheet,
analysis variations as prescribed by Specification B880.
strip, and plate shall not exceed 0.05 in. (1.27 mm) multiplied
by the length in feet (0.04 mm multiplied by the length in
6. Mechanical Properties and Other Requirements
centimetres).
6.1 Mechanical Properties—The material shall conform to 7.4.2 Straightness for coiled material is subject to agree-
the heat treatment and room temperature tensile properties ment between the manufacturer and the purchaser.
prescribed in Table 3.
7.5 Edges:
7.5.1 Sheet and strip shall have sheared or slit edges.
7. Dimensions and Permissible Variations
7.5.2 Plate shall have sheared or cut (machined, abrasive
7.1 Thickness and Weight:
cut, powder cut, or inert arc cut) edges, as specified.
7.1.1 Plate—For plate up to 2 in. (50.8 mm), inclusive, in
7.6 Squareness (Sheet)—For sheets of all thicknesses, the
thickness, the permissible variations under the specified thick-
angle between adjacent sides shall be 90 6 0.15° ( ⁄16 in. in 24
ness and permissible excess in overweight shall not exceed the
in.) (1.6 mm in 610 mm).
amounts prescribed in Table 4.
7.1.1.1 For use with Table 4, plate shall be assumed to 7.7 Flatness—Standard flatness tolerances for plate shall
3 3
weigh 0.305 lb/in. (8.442 g/cm ). conform to the requirements of Table 11.
B443−19
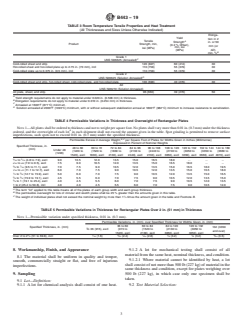
TABLE 3 Room Temperature Tensile Properties and Heat Treatment
(All Thicknesses and Sizes Unless Otherwise Indicated)
Elonga-
Yield
tionin2
Tensile A
Strength
in.or50
Product Strength, min,
(0.2 % Offset),
mm (or
min, ksi
ksi (MPa)
4D),
(MPa)
B
min, %
Grade 1
C
UNS N06625 (Annealed)
Cold-rolled sheet and strip 120 (827) 60 (414) 30
Hot-rolled sheet and hot-rolled plate up to 2.75 in. (70 mm), incl 110 (758) 55 (379) 30
Cold-rolled plate up to 0.375 in. (9.5 mm), incl 110 (758) 55 (379) 30
Grade 2
D
UNS N06625 (Solution Annealed)
Cold-rolled sheet and strip, hot-rolled sheet, cold-rolled plate, and hot-rolled plate 100 (690) 40 (276) 30
All
UNS N06219 (Solution Annealed)
All plate, sheet, and strip 96 (660) 39 (270) 50
A
Yield strength requirements do not apply to material under 0.020 in. (0.508 mm) in thickness.
B
Elongation requirements do not apply to material under 0.010 in. (0.254 mm) in thickness.
C
Annealed at 1600°F (871°C) minimum.
D
Solution annealed at 2000°F (1093°C) minimum, with or without subsequent stabilization anneal at 1800°F (982°C) minimum to increase resistance to sensitization.
TABLE 4 Permissible Variations in Thickness and Overweight of Rectangular Plates
NOTE 1—All plates shall be ordered to thickness and not to weight per square foot. No plates shall vary more than 0.01 in. (0.3 mm) under the thickness
A
ordered, and the overweight of each lot in each shipment shall not exceed the amount given in the table. Spot grinding is permitted to remove surface
imperfections, such spots not to exceed 0.01 in. (0.3 mm) under the specified thickness.
B,C
Permissible Excess in Average Weight, per Square Foot of Plates for Widths Given in Inches (Millimetres)
Expressed in Percent of Nominal Weights
Specified Thickness, in.
48 to 60 60 to 72 72 to 84 84 to 96 96 to 108 108 to 120 120 to 132 132 to 144 144 to 160
(mm)
Under 48
(1220 to (1520 to (1830 to (2130 to (2440 to (2740 to (3050 to (3350 to (3660 to
(1220)
1520), excl 1830), excl 2130), excl 2440), excl 2740), excl 3050), excl 3350), excl 3660), excl 4070), excl
3 5
⁄16 to ⁄16 (4.8 to 7.9), excl 9.0 10.5 12.0 13.5 15.0 16.5 18.0 . . .
5 3
⁄16 to ⁄8 (7.9 to 9.5), excl 7.5 9.0 10.5 12.0 13.5 15.0 16.5 18.0 . .
3 7
⁄8 to ⁄16 (9.5 to 11.1), excl 7.0 7.5 9.0 10.5 12.0 13.5 15.0 16.5 18.0 19.5
7 1
⁄16 to ⁄2 (11.1 to 12.7), excl 6.0 7.0 7.5 9.0 10.5 12.0 13.5 15.0 16.5 18.0
1 5
⁄2 to ⁄8 (12.7 to 15.9), excl 5.0 6.0 7.0 7.5 9.0 10.5 12.0 13.5 15.0 16.5
5 3
⁄8 to ⁄4 (15.9 to 19.1), excl 4.5 5.5 6.0 7.0 7.5 9.0 10.5 12.0 13.5 15.0
⁄4 to 1 (19.1 to 25.4), excl 4.0 4.5 5.5 6.0 7.0 7.5 9.0 10.5 12.0 13.5
1 to 2 (25.4 to 50.8), incl 4.0 4.0 4.5 5.5 6.0 7.0 7.5 9.0 10.5 12.0
A
The term “lot” applied to this table means all of the plates of each group width and each group thickness.
B
The permissible overweight for lots of circular and sketch plates shall be 25 % greater than the amounts given in this table.
C
The weight of individual plates shall not exceed the nominal weight by more than 1 ⁄4 times the amount given in the table and Footnote B.
TABLE 5 Permissible Variations in Thickness for Rectangular Plates Over 2 in. (51 mm) in Thickness
NOTE 1—Permissible variation under specified thickness, 0.01 in. (0.3 mm).
Permissible Variations, in. (mm), over Specified Thickness for Widths Given, in. (mm)
36 to 60 60 to 84 84 to 120 120 to 132
Specified Thickness, in. (mm) 132 (3350
To 36 (915), excl (915 to (1520 to (2130 to (3050 to
and over)
1520), excl 2130), excl 3050), excl 3350), excl
3 1 3 7 1 1 9
Over 2 to 2 ⁄4 (51 to 69.8), incl ⁄16 (1.6) ⁄32 (2.4) ⁄64 (2.8) ⁄8 (3.2) ⁄8 (3.2) ⁄64 (3.6)
8. Workmanship, Finish, and Appearance 9.1.2 A lot for mechanical testing shall consist of all
material from the same heat, nominal thickness, and condition.
8.1 The material shall be uniform in quality and temper,
9.1.2.1 Where material cannot be identified by heat, a lot
smooth, commercially straight or flat, and free of injurious
shall consist of not more than 500 lb (227 kg) of material in the
imperfections.
same thickness and condition, except for plates weighing over
9. Sampling 500 lb (227 kg), in which case only one specimen shall be
taken.
9.1 Lot—Definition:
9.1.1 A lot for chemical analysis shall consist of one heat. 9.2 Test Material Selection:
B443−19
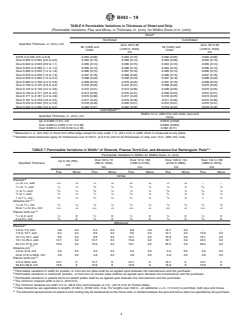
TABLE 6 Permissible Variations in Thickness of Sheet and Strip
(Permissible Variations, Plus and Minus, in Thickness, in. (mm), for Widths Given in in. (mm))
A
Sheet
Hot-Rolled Cold-Rolled
Specified Thickness, in. (mm), incl
Over 48 to 60 Over 48 to 60
48 (1220) and 48 (1220) and
(1220 to 1520), (1220 to 1520),
Under Under
incl incl
0.018 to 0.025 (0.5 to 0.6) 0.003 (0.08) 0.004 (0.10) 0.002 (0.05) 0.003 (0.08)
Over 0.025 to 0.034 (0.6 to 0.9) 0.004 (0.10) 0.005 (0.13) 0.003 (0.08) 0.004 (0.10)
Over 0.034 to 0.043 (0.9 to 1.1) 0.005 (0.13) 0.006 (0.15) 0.004 (0.10) 0.005 (0.13)
Over 0.043 to 0.056 (1.1 to 1.4) 0.005 (0.13) 0.006 (0.15) 0.004 (0.10) 0.005 (0.13)
Over 0.056 to 0.070 (1.4 to 1.8) 0.006 (0.15) 0.007 (0.18) 0.005 (0.13) 0.006 (0.15)
Over 0.070 to 0.078 (1.8 to 1.9) 0.007 (0.18) 0.008 (0.20) 0.006 (0.15) 0.007 (0.18)
Over 0.078 to 0.093 (1.9 to 2.4) 0.008 (0.20) 0.009 (0.23) 0.007 (0.18) 0.008 (0.20)
Over 0.093 to 0.109 (2.4 to 2.8) 0.009 (0.23) 0.010 (0.25) 0.007 (0.18) 0.009 (0.23)
Over 0.109 to 0.125 (2.8 to 3.2) 0.010 (0.25) 0.012 (0.31) 0.008 (0.20) 0.010 (0.25)
Over 0.125 to 0.140 (3.2 to 3.6) 0.012 (0.31) 0.014 (0.36) 0.008 (0.20) 0.010 (0.25)
Over 0.140 to 0.171 (3.6 to 4.3) 0.014 (0.36) 0.016 (0.41) 0.009 (0.23) 0.012 (0.31)
Over 0.171 to 0.187 (4.3 to 4.8) 0.015 (0.38) 0.017 (0.43) 0.010 (0.25) 0.013 (0.33)
Over 0.187 to 0.218 (4.8 to 5.5) 0.017 (0.43) 0.019 (0.48) 0.011 (0.28) 0.015 (0.38)
Over 0.218 to 0.234 (5.5 to 5.9) 0.018 (0.46) 0.020 (0.51) 0.012 (0.31) 0.016 (0.41)
Over 0.234 to 0.250 (5.9 to 6.4) 0.020 (0.51) 0.022 (0.56) 0.013 (0.33) 0.018 (0.46)
A,B
Cold-Rolled
Widths 12 in. (305 mm) and under, plus and
Specified Thickness, in. (mm), incl
minus
Up to 0.050 (1.27), incl 0.0015 (0.038)
Over 0.050 to 0.093 (1.27 to 2.39) 0.0025 (0.063)
Over 0.093 to 0.125 (2.39 to 3.18) 0.004 (0.11)
A
Measured ⁄8 in. (9.5 mm) or more from either edge except for strip under 1 in. (25.4 mm) in width which is measured at any place.
B
Standard sheet tolerances apply for thickn
...
This document is not an ASTM standard and is intended only to provide the user of an ASTM standard an indication of what changes have been made to the previous version. Because
it may not be technically possible to adequately depict all changes accurately, ASTM recommends that users consult prior editions as appropriate. In all cases only the current version
of the standard as published by ASTM is to be considered the official document.
Designation: B443 − 00 (Reapproved 2014) B443 − 19
Standard Specification for
Nickel-Chromium-Molybdenum-Columbium Alloy
(UNS N06625) and Nickel-Chromium-Molybdenum-Silicon
Alloy (UNS N06219) Plate, Sheet, and Strip
This standard is issued under the fixed designation B443; the number immediately following the designation indicates the year of
original adoption or, in the case of revision, the year of last revision. A number in parentheses indicates the year of last reapproval. A
superscript epsilon (´) indicates an editorial change since the last revision or reapproval.
This standard has been approved for use by agencies of the U.S. Department of Defense.
1. Scope Scope*
1.1 This specification covers rolled nickel-chromium-molybdenum-columbium alloy (UNS N06625) and nickel-chromium-
molybdenum-silicon alloy (UNS N06219) plate, sheet, and strip.
1.1.1 Alloy UNS N06625 products are furnished in two grades of different heat-treated conditions:
1.1.1.1 Grade 1 (Annealed)—Material is normally employed in service temperatures up to 1100°F (593°C).
1.1.1.2 Grade 2 (Solution Annealed)—Material is normally employed in service temperatures above 1100°F (593°C) when
resistance to creep and rupture is required.
NOTE 1—Hot-working or reannealing may change properties significantly, depending on working history and temperatures.
1.1.2 Alloy UNS N06219 is supplied in solution annealed condition only.
1.2 The values stated in inch-pound units are to be regarded as standard. The values given in parentheses are mathematical
conversions to SI units that are provided for information only and are not considered standard.
1.3 This standard does not purport to address all of the safety concerns, if any, associated with its use. It is the responsibility
of the user of this standard to become familiar with all hazards including those identified in the appropriate Material Safety Data
Sheet (MSDS) for this product/material as provided by the manufacturer, to establish appropriate safety safety, health, and
healthenvironmental practices, and determine the applicability of regulatory limitations prior to use.
1.4 This international standard was developed in accordance with internationally recognized principles on standardization
established in the Decision on Principles for the Development of International Standards, Guides and Recommendations issued
by the World Trade Organization Technical Barriers to Trade (TBT) Committee.
2. Referenced Documents
2.1 ASTM Standards:
B446 Specification for Nickel-Chromium-Molybdenum-Columbium Alloy (UNS N06625), Nickel-Chromium-Molybdenum-
Silicon Alloy (UNS N06219), and Nickel-Chromium-Molybdenum-Tungsten Alloy (UNS N06650) Rod and Bar
B880 Specification for General Requirements for Chemical Check Analysis Limits for Nickel, Nickel Alloys and Cobalt Alloys
E8 Test Methods for Tension Testing of Metallic Materials [Metric] E0008_E0008M
E29 Practice for Using Significant Digits in Test Data to Determine Conformance with Specifications
E1473 Test Methods for Chemical Analysis of Nickel, Cobalt and High-Temperature Alloys
3. Terminology
3.1 Definitions of Terms Specific to This Standard—The terms given in Table 1 shall apply.
This specification is under the jurisdiction of ASTM Committee B02 on Nonferrous Metals and Alloys and is the direct responsibility of Subcommittee B02.07 on Refined
Nickel and Cobalt and Their Alloys.
Current edition approved Oct. 1, 2014Nov. 1, 2019. Published October 2014November 2019. Originally approved in 1966. Last previous edition approved in 20092014
as B443B443 – 00 (2014).– 00 (2009). DOI: 10.1520/B0443-00R14.10.1520/B0443-19.
For ASME Boiler and Pressure Vessel Code applications, see related Specification SB-443 in Section II of that Code.
New designation established in accordance with Practice E527 and SAE J1086, Practice for Numbering Metals and Alloys (UNS).
For referenced ASTM standards, visit the ASTM website, www.astm.org, or contact ASTM Customer Service at service@astm.org. For Annual Book of ASTM Standards
volume information, refer to the standard’s Document Summary page on the ASTM website.
*A Summary of Changes section appears at the end of this standard
Copyright © ASTM International, 100 Barr Harbor Drive, PO Box C700, West Conshohocken, PA 19428-2959. United States
B443 − 19
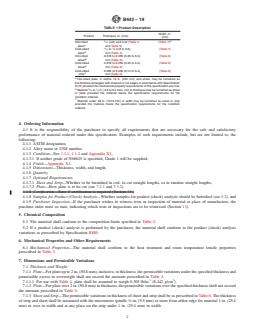
TABLE 1 Product Description
Width, in.
Product Thickness, in. (mm)
(mm)
A
Hot-rolled ⁄16 (4.8) and over (Table 4 (Table 7)
A
plate and Table 5)
3 3
Cold-rolled ⁄16 to ⁄8 (4.8 to 9.5), (Table 7)
B
plate incl (Table 4)
Hot-rolled 0.018 to 0.250 (0.46 to 6.4), (Table 9)
B
sheet incl (Table 6)
Cold-rolled 0.018 to 0.250 (0.46 to 6.4), (Table 9)
C
sheet incl (Table 6)
Cold-rolled 0.005 to 0.250 (0.13 to 6.4), (Table 9)
C
strip incl (Table 6)
A
Hot-rolled plate, in widths 10 in. (254 mm) and under, may be furnished as
hot-finished rectangles with sheared or cut edges in accordance with Specification
B446 provided the mechanical property requirements of this specification are met.
B
3 1
Material ⁄16 to ⁄4 in. (4.8 to 6.4 mm), incl, in thickness may be furnished as sheet
or plate provided the material meets the specification requirements for the
condition ordered.
C
Material under 48 in. (1219 mm) in width may be furnished as sheet or strip
provided the material meets the specification requirements for the condition
ordered.
4. Ordering Information
4.1 It is the responsibility of the purchaser to specify all requirements that are necessary for the safe and satisfactory
performance of material ordered under this specification. Examples of such requirements include, but are not limited to, the
following:
4.1.1 ASTM designation,
4.1.2 Alloy name or UNS number,
4.1.3 Condition—See 1.1.1, 1.1.2 and Appendix X1,
4.1.3.1 If neither grade of N06625 is specified, Grade 1 will be supplied,
4.1.4 Finish—Appendix X1,
4.1.5 Dimensions—Thickness, width, and length,
4.1.6 Quantity,
4.1.7 Optional Requirements:
4.1.7.1 Sheet and Strip—Whether to be furnished in coil, in cut straight lengths, or in random straight lengths,
4.1.7.2 Plate—How plate is to be cut (see 7.2.1 and 7.3.2),
4.1.8 Certification—State if certification is required (Section 15),
4.1.8 Samples for Product (Check) Analysis—Whether samples for product (check) analysis should be furnished (see 5.2), and
4.1.9 Purchaser Inspection—If the purchaser wishes to witness tests or inspection of material at place of manufacture, the
purchase order must so state, indicating which tests or inspections are to be witnessed (Section 13).
5. Chemical Composition
5.1 The material shall conform to the composition limits specified in Table 2.
5.2 If a product (check) analysis is performed by the purchaser, the material shall conform to the product (check) analysis
variations as prescribed by Specification B880.
6. Mechanical Properties and Other Requirements
6.1 Mechanical Properties—The material shall conform to the heat treatment and room temperature tensile properties
prescribed in Table 3.
7. Dimensions and Permissible Variations
7.1 Thickness and Weight:
7.1.1 Plate—For plate up to 2 in. (50.8 mm), inclusive, in thickness, the permissible variations under the specified thickness and
permissible excess in overweight shall not exceed the amounts prescribed in Table 4.
3 3
7.1.1.1 For use with Table 4, plate shall be assumed to weigh 0.305 lb/in. (8.442 g/cm ).
7.1.2 Plate—For plate over 2 in. (50.8 mm) in thickness, the permissible variations over the specified thickness shall not exceed
the amounts prescribed in Table 5.
7.1.3 Sheet and Strip—The permissible variations in thickness of sheet and strip shall be as prescribed in Table 6. The thickness
of strip and sheet shall be measured with the micrometer spindle ⁄8 in. (9.5 mm) or more from either edge for material 1 in. (25.4
mm) or over in width and at any place on the strip under 1 in. (25.4 mm) in width.
B443 − 19
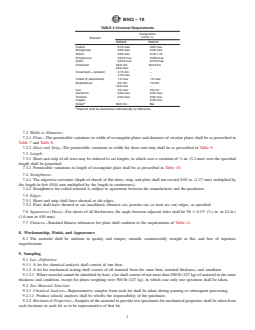
TABLE 2 Chemical Requirements
Composition
Limits, %
Element
N06625 N06219
Carbon 0.10 max 0.05 max
Manganese 0.50 max 0.50 max
Silicon 0.50 max 0.70-1.10
Phosphorus 0.015 max 0.020 max
Sulfur 0.015 max 0.010 max
Chromium 20.0 min 18.0-22.0
23.0 max .
Columbium + tantalum 3.15 min .
4.15 max .
Cobalt (if determined) 1.0 max 1.0 max
Molybdenum 8.0 min 7.0-9.0
10.0 max .
Iron 5.0 max 2.0-4.0
Aluminum 0.40 max 0.50 max
Titanium 0.40 max 0.50 max
Copper . 0.50 max
A
Nickel 58.0 min Bal.
A
Element shall be determined arithmetically by difference.
7.2 Width or Diameter:
7.2.1 Plate—The permissible variations in width of rectangular plates and diameter of circular plates shall be as prescribed in
Table 7 and Table 8.
7.2.2 Sheet and Strip—The permissible variations in width for sheet and strip shall be as prescribed in Table 9.
7.3 Length:
7.3.1 Sheet and strip of all sizes may be ordered to cut lengths, in which case a variation of ⁄8 in. (3.2 mm) over the specified
length shall be permitted.
7.3.2 Permissible variations in length of rectangular plate shall be as prescribed in Table 10.
7.4 Straightness:
7.4.1 The edgewise curvature (depth of chord) of flat sheet, strip, and plate shall not exceed 0.05 in. (1.27 mm) multiplied by
the length in feet (0.04 mm multiplied by the length in centimetres).
7.4.2 Straightness for coiled material is subject to agreement between the manufacturer and the purchaser.
7.5 Edges:
7.5.1 Sheet and strip shall have sheared or slit edges.
7.5.2 Plate shall have sheared or cut (machined, abrasive cut, powder cut, or inert arc cut) edges, as specified.
7.6 Squareness (Sheet)—For sheets of all thicknesses, the angle between adjacent sides shall be 90 6 0.15° ( ⁄16 in. in 24 in.)
(1.6 mm in 610 mm).
7.7 Flatness—Standard flatness tolerances for plate shall conform to the requirements of Table 11.
8. Workmanship, Finish, and Appearance
8.1 The material shall be uniform in quality and temper, smooth, commercially straight or flat, and free of injurious
imperfections.
9. Sampling
9.1 Lot—Definition:
9.1.1 A lot for chemical analysis shall consist of one heat.
9.1.2 A lot for mechanical testing shall consist of all material from the same heat, nominal thickness, and condition.
9.1.2.1 Where material cannot be identified by heat, a lot shall consist of not more than 500 lb (227 kg) of material in the same
thickness and condition, except for plates weighing over 500 lb (227 kg), in which case only one specimen shall be taken.
9.2 Test Material Selection:
9.2.1 Chemical Analysis—Representative samples from each lot shall be taken during pouring or subsequent processing.
9.2.1.1 Product (check) analysis shall be wholly the responsibility of the purchaser.
9.2.2 Mechanical Properties—Samples of the material to provide test specimens for mechanical properties shall be taken from
such locations in each lot as to be representative of that lot.
B443 − 19
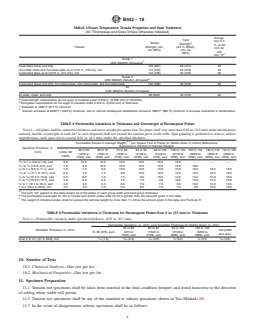
TABLE 3 Room Temperature Tensile Properties and Heat Treatment
(All Thicknesses and Sizes Unless Otherwise Indicated)
Elonga-
Yield
tion in 2
Tensile A
Strength
in. or 50
Product Strength, min, (0.2 % Offset),
mm (or
min, ksi
ksi (MPa)
4D),
(MPa)
B
min, %
Grade 1
C
UNS N06625 (Annealed)
Cold-rolled sheet and strip 120 (827) 60 (414) 30
Hot-rolled sheet and hot-rolled plate up to 2.75 in. (70 mm), incl 110 (758) 55 (379) 30
Cold-rolled plate up to 0.375 in. (9.5 mm), incl 110 (758) 55 (379) 30
Grade 2
D
UNS N06625 (Solution Annealed)
Cold-rolled sheet and strip, hot-rolled sheet, cold-rolled plate, and hot-rolled plate 100 (690) 40 (276) 30
All
UNS N06219 (Solution Annealed)
All plate, sheet, and strip 96 (660) 39 (270) 50
A
Yield strength requirements do not apply to material under 0.020 in. (0.508 mm) in thickness.
B
Elongation requirements do not apply to material under 0.010 in. (0.254 mm) in thickness.
C
Annealed at 1600°F (871°C) minimum.
D
Solution annealed at 2000°F (1093°C) minimum, with or without subsequent stabilization anneal at 1800°F (982°C) minimum to increase resistance to sensitization.
TABLE 4 Permissible Variations in Thickness and Overweight of Rectangular Plates
NOTE 1—All plates shall be ordered to thickness and not to weight per square foot. No plates shall vary more than 0.01 in. (0.3 mm) under the thickness
A
ordered, and the overweight of each lot in each shipment shall not exceed the amount given in the table. Spot grinding is permitted to remove surface
imperfections, such spots not to exceed 0.01 in. (0.3 mm) under the specified thickness.
B,C
Permissible Excess in Average Weight, per Square Foot of Plates for Widths Given in Inches (Millimetres)
Expressed in Percent of Nominal Weights
Specified Thickness, in.
48 to 60 60 to 72 72 to 84 84 to 96 96 to 108 108 to 120 120 to 132 132 to 144 144 to 160
(mm)
Under 48
(1220 to (1520 to (1830 to (2130 to (2440 to (2740 to (3050 to (3350 to (3660 to
(1220)
1520), excl 1830), excl 2130), excl 2440), excl 2740), excl 3050), excl 3350), excl 3660), excl 4070), excl
3 5
⁄16 to ⁄16 (4.8 to 7.9), excl 9.0 10.5 12.0 13.5 15.0 16.5 18.0 . . .
5 3
⁄16 to ⁄8 (7.9 to 9.5), excl 7.5 9.0 10.5 12.0 13.5 15.0 16.5 18.0 . .
3 7
⁄8 to ⁄16 (9.5 to 11.1), excl 7.0 7.5 9.0 10.5 12.0 13.5 15.0 16.5 18.0 19.5
7 1
⁄16 to ⁄2 (11.1 to 12.7), excl 6.0 7.0 7.5 9.0 10.5 12.0 13.5 15.0 16.5 18.0
1 5
⁄2 to ⁄8 (12.7 to 15.9), excl 5.0 6.0 7.0 7.5 9.0 10.5 12.0 13.5 15.0 16.5
5 3
⁄8 to ⁄4 (15.9 to 19.1), excl 4.5 5.5 6.0 7.0 7.5 9.0 10.5 12.0 13.5 15.0
⁄4 to 1 (19.1 to 25.4), excl 4.0 4.5 5.5 6.0 7.0 7.5 9.0 10.5 12.0 13.5
1 to 2 (25.4 to 50.8), incl 4.0 4.0 4.5 5.5 6.0 7.0 7.5 9.0 10.5 12.0
A
The term “lot” applied to this table means all of the plates of each group width and each group thickness.
B
The permissible overweight for lots of circular and sketch plates shall be 25 % greater than the amounts given in this table.
C
The weight of individual plates shall not exceed the nominal weight by more than 1 ⁄4 times the amount given in the table and Footnote B.
TABLE 5 Permissible Variations in Thickness for Rectangular Plates Over 2 in. (51 mm) in Thickness
NOTE 1—Permissible variation under specified thickness, 0.01 in. (0.3 mm).
Permissible Variations, in. (mm), over Specified Thickness for Widths Given, in. (mm)
36 to 60 60 to 84 84 to 120 120 to 132
Specified Thickness, in. (mm) 132 (3350
To 36 (915), excl (915 to (1520 to (2130 to (3050 to
and over)
1520), excl 2130), excl 3050), excl 3350), excl
3 1 3 7 1 1 9
Over 2 to 2 ⁄4 (51 to 69.8), incl ⁄16 (1.6) ⁄32 (2.4) ⁄64 (2.8) ⁄8 (3.2) ⁄8 (3.2) ⁄64 (3.6)
10. Number of Tests
10.1 Chemical Analysis—One test per lot.
10.2 Mechanical Properties—One test per lot.
11. Specimen Preparation
11.1 Tension test specimens shall be taken from material in the final condition (temper) and tested transverse to the direction
of rolling when width will permit.
11.2 Tension test specimens shall be any of the standard or subsize specimens shown in Test Methods E8.
11.3 In the event of disagreement, referee specimens shall be as follows:
B443 − 19
TABLE 6 Permissible Variations in Thickness of Sheet and Strip
(Permissible Variations, Plus and Minus, in Thickness, in. (mm), for Widths Given in in. (mm))
A
Sheet
Hot-Rolled Cold-Rolled
Specified Thickness, in. (mm), incl
Over 48 to 60 Over 48 to 60
48 (1220) and 48 (1220) and
(1220 to 1520), (1220 to 1520),
Under Under
incl incl
0.018 to 0.025 (0.5 to 0.6) 0.003 (0.08) 0.004 (0.10) 0.002 (0.05) 0.003 (0.08)
Over 0.025 to 0.034 (0.6 to 0.9) 0.004 (0.10) 0.005 (0.13) 0.003 (0.08) 0.004 (0.10)
Over 0.034 to 0.043 (0.9 to 1.1) 0.005 (0.13) 0.006 (0.15) 0.004 (0.10) 0.005 (0.13)
Over 0.043 to 0.056 (1.1 to 1.4) 0.005 (0.13) 0.006 (0.15) 0.004 (0.10) 0.005 (0.13)
Over 0.056 to 0.070 (1.4 to 1.8) 0.006 (0.15) 0.007 (0.18) 0.005 (0.13) 0.006 (0.15)
Over 0.070 to 0.078 (1.8 to 1.9) 0.007 (0.18) 0.008 (0.20) 0.006 (0.15) 0.007 (0.18)
Over 0.078 to 0.093 (1.9 to 2.4) 0.008 (0.20) 0.009 (0.23) 0.007 (0.18) 0.008 (0.20)
Over 0.093 to 0.109 (2.4 to 2.8) 0.009 (0.23) 0.010 (0.25) 0.007 (0.18) 0.009 (0.23)
Over 0.109 to 0.125 (2.8 to 3.2) 0.010 (0.25) 0.012 (0.31) 0.008 (0.20) 0.010 (0.25)
O
...
Questions, Comments and Discussion
Ask us and Technical Secretary will try to provide an answer. You can facilitate discussion about the standard in here.
Loading comments...