ASTM E415-14
(Test Method)Standard Test Method for Analysis of Carbon and Low-Alloy Steel by Spark Atomic Emission Spectrometry
Standard Test Method for Analysis of Carbon and Low-Alloy Steel by Spark Atomic Emission Spectrometry
SIGNIFICANCE AND USE
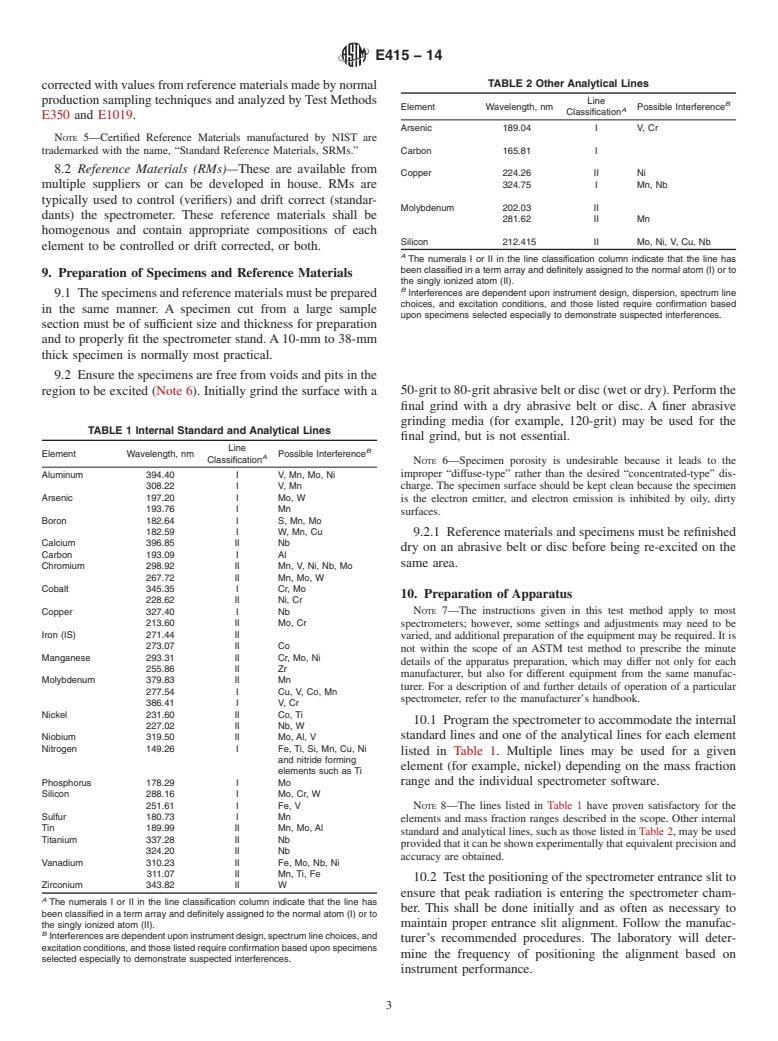
5.1 This test method for the spectrometric analysis of metals and alloys is primarily intended to test such materials for compliance with compositional specifications. It is assumed that all who use this test method will be analysts capable of performing common laboratory procedures skillfully and safely. It is expected that work will be performed in a properly equipped laboratory.
SCOPE
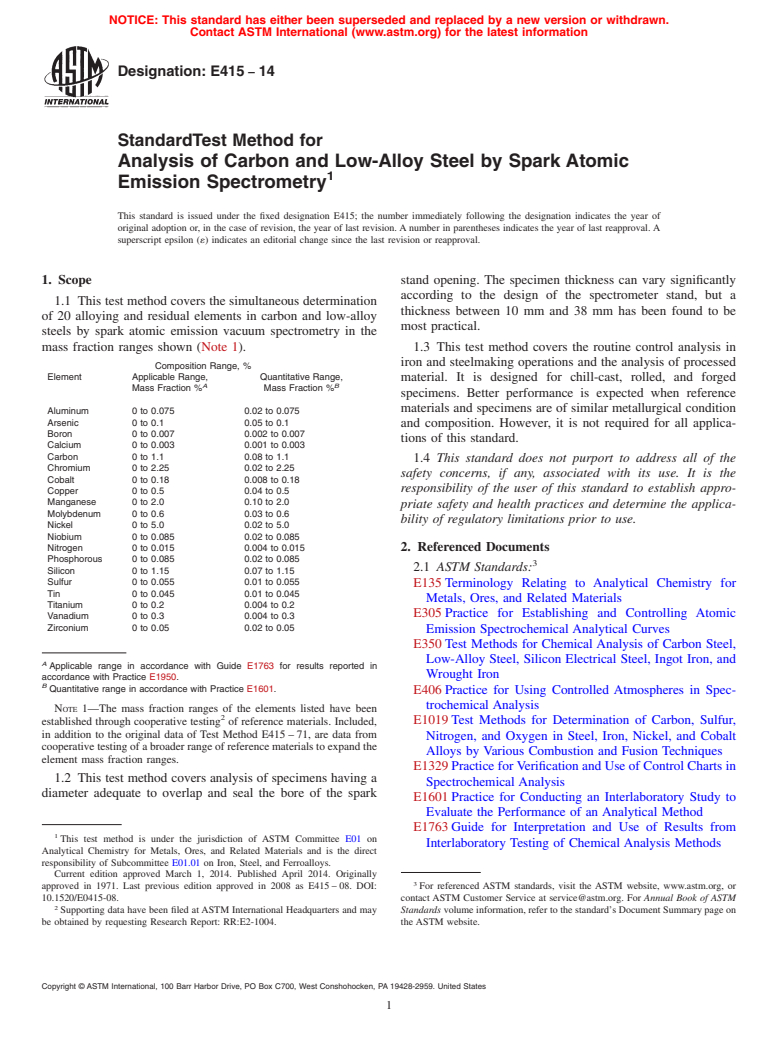
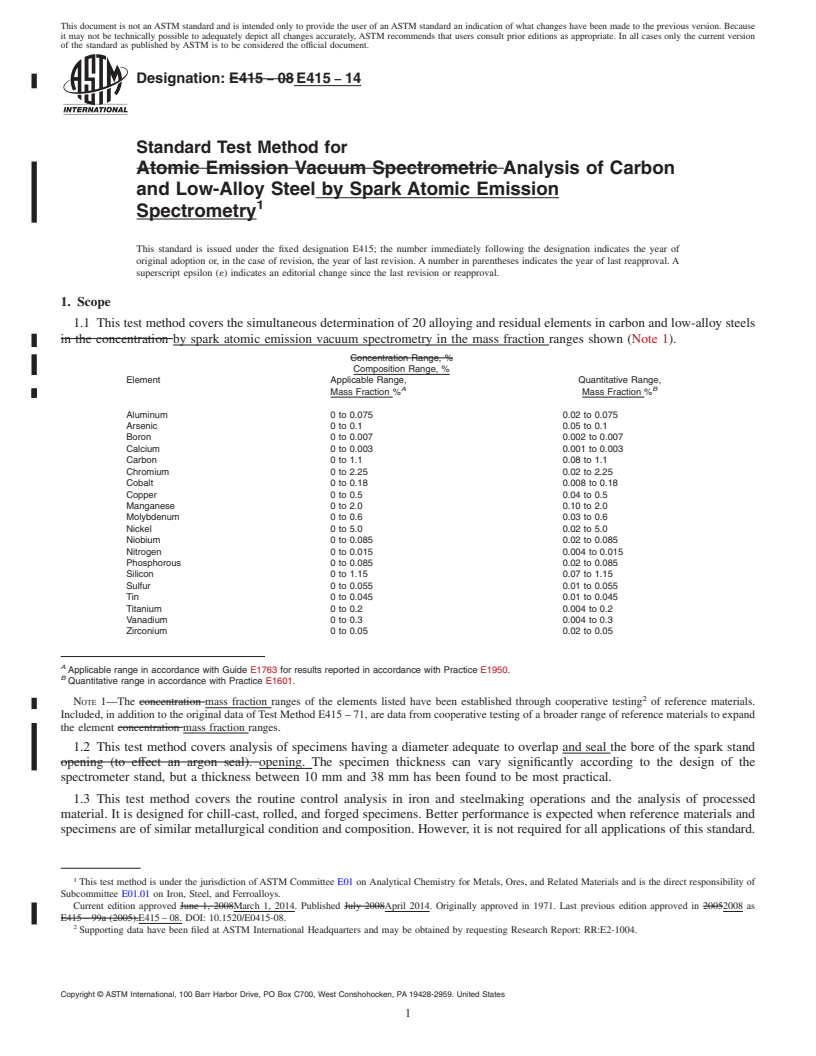
1.1 This test method covers the simultaneous determination of 20 alloying and residual elements in carbon and low-alloy steels by spark atomic emission vacuum spectrometry in the mass fraction ranges shown (Note 1).
Note 1—The mass fraction ranges of the elements listed have been established through cooperative testing2 of reference materials. Included, in addition to the original data of Test Method E415 – 71, are data from cooperative testing of a broader range of reference materials to expand the element mass fraction ranges.
1.2 This test method covers analysis of specimens having a diameter adequate to overlap and seal the bore of the spark stand opening. The specimen thickness can vary significantly according to the design of the spectrometer stand, but a thickness between 10 mm and 38 mm has been found to be most practical.
1.3 This test method covers the routine control analysis in iron and steelmaking operations and the analysis of processed material. It is designed for chill-cast, rolled, and forged specimens. Better performance is expected when reference materials and specimens are of similar metallurgical condition and composition. However, it is not required for all applications of this standard.
1.4 This standard does not purport to address all of the safety concerns, if any, associated with its use. It is the responsibility of the user of this standard to establish appropriate safety and health practices and determine the applicability of regulatory limitations prior to use.
General Information
Relations
Buy Standard
Standards Content (Sample)
NOTICE: This standard has either been superseded and replaced by a new version or withdrawn.
Contact ASTM International (www.astm.org) for the latest information
Designation: E415 − 14
StandardTest Method for
Analysis of Carbon and Low-Alloy Steel by Spark Atomic
1
Emission Spectrometry
This standard is issued under the fixed designation E415; the number immediately following the designation indicates the year of
original adoption or, in the case of revision, the year of last revision. A number in parentheses indicates the year of last reapproval. A
superscript epsilon (´) indicates an editorial change since the last revision or reapproval.
1. Scope stand opening. The specimen thickness can vary significantly
according to the design of the spectrometer stand, but a
1.1 This test method covers the simultaneous determination
thickness between 10 mm and 38 mm has been found to be
of 20 alloying and residual elements in carbon and low-alloy
most practical.
steels by spark atomic emission vacuum spectrometry in the
mass fraction ranges shown (Note 1). 1.3 This test method covers the routine control analysis in
iron and steelmaking operations and the analysis of processed
Composition Range, %
Element Applicable Range, Quantitative Range,
material. It is designed for chill-cast, rolled, and forged
A B
Mass Fraction % Mass Fraction %
specimens. Better performance is expected when reference
materials and specimens are of similar metallurgical condition
Aluminum 0 to 0.075 0.02 to 0.075
Arsenic 0 to 0.1 0.05 to 0.1
and composition. However, it is not required for all applica-
Boron 0 to 0.007 0.002 to 0.007
tions of this standard.
Calcium 0 to 0.003 0.001 to 0.003
Carbon 0 to 1.1 0.08 to 1.1
1.4 This standard does not purport to address all of the
Chromium 0 to 2.25 0.02 to 2.25
safety concerns, if any, associated with its use. It is the
Cobalt 0 to 0.18 0.008 to 0.18
responsibility of the user of this standard to establish appro-
Copper 0 to 0.5 0.04 to 0.5
Manganese 0 to 2.0 0.10 to 2.0
priate safety and health practices and determine the applica-
Molybdenum 0 to 0.6 0.03 to 0.6
bility of regulatory limitations prior to use.
Nickel 0 to 5.0 0.02 to 5.0
Niobium 0 to 0.085 0.02 to 0.085
Nitrogen 0 to 0.015 0.004 to 0.015 2. Referenced Documents
Phosphorous 0 to 0.085 0.02 to 0.085
3
2.1 ASTM Standards:
Silicon 0 to 1.15 0.07 to 1.15
Sulfur 0 to 0.055 0.01 to 0.055
E135 Terminology Relating to Analytical Chemistry for
Tin 0 to 0.045 0.01 to 0.045
Metals, Ores, and Related Materials
Titanium 0 to 0.2 0.004 to 0.2
E305 Practice for Establishing and Controlling Atomic
Vanadium 0 to 0.3 0.004 to 0.3
Zirconium 0 to 0.05 0.02 to 0.05
Emission Spectrochemical Analytical Curves
E350 Test Methods for Chemical Analysis of Carbon Steel,
Low-Alloy Steel, Silicon Electrical Steel, Ingot Iron, and
A
Applicable range in accordance with Guide E1763 for results reported in
Wrought Iron
accordance with Practice E1950.
B
Quantitative range in accordance with Practice E1601.
E406 Practice for Using Controlled Atmospheres in Spec-
trochemical Analysis
NOTE 1—The mass fraction ranges of the elements listed have been
2
E1019 Test Methods for Determination of Carbon, Sulfur,
established through cooperative testing of reference materials. Included,
in addition to the original data of Test Method E415 – 71, are data from
Nitrogen, and Oxygen in Steel, Iron, Nickel, and Cobalt
cooperative testing of a broader range of reference materials to expand the
Alloys by Various Combustion and Fusion Techniques
element mass fraction ranges.
E1329 Practice for Verification and Use of Control Charts in
1.2 This test method covers analysis of specimens having a
Spectrochemical Analysis
diameter adequate to overlap and seal the bore of the spark
E1601 Practice for Conducting an Interlaboratory Study to
Evaluate the Performance of an Analytical Method
E1763 Guide for Interpretation and Use of Results from
1
This test method is under the jurisdiction of ASTM Committee E01 on
Interlaboratory Testing of Chemical Analysis Methods
Analytical Chemistry for Metals, Ores, and Related Materials and is the direct
responsibility of Subcommittee E01.01 on Iron, Steel, and Ferroalloys.
Current edition approved March 1, 2014. Published April 2014. Originally
3
approved in 1971. Last previous edition approved in 2008 as E415 – 08. DOI: For referenced ASTM standards, visit the ASTM website, www.astm.org, or
10.1520/E0415-08. contact ASTM Customer Service at service@astm.org. For Annual Book of ASTM
2
Supporting data have been filed at ASTM International Headquarters and may Standards volume information, refer to the standard’s Document Summary page on
be obtained by requesting Research Report: RR:E2-1004. the ASTM website.
Copyright © ASTM International, 100 Barr Harbor Drive, PO Box C700, West Conshohocken, PA 19428-2959. United States
1
---------------------- Page: 1 ----------------------
E415 − 14
E1806 Practice for Sampling Steel and Iron for Determina- shall be operat
...
This document is not an ASTM standard and is intended only to provide the user of an ASTM standard an indication of what changes have been made to the previous version. Because
it may not be technically possible to adequately depict all changes accurately, ASTM recommends that users consult prior editions as appropriate. In all cases only the current version
of the standard as published by ASTM is to be considered the official document.
Designation: E415 − 08 E415 − 14
Standard Test Method for
Atomic Emission Vacuum Spectrometric Analysis of Carbon
and Low-Alloy Steel by Spark Atomic Emission
1
Spectrometry
This standard is issued under the fixed designation E415; the number immediately following the designation indicates the year of
original adoption or, in the case of revision, the year of last revision. A number in parentheses indicates the year of last reapproval. A
superscript epsilon (´) indicates an editorial change since the last revision or reapproval.
1. Scope
1.1 This test method covers the simultaneous determination of 20 alloying and residual elements in carbon and low-alloy steels
in the concentration by spark atomic emission vacuum spectrometry in the mass fraction ranges shown (Note 1).
Concentration Range, %
Composition Range, %
Element Applicable Range, Quantitative Range,
A B
Mass Fraction % Mass Fraction %
Aluminum 0 to 0.075 0.02 to 0.075
Arsenic 0 to 0.1 0.05 to 0.1
Boron 0 to 0.007 0.002 to 0.007
Calcium 0 to 0.003 0.001 to 0.003
Carbon 0 to 1.1 0.08 to 1.1
Chromium 0 to 2.25 0.02 to 2.25
Cobalt 0 to 0.18 0.008 to 0.18
Copper 0 to 0.5 0.04 to 0.5
Manganese 0 to 2.0 0.10 to 2.0
Molybdenum 0 to 0.6 0.03 to 0.6
Nickel 0 to 5.0 0.02 to 5.0
Niobium 0 to 0.085 0.02 to 0.085
Nitrogen 0 to 0.015 0.004 to 0.015
Phosphorous 0 to 0.085 0.02 to 0.085
Silicon 0 to 1.15 0.07 to 1.15
Sulfur 0 to 0.055 0.01 to 0.055
Tin 0 to 0.045 0.01 to 0.045
Titanium 0 to 0.2 0.004 to 0.2
Vanadium 0 to 0.3 0.004 to 0.3
Zirconium 0 to 0.05 0.02 to 0.05
A
Applicable range in accordance with Guide E1763 for results reported in accordance with Practice E1950.
B
Quantitative range in accordance with Practice E1601.
2
NOTE 1—The concentration mass fraction ranges of the elements listed have been established through cooperative testing of reference materials.
Included, in addition to the original data of Test Method E415 – 71, are data from cooperative testing of a broader range of reference materials to expand
the element concentration mass fraction ranges.
1.2 This test method covers analysis of specimens having a diameter adequate to overlap and seal the bore of the spark stand
opening (to effect an argon seal). opening. The specimen thickness can vary significantly according to the design of the
spectrometer stand, but a thickness between 10 mm and 38 mm has been found to be most practical.
1.3 This test method covers the routine control analysis in iron and steelmaking operations and the analysis of processed
material. It is designed for chill-cast, rolled, and forged specimens. Better performance is expected when reference materials and
specimens are of similar metallurgical condition and composition. However, it is not required for all applications of this standard.
1
This test method is under the jurisdiction of ASTM Committee E01 on Analytical Chemistry for Metals, Ores, and Related Materials and is the direct responsibility of
Subcommittee E01.01 on Iron, Steel, and Ferroalloys.
Current edition approved June 1, 2008March 1, 2014. Published July 2008April 2014. Originally approved in 1971. Last previous edition approved in 20052008 as
E415 – 99a (2005).E415 – 08. DOI: 10.1520/E0415-08.
2
Supporting data have been filed at ASTM International Headquarters and may be obtained by requesting Research Report: RR:E2-1004.
Copyright © ASTM International, 100 Barr Harbor Drive, PO Box C700, West Conshohocken, PA 19428-2959. United States
1
---------------------- Page: 1 ----------------------
E415 − 14
1.4 This standard does not purport to address all of the safety concerns, if any, associated with its use. It is the responsibility
of the user of this standard to establish appropriate safety and health practices and determine the applicability of regulatory
limitations prior to use.
2. Referenced Documents
3
2.1 ASTM Standards:
E135 Terminology Relating to Analytical Chemistry for Metals, Ores, and Related Materials
E158 Practice for Fundamental Calculations to Convert Intensities into Concentrations in Optical Emission Spectrochemical
4
Analysis (Withdrawn 2004)
E305 Practice for Establishing and Controlling Atomic Emission Spectrochemical Analytical Curves
E350 Test Methods for Chemical Analysis of Carbon Steel, Low-Alloy Steel, Silicon Electrical Steel, Ingot Iron, and Wrought
Iron
E406 Practice for Using Controlled Atmospheres in Spectrochemical Analysis
E1019 Test Methods for Determination of Carbon, Sulfur, Nitrogen, and Oxygen in Steel, Iron, Nickel, and Cobalt Alloys by
Various Combustion and Fusion Techniques
...


Questions, Comments and Discussion
Ask us and Technical Secretary will try to provide an answer. You can facilitate discussion about the standard in here.