ASTM E243-18
(Practice)Standard Practice for Electromagnetic (Eddy Current) Examination of Copper and Copper-Alloy Tubes
Standard Practice for Electromagnetic (Eddy Current) Examination of Copper and Copper-Alloy Tubes
SIGNIFICANCE AND USE
5.1 Eddy current testing is a nondestructive method of locating discontinuities in a product. Signals can be produced by discontinuities located either on the external or internal surface of the tube or by discontinuities totally contained within the walls. Since the density of eddy currents decreases nearly exponentially as the distance from the external surface increases, the response to deep-seated defects decreases.
5.2 Some indications obtained by this method may not be relevant to product quality; for example, a reject signal may be caused by minute dents or tool chatter marks that are not detrimental to the end use of the product. Irrelevant indications can mask unacceptable discontinuities. Relevant indications are those which result from nonacceptable discontinuities. Any indication above the reject level that is believed to be irrelevant shall be regarded as unacceptable until it is demonstrated by re-examination or other means to be irrelevant (see 10.3.2).
5.3 Eddy current testing systems are generally not sensitive to discontinuities adjacent to the ends of the tube (end effect). On-line eddy current examining would not be subject to end effect.
5.4 Discontinuities such as scratches or seams that are continuous and uniform for the full length of the tube may not always be detected.
SCOPE
1.1 This practice2 covers the procedures that shall be followed in eddy current examination of copper and copper-alloy tubes for detecting discontinuities of a severity likely to cause failure of the tube. These procedures are applicable for tubes with outside diameters to 31/8 in. (79.4 mm), inclusive, and wall thicknesses from 0.017 in. (0.432 mm) to 0.120 in. (3.04 mm), inclusive, or as otherwise stated in ASTM product specifications; or by other users of this practice. These procedures may be used for tubes beyond the size range recommended, upon contractual agreement between the purchaser and the manufacturer.
1.2 The procedures described in this practice are based on methods making use of encircling annular examination coil systems.
1.3 Units—The values stated in inch-pound units are to be regarded as the standard. The values given in parentheses are mathematical conversions to SI units that are provided for information only and are not considered standard.
Note 1: This practice may be used as a guideline for the examination, by means of internal probe examination coil systems, of installations using tubular products where the outer surface of the tube is not accessible. For such applications, the technical differences associated with the use of internal probe coils should be recognized and accommodated. The effect of foreign materials on the tube surface and signals due to tube supports are typical of the factors that must be considered. See E690 for additional details regarding the in-situ examinations using internal probes.
1.4 This standard does not purport to address all of the safety concerns, if any, associated with its use. It is the responsibility of the user of this standard to establish appropriate safety, health, and environmental practices and determine the applicability of regulatory limitations prior to use.
1.5 This international standard was developed in accordance with internationally recognized principles on standardization established in the Decision on Principles for the Development of International Standards, Guides and Recommendations issued by the World Trade Organization Technical Barriers to Trade (TBT) Committee.
General Information
- Status
- Published
- Publication Date
- 31-May-2018
- Technical Committee
- E07 - Nondestructive Testing
- Drafting Committee
- E07.07 - Electromagnetic Method
Relations
- Effective Date
- 01-Jun-2018
- Effective Date
- 01-Feb-2024
- Effective Date
- 01-Jun-2020
- Effective Date
- 01-Dec-2019
- Effective Date
- 01-Mar-2019
- Effective Date
- 01-Mar-2018
- Effective Date
- 01-Mar-2018
- Effective Date
- 01-Jan-2018
- Effective Date
- 15-Jun-2017
- Effective Date
- 01-Feb-2017
- Effective Date
- 01-Oct-2016
- Effective Date
- 01-Oct-2016
- Effective Date
- 01-Aug-2016
- Effective Date
- 01-Feb-2016
- Effective Date
- 01-Dec-2015
Overview
ASTM E243-18, Standard Practice for Electromagnetic (Eddy Current) Examination of Copper and Copper-Alloy Tubes, outlines nondestructive testing methods for detecting discontinuities in copper and copper-alloy tubes using eddy current techniques. Published by ASTM International, this standard ensures product quality, reliability, and safety by providing procedures to identify surface and sub-surface defects that could compromise the integrity of tubing used in critical applications. Its methods are applicable for tubes with outside diameters up to 3⅛ inches (79.4 mm) and wall thicknesses ranging from 0.017 in. (0.432 mm) to 0.120 in. (3.04 mm), though they may be adapted for tube sizes beyond this range through contractual agreement.
Key Topics
Eddy Current Testing Fundamentals
The practice describes how alternating currents are used in encircling coils to generate electromagnetic fields, which detect changes caused by variations in tube material or discontinuities. This nondestructive examination method is capable of identifying flaws on external and internal surfaces or within tube walls.Discontinuity Detection
Eddy current signals indicate the presence of discontinuities. However, detection sensitivity declines with greater depth from the tube surface, meaning deep-seated flaws may be less apparent. Some indications, such as those from minor dents or tool marks, may not be relevant to product performance and can complicate signal interpretation.System Limitations
- End Effect: The equipment may not reliably detect flaws near the ends of tubes; however, in-line testing during manufacturing minimizes this issue.
- Continuous Defects: Long, uniform scratches or seams might not always be detected.
- Surface Accessibility: For in-situ or installed tubes where the external surface is inaccessible, internal probe coils may be used, with adjusted techniques and consideration for other factors such as tube supports or surface contaminants.
Reference Standards and Calibration
The standard includes methods for using artificially induced discontinuity reference tubes to adjust and check system sensitivity, ensuring consistency and reliability in test results.Personnel Qualification
Qualified NDT personnel, according to standards like ANSI/ASNT CP-189, SNT-TC-1A, NAS-410, or ISO 9712, must conduct and interpret tests, ensuring testing is performed by competent professionals.
Applications
Eddy current testing procedures provided in ASTM E243-18 are essential in industries where copper and copper-alloy tubes are used, including:
- Heat exchangers, condensers, and refrigeration systems
- Power generation, especially boilers and nuclear facilities
- Chemical and petrochemical processing equipment
- HVAC and plumbing systems
Practical Value:
- Early detection of potentially failure-causing flaws helps maintain safety, reduce downtime, and prevent costly repairs or replacements.
- Testing can be conducted on newly manufactured tubes or in-service installations (with suitable coil systems), supporting maintenance and quality assurance programs.
- The standard provides guidelines that support regulatory compliance and customer specifications, reinforcing confidence in tubing performance.
Related Standards
ASTM E243-18 references and aligns with several other standards to provide comprehensive coverage and compatibility:
- ASTM E690 - In Situ Electromagnetic (Eddy Current) Examination of Nonmagnetic Heat Exchanger Tubes
- ASTM B111/B111M, B395/B395M, B543 - Specifications for copper and copper-alloy tubes
- ASTM E543 - Qualification of nondestructive testing agencies
- ASTM E1316 - Terminology for Nondestructive Examination
- SNT-TC-1A, ANSI/ASNT CP-189, NAS-410, ISO 9712 - NDT personnel qualification standards
These standards, when used together, create a robust framework for ensuring the effective, reliable, and qualified performance of eddy current testing of copper and copper-alloy tubes.
Keywords: eddy current testing, nondestructive testing, copper tube examination, ASTM E243, copper-alloy tube quality, internal tube defect detection, heat exchanger tube testing
Buy Documents
ASTM E243-18 - Standard Practice for Electromagnetic (Eddy Current) Examination of Copper and Copper-Alloy Tubes
REDLINE ASTM E243-18 - Standard Practice for Electromagnetic (Eddy Current) Examination of Copper and Copper-Alloy Tubes
Get Certified
Connect with accredited certification bodies for this standard

Institut za varilstvo d.o.o. (Welding Institute)
Slovenia's leading welding institute since 1952. ISO 3834, EN 1090, pressure equipment certification, NDT personnel, welder qualification. Only IIW Au
Sponsored listings
Frequently Asked Questions
ASTM E243-18 is a standard published by ASTM International. Its full title is "Standard Practice for Electromagnetic (Eddy Current) Examination of Copper and Copper-Alloy Tubes". This standard covers: SIGNIFICANCE AND USE 5.1 Eddy current testing is a nondestructive method of locating discontinuities in a product. Signals can be produced by discontinuities located either on the external or internal surface of the tube or by discontinuities totally contained within the walls. Since the density of eddy currents decreases nearly exponentially as the distance from the external surface increases, the response to deep-seated defects decreases. 5.2 Some indications obtained by this method may not be relevant to product quality; for example, a reject signal may be caused by minute dents or tool chatter marks that are not detrimental to the end use of the product. Irrelevant indications can mask unacceptable discontinuities. Relevant indications are those which result from nonacceptable discontinuities. Any indication above the reject level that is believed to be irrelevant shall be regarded as unacceptable until it is demonstrated by re-examination or other means to be irrelevant (see 10.3.2). 5.3 Eddy current testing systems are generally not sensitive to discontinuities adjacent to the ends of the tube (end effect). On-line eddy current examining would not be subject to end effect. 5.4 Discontinuities such as scratches or seams that are continuous and uniform for the full length of the tube may not always be detected. SCOPE 1.1 This practice2 covers the procedures that shall be followed in eddy current examination of copper and copper-alloy tubes for detecting discontinuities of a severity likely to cause failure of the tube. These procedures are applicable for tubes with outside diameters to 31/8 in. (79.4 mm), inclusive, and wall thicknesses from 0.017 in. (0.432 mm) to 0.120 in. (3.04 mm), inclusive, or as otherwise stated in ASTM product specifications; or by other users of this practice. These procedures may be used for tubes beyond the size range recommended, upon contractual agreement between the purchaser and the manufacturer. 1.2 The procedures described in this practice are based on methods making use of encircling annular examination coil systems. 1.3 Units—The values stated in inch-pound units are to be regarded as the standard. The values given in parentheses are mathematical conversions to SI units that are provided for information only and are not considered standard. Note 1: This practice may be used as a guideline for the examination, by means of internal probe examination coil systems, of installations using tubular products where the outer surface of the tube is not accessible. For such applications, the technical differences associated with the use of internal probe coils should be recognized and accommodated. The effect of foreign materials on the tube surface and signals due to tube supports are typical of the factors that must be considered. See E690 for additional details regarding the in-situ examinations using internal probes. 1.4 This standard does not purport to address all of the safety concerns, if any, associated with its use. It is the responsibility of the user of this standard to establish appropriate safety, health, and environmental practices and determine the applicability of regulatory limitations prior to use. 1.5 This international standard was developed in accordance with internationally recognized principles on standardization established in the Decision on Principles for the Development of International Standards, Guides and Recommendations issued by the World Trade Organization Technical Barriers to Trade (TBT) Committee.
SIGNIFICANCE AND USE 5.1 Eddy current testing is a nondestructive method of locating discontinuities in a product. Signals can be produced by discontinuities located either on the external or internal surface of the tube or by discontinuities totally contained within the walls. Since the density of eddy currents decreases nearly exponentially as the distance from the external surface increases, the response to deep-seated defects decreases. 5.2 Some indications obtained by this method may not be relevant to product quality; for example, a reject signal may be caused by minute dents or tool chatter marks that are not detrimental to the end use of the product. Irrelevant indications can mask unacceptable discontinuities. Relevant indications are those which result from nonacceptable discontinuities. Any indication above the reject level that is believed to be irrelevant shall be regarded as unacceptable until it is demonstrated by re-examination or other means to be irrelevant (see 10.3.2). 5.3 Eddy current testing systems are generally not sensitive to discontinuities adjacent to the ends of the tube (end effect). On-line eddy current examining would not be subject to end effect. 5.4 Discontinuities such as scratches or seams that are continuous and uniform for the full length of the tube may not always be detected. SCOPE 1.1 This practice2 covers the procedures that shall be followed in eddy current examination of copper and copper-alloy tubes for detecting discontinuities of a severity likely to cause failure of the tube. These procedures are applicable for tubes with outside diameters to 31/8 in. (79.4 mm), inclusive, and wall thicknesses from 0.017 in. (0.432 mm) to 0.120 in. (3.04 mm), inclusive, or as otherwise stated in ASTM product specifications; or by other users of this practice. These procedures may be used for tubes beyond the size range recommended, upon contractual agreement between the purchaser and the manufacturer. 1.2 The procedures described in this practice are based on methods making use of encircling annular examination coil systems. 1.3 Units—The values stated in inch-pound units are to be regarded as the standard. The values given in parentheses are mathematical conversions to SI units that are provided for information only and are not considered standard. Note 1: This practice may be used as a guideline for the examination, by means of internal probe examination coil systems, of installations using tubular products where the outer surface of the tube is not accessible. For such applications, the technical differences associated with the use of internal probe coils should be recognized and accommodated. The effect of foreign materials on the tube surface and signals due to tube supports are typical of the factors that must be considered. See E690 for additional details regarding the in-situ examinations using internal probes. 1.4 This standard does not purport to address all of the safety concerns, if any, associated with its use. It is the responsibility of the user of this standard to establish appropriate safety, health, and environmental practices and determine the applicability of regulatory limitations prior to use. 1.5 This international standard was developed in accordance with internationally recognized principles on standardization established in the Decision on Principles for the Development of International Standards, Guides and Recommendations issued by the World Trade Organization Technical Barriers to Trade (TBT) Committee.
ASTM E243-18 is classified under the following ICS (International Classification for Standards) categories: 23.040.15 - Non-ferrous metal pipes. The ICS classification helps identify the subject area and facilitates finding related standards.
ASTM E243-18 has the following relationships with other standards: It is inter standard links to ASTM E243-13, ASTM E1316-24, ASTM E690-15(2020), ASTM E1316-19b, ASTM E1316-19, ASTM B111/B111M-18, ASTM B395/B395M-18, ASTM E1316-18, ASTM E1316-17a, ASTM E1316-17, ASTM B111/B111M-16, ASTM B395/B395M-16, ASTM E1316-16a, ASTM E1316-16, ASTM E1316-15a. Understanding these relationships helps ensure you are using the most current and applicable version of the standard.
ASTM E243-18 is available in PDF format for immediate download after purchase. The document can be added to your cart and obtained through the secure checkout process. Digital delivery ensures instant access to the complete standard document.
Standards Content (Sample)
This international standard was developed in accordance with internationally recognized principles on standardization established in the Decision on Principles for the
Development of International Standards, Guides and Recommendations issued by the World Trade Organization Technical Barriers to Trade (TBT) Committee.
Designation: E243 − 18
Standard Practice for
Electromagnetic (Eddy Current) Examination of Copper and
Copper-Alloy Tubes
This standard is issued under the fixed designation E243; the number immediately following the designation indicates the year of
original adoption or, in the case of revision, the year of last revision.Anumber in parentheses indicates the year of last reapproval.A
superscript epsilon (´) indicates an editorial change since the last revision or reapproval.
This standard has been approved for use by agencies of the U.S. Department of Defense.
1. Scope* 1.5 This international standard was developed in accor-
dance with internationally recognized principles on standard-
1.1 This practice covers the procedures that shall be
ization established in the Decision on Principles for the
followed in eddy current examination of copper and copper-
Development of International Standards, Guides and Recom-
alloy tubes for detecting discontinuities of a severity likely to
mendations issued by the World Trade Organization Technical
cause failure of the tube. These procedures are applicable for
Barriers to Trade (TBT) Committee.
tubes with outside diameters to 3 ⁄8 in. (79.4 mm), inclusive,
and wall thicknesses from 0.017 in. (0.432 mm) to 0.120 in.
2. Referenced Documents
(3.04 mm), inclusive, or as otherwise stated inASTM product
2.1 ASTM Standards:
specifications; or by other users of this practice. These proce-
B111/B111MSpecification for Copper and Copper-Alloy
dures may be used for tubes beyond the size range
Seamless Condenser Tubes and Ferrule Stock
recommended, upon contractual agreement between the pur-
B395/B395MSpecification for U-Bend Seamless Copper
chaser and the manufacturer.
and Copper Alloy Heat Exchanger and Condenser Tubes
1.2 The procedures described in this practice are based on
B543Specification for Welded Copper and Copper-Alloy
methods making use of encircling annular examination coil
Heat Exchanger Tube
systems.
E543Specification forAgencies Performing Nondestructive
Testing
1.3 Units—The values stated in inch-pound units are to be
E690Practice for In Situ Electromagnetic (Eddy Current)
regarded as the standard. The values given in parentheses are
Examination of Nonmagnetic Heat Exchanger Tubes
mathematical conversions to SI units that are provided for
E1316Terminology for Nondestructive Examinations
information only and are not considered standard.
2.2 Other Documents:
NOTE 1—This practice may be used as a guideline for the examination,
SNT-TC-1A Recommended Practice for Personnel Qualifi-
bymeansofinternalprobeexaminationcoilsystems,ofinstallationsusing
cation and Certification in Nondestructive Testing
tubular products where the outer surface of the tube is not accessible. For
such applications, the technical differences associated with the use of
ANSI/ASNTCP-189ASNT Standard for Qualification and
internal probe coils should be recognized and accommodated. The effect
Certification of Nondestructive Testing Personnel
of foreign materials on the tube surface and signals due to tube supports
NAS-410NAS Certification and Qualification of Nonde-
are typical of the factors that must be considered. See E690 for additional
structive Personnel (Quality Assurance Committee)
details regarding the in-situ examinations using internal probes.
2.3 International Standards:
1.4 This standard does not purport to address all of the
ISO 9712Non-Destructive Testing – Qualification and Cer-
safety concerns, if any, associated with its use. It is the
tification of NDT personnel
responsibility of the user of this standard to establish appro-
priate safety, health, and environmental practices and deter-
mine the applicability of regulatory limitations prior to use.
For referenced ASTM standards, visit the ASTM website, www.astm.org, or
contact ASTM Customer Service at service@astm.org. For Annual Book of ASTM
Standards volume information, refer to the standard’s Document Summary page on
the ASTM website.
1 4
This practice is under the jurisdiction of ASTM Committee E07 on Nonde- AvailablefromAmericanSocietyforNondestructiveTesting(ASNT),P.O.Box
structive Testing and is the direct responsibility of Subcommittee E07.07 on 28518, 1711 Arlingate Ln., Columbus, OH 43228-0518, http://www.asnt.org.
Electromagnetic Method. Available fromAerospace IndustriesAssociation ofAmerica, Inc. (AIA), 1000
Current edition approved June 1, 2018. Published June 2018. Originally WilsonBlvd.,Suite1700,Arlington,VA22209-3928,http://www.aia-aerospace.org.
approved in 1967. Last previous edition approved in 2013 as E243-13. DOI:
10.1520/E0243-18. Available from International Organization for Standardization (ISO), ISO
For ASME Boiler and Pressure Vessel Code applications see related Practice Central Secretariat, BIBC II, Chemin de Blandonnet 8, CP 401, 1214 Vernier,
SE-243 in the Code. Geneva, Switzerland, http://www.iso.org.
*A Summary of Changes section appears at the end of this standard
Copyright © ASTM International, 100 Barr Harbor Drive, PO Box C700, West Conshohocken, PA 19428-2959. United States
E243 − 18
3. Terminology by discontinuities located either on the external or internal
surface of the tube or by discontinuities totally contained
3.1 Definitions of Terms Specific to this Standard
within the walls. Since the density of eddy currents decreases
3.1.1 The following terms are defined in relation to this
nearly exponentially as the distance from the external surface
standard.
increases, the response to deep-seated defects decreases.
3.1.1.1 artificial discontinuity reference standard—a stan-
dard consisting of a selected tube with defined artificial 5.2 Some indications obtained by this method may not be
discontinuities, used when adjusting the system controls to relevanttoproductquality;forexample,arejectsignalmaybe
obtain some predetermined system output signal level. This caused by minute dents or tool chatter marks that are not
standard may be used for periodic checking of the instrument detrimentaltotheenduseoftheproduct.Irrelevantindications
during an examination. can mask unacceptable discontinuities. Relevant indications
3.1.1.2 percent maximum unbalance standardization arethosewhichresultfromnonacceptablediscontinuities.Any
standard—a method of standardization that can be used with indicationabovetherejectlevelthatisbelievedtobeirrelevant
speed-insensitive instruments (see 3.1.1.4). The acceptance shall be regarded as unacceptable until it is demonstrated by
re-examination or other means to be irrelevant (see
level of the examination is established at the operating exami- 10.3.2).
nation frequency as an accurate fraction of the maximum
5.3 Eddy current testing systems are generally not sensitive
unbalance signal resulting from the end effect of a tube. Any
to discontinuities adjacent to the ends of the tube (end effect).
low-noise tube from the production run having a squared end
On-line eddy current examining would not be subject to end
may be used as this standard. This standard may be used for
effect.
periodic checking of the instrument during an examination.
5.4 Discontinuities such as scratches or seams that are
3.1.1.3 electrical center—the center established by the elec-
continuous and uniform for the full length of the tube may not
tromagnetic field distribution within the examination coil. A
always be detected.
constant-intensity signal, irrespective of the circumferential
position of a discontinuity, is indicative of electrical centering.
6. Basis of Application
The electrical center may be different from the physical center
6.1 Personnel Qualification—Nondestructive testing (NDT)
of the examination coil.
personnel shall be qualified in accordance with a nationally
3.1.1.4 speed-sensitive equipment—examination equipment
recognized NDT personnel qualification practice or standard
that produces a variation in signal response with variations in
such as ANSI/ASNTCP-189, SNT-TC-1A, MIL-STD-410,
theexaminationspeed.Speed-insensitiveequipmentprovidesa
NAS-410, ISO 9712, or a similar document. The practice or
constant signal response with changing examination speeds.
standard used and its applicable revision shall be specified in
3.1.1.5 off-line examining / in-line—eddy current examina-
the purchase specification or contractual agreement between
tions conducted on equipment that includes the examination
the using parties.
coil and means to propel individual tubes under examination
NOTE 2—MIL-STD-410 is canceled and has been replaced with
through the coil at appropriate speeds and conditions.
NAS-410, however, it may be used with agreement between contracting
3.1.1.6 on-line examining—eddy current examinations con-
parties.
ducted on equipment that includes the examination coil and
6.2 Qualification of Nondestructive Testing Agencies—If
means to propel tubes under examination through the coil at
specified in the purchase specification or contractual
appropriate speeds and conditions as an integral part of a
agreement, NDT agencies shall be evaluated and qualified as
continuous tube manufacturing sequence.
described in Practice E543. The applicable edition of Practice
3.2 Definitions of Terms—Refer to Terminology E1316 for
E543 shall be identified in the purchase specification or
definitions of terms that are applicable to nondestructive
contractual agreement between the using parties.
examinations in general.
7. Apparatus
4. Summary of Practice
7.1 Electronic Apparatus—Theelectronicapparatusshallbe
4.1 Examining is usually performed by passing the tube
capable of energizing the examination coil with alternating
lengthwise through a coil energized with alternating current at
currents of suitable frequencies (for example, 1 kHz to 125
one or more frequencies. The electrical impedance of the coil
kHz), and shall be capable of sensing the changes in the
is modified by the proximity of the tube, the tube dimensions,
electromagnetic response of the coils. Electrical signals pro-
electrical conductivity and magnetic permeability of the tube
ducedinthismannerareprocessedsoastoactuateanaudioor
material,andmetallurgicalormechanicaldiscontinuitiesinthe
visual signaling device or mechanical marker which produces
tube. During passage of the tube, the changes in electromag-
a record.
netic response caused by these variables in the tube produce
7.2 Examination Coils—Examination coils shall be capable
electrical signals which are processed so as to actuate an audio
of inducing current in the tube and sensing changes in the
or visual signaling device or mechanical marker which pro-
electrical characteristics of the tube. The examination coil
duces a record.
diameter should be selected to yield the largest practical
5. Significance and Use fill-factor.
5.1 Eddy current testing is a nondestructive method of 7.3 Driving Mechanism—A mechanical means of passing
locating discontinuities in a product. Signals can be produced the tube through the examination coil with minimum vibration
E243 − 18
of the examination coil or the tube. The device shall maintain (c) One round bottom transverse notch on the outside of
the tube substantially concentric with the electrical center of thetubeat0°andanotherat180°,andoneholedrilledradially
theexaminationcoil.Auniformspeed(65.0%speedvariation through the wall at 90° and another at 270°. Only one notch or
maximum) shall be maintained. hole shall be made in each transverse plane (Fig. 3).
7.4 End Effect Suppression Device—A means capable of
suppressing the signals produced at the ends of the tube.
IndividualASTM product specifications shall specify when an
end effect suppression device is mandatory.
NOTE 3—Signals close to the ends of the tube may carry on beyond the
limits of end suppression. Refer to 9.4.
8. Reference Standards
8.1 Artificial Discontinuity Reference Standard:
8.1.1 Thetubeusedwhenadjustingthesensitivitysettingof
NOTE 1—A= Space to provide signal resolution adequate for interpre-
the apparatus shall be selected from a typical production run
tation.
and shall be representative of
...
This document is not an ASTM standard and is intended only to provide the user of an ASTM standard an indication of what changes have been made to the previous version. Because
it may not be technically possible to adequately depict all changes accurately, ASTM recommends that users consult prior editions as appropriate. In all cases only the current version
of the standard as published by ASTM is to be considered the official document.
Designation: E243 − 13 E243 − 18
Standard Practice for
Electromagnetic (Eddy Current) Examination of Copper and
Copper-Alloy Tubes
This standard is issued under the fixed designation E243; the number immediately following the designation indicates the year of
original adoption or, in the case of revision, the year of last revision. A number in parentheses indicates the year of last reapproval. A
superscript epsilon (´) indicates an editorial change since the last revision or reapproval.
This standard has been approved for use by agencies of the U.S. Department of Defense.
1. Scope*
1.1 This practice covers the procedures that shall be followed in eddy current examination of copper and copper-alloy tubes
for detecting discontinuities of a severity likely to cause failure of the tube. These procedures are applicable for tubes with outside
diameters to 3 ⁄8 in. (79.4 mm), inclusive, and wall thicknesses from 0.017 in. (0.432 mm) to 0.120 in. (3.04 mm), inclusive, or
as otherwise stated in ASTM product specifications; or by other users of this practice. These procedures may be used for tubes
beyond the size range recommended, upon contractual agreement between the purchaser and the manufacturer.
1.2 The procedures described in this practice are based on methods making use of encircling annular examination coil systems.
1.3 Units—The values stated in inch-pound units are to be regarded as the standard. The values given in parentheses are
mathematical conversions to SI units that are provided for information only and are not considered standard.
NOTE 1—This practice may be used as a guideline for the examination, by means of internal probe examination coil systems, of installations using
tubular products where the outer surface of the tube is not accessible. For such applications, the technical differences associated with the use of internal
probe coils should be recognized and accommodated. The effect of foreign materials on the tube surface and signals due to tube supports are typical of
the factors that must be considered. See E690 for additional details regarding the in-situ examinations using internal probes.
1.4 This standard does not purport to address all of the safety concerns, if any, associated with its use. It is the responsibility
of the user of this standard to establish appropriate safety safety, health, and healthenvironmental practices and determine the
applicability of regulatory limitations prior to use.
1.5 This international standard was developed in accordance with internationally recognized principles on standardization
established in the Decision on Principles for the Development of International Standards, Guides and Recommendations issued
by the World Trade Organization Technical Barriers to Trade (TBT) Committee.
2. Referenced Documents
2.1 ASTM Standards:
B111/B111M Specification for Copper and Copper-Alloy Seamless Condenser Tubes and Ferrule Stock
B395/B395M Specification for U-Bend Seamless Copper and Copper Alloy Heat Exchanger and Condenser Tubes
B543 Specification for Welded Copper and Copper-Alloy Heat Exchanger Tube
E543 Specification for Agencies Performing Nondestructive Testing
E690 Practice for In Situ Electromagnetic (Eddy Current) Examination of Nonmagnetic Heat Exchanger Tubes
E1316 Terminology for Nondestructive Examinations
2.2 Other Documents:
SNT-TC-1A Recommended Practice for Personnel Qualification and Certification in Nondestructive Testing
ANSI/ASNT CP-189 ASNT Standard for Qualification and Certification of Nondestructive Testing Personnel
NAS-410 NAS Certification and Qualification of Nondestructive Personnel (Quality Assurance Committee)
This practice is under the jurisdiction of ASTM Committee E07 on Nondestructive Testing and is the direct responsibility of Subcommittee E07.07 on Electromagnetic
Method.
Current edition approved Dec. 1, 2013June 1, 2018. Published December 2013June 2018. Originally approved in 1967. Last previous edition approved in 20092013 as
E243 - 09.E243 - 13. DOI: 10.1520/E0243-13.10.1520/E0243-18.
For ASME Boiler and Pressure Vessel Code applications see related Practice SE-243 in the Code.
For referenced ASTM standards, visit the ASTM website, www.astm.org, or contact ASTM Customer Service at service@astm.org. For Annual Book of ASTM Standards
volume information, refer to the standard’s Document Summary page on the ASTM website.
Available from American Society for Nondestructive Testing (ASNT), P.O. Box 28518, 1711 Arlingate Ln., Columbus, OH 43228-0518, http://www.asnt.org.
Available from Aerospace Industries Association of America, Inc. (AIA), 1000 Wilson Blvd., Suite 1700, Arlington, VA 22209-3928, http://www.aia-aerospace.org.
*A Summary of Changes section appears at the end of this standard
Copyright © ASTM International, 100 Barr Harbor Drive, PO Box C700, West Conshohocken, PA 19428-2959. United States
E243 − 18
2.3 International Standards:
ISO 9712 Non-Destructive Testing – Qualification and Certification of NDT personnel
3. Terminology
3.1 Definitions of Terms Specific to this Standard
3.1.1 The following terms are defined in relation to this standard.
3.1.1.1 artificial discontinuity reference standard—a standard consisting of a selected tube with defined artificial discontinuities,
used when adjusting the system controls to obtain some predetermined system output signal level. This standard may be used for
periodic checking of the instrument during an examination.
3.1.1.2 percent maximum unbalance standardization standard—a method of standardization that can be used with speed-
insensitive instruments (see 3.1.1.4). The acceptance level of the examination is established at the operating examination frequency
as an accurate fraction of the maximum unbalance signal resulting from the end effect of a tube. Any low-noise tube from the
production run having a squared end may be used as this standard. This standard may be used for periodic checking of the
instrument during an examination.
3.1.1.3 electrical center—the center established by the electromagnetic field distribution within the examination coil. A
constant-intensity signal, irrespective of the circumferential position of a discontinuity, is indicative of electrical centering. The
electrical center may be different from the physical center of the examination coil.
3.1.1.4 speed-sensitive equipment—examination equipment that produces a variation in signal response with variations in the
examination speed. Speed-insensitive equipment provides a constant signal response with changing examination speeds.
3.1.1.5 off-line examining—examining / in-line—eddy current examinations conducted on equipment that includes the
examination coil and means to propel individual tubes under examination through the coil at appropriate speeds and conditions.
3.1.1.6 on-line examining—eddy current examinations conducted on equipment that includes the examination coil and means
to propel tubes under examination through the coil at appropriate speeds and conditions as an integral part of a continuous tube
manufacturing sequence.
3.2 Definitions of Terms—Refer to Terminology E1316 for definitions of terms that are applicable to nondestructive
examinations in general.
4. Summary of Practice
4.1 Examining is usually performed by passing the tube lengthwise through a coil energized with alternating current at one or
more frequencies. The electrical impedance of the coil is modified by the proximity of the tube, the tube dimensions, electrical
conductivity and magnetic permeability of the tube material, and metallurgical or mechanical discontinuities in the tube. During
passage of the tube, the changes in electromagnetic response caused by these variables in the tube produce electrical signals which
are processed so as to actuate an audio or visual signaling device or mechanical marker which produces a record.
5. Significance and Use
5.1 Eddy current testing is a nondestructive method of locating discontinuities in a product. Signals can be produced by
discontinuities located either on the external or internal surface of the tube or by discontinuities totally contained within the walls.
Since the density of eddy currents decreases nearly exponentially as the distance from the external surface increases, the response
to deep-seated defects decreases.
5.2 Some indications obtained by this method may not be relevant to product quality; for example, a reject signal may be caused
by minute dents or tool chatter marks that are not detrimental to the end use of the product. Irrelevant indications can mask
unacceptable discontinuities. Relevant indications are those which result from nonacceptable discontinuities. Any indication above
the reject level that is believed to be irrelevant shall be regarded as unacceptable until it is demonstrated by re-examination or other
means to be irrelevant (see 10.3.2).
5.3 Eddy current testing systems are generally not sensitive to discontinuities adjacent to the ends of the tube (end effect).
On-line eddy current examining would not be subject to end effect.
5.4 Discontinuities such as scratches or seams that are continuous and uniform for the full length of the tube may not always
be detected.
6. Basis of Application
6.1 Personnel Qualification—Nondestructive testing (NDT) personnel shall be qualified in accordance with a nationally
recognized NDT personnel qualification practice or standard such as ANSI/ASNT CP-189, SNT-TC-1A, MIL-STD-410, NAS-410,
ISO 9712, or a similar document. The practice or standard used and its applicable revision shall be specified in the purchase
specification or contractual agreement between the using parties.
Available from International Organization for Standardization (ISO), ISO Central Secretariat, BIBC II, Chemin de Blandonnet 8, CP 401, 1214 Vernier, Geneva,
Switzerland, http://www.iso.org.
E243 − 18
NOTE 2—MIL-STD-410 is canceled and has been replaced with NAS-410, however, it may be used with agreement between contracting parties.
6.2 Qualification of Nondestructive Testing Agencies—If specified in the purchase specification or contractual agreement, NDT
agencies shall be evaluated and qualified as described in Practice E543. The applicable edition of Practice E543 shall be identified
in the purchase specification or contractual agreement between the using parties.
7. Apparatus
7.1 Electronic Apparatus—The electronic apparatus shall be capable of energizing the examination coil with alternating currents
of suitable frequencies (for example, 1 kHz to 125 kHz), and shall be capable of sensing the changes in the electromagnetic
response of the coils. Electrical signals produced in this manner are processed so as to actuate an audio or visual signaling device
or mechanical marker which produces a record.
7.2 Examination Coils—Examination coils shall be capable of inducing current in the tube and sensing changes in the electrical
characteristics of the tube. The examination coil diameter should be selected to yield the largest practical fill-factor.
7.3 Driving Mechanism—A mechanical means of passing the tube through the examination coil with minimum vibration of the
examination coil or the tube. The device shall maintain the tube substantially concentric with the electrical center of the
examination coil. A uniform speed (65.0 % speed variation maximum) shall be maintained.
7.4 End Effect Suppression Device—A means capable of suppressing the signals produced at the ends of the tube. Individual
ASTM product specifications shall specify when an end effect suppression device is mandatory.
NOTE 3—Signals close to the ends of the tube may carry on beyond the limits of end suppression. Refer to 9.59.4.
8. Reference Standards
8.1 Artificial Discontinuity Reference Standard:
8.1.1 The tube used when adjusting the sensitivity setting of the apparatus shall be selected from a typical production run and
shall be representative of the purchaser’s order. The tubes shall be passed through the examination coil with the instrument
sensitivity high enough to determine the nominal background noise inherent in the tubes. The reference standard shall be selected
from tubes exhibiting low background noise. For on-line eddy current examining, the reference standard is created in a tube portion
existent in the continuous manufacturing sequence or in other forms as allowed by the product specification.
8.1.2 The artificial discontinuities shall be spaced to provide signal resolution adequate for interpretation. The artificial
discontinuities shall be prepared in accordance with one of the following options:
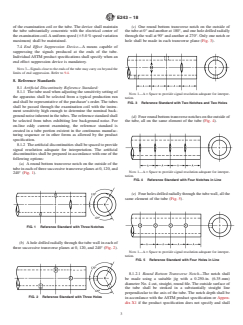
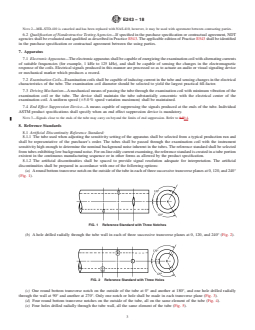
(a) A round bottom transverse notch on the outside of the tube in each of three successive transverse planes at 0, 120, and 240°
(Fig. 1).
FIG. 1 Reference Standard with Three Notches
(b) A hole drilled radially through the tube wall in each of three successive transverse planes at 0, 120, and 240° (Fig. 2).
FIG. 2 Reference Standard with Three Holes
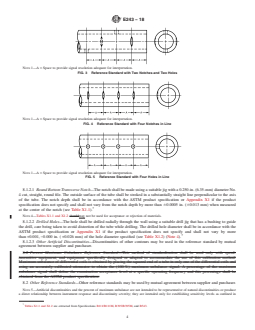
(c) One round bottom transverse notch on the outside of the tube at 0° and another
...
Questions, Comments and Discussion
Ask us and Technical Secretary will try to provide an answer. You can facilitate discussion about the standard in here.
Loading comments...