ISO 7884-7:1987
(Main)Glass — Viscosity and viscometric fixed points — Part 7: Determination of annealing point and strain point by beam bending
Glass — Viscosity and viscometric fixed points — Part 7: Determination of annealing point and strain point by beam bending
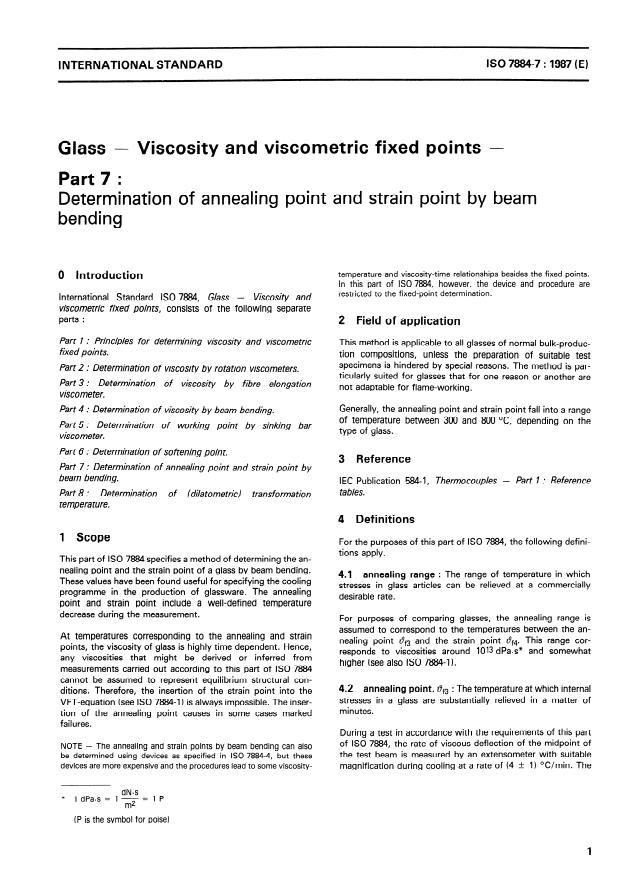
The specified method provides values being useful for specifying the cooling programme in the production of glassware. The annealing point is determined by measuring the rate of midpoint viscous bending of a simple loaded glass beam. The strain point is subsequently determined by an extrapolation method. Annex A provides the formulae for cross-sectional moment of inertia at various cross-section geometries, and annex B shows an example of beam bending apparatus
Verre — Viscosité et points viscosimétriques fixes — Partie 7: Détermination de la température de recuit et de la température de contrainte par flexion de barreau
General Information
- Status
- Published
- Publication Date
- 25-Nov-1987
- Technical Committee
- ISO/TC 48 - Laboratory equipment
- Drafting Committee
- ISO/TC 48 - Laboratory equipment
- Current Stage
- 9060 - Close of review
- Completion Date
- 04-Jun-2031
Relations
- Effective Date
- 09-Feb-2026
- Effective Date
- 09-Feb-2026
- Effective Date
- 09-Feb-2026
- Effective Date
- 09-Feb-2026
- Effective Date
- 09-Feb-2026
Overview
ISO 7884-7:1987 - Glass: Viscosity and viscometric fixed points - Part 7 specifies a standardized beam-bending method to determine the annealing point and strain point of glass. The method measures the midpoint viscous bending rate of a simply loaded glass beam and derives the strain point by extrapolation. Results are used to define cooling programmes in glassware production and to control residual stress relief during manufacture.
Key topics and requirements
- Measurement principle: Rate of midpoint deflection of a loaded beam is recorded during controlled cooling; annealing point is taken from a specific deflection-rate criterion and the strain point obtained by extrapolation.
- Apparatus:
- Electrically heated furnace with controlled temperature distribution (temperature variation along the specimen ≤ 2 °C).
- Low-inertia thermocouples (type S or K) for measurement and control, with calibrated cold junctions.
- Ceramic support stand and loading rod (matching thermal expansion); single-crystal sapphire or vitreous silica often recommended.
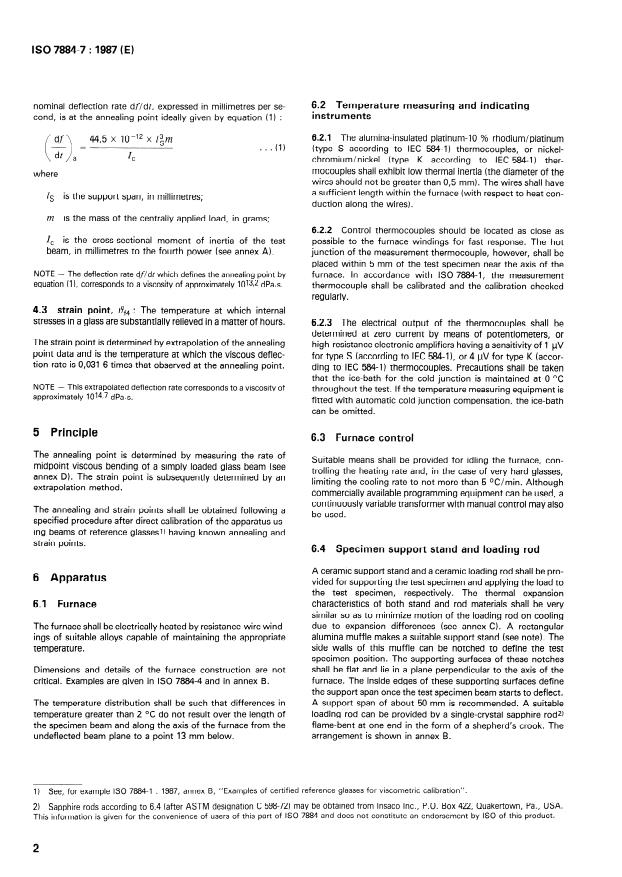
- Extensometer (e.g., LVDT) capable of reliably measuring at least 2.5 mm with direct reading to 0.025 mm and resolution ~0.0025 mm.
- Specimens:
- Cylindrical or rectangular beams with non‑uniformity ≤ 2% along length.
- Typical support span ≈ 50 mm; recommended cross‑sectional moment of inertia about 2–10 mm4 for that span (Annex A provides formulae for I).
- Procedure controls:
- Heating and cooling ramps (e.g., heating ~5 °C/min; controlled cooling ≈ (4 ± 1) °C/min during measurement).
- Calibration with reference glasses of known annealing/strain points; graphical plotting of log(deflection rate) vs temperature and calibration plots versus reciprocal moment of inertia (see Annex B for apparatus example).
- Viscosity context: The annealing point corresponds to a viscosity near 10^13 dPa·s; the extrapolated strain-point deflection rate corresponds to ≈10^14.7 dPa·s.
Applications and users
- Practical uses:
- Specifying and validating cooling programmes and annealing cycles for glassware and laboratory glass products.
- Quality control to minimize residual stress and reduce breakage during downstream processing.
- Material characterization during glass development and batch formulation.
- Typical users:
- Glass manufacturers and process engineers, QA laboratories, materials scientists, standards and test houses, and furnace/equipment designers.
Related standards
- ISO 7884 series (other parts cover rotation viscometers, fibre elongation, sinking bar, softening point, etc.)
- IEC 584-1 (thermocouple types and reference tables) - referenced for temperature measurement.
Keywords: ISO 7884-7:1987, annealing point, strain point, beam bending, glass viscosity, viscometric fixed points, extensometer, LVDT, calibration, furnace control, cross-sectional moment of inertia.
Frequently Asked Questions
ISO 7884-7:1987 is a standard published by the International Organization for Standardization (ISO). Its full title is "Glass — Viscosity and viscometric fixed points — Part 7: Determination of annealing point and strain point by beam bending". This standard covers: The specified method provides values being useful for specifying the cooling programme in the production of glassware. The annealing point is determined by measuring the rate of midpoint viscous bending of a simple loaded glass beam. The strain point is subsequently determined by an extrapolation method. Annex A provides the formulae for cross-sectional moment of inertia at various cross-section geometries, and annex B shows an example of beam bending apparatus
The specified method provides values being useful for specifying the cooling programme in the production of glassware. The annealing point is determined by measuring the rate of midpoint viscous bending of a simple loaded glass beam. The strain point is subsequently determined by an extrapolation method. Annex A provides the formulae for cross-sectional moment of inertia at various cross-section geometries, and annex B shows an example of beam bending apparatus
ISO 7884-7:1987 is classified under the following ICS (International Classification for Standards) categories: 81.040.01 - Glass in general. The ICS classification helps identify the subject area and facilitates finding related standards.
ISO 7884-7:1987 has the following relationships with other standards: It is inter standard links to EN 14706:2012, EN 14305:2009, EN ISO 18097:2022, EN 14305:2015, EN 14305:2009+A1:2013. Understanding these relationships helps ensure you are using the most current and applicable version of the standard.
ISO 7884-7:1987 is available in PDF format for immediate download after purchase. The document can be added to your cart and obtained through the secure checkout process. Digital delivery ensures instant access to the complete standard document.
Standards Content (Sample)
ISO
INTERNATIONAL STANDARD
7884-7
First edition
1987-12-15
INTERNATIONAL ORGANIZATION FOR STANDARDIZATION
ORGANISATION INTERNATIONALE DE NORMALISATION
MEXJJYHAPOflHAfl OPI-AHM3AuMfl fl0 CTAH~APTM3A~MM
Viscosity and viscometric fixed Points -
Glass -
Part 7 :
Determination of annealing Point and strain Point by beam
bending
I
Reference number
ISO 7884-7 : 1987 (E)
Foreword
ISO (the International Organization for Standardization) is a worldwide federation of
national Standards bodies (ISO member bodies). The work of preparing International
Standards is normally carried out through ISO technical committees. Esch member
body interested in a subject for which a technical committee has been established has
the right to be represented on that committee. International organizations, govern-
mental and non-governmental, in liaison with ISO, also take part in the work.
Draft International Standards adopted by the technical committees are circulated to
the member bodies for approval before their acceptance as International Standards by
the ISO Council. They are approved in accordance with ISO procedures requiring at
least 75 % approval by the member bodies voting.
International Standard ISO 78847 was prepared by Technical Committee ISO/TC 48,
Laborstory glassware and related apparatus.
Users should note that all International Standards undergo revision from time to time
and that any reference made herein to any other International Standard implies its
latest edition, unless othetwise stated.
0 International Organkation for Standardkation, 1987
Printed in Switzerland
ISO7884-7:1987 (E)
INTERNATIONAL STANDARD
Glass - Viscosity and viscometric fixed Points -
Part 7 :
Determination of annealing Point and strain Point by beam
bending
temperature and viscosity-time relationships besides the fixed Points.
0 Introduction
In this part of ISO 7884, however, the device and procedure are
restricted to the fixed-Point determination.
International Standard ISO 7834, Glass - Viscosity and
viscometric fixed Points, consists of the following separate
Parts :
2 Field of application
Part 7 : Principles for defermining viscosity and viscometric
This method is applicable to all glasses of normal bulk-produc-
fixed poin ts.
tion compositions,
unless the preparation of suitable test
specimens is hindered by special reasons. The method is par-
Part 2 : Determination of viscosity by rotation viscometers.
ticularly suited for glasses that for one reason or another are
Part 3 :
Determination of viscosity b y fibre elonga tion
not adaptable for flame-working.
viscometer.
Generally, the annealing Point and strain Point fall into a range
Part 4 : Determination of viscosity by beam bending.
of temperature between 300 and 800 OC, depending on the
Part 5 : Determination of working Point by sinking bar
type of glass.
viscometer.
Part 6 : Determination of so ftening Point.
3 Reference
Part 7: Determination of annealing Point and strain Point by
beam bending.
IEC Publication 584-1, Thermocouples - Part 7 .= Reference
tables.
Part 8 : Determination transforma tion
o f f dilatometric)
tempera ture.
4 Definitions
1 Scope
For the purposes of this part of ISO 7884, the following defini-
tions apply.
This part of ISO 7884 specifies a method of determining the an-
nealing Point and the strain Point of a glass by beam bending.
4.1 annealing range : The range of temperature in which
These values have been found useful for specifying the cooling
Stresses in glass articles tan be relieved at a commercially
Programme in the production of glassware. The annealing
desira ble rate.
Point and strain Point include a weil-defined temperature
decrease during the measurement.
For purposes of comparing glasses, the annealing range is
assumed to correspond to the temperatures between the an-
At temperatures corresponding to the annealing and strain
nealing Point 19, and the strain Point 1-9~~. This range cor-
Points, the viscosity of glass is highly time dependent. Hence,
responds to viscosities around 1013 dPa.s* and somewhat
any viscosities that might be derived or inferred from
higher (sec also ISO 7884-1).
measurements carried out according to this patt of ISO 7884
cannot be assumed to represent equilibrium structural con-
4.2 annealing Point, 1-9~3 : The temperature at which internal
ditions. Therefore, the insertion of the strain Point into the
Stresses in a glass are substantially relieved in a matter of
VFT-equation (sec ISO 7884-1) is always impossible. The inser-
minutes.
tion of the annealing Point Causes in some cases marked
failures.
During a test in accordance with the requirements of this part
of ISO 7884, the rate of viscous deflection of the midpoint of
NOTE - The annealing and strain Points by beam bending tan also
the test beam is measured by an extensometer with suitable
be determined using devices as specified in ISO 7884-4, but these
devices are more expensive and the procedures lead to some viscosity-
magnification during cooling at a rate of (4 -tr 1) “C/min. The
dNs
* 1 dPa.s = 1 : = 1 P
(P is the Symbol for Poise)
ISO 7884-7 : 1987 (E)
6.2 Temperature measuring and indicating
nomi nal de flection rate dfldt, expressed in millimetres per se-
instruments
the annealing Point ideally given by equatio n (1) :
cond , is at
6.2.1 The alumina-insulated platinum-10 % rhodium/platinum
445 x 10-‘* x l3rt-l
I
S
. . . (1) (type S according to IEC 584-1) thermocouples, or nickel-
I,
chromium/nickel (type K according to IEC 584-1) ther-
mocouples shall exhibit Iow thermal inertia (the diameter of the
where
wires should not be greater than 0,5 mm). The wires shall have
a sufficient length within the furnace (with respect to heat con-
is the support span, in millimetres;
duction along the wires).
m is the mass of the centrally applied load, in grams;
6.2.2 Control thermocouples should be Iocated as close as
1, is th e Cross-sec tional moment of inertia
sf the test possible to the furnace windings for fast response. The hot
in millimetres
beam, to the fourth power (sec annex A). junction of the measurement thermocouple, however, shall be
placed within 5 mm of the test specimen near the axis of the
NOTE - The deflection rate dfldt which defines the annealing Point by furnace. In accordance with ISO 7884-1, the measurement
equation (l), corresponds to a viscosity of approximately 1013,* dpa-s.
thermocouple shall be calibrated and the calibration checked
regularly.
4.3 strain Point, 8f4 : The temperature at which internal
Stresses in a glass are substantially relieved in a matter of hours. 6.2.3 The electrical output of the thermocouples shall be
determined at zero current by means of potentiometers, or
The strain Point is determined by extrapolation of the annealing
high-resistance electronie amplifiers having a sensitivity of 1 I-IV
Point data and is the temperature at which the viscous deflec-
for type S (according to IEC 584-11, or 4 FV for type K (accor-
tion rate is 0,031 6 times that observed at the annealing Point.
ding to IEC 584-1) thermocouples. Precautions shall be taken
that the ice-bath for the cold junction is maintained at 0 OC
NOTE - This extrapolated deflection rate corresponds to a viscosity of
throughout the test. If the temperature measuring equipment is
1014,7 dPa.s.
approximately
fitted with automatic cold junction compensation, the ice-bath
tan be omitted.
5 Principle
6.3 Furnace control
The annealing Point is determined by measuring the rate of
Suitable means shall be provided for idling the furnace, con-
midpoint viscous bending of a simply loaded glass beam (sec
trolling the heating rate and, in the case of very hard glasses,
annex D). The strain Point is subsequently determined by an
limiting the cooling rate to not more than 5 ‘Umin. Although
extrapolation method.
commercially available programming equipment tan be used, a
continuously variable transformer with manual control may also
The annealing and strain Points shall be obtained following a
be used.
specified procedure after direct calibration of the apparatus us-
ing beams of reference glassesl) having known annealing and
strain Points.
6.4 Specimen support stand and loading rod
A ceramic support stand and a ceramic loading rod shall be pro-
6 Apparatus
vided for supporting the test specimen and applying the load to
the test specimen, respectively. The thermal expansion
characteristics of both stand and rod materials shall be very
6.1 Furnace
similar so as to minimize motion of the loading rod on cooling
due to expansion differentes (see annex CL A rectangular
The furnace shall be electrically heated by resistance-wire wind-
alumina muffle makes a suitable support stand (sec note). The
ings of suitable alloys capable of maintaining the appropriate
side Walls of this muffle tan be notched to define the test
temperature.
specimen Position. The supporting surfaces of these notches
shall be flat and lie in a plane perpendicular to the axis of the
Dimensions and details of the furnace construction are not
furnace. The inside edges of these supporting surfaces define
critical. Examples are given in ISO 7884-4 and in annex B.
the support span once the test specimen beam Starts to deflect.
A support span of about 50 mm is recommended. A suitable
The temperature distribution shall be such that differentes in
loading rod tan be provided by a Single-crystal sapphire rod*)
temperature greater than 2 OC do not result over the length of
flame-bent at one end in the form of a shepherd’s crook. The
the specimen beam and along the axis of the furnace from the
arrangement is shown in annex B.
undeflected beam plane to a Point 13 mm below.
“Examples of certified reference glasses for viscometric calibration”.
1) See, for example ISO 7884-1 : 1987, annex B,
2) Sapphire rods according to 6.4 (after ASTM designation C 598-72) may be obtained from Insaco Inc., P.O. Box 422, Quakertown, Pa., USA.
This information is given for the convenience of users of this part of ISO 7884 and does not constitute an endorsement by ISO of this product.
ISO 7884-7 : 1987 (E)
that the total mass of the loading device - consisting of the
NOTE - Vitreous silica is a suitable material for both support stand
and loading rod. lt is not recommended for temperatures above
loading rod, LVDT core, hooks, fixtures and the weight piece
-
900 OC, howcver.
is close to the Optimum load.
This loading mass m shall be used throughout, both for calibra-
6.5 Extensometer for measuring midpoint
tion and for test measurements.
deflection
The means of observing the rate of midpoint deflection of the
beam should be such as to indicate reliably over a range of at
least 2,5 mm. The graduated scale of the extensometer shall
permit direct reading to 0,025 mm and estimates of
0,002 5 mm. Its accuracy shall be such that
...


Questions, Comments and Discussion
Ask us and Technical Secretary will try to provide an answer. You can facilitate discussion about the standard in here.
Loading comments...